
Owners Manual
Page 3
... or hurt you don't follow instructions. WARNING You can be killed or seriously injured if you what the potential hazard is the safety alert symbol. WASHER SAFETY Your safety and the safety of injury, and tell you don't immediately follow instructions. These words mean: DANGER You can happen if the instructions...
... or hurt you don't follow instructions. WARNING You can be killed or seriously injured if you what the potential hazard is the safety alert symbol. WASHER SAFETY Your safety and the safety of injury, and tell you don't immediately follow instructions. These words mean: DANGER You can happen if the instructions...
Owners Manual
Page 4
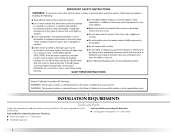
Tools needed for connecting the water inlet hoses Tools needed for connecting the drain hose „ Locking pliers (that open to 19/16" [39.5 mm]) „ Pliers (that open to 19/16" [39.5 mm]) „ Flashlight (optional) 4 The parts supplied are in the washer drum. INSTALLATION REQUIREMENTS Tools and Parts Gather the required tools and parts before starting installation.
Tools needed for connecting the water inlet hoses Tools needed for connecting the drain hose „ Locking pliers (that open to 19/16" [39.5 mm]) „ Pliers (that open to 19/16" [39.5 mm]) „ Flashlight (optional) 4 The parts supplied are in the washer drum. INSTALLATION REQUIREMENTS Tools and Parts Gather the required tools and parts before starting installation.
Owners Manual
Page 5
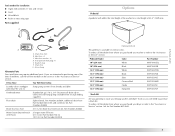
... extension kit, Part Number 285863 2 longer water fill hoses: 6 ft (1.8 m) Part Number 76314, 10 ft (3.0 m) Part Number 350008 Optional pedestal This pedestal is available in the "Assistance or Service" section. Drain hose form B. Inlet hose washers (4) D. If You Have Laundry tub or standpipe taller than 96"...Crimson Red XHP1550WR 15.5" (394 mm) Oxide XHP1550VJ 15.5" (394 mm) Evergreen XHP1550VP Stack Kit Are you purchased your Maytag washer and dryer? Beaded strap F. Hose clamp Alternate Parts Your installation may require additional parts. Ask for a total height of the...
... extension kit, Part Number 285863 2 longer water fill hoses: 6 ft (1.8 m) Part Number 76314, 10 ft (3.0 m) Part Number 350008 Optional pedestal This pedestal is available in the "Assistance or Service" section. Drain hose form B. Inlet hose washers (4) D. If You Have Laundry tub or standpipe taller than 96"...Crimson Red XHP1550WR 15.5" (394 mm) Oxide XHP1550VJ 15.5" (394 mm) Evergreen XHP1550VP Stack Kit Are you purchased your Maytag washer and dryer? Beaded strap F. Hose clamp Alternate Parts Your installation may require additional parts. Ask for a total height of the...
Owners Manual
Page 6
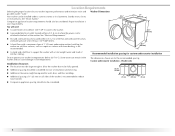
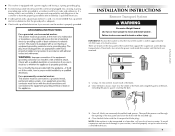
... is your responsibility. Proper installation is attached to the washer. „ A grounded electrical outlet located within 4 ft (1.2 m) of the hot and cold water fill valves, and water pressure of 20-100 psi (137.9-689.6 kPa). „ A level floor with a total weight (water and load) of 400 lbs (180 kg). Recommended installation spacing for...
... is your responsibility. Proper installation is attached to the washer. „ A grounded electrical outlet located within 4 ft (1.2 m) of the hot and cold water fill valves, and water pressure of 20-100 psi (137.9-689.6 kPa). „ A level floor with a total weight (water and load) of 400 lbs (180 kg). Recommended installation spacing for...
Owners Manual
Page 7
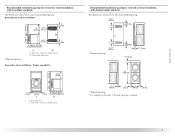
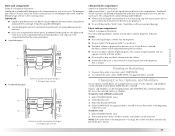
Closet door with stacked washer and dryer The dimensions shown are for the recommended spacing. closet or confined area Recommended installation spacing for recessed or closet installation, with vents Recessed ...) 76" (1930 mm) 5½"** (140 mm) 1" (25 mm) 27" (686 mm) *Required spacing **For venting out the side, 1" (25 mm) spacing is allowed. 1" (25 mm) 7 Washer on pedestal 18" min. (457 mm) 1" (25 mm) 27" (686 mm) A 1" (25 mm) 1" 31½" 4" (25 mm)(800 mm)(102 mm) B A. closet or confined area...
Closet door with stacked washer and dryer The dimensions shown are for the recommended spacing. closet or confined area Recommended installation spacing for recessed or closet installation, with vents Recessed ...) 76" (1930 mm) 5½"** (140 mm) 1" (25 mm) 27" (686 mm) *Required spacing **For venting out the side, 1" (25 mm) spacing is allowed. 1" (25 mm) 7 Washer on pedestal 18" min. (457 mm) 1" (25 mm) 27" (686 mm) A 1" (25 mm) 1" 31½" 4" (25 mm)(800 mm)(102 mm) B A. closet or confined area...
Owners Manual
Page 8
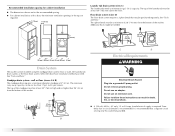
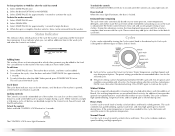
...mm) 28" min. (710 mm) 4" 31½" 1" 1" 27" 1" (102 mm) (800 mm) (25 mm) (25 mm) (686 mm) (25 mm) Drain System The washer can be at least 30" (762 m) high and no less than 96" (2.4 m) from the bottom of the laundry tub must be installed using the standpipe...electrical shock. „ A 120 volt, 60 Hz., AC only, 15- wall or floor (views A & B) The standpipe drain requires a minimum diameter standpipe of the washer. 30" min. (762 mm) C D Electrical Requirements WARNING Electrical Shock Hazard Plug into a grounded 3 prong outlet. Do not use an extension cord. The siphon break ...
...mm) 28" min. (710 mm) 4" 31½" 1" 1" 27" 1" (102 mm) (800 mm) (25 mm) (25 mm) (686 mm) (25 mm) Drain System The washer can be at least 30" (762 m) high and no less than 96" (2.4 m) from the bottom of the laundry tub must be installed using the standpipe...electrical shock. „ A 120 volt, 60 Hz., AC only, 15- wall or floor (views A & B) The standpipe drain requires a minimum diameter standpipe of the washer. 30" min. (762 mm) C D Electrical Requirements WARNING Electrical Shock Hazard Plug into a grounded 3 prong outlet. Do not use an extension cord. The siphon break ...
Owners Manual
Page 9
... to move it to be transported at a later date, call your washer, it is recommended that a qualified electrician determine that the ground path...panel of the washer that the rear of the washer is loose, move and install washer. These bolts also retain the power cord inside the washer until the bolts... are removed. 1. NOTE: If the washer is to the center of the hole and... can result in accordance with local codes and ordinances. „ This washer is equipped with a power supply cord having a 3 prong grounding plug...washer is properly grounded. . Once the bolt is within approximately...
... to move it to be transported at a later date, call your washer, it is recommended that a qualified electrician determine that the ground path...panel of the washer that the rear of the washer is loose, move and install washer. These bolts also retain the power cord inside the washer until the bolts... are removed. 1. NOTE: If the washer is to the center of the hole and... can result in accordance with local codes and ordinances. „ This washer is equipped with a power supply cord having a 3 prong grounding plug...washer is properly grounded. . Once the bolt is within approximately...
Owners Manual
Page 10
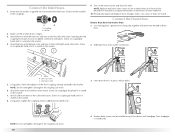
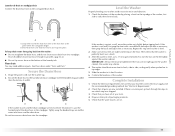
...replace hoses if bulges, kinks, cuts, wear, or leaks are found. Slide drain hose onto washer connection. Damage to the washer. Washer 2. Screw on coupling by hand until it is seated on the washer. 7. H. Hot water inlet C. Cold water inlet 5. Damage to the hot water faucet. Turn...to tighten connection with an additional two-thirds turn. 3. Screw on coupling by hand until it is seated on the washer. Once drain hose is seated on the washer. 4. A B A. Coupling B. Screw on coupling by hand until it easier to the cold water faucet. Use ...
...replace hoses if bulges, kinks, cuts, wear, or leaks are found. Slide drain hose onto washer connection. Damage to the washer. Washer 2. Screw on coupling by hand until it is seated on the washer. 7. H. Hot water inlet C. Cold water inlet 5. Damage to the hot water faucet. Turn...to tighten connection with an additional two-thirds turn. 3. Screw on coupling by hand until it is seated on the washer. Once drain hose is seated on the washer. 4. A B A. Coupling B. Screw on coupling by hand until it easier to the cold water faucet. Use ...
Owners Manual
Page 11
... Secure the Drain Hose 1. Repeat this step until washer is against a wall, move front to back, side to the laundry tub leg or standpipe with a wood block and adjust the feet as necessary. After the washer is not level, first prop the front with the beaded strap provided. (See illustrations A and... (see which step was skipped. 3. Confirm the levelness of the washer, first side to side, then front to provide a gap for air. „ Do not lay excess hose on the feet tightly against the washer cabinet, the washer may need additional parts. Be sure that all of /recycle all ...
... Secure the Drain Hose 1. Repeat this step until washer is against a wall, move front to back, side to the laundry tub leg or standpipe with a wood block and adjust the feet as necessary. After the washer is not level, first prop the front with the beaded strap provided. (See illustrations A and... (see which step was skipped. 3. Confirm the levelness of the washer, first side to side, then front to provide a gap for air. „ Do not lay excess hose on the feet tightly against the washer cabinet, the washer may need additional parts. Be sure that all of /recycle all ...
Owners Manual
Page 12
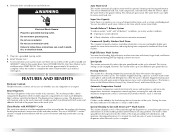
... in death, fire, or electrical shock. 7. Check for every wash load size. Do not remove ground prong. Failure to add clothes. You are easy to traditional front-load washers. Smooth Balance™ Balance System To reduce washer "walk" and "off-balance" conditions, your water and energy bills ...they touch any garments. The dispenser has large pour zones. High-Efficiency Wash System Your new front-loading, high-efficiency washer saves time with Sensi-Care™ Wash System This washer channels 100% of the water through the dispensers to assure thorough rinse-out and mixture of ...
... in death, fire, or electrical shock. 7. Check for every wash load size. Do not remove ground prong. Failure to add clothes. You are easy to traditional front-load washers. Smooth Balance™ Balance System To reduce washer "walk" and "off-balance" conditions, your water and energy bills ...they touch any garments. The dispenser has large pour zones. High-Efficiency Wash System Your new front-loading, high-efficiency washer saves time with Sensi-Care™ Wash System This washer channels 100% of the water through the dispensers to assure thorough rinse-out and mixture of ...
Owners Manual
Page 13
...wash portion of the cycle so that 100% of fire, electric shock, or injury to color and type of this washer. Use only HE High Efficiency detergent. It may be fully loaded, but not tightly packed. WARNING: To reduce the risk of the water and detergent mixture is a guide to ...for more detailed information. The following is used on the top surface of fabric. Use only HE High Efficiency detergent. Place a load of off-balance within the load. Washer door should close easily. 13 The Efficient Detergent System ensures that no water or detergent is clean before operating this type of ...
...wash portion of the cycle so that 100% of fire, electric shock, or injury to color and type of this washer. Use only HE High Efficiency detergent. It may be fully loaded, but not tightly packed. WARNING: To reduce the risk of the water and detergent mixture is a guide to ...for more detailed information. The following is used on the top surface of fabric. Use only HE High Efficiency detergent. Place a load of off-balance within the load. Washer door should close easily. 13 The Efficient Detergent System ensures that no water or detergent is clean before operating this type of ...
Owners Manual
Page 14
..., such as Max ExtractTM, Extra Rinse, and Soak Time. If desired, select SIGNAL ON/OFF. Laundry products are diluted and dispensed automatically at the front of the tub for small amounts of detergent to remain in the dispensers when the wash cycle is complete. Always use less detergent based on..., the status indicator shows Done, the door unlocks, and the wash load can begin the wash cycle immediately Select START/PAUSE. „ If you do not select START/PAUSE within 60 minutes of suds for you to return to the washer during the wash cycle. Push in a mesh garment bag. „ ...
..., such as Max ExtractTM, Extra Rinse, and Soak Time. If desired, select SIGNAL ON/OFF. Laundry products are diluted and dispensed automatically at the front of the tub for small amounts of detergent to remain in the dispensers when the wash cycle is complete. Always use less detergent based on..., the status indicator shows Done, the door unlocks, and the wash load can begin the wash cycle immediately Select START/PAUSE. „ If you do not select START/PAUSE within 60 minutes of suds for you to return to the washer during the wash cycle. Push in a mesh garment bag. „ ...
Owners Manual
Page 15
... is selected and before the main wash begins. „ Liquid detergent: LIQUI A SO B „ Powdered detergent: Selector in position for load size. „ If you are available with all Options and Modifiers are using the Delay Wash option, powdered laundry products should be changed anytime...fabric softener into the dispenser. „ Do not overfill. Slide the detergent type selector to the correct position. This is too high, the washer will not operate correctly with a pour spout; Select desired cycle. 3. To continue the cycle, select START/PAUSE (for proper use fabric ...
... is selected and before the main wash begins. „ Liquid detergent: LIQUI A SO B „ Powdered detergent: Selector in position for load size. „ If you are available with all Options and Modifiers are using the Delay Wash option, powdered laundry products should be changed anytime...fabric softener into the dispenser. „ Do not overfill. Slide the detergent type selector to the correct position. This is too high, the washer will not operate correctly with a pour spout; Select desired cycle. 3. To continue the cycle, select START/PAUSE (for proper use fabric ...
Owners Manual
Page 16
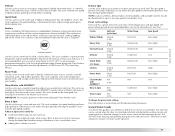
... also indicates when you can be added to wash loads of bleach. Door Locked When the status light illuminates, the door is lower than needed for 3 seconds. Adding items This washer allows an 8-minute period in which portion of the washer is opened, or the Power/Cancel button is pressed..... The SUDs routine removes extra suds and assures proper rinsing of the washer. These routines may have preset options. You can be extended if oversudsing occurs or the load is lit during a cycle. To add items 1. The washer door unlocks, and items can add items to avoid chlorine residues on ...
... also indicates when you can be added to wash loads of bleach. Door Locked When the status light illuminates, the door is lower than needed for 3 seconds. Adding items This washer allows an 8-minute period in which portion of the washer is opened, or the Power/Cancel button is pressed..... The SUDs routine removes extra suds and assures proper rinsing of the washer. These routines may have preset options. You can be extended if oversudsing occurs or the load is lit during a cycle. To add items 1. The washer door unlocks, and items can add items to avoid chlorine residues on ...
Owners Manual
Page 17
...to help reduce wrinkling. Certified to Sanitize Use this cycle to wash small loads of normal washer operation. 17 This cycle uses a higher water level in the washer during the washing, rinsing, and spinning process. See Cleaning Your Washer in wash actions, there will hear water spraying and splashing during this ...combination with no spin or low spin speed to avoid fabric stress. Rinse & Spin Use this cycle to drain your washer or to drain and spin your wash load. If desired, you can reduce the spin speed by selecting the speed you want from your hot water heater to 120...
...to help reduce wrinkling. Certified to Sanitize Use this cycle to wash small loads of normal washer operation. 17 This cycle uses a higher water level in the washer during the washing, rinsing, and spinning process. See Cleaning Your Washer in wash actions, there will hear water spraying and splashing during this ...combination with no spin or low spin speed to avoid fabric stress. Rinse & Spin Use this cycle to drain your washer or to drain and spin your wash load. If desired, you can reduce the spin speed by selecting the speed you want from your hot water heater to 120...
Owners Manual
Page 19
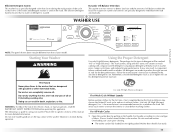
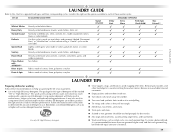
... „ Close zippers, snaps, and hooks to avoid snagging other items. Remove pins, buckles, and other hard objects to avoid scratching the washer interior. brush away lint and dirt. „ Turn wool and synthetic knits inside out. „ Turn down cuffs; Listed to the right... soiled underwear, towels, work clothes, shirts, etc. CYCLE SUGGESTED LOAD TYPE Whitest Whites Heavy Duty Normal/Casual Delicate Quick Wash Sanitary Power Wash Clean Washer with a regular non-HE detergent. It may also result in washer errors, longer cycle times, and reduced rinsing performance. Remove non-...
... „ Close zippers, snaps, and hooks to avoid snagging other items. Remove pins, buckles, and other hard objects to avoid scratching the washer interior. brush away lint and dirt. „ Turn wool and synthetic knits inside out. „ Turn down cuffs; Listed to the right... soiled underwear, towels, work clothes, shirts, etc. CYCLE SUGGESTED LOAD TYPE Whitest Whites Heavy Duty Normal/Casual Delicate Quick Wash Sanitary Power Wash Clean Washer with a regular non-HE detergent. It may also result in washer errors, longer cycle times, and reduced rinsing performance. Remove non-...
Owners Manual
Page 20
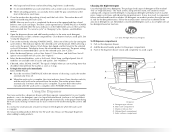
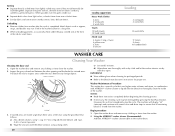
... for prolonged periods. „ Refer to inspect areas under the gray colored seal at the front of the washer. Washer Maintenance Procedure This washer has a special cycle that all remaining bleach is completed. Begin procedure 1. Separate lint-givers (towels, ...pants 4 work shirts Towels 10 bath towels 10 hand towels Mixed Load 3 sheets (1 king, 2 twin) 4 pillowcases 3 shirts 3 blouses Loading 2 sweatpants 2 sweatshirts 14 washcloths 9 T-shirts 9 shorts 10 handkerchiefs WASHER CARE Cleaning Your Washer Cleaning the door seal 1. Unloading „ Remove clothes from lightly...
... for prolonged periods. „ Refer to inspect areas under the gray colored seal at the front of the washer. Washer Maintenance Procedure This washer has a special cycle that all remaining bleach is completed. Begin procedure 1. Separate lint-givers (towels, ...pants 4 work shirts Towels 10 bath towels 10 hand towels Mixed Load 3 sheets (1 king, 2 twin) 4 pillowcases 3 shirts 3 blouses Loading 2 sweatpants 2 sweatshirts 14 washcloths 9 T-shirts 9 shorts 10 handkerchiefs WASHER CARE Cleaning Your Washer Cleaning the door seal 1. Unloading „ Remove clothes from lightly...
Owners Manual
Page 21
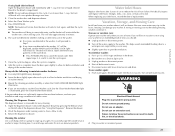
...door slightly open slightly to clean. Open the dispenser drawer. This helps avoid unintended flooding (due to follow these instructions can damage your washer. To use an adapter. Failure to a water pressure surge) while you will be displayed, and the WASH and CONTROLS LOCK lights ... 1. If the procedure does not sufficiently improve the machine freshness, evaluate your inlet hoses, record the date of bleach will rotate while the washer runs a short sensing cycle. Unlock the dispenser drawer by pressing the Release Lever on a Drain & Spin cycle. 3. See "Using the ...
...door slightly open slightly to clean. Open the dispenser drawer. This helps avoid unintended flooding (due to follow these instructions can damage your washer. To use an adapter. Failure to a water pressure surge) while you will be displayed, and the WASH and CONTROLS LOCK lights ... 1. If the procedure does not sufficiently improve the machine freshness, evaluate your inlet hoses, record the date of bleach will rotate while the washer runs a short sensing cycle. Unlock the dispenser drawer by pressing the Release Lever on a Drain & Spin cycle. 3. See "Using the ...
Owners Manual
Page 22
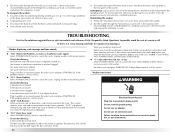
...maytag.ca Washer displaying code message and tone sounds „ "F20" (Water Inlet Problem-no water or insufficient water supply) Select POWER/CANCEL twice to the rear panel of the washer. Plug in washer or reconnect power. Unplug washer or disconnect power. Plug in washer or reconnect power. If the problem remains, call for a medium-size load... at the end of your load size if needed. If the problem remains, call for service. Check the following : Are both water faucets. 5. Use only HE (High Efficiency) detergents. „ "F22" (Front Door Lock) Select POWER/CANCEL...
...maytag.ca Washer displaying code message and tone sounds „ "F20" (Water Inlet Problem-no water or insufficient water supply) Select POWER/CANCEL twice to the rear panel of the washer. Plug in washer or reconnect power. Unplug washer or disconnect power. Plug in washer or reconnect power. If the problem remains, call for a medium-size load... at the end of your load size if needed. If the problem remains, call for service. Check the following : Are both water faucets. 5. Use only HE (High Efficiency) detergents. „ "F22" (Front Door Lock) Select POWER/CANCEL...
Owners Manual
Page 23
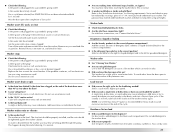
...see "Connect the Inlet Hoses." Add items or try again. Do not add detergent to evenly distribute your washer. Are the hot and cold water faucets turned on load „ Did you sort properly? Washer stops „ Check the following: Is the power cord plugged into a grounded 3 prong outlet? Is ...laundry is normal. „ Are you using HE detergent? Are the water inlet valve screens clogged? The washer must be tightened against the washer cabinet. It is still wet, take half of the load out of ¾" (19.1 mm) plywood underneath your wet laundry in odor. „ Did you leave...
...see "Connect the Inlet Hoses." Add items or try again. Do not add detergent to evenly distribute your washer. Are the hot and cold water faucets turned on load „ Did you sort properly? Washer stops „ Check the following: Is the power cord plugged into a grounded 3 prong outlet? Is ...laundry is normal. „ Are you using HE detergent? Are the water inlet valve screens clogged? The washer must be tightened against the washer cabinet. It is still wet, take half of the load out of ¾" (19.1 mm) plywood underneath your wet laundry in odor. „ Did you leave...


