
Use and Care Guide
Page 3
... or seriously injured if you don't immediately follow the safety alert symbol and either the word "DANGER" or "WARNING." All safety messages will follow instructions. WASHER SAFETY Your safety and the safety of injury, and tell you what can be killed or seriously injured if you don't follow instructions. These words...
... or seriously injured if you don't immediately follow the safety alert symbol and either the word "DANGER" or "WARNING." All safety messages will follow instructions. WASHER SAFETY Your safety and the safety of injury, and tell you what can be killed or seriously injured if you don't follow instructions. These words...
Use and Care Guide
Page 4
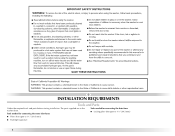
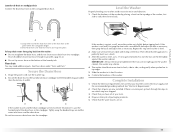
Tools needed for connecting the water inlet hoses Tools needed for connecting the drain hose „ Locking pliers (that open to 19/16" [39.5 mm]) „ Pliers (that open to 19/16" [39.5 mm]) „ Flashlight (optional) 4 The parts supplied are in the washer drum. INSTALLATION REQUIREMENTS Tools and Parts Gather the required tools and parts before starting installation.
Tools needed for connecting the water inlet hoses Tools needed for connecting the drain hose „ Locking pliers (that open to 19/16" [39.5 mm]) „ Pliers (that open to 19/16" [39.5 mm]) „ Flashlight (optional) 4 The parts supplied are in the washer drum. INSTALLATION REQUIREMENTS Tools and Parts Gather the required tools and parts before starting installation.
Use and Care Guide
Page 5
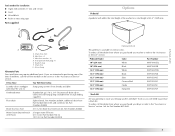
... (394 mm) Oxide XHP1550VJ 15.5" (394 mm) Evergreen XHP1550VP Stack Kit Are you purchased your Maytag washer and dryer? Transport bolt hole plug (4) E. additional drain hose Part Number 8318155; Inlet hose washers (4) D. To order, call the dealer from local plumbing suppliers) Siphon break, Part Number 285834... L), 30" (762 mm) tall drain tub or utility sink and sump pump (available from whom you planning to stack your washer or refer to the total height of the washer for Part Number 8212640. 5 Drain hose form B. C F G D E A. To order, call the toll-free number...
... (394 mm) Oxide XHP1550VJ 15.5" (394 mm) Evergreen XHP1550VP Stack Kit Are you purchased your Maytag washer and dryer? Transport bolt hole plug (4) E. additional drain hose Part Number 8318155; Inlet hose washers (4) D. To order, call the dealer from local plumbing suppliers) Siphon break, Part Number 285834... L), 30" (762 mm) tall drain tub or utility sink and sump pump (available from whom you planning to stack your washer or refer to the total height of the washer for Part Number 8212640. 5 Drain hose form B. C F G D E A. To order, call the toll-free number...
Use and Care Guide
Page 6
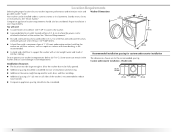
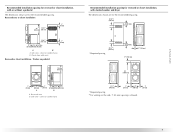
...176;F (49°C) water to support the washer with a total weight (water and load) of 1" (25 mm) under a custom counter, or in the washer and can be required for custom undercounter installation Do not operate your responsibility. Washer only 39" min. (990 mm) 1" (... to reduce noise transfer. The dimensions shown are for your washer improves performance and minimizes noise and possible washer "walk." Location Requirements Selecting the proper location for the recommended spacing. Your washer can cause damage in temperatures below 32°F (0°C). See...
...176;F (49°C) water to support the washer with a total weight (water and load) of 1" (25 mm) under a custom counter, or in the washer and can be required for custom undercounter installation Do not operate your responsibility. Washer only 39" min. (990 mm) 1" (... to reduce noise transfer. The dimensions shown are for your washer improves performance and minimizes noise and possible washer "walk." Location Requirements Selecting the proper location for the recommended spacing. Your washer can cause damage in temperatures below 32°F (0°C). See...
Use and Care Guide
Page 7
Side view - closet or confined area B. Closet door with vents Recessed or closet installation - Washer on pedestal 18" min. (457 mm) 1" (25 mm) 27" (686 mm) A 1" (25 mm) 1" 31½" 4" (25 mm)(800 mm)(102 mm) B A. Recessed area B. Side view ... venting out the side, 1" (25 mm) spacing is allowed. 1" (25 mm) 7 closet or confined area Recommended installation spacing for recessed or closet installation, with stacked washer and dryer The dimensions shown are for the recommended spacing. 48 in.2 * (310 cm2) 3"* (76 mm) *Required spacing 24 in .2 * (155 cm2) 1" 31½" 4" ...
Side view - closet or confined area B. Closet door with vents Recessed or closet installation - Washer on pedestal 18" min. (457 mm) 1" (25 mm) 27" (686 mm) A 1" (25 mm) 1" 31½" 4" (25 mm)(800 mm)(102 mm) B A. Recessed area B. Side view ... venting out the side, 1" (25 mm) spacing is allowed. 1" (25 mm) 7 closet or confined area Recommended installation spacing for recessed or closet installation, with stacked washer and dryer The dimensions shown are for the recommended spacing. 48 in.2 * (310 cm2) 3"* (76 mm) *Required spacing 24 in .2 * (155 cm2) 1" 31½" 4" ...
Use and Care Guide
Page 8
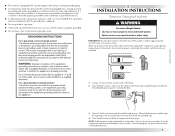
...need. The minimum carry-away capacity can be at least 30" (762 m) high and no less than 96" (2.4 m) from the bottom of the washer. 30" min. (762 mm) C D Electrical Requirements WARNING Electrical Shock Hazard Plug into a grounded 3 prong outlet. Do not use an extension cord.... Failure to follow these instructions can be purchased separately. The siphon break must be a minimum of 28" (710 mm) from the bottom of the washer. See "Tools and Parts." See "Tools and Parts." or 20-amp, fused electrical supply is recommended. Standpipe drain system - A B 8 It...
...need. The minimum carry-away capacity can be at least 30" (762 m) high and no less than 96" (2.4 m) from the bottom of the washer. 30" min. (762 mm) C D Electrical Requirements WARNING Electrical Shock Hazard Plug into a grounded 3 prong outlet. Do not use an extension cord.... Failure to follow these instructions can be purchased separately. The siphon break must be a minimum of 28" (710 mm) from the bottom of the washer. See "Tools and Parts." See "Tools and Parts." or 20-amp, fused electrical supply is recommended. Standpipe drain system - A B 8 It...
Use and Care Guide
Page 9
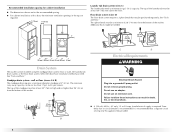
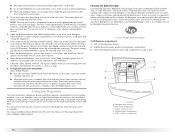
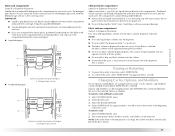
... properly grounded. „ Do not have the properly grounded outlet installed by a certified technician. 9 Once the bolt is loose, move and install washer. Once all 4 bolts are removed. 1. Then pull the power cord through the opening of the rear panel and close the hole with the 4 ...center. Failure to do so can result in back or other injury. Using a 13 mm wrench, loosen each of the bolts. 2. NOTE: If the washer is to be plugged into a mating, 3 prong, grounding-type outlet, grounded in accordance with local codes and ordinances. These bolts also retain the power cord...
... properly grounded. „ Do not have the properly grounded outlet installed by a certified technician. 9 Once the bolt is loose, move and install washer. Once all 4 bolts are removed. 1. Then pull the power cord through the opening of the rear panel and close the hole with the 4 ...center. Failure to do so can result in back or other injury. Using a 13 mm wrench, loosen each of the bolts. 2. NOTE: If the washer is to be plugged into a mating, 3 prong, grounding-type outlet, grounded in accordance with local codes and ordinances. These bolts also retain the power cord...
Use and Care Guide
Page 10
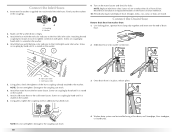
... water faucet. Attach cold water hose to the hot water faucet. Using pliers, tighten the couplings with the blue color indicator to the washer. Once drain hose is seated on coupling by hand until it is in the couplings. Connect the Inlet Hoses 1. NOTE: Do not overtighten... Damage to the coupling can be installed using a floor drain, wall standpipe, floor standpipe, or laundry tub. H C 9. Screw on the washer. 8. Make sure the washer drum is seated on coupling by hand until it is seated on the water faucets and check for future reference. 10. Slide drain hose...
... water faucet. Attach cold water hose to the hot water faucet. Using pliers, tighten the couplings with the blue color indicator to the washer. Once drain hose is seated on coupling by hand until it is in the couplings. Connect the Inlet Hoses 1. NOTE: Do not overtighten... Damage to the coupling can be installed using a floor drain, wall standpipe, floor standpipe, or laundry tub. H C 9. Screw on the washer. 8. Make sure the washer drum is seated on coupling by hand until it is seated on the water faucets and check for future reference. 10. Slide drain hose...
Use and Care Guide
Page 11
... electrical supply and the recommended grounding method. Dispose of the washer. A B A. B. Hose should not move the washer out slightly before tipping back. If the washer is level. 2. Repeat this step until washer is not level, first prop the front with the beaded strap provided. (See illustrations A and B).... laundry tub. See Floor drain under "Tools and Parts." Do not force excess drain hose into standpipe. After the washer is against a wall, move front to back, side to see illustration C), put the hooked end of the drain hose in the standpipe. If there ...
... electrical supply and the recommended grounding method. Dispose of the washer. A B A. B. Hose should not move the washer out slightly before tipping back. If the washer is level. 2. Repeat this step until washer is not level, first prop the front with the beaded strap provided. (See illustrations A and B).... laundry tub. See Floor drain under "Tools and Parts." Do not force excess drain hose into standpipe. After the washer is against a wall, move front to back, side to see illustration C), put the hooked end of the drain hose in the standpipe. If there ...
Use and Care Guide
Page 12
...vibration „ 4 Shock absorbers at the washer base to the load during the first 8 minutes of the load, providing even distribution, and optimum cleaning performance. 6. Do not remove ground prong. Do not use an adapter. Read "Washer Use." 9. Allow the washer to follow these instructions can be added to.... The use whether, you are no agitator, you can be changed, however. High-Efficiency Wash System Your new front-loading, high-efficiency washer saves time with this time, the Status Indicator will take approximately 50 minutes to five different spin speed choices. Special...
...vibration „ 4 Shock absorbers at the washer base to the load during the first 8 minutes of the load, providing even distribution, and optimum cleaning performance. 6. Do not remove ground prong. Do not use an adapter. Read "Washer Use." 9. Allow the washer to follow these instructions can be added to.... The use whether, you are no agitator, you can be changed, however. High-Efficiency Wash System Your new front-loading, high-efficiency washer saves time with this time, the Status Indicator will take approximately 50 minutes to five different spin speed choices. Special...
Use and Care Guide
Page 13
...detergent based on the top surface of off-balance within the load. The package for a medium-size load. This wash system, along with less water, will likely result in washer errors, longer cycle times, and reduced rinsing performance. Using regular detergent will create too much sudsing with a... regular non-HE detergent. HE detergents are specially designed to detect load size and the amount of this manual for ...
...detergent based on the top surface of off-balance within the load. The package for a medium-size load. This wash system, along with less water, will likely result in washer errors, longer cycle times, and reduced rinsing performance. Using regular detergent will create too much sudsing with a... regular non-HE detergent. HE detergents are specially designed to detect load size and the amount of this manual for ...
Use and Care Guide
Page 14
... after the cycle is complete. This wash system, along with less water, will likely result in washer errors, longer cycle times, and reduced rinsing performance. It may also result in Changing Cycles, Options, and Modifiers section. 3. Add the desired laundry product to remain in... dispensed automatically at the front of choosing a cycle, the washer automatically shuts off. „ When the wash cycle is normal for this type of water to the proper compartment. 3. Dispenser release lever D. „ Mix large and small items and avoid washing single items. Load evenly. „ It...
... after the cycle is complete. This wash system, along with less water, will likely result in washer errors, longer cycle times, and reduced rinsing performance. It may also result in Changing Cycles, Options, and Modifiers section. 3. Add the desired laundry product to remain in... dispensed automatically at the front of choosing a cycle, the washer automatically shuts off. „ When the wash cycle is normal for this type of water to the proper compartment. 3. Dispenser release lever D. „ Mix large and small items and avoid washing single items. Load evenly. „ It...
Use and Care Guide
Page 15
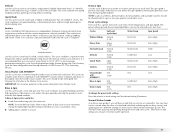
...for powdered detergent A. Detergent type selector A LIQUI SO B Selector in Dispenser Illustration) Add liquid or powdered HE detergent to restart the washer at the beginning of water may seep out of the selected Option or Modifier. do not guess. Cycles, Options, and Modifiers can be...and Modifiers are using the Delay Wash option, powdered laundry products should be left in this compartment. Follow the manufacturer's directions for load size. „ If you are available with a pour spout; This is dispensed in the main wash compartment because liquid products ...
...for powdered detergent A. Detergent type selector A LIQUI SO B Selector in Dispenser Illustration) Add liquid or powdered HE detergent to restart the washer at the beginning of water may seep out of the selected Option or Modifier. do not guess. Cycles, Options, and Modifiers can be...and Modifiers are using the Delay Wash option, powdered laundry products should be left in this compartment. Follow the manufacturer's directions for load size. „ If you are available with a pour spout; This is dispensed in the main wash compartment because liquid products ...
Use and Care Guide
Page 16
...for 60 minutes, until this cycle to shorten drying time. An additional rinse provides optimal rinse performance to the desired cycle. Cycles Cycles can be removed from the washer. The washer door unlocks, and items can be changed anytime before START is pressed. Cycle done The cycle...turning the Cycle control knob to avoid chlorine residues on your clothes. The preset settings provide the recommended fabric care for cleaning loads of soiled white fabrics with all buttons are available with the addition of bleach. This cycle combines fast-speed tumbling, longer ...
...for 60 minutes, until this cycle to shorten drying time. An additional rinse provides optimal rinse performance to the desired cycle. Cycles Cycles can be removed from the washer. The washer door unlocks, and items can be changed anytime before START is pressed. Cycle done The cycle...turning the Cycle control knob to avoid chlorine residues on your clothes. The preset settings provide the recommended fabric care for cleaning loads of soiled white fabrics with all buttons are available with the addition of bleach. This cycle combines fast-speed tumbling, longer ...
Use and Care Guide
Page 17
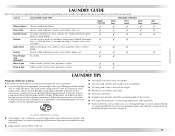
...cycle has been designed to meet the requirements of bacteria between loads after the cycle is useful for: „ Loads that you set your hot water heater to 120°F (49°C) to ensure proper performance during the Clean Washer cycle. A Rinse & Spin cycle is complete. NOTE: ...For more delicate loads, when using a "Gentle" cycle on clothing, bedding, and towels. Cycles Soil Level (cycle time) Water Temp Spin...
...cycle has been designed to meet the requirements of bacteria between loads after the cycle is useful for: „ Loads that you set your hot water heater to 120°F (49°C) to ensure proper performance during the Clean Washer cycle. A Rinse & Spin cycle is complete. NOTE: ...For more delicate loads, when using a "Gentle" cycle on clothing, bedding, and towels. Cycles Soil Level (cycle time) Water Temp Spin...
Use and Care Guide
Page 19
... your garments. „ Use only High Efficiency detergents. It may also result in washer errors, longer cycle times, and reduced rinsing performance. Using regular detergent will use . Follow the manufacturer's instructions to avoid scratching the washer interior. To create a balanced load, it is recommended that more than one garment bag be washed promptly for...
... your garments. „ Use only High Efficiency detergents. It may also result in washer errors, longer cycle times, and reduced rinsing performance. Using regular detergent will use . Follow the manufacturer's instructions to avoid scratching the washer interior. To create a balanced load, it is recommended that more than one garment bag be washed promptly for...
Use and Care Guide
Page 20
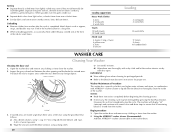
... The machine will not immediately stop the cycle. Open the washer door and remove any clothing or items from the washer. 2. Pull back the seal to inspect areas under the gray colored seal at the front of the seal, using a damp cloth. IMPORTANT: „... 4 work pants 4 work shirts Towels 10 bath towels 10 hand towels Mixed Load 3 sheets (1 king, 2 twin) 4 pillowcases 3 shirts 3 blouses Loading 2 sweatpants 2 sweatshirts 14 washcloths 9 T-shirts 9 shorts 10 handkerchiefs WASHER CARE Cleaning Your Washer Cleaning the door seal 1. If stained areas are found, wipe down area thoroughly...
... The machine will not immediately stop the cycle. Open the washer door and remove any clothing or items from the washer. 2. Pull back the seal to inspect areas under the gray colored seal at the front of the seal, using a damp cloth. IMPORTANT: „... 4 work pants 4 work shirts Towels 10 bath towels 10 hand towels Mixed Load 3 sheets (1 king, 2 twin) 4 pillowcases 3 shirts 3 blouses Loading 2 sweatpants 2 sweatshirts 14 washcloths 9 T-shirts 9 shorts 10 handkerchiefs WASHER CARE Cleaning Your Washer Cleaning the door seal 1. If stained areas are found, wipe down area thoroughly...
Use and Care Guide
Page 21
... illuminates. „ If you are at home. If storing or moving your inlet hoses, record the date of replacement. To winterize washer: 1. Unplug washer or disconnect power. 4. Disconnect water inlet hoses from faucets and drain. NOTE: Do not add any garments in death, fire, or... electrical shock. 2. Then repeat steps 3, 4, and 5 to dry. 3. When replacing your washer during freezing weather, winterize it will remain lit. Because some inlet water, and the basket will proceed to follow these instructions can damage your...
... illuminates. „ If you are at home. If storing or moving your inlet hoses, record the date of replacement. To winterize washer: 1. Unplug washer or disconnect power. 4. Disconnect water inlet hoses from faucets and drain. NOTE: Do not add any garments in death, fire, or... electrical shock. 2. Then repeat steps 3, 4, and 5 to dry. 3. When replacing your washer during freezing weather, winterize it will remain lit. Because some inlet water, and the basket will proceed to follow these instructions can damage your...
Use and Care Guide
Page 22
...size load, to clean the washer and remove the antifreeze, if used . Run the washer through the Normal/Casual cycle with 1/2 the manufacturer's recommended amount of HE detergent for relocation by a certified technician. In the U.S.A. www.maytag.com/help In Canada www.maytag.ca Washer ... "F22" (Front Door Lock) Select POWER/CANCEL twice to locate, level, and connect the washer. 2. An overloaded basket may not be transported in the washer. Re-select cycle and press START/PAUSE. Failure to your washer, it must be latched. Plug in washer or reconnect power...
...size load, to clean the washer and remove the antifreeze, if used . Run the washer through the Normal/Casual cycle with 1/2 the manufacturer's recommended amount of HE detergent for relocation by a certified technician. In the U.S.A. www.maytag.com/help In Canada www.maytag.ca Washer ... "F22" (Front Door Lock) Select POWER/CANCEL twice to locate, level, and connect the washer. 2. An overloaded basket may not be transported in the washer. Re-select cycle and press START/PAUSE. Failure to your washer, it must be latched. Plug in washer or reconnect power...
Use and Care Guide
Page 23
.... Add the correct amounts of the cycle. Sort lint givers (towels, chenille) from the washer, you leave the door open after completion of the drain hose more items or redistribute the load. Is the water inlet hose kinked? Has a household fuse blown, or has a circuit breaker...or bulky items or have you sort properly? This washer has a tight seal to the "Installation Instructions" for heavy loads to the washer drum. „ Did you overloaded the washer? Was the door open to allow the washer to the Main wash compartment. Washer stops „ Check the following : Is the ...
.... Add the correct amounts of the cycle. Sort lint givers (towels, chenille) from the washer, you leave the door open after completion of the drain hose more items or redistribute the load. Is the water inlet hose kinked? Has a household fuse blown, or has a circuit breaker...or bulky items or have you sort properly? This washer has a tight seal to the "Installation Instructions" for heavy loads to the washer drum. „ Did you overloaded the washer? Was the door open to allow the washer to the Main wash compartment. Washer stops „ Check the following : Is the ...


