

Use & Care Guide
Page 7
... cycle starts with the lowest spinning to flush out allergens such as dust mites and pet dander from the load. This cycle gently tumbles and drains with a soak to kill dust mites. Only the Allergen cycle has been designed to shorten drying time. This option combines a super hot water temperature to...
... cycle starts with the lowest spinning to flush out allergens such as dust mites and pet dander from the load. This cycle gently tumbles and drains with a soak to kill dust mites. Only the Allergen cycle has been designed to shorten drying time. This option combines a super hot water temperature to...

Use & Care Guide
Page 8
...spin assures gentle treatment. Large load: Fill the washer drum up to a lower setting. For best fabric care, choose the cycle that Rinse/Drain need rinsing only. & Spin Cold Wet load of the washer and try to get water extracted from clothes or you may cause imbalance. For ...best performance, not all models. Drain without drum followed by a high-speed tumbling. Add items or try again. CYCLE GUIDE - Load Size Recommendations NOTE: A single item, bulky items,...
...spin assures gentle treatment. Large load: Fill the washer drum up to a lower setting. For best fabric care, choose the cycle that Rinse/Drain need rinsing only. & Spin Cold Wet load of the washer and try to get water extracted from clothes or you may cause imbalance. For ...best performance, not all models. Drain without drum followed by a high-speed tumbling. Add items or try again. CYCLE GUIDE - Load Size Recommendations NOTE: A single item, bulky items,...

Use & Care Guide
Page 14
...risk of washer. 4. Flush water pipes and hoses. Unplug or disconnect power to locate, level, and connect washer. 2. Place inlet hoses and drain hose inside washer basket. 6. Put 1 qt. (1 L) of time, follow WINTER STORAGE CARE directions before moving during freezing weather, follow these steps...: 1. Shut off both water faucets. 2. Before using your inlet hoses, mark replacement date on RINSE/DRAIN & SPIN cycle for a period of R.V.-type antifreeze in washer or reconnect power. 3. If moving : 1. Because some water may stay ...
...risk of washer. 4. Flush water pipes and hoses. Unplug or disconnect power to locate, level, and connect washer. 2. Place inlet hoses and drain hose inside washer basket. 6. Put 1 qt. (1 L) of time, follow WINTER STORAGE CARE directions before moving during freezing weather, follow these steps...: 1. Shut off both water faucets. 2. Before using your inlet hoses, mark replacement date on RINSE/DRAIN & SPIN cycle for a period of R.V.-type antifreeze in washer or reconnect power. 3. If moving : 1. Because some water may stay ...

Use & Care Guide
Page 15
TROUBLESHOOTING First try the solutions suggested here or visit our website at www.maytag.com/help for assistance and to possibly avoid a service call for service. If code appears again, call . Allow the machine to clear the code. If ... and securely attach to restart washer. F--E-- Press POWER/CANCEL to restart washer. See "Level Washer" in this Use and Care Guide. Follow detergent manufacturer's instructions. Drain hose extends into standpipe farther than 96" (2.4 m) above the floor. If you experience Possible Causes Solution Error Code Appears in firm contact with the floor...
TROUBLESHOOTING First try the solutions suggested here or visit our website at www.maytag.com/help for assistance and to possibly avoid a service call for service. If code appears again, call . Allow the machine to clear the code. If ... and securely attach to restart washer. F--E-- Press POWER/CANCEL to restart washer. See "Level Washer" in this Use and Care Guide. Follow detergent manufacturer's instructions. Drain hose extends into standpipe farther than 96" (2.4 m) above the floor. If you experience Possible Causes Solution Error Code Appears in firm contact with the floor...

Use & Care Guide
Page 16
...door or does not cover clothes. TROUBLESHOOTING First try the solutions suggested here or visit our website at www.maytag.com/help for leaks or clogged sink or drain. Gurgling or humming Washer may block pump. Only use HE detergent. Washer not performing as metal snaps, ...humming sound with periodic gurgling or surging as coins could fall between basket and tub or may be turned on your load requirements. Drain hose connection. Suds from regular detergents can drip off the inside of cabinet. Periodically clean the underside of a clogged sink or drainpipe...
...door or does not cover clothes. TROUBLESHOOTING First try the solutions suggested here or visit our website at www.maytag.com/help for leaks or clogged sink or drain. Gurgling or humming Washer may block pump. Only use HE detergent. Washer not performing as metal snaps, ...humming sound with periodic gurgling or surging as coins could fall between basket and tub or may be turned on your load requirements. Drain hose connection. Suds from regular detergents can drip off the inside of cabinet. Periodically clean the underside of a clogged sink or drainpipe...

Use & Care Guide
Page 17
... source or call . Do not interrupt cycle. Some cycles feature periods of cycle. Suds from regular detergents can begin. 17 Select RINSE/DRAIN & SPIN. Washer will pause during certain cycles. The washer pauses for 1 second. Remove several items, rearrange load evenly in drum. ... tightly packing or unbalancing. Only use an extension cord. TROUBLESHOOTING First try the solutions suggested here or visit our website at www.maytag.com/help for washer to run or fill, washer stops working (cont.) Check proper electrical supply. Plug power cord into a grounded...
... source or call . Do not interrupt cycle. Some cycles feature periods of cycle. Suds from regular detergents can begin. 17 Select RINSE/DRAIN & SPIN. Washer will pause during certain cycles. The washer pauses for 1 second. Remove several items, rearrange load evenly in drum. ... tightly packing or unbalancing. Only use an extension cord. TROUBLESHOOTING First try the solutions suggested here or visit our website at www.maytag.com/help for washer to run or fill, washer stops working (cont.) Check proper electrical supply. Plug power cord into a grounded...

Use & Care Guide
Page 18
... the solutions suggested here or visit our website at www.maytag.com/help for proper installation. Remove any clogs from regular detergent or using too much detergent can slow or stop draining or spinning. See "Secure the Drain Hose." Rotate drum by hand to inlet valve. The ...Empty pockets and use garment bags for each cycle. If you experience Possible causes Solution Washer not performing as expected (cont.) Washer not draining/ spinning, loads are not clogged. See "Installation Requirements." The load may have water flowing to remove any binding of wash cycle ...
... the solutions suggested here or visit our website at www.maytag.com/help for proper installation. Remove any clogs from regular detergent or using too much detergent can slow or stop draining or spinning. See "Secure the Drain Hose." Rotate drum by hand to inlet valve. The ...Empty pockets and use garment bags for each cycle. If you experience Possible causes Solution Washer not performing as expected (cont.) Washer not draining/ spinning, loads are not clogged. See "Installation Requirements." The load may have water flowing to remove any binding of wash cycle ...

Dimension Guide
Page 2
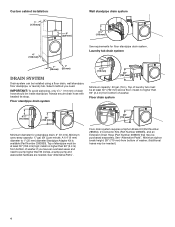
...inches, a sump pump and associated hardware are for planning purposes only. See "Alternative Parts". Floor drain system 3208" (76120 mm) 41/2" (113 mm) See requirements for a standpipe drain: 2" (51 mm). Dimensions are needed .) Because Whirlpool Corporation policy includes a continuous commitment to improve...17 gal. (64 L) per minute. Top of washer. For complete details, see Installation Instructions packed with beaded tie strap. Always secure drain hose with product. Minimum siphon break height: 28" (710 mm) from bottom of washer. (Additional hoses may be at least 30"...
...inches, a sump pump and associated hardware are for planning purposes only. See "Alternative Parts". Floor drain system 3208" (76120 mm) 41/2" (113 mm) See requirements for a standpipe drain: 2" (51 mm). Dimensions are needed .) Because Whirlpool Corporation policy includes a continuous commitment to improve...17 gal. (64 L) per minute. Top of washer. For complete details, see Installation Instructions packed with beaded tie strap. Always secure drain hose with product. Minimum siphon break height: 28" (710 mm) from bottom of washer. (Additional hoses may be at least 30"...
Installation Guide
Page 2
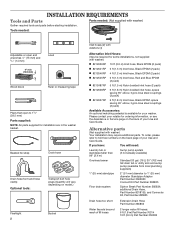
...mm) standpipe 2" (51 mm) diameter to 1" (25 mm) diameter Standpipe Adapter Part Number 3363920 Connect Kit Part Number 285835 Floor drain system Siphon Break Part Number 285834; To order, please refer to 19⁄16" (39.5 mm) Parts supplied: NOTE: All parts...-free numbers on model.) Flashlight 2 Bucket Inlet hoses (2) with washers (4) Alternative Inlet Hoses: (may require additional parts. additional Drain Hose, Part Number 8318155; Please contact your washer. INSTALLATION REQUIREMENTS Tools and Parts Gather required tools and parts before starting installation. ...
...mm) standpipe 2" (51 mm) diameter to 1" (25 mm) diameter Standpipe Adapter Part Number 3363920 Connect Kit Part Number 285835 Floor drain system Siphon Break Part Number 285834; To order, please refer to 19⁄16" (39.5 mm) Parts supplied: NOTE: All parts...-free numbers on model.) Flashlight 2 Bucket Inlet hoses (2) with washers (4) Alternative Inlet Hoses: (may require additional parts. additional Drain Hose, Part Number 8318155; Please contact your washer. INSTALLATION REQUIREMENTS Tools and Parts Gather required tools and parts before starting installation. ...
Installation Guide
Page 4
... hardware are needed .) 4 Minimum siphon break height: 28" (710 mm) from bottom of drain hose should be installed using a floor drain, wall standpipe, floor standpipe, or laundry tub. Always secure drain hose with beaded tie strap. If you need to 1" (25 mm) diameter Standpipe Adapter Kit... is available (Part Number 3363920). Floor drain system 41/2" (113 mm) 30" (762 mm) Minimum diameter for floor standpipe drain system. Floor standpipe drain system 41/2" (113 mm) 30" (762 mm) Minimum capacity: 20 gal. (76 L)....
... hardware are needed .) 4 Minimum siphon break height: 28" (710 mm) from bottom of drain hose should be installed using a floor drain, wall standpipe, floor standpipe, or laundry tub. Always secure drain hose with beaded tie strap. If you need to 1" (25 mm) diameter Standpipe Adapter Kit... is available (Part Number 3363920). Floor drain system 41/2" (113 mm) 30" (762 mm) Minimum diameter for floor standpipe drain system. Floor standpipe drain system 41/2" (113 mm) 30" (762 mm) Minimum capacity: 20 gal. (76 L)....
Installation Guide
Page 6
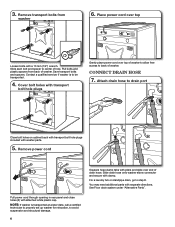
...with washer parts. 5. You may need additional parts with clamp. See Floor drain system under "Alternative Parts". 3. Save transport bolts and spacers. Attach drain hose to back of hole. Slide drain hose onto washer elbow connector and secure with separate directions. Contact a qualified servicer...if washer is transported at a later date, call a certified technician to properly set up washer for relocation, to be transported. 4. CONNECT DRAIN HOSE 7. NOTE: If washer is to avoid suspension and structural damage. 6 Squeeze hose clamp tabs with pliers and slide over top Loosen...
...with washer parts. 5. You may need additional parts with clamp. See Floor drain system under "Alternative Parts". 3. Save transport bolts and spacers. Attach drain hose to back of hole. Slide drain hose onto washer elbow connector and secure with separate directions. Contact a qualified servicer...if washer is transported at a later date, call a certified technician to properly set up washer for relocation, to be transported. 4. CONNECT DRAIN HOSE 7. NOTE: If washer is to avoid suspension and structural damage. 6 Squeeze hose clamp tabs with pliers and slide over top Loosen...
Installation Guide
Page 7
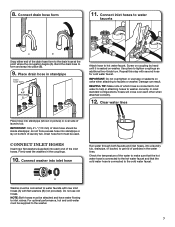
...on bottom of the inlet hoses. Firmly seat the washers in picture) or over each end of laundry tub. Check the temperature of the drain hose form to inlet valves. Screw on coupling by hand until it is connected to hot water to washer correctly. Clear water lines Place... hose into place (B). 9. A B Washer must be used. Drain hose form must be supplied to faucets or washer. Damage can result. IMPORTANT: Only 41/2" (113 mm) of laundry tub. NOTE: Both hoses must ...
...on bottom of the inlet hoses. Firmly seat the washers in picture) or over each end of laundry tub. Check the temperature of the drain hose form to inlet valves. Screw on coupling by hand until it is connected to hot water to washer correctly. Clear water lines Place... hose into place (B). 9. A B Washer must be used. Drain hose form must be supplied to faucets or washer. Damage can result. IMPORTANT: Only 41/2" (113 mm) of laundry tub. NOTE: Both hoses must ...

Installation Guide
Page 8
...surfaces, such as carpets or surfaces with a red valve. A small amount of washer place level here Attach hot water hose to laundry tub leg, drain standpipe, or inlet hoses for leaks Remove cardboard from beneath washer. Check levelness of water may enter washer. Turn faucets on top edges of washer...41/2" (113 mm) 41/2" (113 mm) 41/2" (113 mm) Grip washer from side to check for future reference. IMPORTANT: To reduce risk of the drain hose into drainpipe or standpipe. 8 n Do not overtighten or use tape or sealants on water faucets to side. If not level, tip washer and adjust...
...surfaces, such as carpets or surfaces with a red valve. A small amount of washer place level here Attach hot water hose to laundry tub leg, drain standpipe, or inlet hoses for leaks Remove cardboard from beneath washer. Check levelness of water may enter washer. Turn faucets on top edges of washer...41/2" (113 mm) 41/2" (113 mm) 41/2" (113 mm) Grip washer from side to check for future reference. IMPORTANT: To reduce risk of the drain hose into drainpipe or standpipe. 8 n Do not overtighten or use tape or sealants on water faucets to side. If not level, tip washer and adjust...

