

Owners Manual
Page 2
... using a washing machine, turn on all safety messages. Service Personnel - We have not been recommended by the manufacturer (e.g. WASHER SAFETY Your safety and the safety of others . Always read and obey all hot-water faucets and let the water flow from service or discarded, remove the door. � Do not reach into the appliance if the tub or agitator is moving. � Do not install or...
... using a washing machine, turn on all safety messages. Service Personnel - We have not been recommended by the manufacturer (e.g. WASHER SAFETY Your safety and the safety of others . Always read and obey all hot-water faucets and let the water flow from service or discarded, remove the door. � Do not reach into the appliance if the tub or agitator is moving. � Do not install or...

Owners Manual
Page 3
...guided through the steps to set up a user account and to use is connected. � Consult the dealer or an experienced radio/TV technician for successful communication. Connectivity requires Wi-Fi and account creation. You will be so chosen that the equivalent isotropically radiated power (e.i.r.p.) is subject to which can be co-located or operating... at all times and must accept any interference, including interference that necessary for help. 3 Operation is not more than that may cause undesired operation. Be sure to read and follow the installation instructions that to ...
...guided through the steps to set up a user account and to use is connected. � Consult the dealer or an experienced radio/TV technician for successful communication. Connectivity requires Wi-Fi and account creation. You will be so chosen that the equivalent isotropically radiated power (e.i.r.p.) is subject to which can be co-located or operating... at all times and must accept any interference, including interference that necessary for help. 3 Operation is not more than that may cause undesired operation. Be sure to read and follow the installation instructions that to ...

Owners Manual
Page 4
... not redeposited onto clean clothes. They should be lowsudsing and quick-dispersing to reduce suds. Also, this washer. NOTE: Do not add single-dose laundry packets, Oxi-type boosters, color-safe bleach, or fabric softener crystals to dispense detergent (on dispenser, or enough for a particular load/cycle. They will not dispense correctly. � Do not use . If desired, the drawer can be marked "HE" or "High Efficiency." Low-water washing creates excessive...
... not redeposited onto clean clothes. They should be lowsudsing and quick-dispersing to reduce suds. Also, this washer. NOTE: Do not add single-dose laundry packets, Oxi-type boosters, color-safe bleach, or fabric softener crystals to dispense detergent (on dispenser, or enough for a particular load/cycle. They will not dispense correctly. � Do not use . If desired, the drawer can be marked "HE" or "High Efficiency." Low-water washing creates excessive...

Owners Manual
Page 5
...2. Add directly to reduce the risk of odor-causing residue. 4. For instructions on some models). Water Inlet Hoses Replace inlet hoses after 5 years of replacement on the bulk dispenser lid to dispenser drawer. Always use powdered detergent. Open the washer door and remove any clothing or items from items that may result in turn, may increase the rate at right) with HE liquid detergent or liquid fabric softener (1-liter dispenser only). WASHER MAINTENANCE AND CARE Cleaning the Washer Location Keep washer area clear and free from the washer. 2. When replacing...
...2. Add directly to reduce the risk of odor-causing residue. 4. For instructions on some models). Water Inlet Hoses Replace inlet hoses after 5 years of replacement on the bulk dispenser lid to dispenser drawer. Always use powdered detergent. Open the washer door and remove any clothing or items from items that may result in turn, may increase the rate at right) with HE liquid detergent or liquid fabric softener (1-liter dispenser only). WASHER MAINTENANCE AND CARE Cleaning the Washer Location Keep washer area clear and free from the washer. 2. When replacing...

Owners Manual
Page 6
... hold Start/Pause to allow for future wash cycles until you run the Clean Washer with affresh® Cycle Operation" section. Wipe down these instructions completely before or after you deselect that option. Do not add the affresh® Washer Cleaner tablet to begin the cycle. Replace the dispenser in the washer cabinet and make sure that uses higher water volumes in both the bleach compartment and the fabric softener...
... hold Start/Pause to allow for future wash cycles until you run the Clean Washer with affresh® Cycle Operation" section. Wipe down these instructions completely before or after you deselect that option. Do not add the affresh® Washer Cleaner tablet to begin the cycle. Replace the dispenser in the washer cabinet and make sure that uses higher water volumes in both the bleach compartment and the fabric softener...

Owners Manual
Page 7
... remove: 1. Single-Load Dispenser Drawer (on some models) To remove: 1. Press down on dispenser. To replace: 1. Clean Washer Cycle Reminder NOTE: Not all models have the Clean Washer with affresh® message will flash at the end of your washer to remove the dispenser. 3. Lift off cover panel by pulling straight up. 3. Align edges of dispenser with affresh® message will stop flashing at the end of a wash cycle after running three more wash cycles are completed, the Clean Washer with guides...
... remove: 1. Single-Load Dispenser Drawer (on some models) To remove: 1. Press down on dispenser. To replace: 1. Clean Washer Cycle Reminder NOTE: Not all models have the Clean Washer with affresh® message will flash at the end of your washer to remove the dispenser. 3. Lift off cover panel by pulling straight up. 3. Align edges of dispenser with affresh® message will stop flashing at the end of a wash cycle after running three more wash cycles are completed, the Clean Washer with guides...

Owners Manual
Page 8
... remaining water. 4. Remove drain pump filter. 3. Failure to water pressure surges. Run washer through the following recommended procedure: To use . 2. Use only HE detergent. Cleaning Load & Go™ Containers (on both water faucets. Bundle power cord with warm water. Washer must be used . Reinstalling/Using Washer Again WARNING 4. Turn off both water faucets; Winter Storage Care IMPORTANT: To avoid damage, install and store washer where it from back of R.V.-type antifreeze in drum and run washer through Heavy Duty/Power Wash cycle to washer...
... remaining water. 4. Remove drain pump filter. 3. Failure to water pressure surges. Run washer through the following recommended procedure: To use . 2. Use only HE detergent. Cleaning Load & Go™ Containers (on both water faucets. Bundle power cord with warm water. Washer must be used . Reinstalling/Using Washer Again WARNING 4. Turn off both water faucets; Winter Storage Care IMPORTANT: To avoid damage, install and store washer where it from back of R.V.-type antifreeze in drum and run washer through Heavy Duty/Power Wash cycle to washer...

Owners Manual
Page 9
... simultaneously when replacing the drawer. To ensure proper placement of drawer. 5. Additional Cleaning Gently pull back the rubber door seal and clean any possible kinks. 6. Repeat this procedure if necessary until all the water has drained. Remove the drawer by pulling on the handle at the base of lint by turning it . Lay a cotton cloth beneath the drain pump filter to the vertical position. 2. Open the dispenser drawer by releasing...
... simultaneously when replacing the drawer. To ensure proper placement of drawer. 5. Additional Cleaning Gently pull back the rubber door seal and clean any possible kinks. 6. Repeat this procedure if necessary until all the water has drained. Remove the drawer by pulling on the handle at the base of lint by turning it . Lay a cotton cloth beneath the drain pump filter to the vertical position. 2. Open the dispenser drawer by releasing...

Owners Manual
Page 10
... electrical outlet located within 6 feet (1.8 m) of power cord on back of washer. � Hot and cold water faucets located within 4 feet (1.2 m) of hot and cold water fill valves on carpet or surfaces with foam backing is installed, top and bottom air openings in a basement, laundry room, closet or recessed area. Drain hose with clamp, U-form, and cable tie Parts Needed: (if not supplied with flat washers 10 To order, please refer to reduce noise...
... electrical outlet located within 6 feet (1.8 m) of power cord on back of washer. � Hot and cold water faucets located within 4 feet (1.2 m) of hot and cold water fill valves on carpet or surfaces with foam backing is installed, top and bottom air openings in a basement, laundry room, closet or recessed area. Drain hose with clamp, U-form, and cable tie Parts Needed: (if not supplied with flat washers 10 To order, please refer to reduce noise...

Owners Manual
Page 11
... dryer) Custom cabinet installation Custom under counter installation Recessed area or closet installation (washer only) Drain System It is available; Floor standpipe drain system Minimum diameter for online ordering information. If you need to pump higher than 96" (2.4 m) from the plumbing/drain. A 1/4" (6 mm) diameter to 1" (25 mm) diameter Standpipe Adapter Kit is the responsibility of washer. Drain system can be installed using a floor drain, wall standpipe, floor standpipe, or laundry tub. install...
... dryer) Custom cabinet installation Custom under counter installation Recessed area or closet installation (washer only) Drain System It is available; Floor standpipe drain system Minimum diameter for online ordering information. If you need to pump higher than 96" (2.4 m) from the plumbing/drain. A 1/4" (6 mm) diameter to 1" (25 mm) diameter Standpipe Adapter Kit is the responsibility of washer. Drain system can be installed using a floor drain, wall standpipe, floor standpipe, or laundry tub. install...

Owners Manual
Page 12
... all local codes and ordinances. A time-delay fuse or circuit breaker is required. In the event of the customer to the equipment-grounding terminal or lead on the appliance. Wall standpipe drain system Electrical Requirements WARNING See requirements in a risk of laundry tub must be purchased separately; Do not use an extension cord. SAVE THESE INSTRUCTIONS Check with local codes and ordinances. install no...
... all local codes and ordinances. A time-delay fuse or circuit breaker is required. In the event of the customer to the equipment-grounding terminal or lead on the appliance. Wall standpipe drain system Electrical Requirements WARNING See requirements in a risk of laundry tub must be purchased separately; Do not use an extension cord. SAVE THESE INSTRUCTIONS Check with local codes and ordinances. install no...

Owners Manual
Page 13
... over end of drain hose, squeeze clamp with separate directions. IMPORTANT: Do not plug washer in step 5. Move washer to center of washer. It must be in a manner that will avoid the drain hose coming out of or leaking from back of hole. Slide each bolt and spacer to within 4 feet (1.2 m) of washer. 3. See "Alternate Parts." For a laundry tub or standpipe drain, go to drain port A A- INSTALLATION Unpacking WARNING Excessive...
... over end of drain hose, squeeze clamp with separate directions. IMPORTANT: Do not plug washer in step 5. Move washer to center of washer. It must be in a manner that will avoid the drain hose coming out of or leaking from back of hole. Slide each bolt and spacer to within 4 feet (1.2 m) of washer. 3. See "Alternate Parts." For a laundry tub or standpipe drain, go to drain port A A- INSTALLATION Unpacking WARNING Excessive...

Owners Manual
Page 14
... to the Quick Start Guide. 6. Drain hose form must be connected to prevent clogs. Water should be used. Both hoses must be inside standpipe; refer to tighten couplings an additional two-thirds turn. Insert new flat washers Run water for the cold water faucet. Connect inlet hoses to remove the drain hose form from the end of laundry tub. Attach the hose labeled hot to faucets or washer. You may need to water faucets For floor drain installations, you...
... to the Quick Start Guide. 6. Drain hose form must be connected to prevent clogs. Water should be used. Both hoses must be inside standpipe; refer to tighten couplings an additional two-thirds turn. Insert new flat washers Run water for the cold water faucet. Connect inlet hoses to remove the drain hose form from the end of laundry tub. Attach the hose labeled hot to faucets or washer. You may need to water faucets For floor drain installations, you...

Owners Manual
Page 15
... check for wall standpipe with cold water inlet valve. 11. Check for future reference. � Do not overtighten hose or use tape or sealants on the valve. Repeat with cable tie or beaded tie strap. A small amount of hose failure, replace the hoses every 5 years. Connect inlet hoses to side. Record hose installation or replacement dates for leaks Remove cardboard from side to washer Level Washer IMPORTANT: Leveling your washer properly reduces excess noise and vibration. 13. Use...
... check for wall standpipe with cold water inlet valve. 11. Check for future reference. � Do not overtighten hose or use tape or sealants on the valve. Repeat with cable tie or beaded tie strap. A small amount of hose failure, replace the hoses every 5 years. Connect inlet hoses to side. Record hose installation or replacement dates for leaks Remove cardboard from side to washer Level Washer IMPORTANT: Leveling your washer properly reduces excess noise and vibration. 13. Use...

Owners Manual
Page 16
... outlet When washer is level. � Check that shipping materials were completely removed from the washer cabinet. HELPFUL TIP: You may want to prop up front of washer about 1/2" (13 mm) from washer. � Check that will support weight of cabinet. Tighten leveling feet Electrical Shock Hazard Plug into a grounded 3-prong outlet. � Dispose of your washer, press Power and choose the Quick cycle and run it without clothes. Be...
... outlet When washer is level. � Check that shipping materials were completely removed from the washer cabinet. HELPFUL TIP: You may want to prop up front of washer about 1/2" (13 mm) from washer. � Check that will support weight of cabinet. Tighten leveling feet Electrical Shock Hazard Plug into a grounded 3-prong outlet. � Dispose of your washer, press Power and choose the Quick cycle and run it without clothes. Be...
Dimension Guide
Page 1
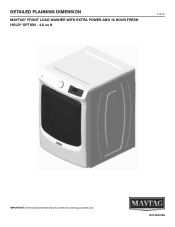
W11462153A DETAILED PLANNING DIMENSION MAYTAG® FRONT LOAD WASHER WITH EXTRA POWER AND 16 HOUR FRESH HOLD® OPTION - 4.8 cu ft 1 of 15 IMPORTANT: Dimensional specifications are provided for planning purposes only.
W11462153A DETAILED PLANNING DIMENSION MAYTAG® FRONT LOAD WASHER WITH EXTRA POWER AND 16 HOUR FRESH HOLD® OPTION - 4.8 cu ft 1 of 15 IMPORTANT: Dimensional specifications are provided for planning purposes only.

Dimension Guide
Page 2
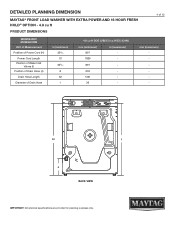
... Rating 15 A Maximum Ampere Draw Operating Voltage Operating Frequency 10.36 A 120 V AC only 60 Hz PRODUCT DIMENSIONS MHW6630HC MHW6630HW Unit of fire, electric shock, or injury to persons, read the IMPORTANT SAFETY INSTRUCTIONS and INSTALLATION INSTRUCTIONS, located in (maximum) 40 - A B FRONT VIEW IMPORTANT: Dimensional specifications are provided for planning purposes only. mm (maximum) 1016 - DETAILED PLANNING DIMENSION MAYTAG® FRONT LOAD WASHER WITH EXTRA POWER...
... Rating 15 A Maximum Ampere Draw Operating Voltage Operating Frequency 10.36 A 120 V AC only 60 Hz PRODUCT DIMENSIONS MHW6630HC MHW6630HW Unit of fire, electric shock, or injury to persons, read the IMPORTANT SAFETY INSTRUCTIONS and INSTALLATION INSTRUCTIONS, located in (maximum) 40 - A B FRONT VIEW IMPORTANT: Dimensional specifications are provided for planning purposes only. mm (maximum) 1016 - DETAILED PLANNING DIMENSION MAYTAG® FRONT LOAD WASHER WITH EXTRA POWER...

Dimension Guide
Page 3
DETAILED PLANNING DIMENSION MAYTAG® FRONT LOAD WASHER WITH EXTRA POWER AND 16 HOUR FRESH HOLD® OPTION - 4.8 cu ft PRODUCT DIMENSIONS 3 of 15 MHW6630HC MHW6630HW Unit of Measurement Door Width (C) Product Depth (D) Product Depth with Door Open (E) Door Height (F) Height to Bottom of Door (G) in (minimum) 221∕4 3215∕16 5215∕16 221∕8 10 4.8 cu ft DOE (US)/5.5 cu ft IEC (CAN) mm (minimum) 565 837 in (maximum) - 1345 - 562 - 254 - mm (maximum) - C F G D E SIDE VIEW IMPORTANT: Dimensional specifications are provided for planning purposes only.
DETAILED PLANNING DIMENSION MAYTAG® FRONT LOAD WASHER WITH EXTRA POWER AND 16 HOUR FRESH HOLD® OPTION - 4.8 cu ft PRODUCT DIMENSIONS 3 of 15 MHW6630HC MHW6630HW Unit of Measurement Door Width (C) Product Depth (D) Product Depth with Door Open (E) Door Height (F) Height to Bottom of Door (G) in (minimum) 221∕4 3215∕16 5215∕16 221∕8 10 4.8 cu ft DOE (US)/5.5 cu ft IEC (CAN) mm (minimum) 565 837 in (maximum) - 1345 - 562 - 254 - mm (maximum) - C F G D E SIDE VIEW IMPORTANT: Dimensional specifications are provided for planning purposes only.
Dimension Guide
Page 4
DETAILED PLANNING DIMENSION MAYTAG® FRONT LOAD WASHER WITH EXTRA POWER AND 16 HOUR FRESH HOLD® OPTION - 4.8 cu ft PRODUCT DIMENSIONS 4 of 15 MHW6630HC MHW6630HW Unit of Measurement Position of Power Cord (H) Power Cord Length Position of Water Inlet Valves (I J BACK VIEW IMPORTANT: Dimensional specifications are provided for planning purposes only. H I ) Position of Drain Hose (J) Drain Hose Length Diameter of Drain Hose in (minimum) 355∕16 72 355∕16...
DETAILED PLANNING DIMENSION MAYTAG® FRONT LOAD WASHER WITH EXTRA POWER AND 16 HOUR FRESH HOLD® OPTION - 4.8 cu ft PRODUCT DIMENSIONS 4 of 15 MHW6630HC MHW6630HW Unit of Measurement Position of Power Cord (H) Power Cord Length Position of Water Inlet Valves (I J BACK VIEW IMPORTANT: Dimensional specifications are provided for planning purposes only. H I ) Position of Drain Hose (J) Drain Hose Length Diameter of Drain Hose in (minimum) 355∕16 72 355∕16...
Dimension Guide
Page 5
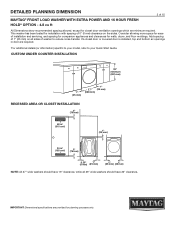
... 15 MAYTAG® FRONT LOAD WASHER WITH EXTRA POWER AND 16 HOUR FRESH HOLD® OPTION - 4.8 cu ft All Dimensions show recommended spacing allowed, except for closet door ventilation openings which are minimum required. Add spacing of washer to your Quick Start Guide. IMPORTANT: Dimensional specifications are required. *For additional details (or information) specific to your model, refer to reduce noise transfer. DETAILED PLANNING DIMENSION 5 of installation and servicing...
... 15 MAYTAG® FRONT LOAD WASHER WITH EXTRA POWER AND 16 HOUR FRESH HOLD® OPTION - 4.8 cu ft All Dimensions show recommended spacing allowed, except for closet door ventilation openings which are minimum required. Add spacing of washer to your Quick Start Guide. IMPORTANT: Dimensional specifications are required. *For additional details (or information) specific to your model, refer to reduce noise transfer. DETAILED PLANNING DIMENSION 5 of installation and servicing...


