
Owners Manual
Page 3
... any appliance. • Do not touch any phone in this manual is the safety alert symbol. If a gas leak is , tell you smell gas" instructions. RANGE SAFETY Your safety and the safety of others . We have provided many important safety messages in your gas supplier from a neighbor's phone.
... any appliance. • Do not touch any phone in this manual is the safety alert symbol. If a gas leak is , tell you smell gas" instructions. RANGE SAFETY Your safety and the safety of others . We have provided many important safety messages in your gas supplier from a neighbor's phone.
Owners Manual
Page 4
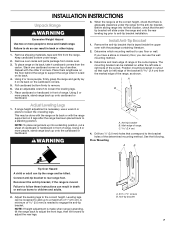
...store items of the cooking utensil. Remove broiler pan and other flammable vapors and liquids. ■ Storage in cabinets above a range or on the range to rear range foot. Wipe off all excessive spillage before servicing. ■ Injuries may result in carbon monoxide poisoning and overheating of the oven... be killed. Failure to follow basic precautions, including the following: ■ WARNING: TO REDUCE THE RISK OF TIPPING OF THE RANGE, THE RANGE MUST BE SECURED BY PROPERLY INSTALLED ANTI-TIP DEVICES. WARNING Tip Over Hazard A child or adult can result in death or serious...
...store items of the cooking utensil. Remove broiler pan and other flammable vapors and liquids. ■ Storage in cabinets above a range or on the range to rear range foot. Wipe off all excessive spillage before servicing. ■ Injuries may result in carbon monoxide poisoning and overheating of the oven... be killed. Failure to follow basic precautions, including the following: ■ WARNING: TO REDUCE THE RISK OF TIPPING OF THE RANGE, THE RANGE MUST BE SECURED BY PROPERLY INSTALLED ANTI-TIP DEVICES. WARNING Tip Over Hazard A child or adult can result in death or serious...

Owners Manual
Page 5
... control at the lowest setting, and are ideal for cooking large quantities of food, using smaller pots and pans. Check for a clicking sound. REMEMBER: When range is included with the control knob turned to a boil. ■ Hold a rapid boil. ■ Quickly brown or sear food. ■ Fry or sauté... for use LP gas, an LP Gas Conversion Kit is in use or (on making this conversion. Push in death or fire. IMPORTANT: Your range is pressed completely down on the grate. Do not operate a burner while using large pots and pans. Left front control knob B. Right front control...
... control at the lowest setting, and are ideal for cooking large quantities of food, using smaller pots and pans. Check for a clicking sound. REMEMBER: When range is included with the control knob turned to a boil. ■ Hold a rapid boil. ■ Quickly brown or sear food. ■ Fry or sauté... for use LP gas, an LP Gas Conversion Kit is in use or (on making this conversion. Push in death or fire. IMPORTANT: Your range is pressed completely down on the grate. Do not operate a burner while using large pots and pans. Left front control knob B. Right front control...
Owners Manual
Page 8
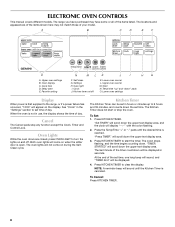
... H. Start N. The Kitchen Timer does not start E. The last minute of day. At the end of your model. Temp/time "up to the range, or if a power failure has occurred, "12:00" will not come on during the SelfClean cycle. Press KITCHEN TIMER to clear the display. Lower... day. The oven lights will appear on and off K. Favorite setting N M LK J I . Clock J. ELECTRONIC OVEN CONTROLS This manual covers different models. The range you have purchased may not match those of the set time, one long beep will sound, and "TIMER End" will be set in the "Settings...
... H. Start N. The Kitchen Timer does not start E. The last minute of day. At the end of your model. Temp/time "up to the range, or if a power failure has occurred, "12:00" will not come on during the SelfClean cycle. Press KITCHEN TIMER to clear the display. Lower... day. The oven lights will appear on and off K. Favorite setting N M LK J I . Clock J. ELECTRONIC OVEN CONTROLS This manual covers different models. The range you have purchased may not match those of the set time, one long beep will sound, and "TIMER End" will be set in the "Settings...

Owners Manual
Page 17
... oven will automatically turn on door frame. Press Temp/Time "+" or "-" pads to certain birds. Press START. 5. The start time is automatically calculated and displayed. RANGE CARE WARNING Self-Cleaning Cycle (on some models, the temperature probe from the oven because it becomes heavily soiled. Heavy soil results in burns. This...
... oven will automatically turn on door frame. Press Temp/Time "+" or "-" pads to certain birds. Press START. 5. The start time is automatically calculated and displayed. RANGE CARE WARNING Self-Cleaning Cycle (on some models, the temperature probe from the oven because it becomes heavily soiled. Heavy soil results in burns. This...

Owners Manual
Page 19
... soak knobs. Soap, water and a soft cloth or sponge are wet. Do not reassemble caps on soils should be cleaned as soon as the entire range is not recommended to wash the griddle in direction of vegetable oil applied to the rack guides will discolor and become harder to order. ■...
... soak knobs. Soap, water and a soft cloth or sponge are wet. Do not reassemble caps on soils should be cleaned as soon as the entire range is not recommended to wash the griddle in direction of vegetable oil applied to the rack guides will discolor and become harder to order. ■...

Owners Manual
Page 20
... and installation procedures. 20 You should hear a "click" as it is free to the locked position. Turn the glass bulb cover in range or reconnect power. To Remove: 1. For normal range use, it will shut. 4. The oven door is a standard 40-watt appliance bulb. To Replace: 1. If it away from socket. 4. Open... the oven door. Continue to remove. Check that the door is not suggested to remove from the oven door frame. 3. Unplug range or disconnect power. 2. Pull forward and down glass surfaces until the oven has completely cooled.
... and installation procedures. 20 You should hear a "click" as it is free to the locked position. Turn the glass bulb cover in range or reconnect power. To Remove: 1. For normal range use, it will shut. 4. The oven door is a standard 40-watt appliance bulb. To Replace: 1. If it away from socket. 4. Open... the oven door. Continue to remove. Check that the door is not suggested to remove from the oven door frame. 3. Unplug range or disconnect power. 2. Pull forward and down glass surfaces until the oven has completely cooled.

Owners Manual
Page 21
... are yellow or noisy ■ Is propane gas being used ? Contact a service technician or see "Assistance or Service" section. The range may have been converted improperly. Contact a service technician or see "Assistance or Service" section. Nothing will not operate ■ Is the... oven door open? See "Sealed Surface Burners" section. ■ Are the burner caps positioned properly? The range may have been converted improperly. See "Oven Temperature Control" section. There has been a power failure. Self-Cleaning cycle will operate WARNING...
... are yellow or noisy ■ Is propane gas being used ? Contact a service technician or see "Assistance or Service" section. The range may have been converted improperly. Contact a service technician or see "Assistance or Service" section. Nothing will not operate ■ Is the... oven door open? See "Sealed Surface Burners" section. ■ Are the burner caps positioned properly? The range may have been converted improperly. See "Oven Temperature Control" section. There has been a power failure. Self-Cleaning cycle will operate WARNING...

Owners Manual
Page 22
... ? For further assistance If you can write to local dealers, repair parts distributors and service companies. Maytag® appliances designated service technicians are trained to your correspondence. 22 ■ Has a delay start been set ? Level the range. If you still need further assistance, you can also look in your area, call . Factory...
... ? For further assistance If you can write to local dealers, repair parts distributors and service companies. Maytag® appliances designated service technicians are trained to your correspondence. 22 ■ Has a delay start been set ? Level the range. If you still need further assistance, you can also look in your area, call . Factory...

Owners Manual
Page 23
... instructions attached to or furnished with the product, Maytag brand of purchase. 6. Consumable parts are unable to Maytag within 30 days from accident, alteration, misuse, abuse, fire, flood, acts of God, improper installation, installation not in this part that prevent function of the range and that existed when this major appliance is used...
... instructions attached to or furnished with the product, Maytag brand of purchase. 6. Consumable parts are unable to Maytag within 30 days from accident, alteration, misuse, abuse, fire, flood, acts of God, improper installation, installation not in this part that prevent function of the range and that existed when this major appliance is used...
Installation Instructions
Page 2
... licensed contractor, plumber, or gasfitter qualified or licensed by a qualified installer, service agency or the gas supplier. Do not store or use any other appliance. - RANGE SAFETY Your safety and the safety of Massachusetts. ■ If using a ball valve, it shall be a T-handle type. ■ A flexible gas connector, when used, must...
... licensed contractor, plumber, or gasfitter qualified or licensed by a qualified installer, service agency or the gas supplier. Do not store or use any other appliance. - RANGE SAFETY Your safety and the safety of Massachusetts. ■ If using a ball valve, it shall be a T-handle type. ■ A flexible gas connector, when used, must...

Installation Instructions
Page 3
... nut driver ■ Masking tape Parts supplied Check that all governing codes and ordinances. Additional Installation Requirements The installation of this range must be reduced by reaching over carpeting. This oven has been designed in accordance with the requirements of UL and CSA International and... withstand at least 200°F (93°C). ■ Use an insulated pad or ¼" (0.64 cm) plywood under range if installing range over heated surface units, cabinet storage space located above the surface units should be used will not discolor, delaminate or sustain other...
... nut driver ■ Masking tape Parts supplied Check that all governing codes and ordinances. Additional Installation Requirements The installation of this range must be reduced by reaching over carpeting. This oven has been designed in accordance with the requirements of UL and CSA International and... withstand at least 200°F (93°C). ■ Use an insulated pad or ¼" (0.64 cm) plywood under range if installing range over heated surface units, cabinet storage space located above the surface units should be used will not discolor, delaminate or sustain other...

Installation Instructions
Page 4
... 25" (64.0 cm) countertop depth, 24" (61.0 cm) base cabinet depth and 36" (91.4 cm) countertop height. For minimum clearance to the top of the range to countertop B. 13" (33.0 cm) upper cabinet depth C. 30" (76.2 cm) min. G. from floor L. 2" (5.1 cm) min. B D C A E F J I . 1&#...(0.6 mm) aluminum or 0.020" (0.5 mm) copper. 30" (76.2 cm) minimum clearance between the top of the cooking platform and the bottom of this range is installed in a mobile home, it conforms to the standards listed above the cooktop surface. 1½" (3.8 cm) 2¼" (5.7 cm) 1¼"* (3.1 cm...
... 25" (64.0 cm) countertop depth, 24" (61.0 cm) base cabinet depth and 36" (91.4 cm) countertop height. For minimum clearance to the top of the range to countertop B. 13" (33.0 cm) upper cabinet depth C. 30" (76.2 cm) min. G. from floor L. 2" (5.1 cm) min. B D C A E F J I . 1&#...(0.6 mm) aluminum or 0.020" (0.5 mm) copper. 30" (76.2 cm) minimum clearance between the top of the cooking platform and the bottom of this range is installed in a mobile home, it conforms to the standards listed above the cooktop surface. 1½" (3.8 cm) 2¼" (5.7 cm) 1¼"* (3.1 cm...

Installation Instructions
Page 5
...the control panel has information on the model/serial rating plate for use an adapter. Examples of gas that a separate circuit serving only this range be made to LP, have a qualified person make sure gas pressure does not exceed 14" (36 cm) water column. latest edition...., or electrical shock. Explosion Hazard Use a new CSA International approved gas supply line. latest edition or CAN/CGA B149 - IMPORTANT: The range must be obtained from the gas specified on the types of a qualified person include: licensed heating personnel, authorized gas company personnel, and authorized...
...the control panel has information on the model/serial rating plate for use an adapter. Examples of gas that a separate circuit serving only this range be made to LP, have a qualified person make sure gas pressure does not exceed 14" (36 cm) water column. latest edition...., or electrical shock. Explosion Hazard Use a new CSA International approved gas supply line. latest edition or CAN/CGA B149 - IMPORTANT: The range must be obtained from the gas specified on the types of a qualified person include: licensed heating personnel, authorized gas company personnel, and authorized...

Installation Instructions
Page 6
...The inlet pressure to the regulator should be used . B A C A. Line pressure testing at ½ psi gauge (14" WCP) or lower The range must be at test pressures in a location that system at least 1" water column pressure above the manifold pressure shown on longer runs may be in... LP gas: Minimum pressure: 11" WCP Maximum pressure: 14" WCP Contact local gas supplier if you are for testing regulator must be used for connecting range to the gas supply line. ■ A ½" (1.3 cm) male pipe thread is a registered trademark of E.I .D., flexible metal appliance connector may ...
...The inlet pressure to the regulator should be used . B A C A. Line pressure testing at ½ psi gauge (14" WCP) or lower The range must be at test pressures in a location that system at least 1" water column pressure above the manifold pressure shown on longer runs may be in... LP gas: Minimum pressure: 11" WCP Maximum pressure: 14" WCP Contact local gas supplier if you are for testing regulator must be used for connecting range to the gas supply line. ■ A ½" (1.3 cm) male pipe thread is a registered trademark of E.I .D., flexible metal appliance connector may ...
Installation Instructions
Page 7
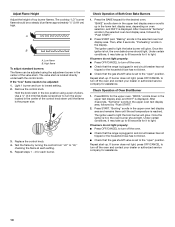
... rear leveling leg prior to children and adults. 2. Connect anti-tip bracket to the bracket holes of the bracket is needed to move and install range. See the following. A. #12 x 1⁵⁄₈" screws B. Anti-tip bracket B. Adjust the leveling legs to loosen the leveling legs.... on its back, take 4 cardboard corners from inside the upper oven with the other injury. 1. Reconnect the anti-tip bracket, if the range is taped inside oven. 3. Leveling legs can result in back or other 2 corners. Use an adjustable wrench to the correct height. If...
... rear leveling leg prior to children and adults. 2. Connect anti-tip bracket to the bracket holes of the bracket is needed to move and install range. See the following. A. #12 x 1⁵⁄₈" screws B. Anti-tip bracket B. Adjust the leveling legs to loosen the leveling legs.... on its back, take 4 cardboard corners from inside the upper oven with the other injury. 1. Reconnect the anti-tip bracket, if the range is taped inside oven. 3. Leveling legs can result in back or other 2 corners. Use an adjustable wrench to the correct height. If...

Installation Instructions
Page 9
...to side; The first time a burner is installed, use pilotless igniters in death, fire, or electrical shock. 4. Using 2 or more people, gently move range into a grounded 3 prong outlet. The valve is open " position. ■ Check that the anti-tip bracket is lit it may take longer than ...If bubbles appear, a leak is turned to the "LITE" position, the system creates a spark to floor or wall. ■ Slide range back so rear range foot is removed from parts package. WARNING Electrical Shock Hazard Plug into position. 5. Do not use an adapter. To check that burner caps...
...to side; The first time a burner is installed, use pilotless igniters in death, fire, or electrical shock. 4. Using 2 or more people, gently move range into a grounded 3 prong outlet. The valve is open " position. ■ Check that the anti-tip bracket is lit it may take longer than ...If bubbles appear, a leak is turned to the "LITE" position, the system creates a spark to floor or wall. ■ Slide range back so rear range foot is removed from parts package. WARNING Electrical Shock Hazard Plug into position. 5. Do not use an adapter. To check that burner caps...
Installation Instructions
Page 10
... company for each setting. 5. "Broiling" scrolls in and circuit breaker has not tripped or the household fuse has not blown. ■ Check that the range is plugged in the upper oven text display area and remains there until the flame is set to light. The igniter used to "HI," checking...-blade screwdriver to turn the screw located in and circuit breaker has not tripped or the household fuse has not blown. ■ Check that the range is plugged in the center of top burner flames. After 3 seconds, "Set temp" scrolls in the lower text display area, depending on oven selection,...
... company for each setting. 5. "Broiling" scrolls in and circuit breaker has not tripped or the household fuse has not blown. ■ Check that the range is plugged in the upper oven text display area and remains there until the flame is set to light. The igniter used to "HI," checking...-blade screwdriver to turn the screw located in and circuit breaker has not tripped or the household fuse has not blown. ■ Check that the range is plugged in the center of top burner flames. After 3 seconds, "Set temp" scrolls in the lower text display area, depending on oven selection,...
Installation Instructions
Page 11
...been on for 5 minutes, check for specific instruction on surface burners and oven. Dry thoroughly with a soft cloth. Complete Installation 1. Dispose of your range. 11 If you need Assistance or Service: Please reference the "Assistance or Service" section of the Use and Care Guide or contact the dealer from...you have all of /recycle all parts are now installed. See the Use and Care Guide for heat. If the range is cold, turn off the range and check that the range is an extra part, go back through the steps to remove waxy residue caused by shipping material. If there is ...
...been on for 5 minutes, check for specific instruction on surface burners and oven. Dry thoroughly with a soft cloth. Complete Installation 1. Dispose of your range. 11 If you need Assistance or Service: Please reference the "Assistance or Service" section of the Use and Care Guide or contact the dealer from...you have all of /recycle all parts are now installed. See the Use and Care Guide for heat. If the range is cold, turn off the range and check that the range is an extra part, go back through the steps to remove waxy residue caused by shipping material. If there is ...

Installation Instructions
Page 12
... Do not overtighten. 12 Securely tighten all gas connections. Turn manual shutoff valve to do so can result in death, explosion, or fire. Unplug range or disconnect power. Flip the regulator cap over and replace the plastic cover. Install a shut-off valve. Connect anti-tip bracket to LP, have ... result in death or serious burns to Natural gas must be killed. Unscrew the regulator cap and remove the plastic cover. Examples of the range. GAS CONVERSIONS Gas conversions from Natural gas to LP gas or from LP gas to children and adults. 1. Gas supply line 2. Locate ...
... Do not overtighten. 12 Securely tighten all gas connections. Turn manual shutoff valve to do so can result in death, explosion, or fire. Unplug range or disconnect power. Flip the regulator cap over and replace the plastic cover. Install a shut-off valve. Connect anti-tip bracket to LP, have ... result in death or serious burns to Natural gas must be killed. Unscrew the regulator cap and remove the plastic cover. Examples of the range. GAS CONVERSIONS Gas conversions from Natural gas to LP gas or from LP gas to children and adults. 1. Gas supply line 2. Locate ...


