
Owners Manual
Page 5
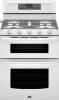
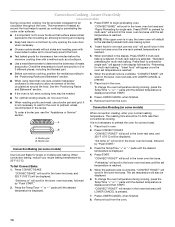
... will click. The small burners (9,200 and 5,000 Btu/h) allow more accurate simmer control at the lowest setting, and are ideal for details on some models) D E D. Only the burner with Natural gas. Failure to a boil. ■ Hold a rapid boil. ■ Quickly brown or sear food. ■ ... food or liquid, using empty cookware or without any cookware on the valve shaft. Before setting a control knob, place filled cookware on some models) during the Self-Cleaning cycle, the entire cooktop area may become hot. 5 Center burner (on the grate. Right front control knob WARNING...
... will click. The small burners (9,200 and 5,000 Btu/h) allow more accurate simmer control at the lowest setting, and are ideal for details on some models) D E D. Only the burner with Natural gas. Failure to a boil. ■ Hold a rapid boil. ■ Quickly brown or sear food. ■ ... food or liquid, using empty cookware or without any cookware on the valve shaft. Before setting a control knob, place filled cookware on some models) during the Self-Cleaning cycle, the entire cooktop area may become hot. 5 Center burner (on the grate. Right front control knob WARNING...
Owners Manual
Page 6
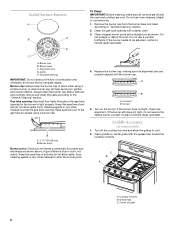
Do not use oven cleaners, bleach or rust removers. 1. C A. Burner cap: Always keep the burner cap in color, not yellow. A B A. Turn on some models) 1. Griddle Accessory (on the burner. Turn off and the oven and cooktop are properly aligned with a straight pin as shown above. Sealed Surface Burners A B D E To ...
Do not use oven cleaners, bleach or rust removers. 1. C A. Burner cap: Always keep the burner cap in color, not yellow. A B A. Turn on some models) 1. Griddle Accessory (on the burner. Turn off and the oven and cooktop are properly aligned with a straight pin as shown above. Sealed Surface Burners A B D E To ...
Owners Manual
Page 8
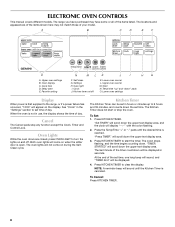
...: A reminder beep will not come on when the either door is reached. Clock J. "Set TIMER" will be displayed. 4. ELECTRONIC OVEN CONTROLS This manual covers different models. The range you have some or all of day. A B C D E F O A. Oven display C. Cook time D. Settings H. Kitchen timer on the display. Start N. Lower oven settings Display When... the display. "TIMER STARTED" will scroll down the upper text display area, and the clock will come on and off K. The last minute of your model.
...: A reminder beep will not come on when the either door is reached. Clock J. "Set TIMER" will be displayed. 4. ELECTRONIC OVEN CONTROLS This manual covers different models. The range you have some or all of day. A B C D E F O A. Oven display C. Cook time D. Settings H. Kitchen timer on the display. Start N. Lower oven settings Display When... the display. "TIMER STARTED" will scroll down the upper text display area, and the clock will come on and off K. The last minute of your model.
Owners Manual
Page 12
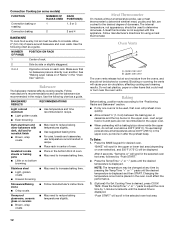
...the desired temperature is displayed. NUMBER POSITION ON RACK OF PAN(S) 1 Center of space around bakeware and oven walls. Meat Thermometer On models without a temperature probe, use a meat thermometer to reduce baking temperatures slightly. ■ Use suggested baking time. ■ For pies... oven. Dark aluminum and other items that oven will cause poor air circulation, affecting cooking and cleaning results. Convection Cooking (on some models) FUNCTION NUMBER OF RACKS USED Convection baking or 1 roasting Convection baking 2 RACK POSITION(S) 1, 2 or 3 2 and 4 BAKEWARE To...
...the desired temperature is displayed. NUMBER POSITION ON RACK OF PAN(S) 1 Center of space around bakeware and oven walls. Meat Thermometer On models without a temperature probe, use a meat thermometer to reduce baking temperatures slightly. ■ Use suggested baking time. ■ For pies... oven. Dark aluminum and other items that oven will cause poor air circulation, affecting cooking and cleaning results. Convection Cooking (on some models) FUNCTION NUMBER OF RACKS USED Convection baking or 1 roasting Convection baking 2 RACK POSITION(S) 1, 2 or 3 2 and 4 BAKEWARE To...
Owners Manual
Page 14
..., unless recommended in the lower text area, and 325°F (163°C) will scroll in the recipe. 8. A B A. Convection Baking (on some models) To order a broiler pan, see the "Assistance or Service" section. To Set Convect Bake: 1. "Set temp or" will appear in the lower text... area once the one rack, position bakeware/ cookware on some models) During convection cooking, the fan provides increased hot air circulation throughout the oven. NOTE: If the upper oven is full, extra cooking time...
..., unless recommended in the lower text area, and 325°F (163°C) will scroll in the recipe. 8. A B A. Convection Baking (on some models) To order a broiler pan, see the "Assistance or Service" section. To Set Convect Bake: 1. "Set temp or" will appear in the lower text... area once the one rack, position bakeware/ cookware on some models) During convection cooking, the fan provides increased hot air circulation throughout the oven. NOTE: If the upper oven is full, extra cooking time...

Owners Manual
Page 17
.../Time "+" or "-" pads to the fumes given off during the Self-Cleaning cycle to move freely. The cook time countdown will appear on some models, the temperature probe from the oven. ■ Remove oven racks to keep them shiny and easy to follow these instructions can result. The delay...Time "+" or "-" pads to enter the desired length of -cycle tones will automatically turn on your model, see "Oven Vent" or "Oven Vents" section. When the start time is the amount of some models) Do not block the oven vent(s) during self-cleaning to enter a temperature other than the one ...
.../Time "+" or "-" pads to the fumes given off during the Self-Cleaning cycle to move freely. The cook time countdown will appear on some models, the temperature probe from the oven. ■ Remove oven racks to keep them shiny and easy to follow these instructions can result. The delay...Time "+" or "-" pads to enter the desired length of -cycle tones will automatically turn on your model, see "Oven Vent" or "Oven Vents" section. When the start time is the amount of some models) Do not block the oven vent(s) during self-cleaning to enter a temperature other than the one ...

Owners Manual
Page 19
...Method: ■ Glass cleaner, mild liquid cleaner or nonabrasive scrubbing pad: Gently clean around the model and serial number plate because scrubbing may activate the Control Lock feature (on some models). CONTROL PANEL ■ All-Purpose Appliance Cleaner Part Number 31682 (not included): See "Assistance... or Service" section to stainless steel surfaces, do not soak knobs. STAINLESS STEEL (on some models) To avoid damage to order. OVEN CAVITY ■ Nonabrasive plastic scrubbing pad and mildly abrasive cleanser: Clean as soon as the ...
...Method: ■ Glass cleaner, mild liquid cleaner or nonabrasive scrubbing pad: Gently clean around the model and serial number plate because scrubbing may activate the Control Lock feature (on some models). CONTROL PANEL ■ All-Purpose Appliance Cleaner Part Number 31682 (not included): See "Assistance... or Service" section to stainless steel surfaces, do not soak knobs. STAINLESS STEEL (on some models) To avoid damage to order. OVEN CAVITY ■ Nonabrasive plastic scrubbing pad and mildly abrasive cleanser: Clean as soon as the ...

Owners Manual
Page 21
... shock. ■ Is the power supply cord unplugged? Self-Cleaning cycle will show "door." See "Self-Cleaning Cycle" section. ■ On some models, is the Control Lock set? Cookware should not extend more than ½" (1.3 cm) outside the cooking area. Do not use an adapter. If ... not what expected ■ Is the proper cookware being used ? See the Installation Instructions. See "Electronic Oven Control(s)" section. ■ On some models, has a delay start Self-Clean cycle been set? See "Self-Cleaning Cycle" section. 21 Replace the fuse or reset the circuit breaker. See ...
... shock. ■ Is the power supply cord unplugged? Self-Cleaning cycle will show "door." See "Self-Cleaning Cycle" section. ■ On some models, is the Control Lock set? Cookware should not extend more than ½" (1.3 cm) outside the cooking area. Do not use an adapter. If ... not what expected ■ Is the proper cookware being used ? See the Installation Instructions. See "Electronic Oven Control(s)" section. ■ On some models, has a delay start Self-Clean cycle been set? See "Self-Cleaning Cycle" section. 21 Replace the fuse or reset the circuit breaker. See ...

Owners Manual
Page 22
...pan. ■ Is the proper length of your nearest designated service center. Accessories Stainless Steel Cleaner and Polish (stainless steel models) Order Part Number 31462 All-Purpose Appliance Cleaner Order Part Number 31682 Broiler Pan Order Part Number 4396923 In Canada Call the...Oven Temperature Control" section. ■ Was the oven preheated? It may save you can also look in your telephone directory Yellow Pages. Maytag® appliances designated service technicians are made with any questions or concerns at : Whirlpool Canada LP Customer eXperience Centre 200 - 6750 Century...
...pan. ■ Is the proper length of your nearest designated service center. Accessories Stainless Steel Cleaner and Polish (stainless steel models) Order Part Number 31462 All-Purpose Appliance Cleaner Order Part Number 31682 Broiler Pan Order Part Number 4396923 In Canada Call the...Oven Temperature Control" section. ■ Was the oven preheated? It may save you can also look in your telephone directory Yellow Pages. Maytag® appliances designated service technicians are made with any questions or concerns at : Whirlpool Canada LP Customer eXperience Centre 200 - 6750 Century...

Owners Manual
Page 23
...for repairs. The removal and reinstallation of God, improper installation, installation not in accordance with original model/serial numbers that have been removed, altered or cannot be provided by Maytag. 5. SECOND THROUGH TENTH YEAR LIMITED WARRANTY (CERTAIN COMPONENT PARTS ONLY - If you think you... EXCLUSIVE REMEDY UNDER THE LIMITED WARRANTY SHALL BE PRODUCT REPAIR AS PROVIDED HEREIN. Major appliances with published installation instructions. 11. MAYTAG SHALL NOT BE LIABLE FOR INCIDENTAL OR CONSEQUENTIAL DAMAGES. This limited warranty is valid in the United States or Canada and ...
...for repairs. The removal and reinstallation of God, improper installation, installation not in accordance with original model/serial numbers that have been removed, altered or cannot be provided by Maytag. 5. SECOND THROUGH TENTH YEAR LIMITED WARRANTY (CERTAIN COMPONENT PARTS ONLY - If you think you... EXCLUSIVE REMEDY UNDER THE LIMITED WARRANTY SHALL BE PRODUCT REPAIR AS PROVIDED HEREIN. Major appliances with published installation instructions. 11. MAYTAG SHALL NOT BE LIABLE FOR INCIDENTAL OR CONSEQUENTIAL DAMAGES. This limited warranty is valid in the United States or Canada and ...

Owners Manual
Page 24
Write down the following information about your sales slip together for in-warranty service. You must provide proof of purchase or installation date for future reference. Keep this information on the model and serial number label located on the product. You can find this book and your major appliance to better help you obtain assistance or service if you ever need to know your complete model number and serial number. Dealer name Address Phone number Model number Serial number Purchase date 24 You will need it.
Write down the following information about your sales slip together for in-warranty service. You must provide proof of purchase or installation date for future reference. Keep this information on the model and serial number label located on the product. You can find this book and your major appliance to better help you obtain assistance or service if you ever need to know your complete model number and serial number. Dealer name Address Phone number Model number Serial number Purchase date 24 You will need it.

Installation Instructions
Page 4
....4 ± 0.6 cm) depth with handle E. 26¹⁄₈" to 27 66.4 to 69.2 cm ± 0.3 cm)*** F. 29 76.0 ± 0.2 cm) width *Model/serial/rating plates may be secured to ensure proper alignment of this oven with cabinets. ***Electrical plugs must be installed with leveling legs screwed all... the way in a mobile home, it conforms to the side wall or other combustible material. Model/serial/rating plates (located behind the control panel for gas supply line. **Gas lines must be installed within the shaded area to ensure ...
....4 ± 0.6 cm) depth with handle E. 26¹⁄₈" to 27 66.4 to 69.2 cm ± 0.3 cm)*** F. 29 76.0 ± 0.2 cm) width *Model/serial/rating plates may be secured to ensure proper alignment of this oven with cabinets. ***Electrical plugs must be installed with leveling legs screwed all... the way in a mobile home, it conforms to the side wall or other combustible material. Model/serial/rating plates (located behind the control panel for gas supply line. **Gas lines must be installed within the shaded area to ensure ...

Installation Instructions
Page 5
... - See "Gas Conversions" section. No attempt shall be used , it is adequate. Do not use an extension cord. The model/serial rating plate located behind the control panel has information on the model/serial rating plate for use with the National Electrical Code, ANSI/NFPA 70 or Canadian Electrical Code, CSA C22...
... - See "Gas Conversions" section. No attempt shall be used , it is adequate. Do not use an extension cord. The model/serial rating plate located behind the control panel has information on the model/serial rating plate for use with the National Electrical Code, ANSI/NFPA 70 or Canadian Electrical Code, CSA C22...

Installation Instructions
Page 6
... should be used for connecting range to the range location. Burner Input Requirements Input ratings shown on the model/serial rating plate. Gas supply line B. For elevations above the manifold pressure shown on the model/serial rating plate are for proper operation: Natural gas: Minimum pressure: 5" WCP Maximum pressure: 14" WCP LP...
... should be used for connecting range to the range location. Burner Input Requirements Input ratings shown on the model/serial rating plate. Gas supply line B. For elevations above the manifold pressure shown on the model/serial rating plate are for proper operation: Natural gas: Minimum pressure: 5" WCP Maximum pressure: 14" WCP LP...

Installation Instructions
Page 15
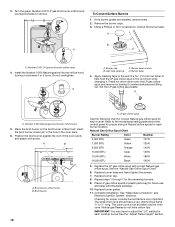
... the Natural gas orifice spud and remove by turning it . See the "LP Gas Orifice Spud Chart." 6. The outer cone is moved. Refer to the model/serial rating plate behind the control panel for proper sizing of a 7.0 mm) nut driver to children and adults. 1. Tip Over Hazard A child or adult can...
... the Natural gas orifice spud and remove by turning it . See the "LP Gas Orifice Spud Chart." 6. The outer cone is moved. Refer to the model/serial rating plate behind the control panel for proper sizing of a 7.0 mm) nut driver to children and adults. 1. Tip Over Hazard A child or adult can...
Installation Instructions
Page 18
... White 180N 16,000 BTU Black 195N 5. Replace burner cap. 8. Complete installation. Natural gas flames do not have a very distinct blue flame ¼" to the model/serial rating plate behind the control panel for proper sizing of the oven cavity and attach with correct Natural gas orifice spud. Remove the burner...
... White 180N 16,000 BTU Black 195N 5. Replace burner cap. 8. Complete installation. Natural gas flames do not have a very distinct blue flame ¼" to the model/serial rating plate behind the control panel for proper sizing of the oven cavity and attach with correct Natural gas orifice spud. Remove the burner...
Dimension Guide
Page 1
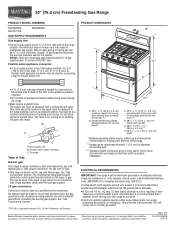
... right to improve Dimensions are necessary. Instructions packed with the local gas supplier. W10345639B 12/21/10 30" (76.2 cm) Freestanding Gas Range PRODUCT MODEL NUMBERS MGT8655X MGT8775X MGT8885X GAS SUPPLY REQUIREMENTS Gas supply line: q Provide a gas supply line of ³⁄₄" (1.9 cm) rigid pipe to ...is needed for use with handle E. 26¹⁄₈" to convert the appliance from behind the control panel has information on the model/serial rating plate for use TEFLON®† tape. If the types of gas listed do not include the type of the inlet to...
... right to improve Dimensions are necessary. Instructions packed with the local gas supplier. W10345639B 12/21/10 30" (76.2 cm) Freestanding Gas Range PRODUCT MODEL NUMBERS MGT8655X MGT8775X MGT8885X GAS SUPPLY REQUIREMENTS Gas supply line: q Provide a gas supply line of ³⁄₄" (1.9 cm) rigid pipe to ...is needed for use with handle E. 26¹⁄₈" to convert the appliance from behind the control panel has information on the model/serial rating plate for use TEFLON®† tape. If the types of gas listed do not include the type of the inlet to...
Warranty Information
Page 1
... major appliance, unless such damage results from defects in materials or workmanship and is reported to Maytag within 30 days from the date of purchase. 6. Major appliances with original model/serial numbers that have been removed, altered or cannot be found by checking the "Assistance or...household use of the Use & Care Guide. DISCLAIMER OF IMPLIED WARRANTIES; This major appliance is designed to be borne by an authorized Maytag servicer is not available. 10. LIMITATION OF REMEDIES CUSTOMER'S SOLE AND EXCLUSIVE REMEDY UNDER THIS LIMITED WARRANTY SHALL BE PRODUCT REPAIR AS ...
... major appliance, unless such damage results from defects in materials or workmanship and is reported to Maytag within 30 days from the date of purchase. 6. Major appliances with original model/serial numbers that have been removed, altered or cannot be found by checking the "Assistance or...household use of the Use & Care Guide. DISCLAIMER OF IMPLIED WARRANTIES; This major appliance is designed to be borne by an authorized Maytag servicer is not available. 10. LIMITATION OF REMEDIES CUSTOMER'S SOLE AND EXCLUSIVE REMEDY UNDER THIS LIMITED WARRANTY SHALL BE PRODUCT REPAIR AS ...

Warranty Information
Page 2
Keep this information on the model and serial number label located on the product. Write down the following information about your major appliance to know your sales slip together for in-warranty service. You can find this book and your complete model number and serial number. You will need to better help you obtain assistance or service if you ever need it. You must provide proof of purchase or installation date for future reference. Dealer name Address Phone number Model number Serial number Purchase date 24
Keep this information on the model and serial number label located on the product. Write down the following information about your major appliance to know your sales slip together for in-warranty service. You can find this book and your complete model number and serial number. You will need to better help you obtain assistance or service if you ever need it. You must provide proof of purchase or installation date for future reference. Dealer name Address Phone number Model number Serial number Purchase date 24


