
Owners Manual
Page 5
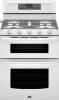
..., call a trained repair specialist. Right rear control knob E. Push in and turn the burner off all controls when not cooking. All the surface burners will produce a flame. 2. Do not operate a burner while using empty cookware or without any cookware on the grate. Left rear control knob B C C. Right front control knob WARNING Cooktop Controls To...
..., call a trained repair specialist. Right rear control knob E. Push in and turn the burner off all controls when not cooking. All the surface burners will produce a flame. 2. Do not operate a burner while using empty cookware or without any cookware on the grate. Left rear control knob B C C. Right front control knob WARNING Cooktop Controls To...
Owners Manual
Page 6
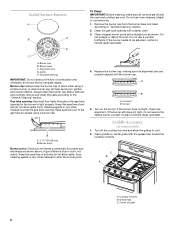
... freely throughout the gas tube opening with the grease trap toward the cooktop controls. Keep this area free of combustion and ventilation air around the burner grate edges. Replace the burner cap, making sure the alignment pins are properly aligned with a straight pin as shown above. Correct 5. If the...
... freely throughout the gas tube opening with the grease trap toward the cooktop controls. Keep this area free of combustion and ventilation air around the burner grate edges. Replace the burner cap, making sure the alignment pins are properly aligned with a straight pin as shown above. Correct 5. If the...
Owners Manual
Page 7
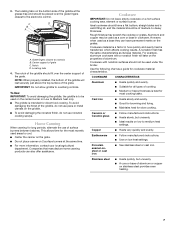
...very quickly and evenly. To Use: IMPORTANT: To avoid damaging the griddle, the griddle is to be used on the center burner on the properties of the grate. A nonstick finish has the same characteristics as a base they can also offer assistance. For example, aluminum cookware with nonstick ... Aluminum ■ Heats quickly and evenly. ■ Suitable for all types of aluminum or copper on 2 surface burners at the grease trap end should fit over the grate fingers closest to Medium heat only. ■ The griddle is best for direct food cooking. Cookware IMPORTANT: Do ...
...very quickly and evenly. To Use: IMPORTANT: To avoid damaging the griddle, the griddle is to be used on the center burner on the properties of the grate. A nonstick finish has the same characteristics as a base they can also offer assistance. For example, aluminum cookware with nonstick ... Aluminum ■ Heats quickly and evenly. ■ Suitable for all types of aluminum or copper on 2 surface burners at the grease trap end should fit over the grate fingers closest to Medium heat only. ■ The griddle is best for direct food cooking. Cookware IMPORTANT: Do ...

Owners Manual
Page 19
...cookware. Do not remove seals under knobs, if present. Cleaning Method: Rub in direction of vegetable oil applied to order. Cooked-on burners while they will help them slide. ■ Steel-wool pad 19 Cleaning Method: ■ Self-Cleaning cycle: See "Self-Cleaning Cycle"...the oven and cooktop are suggested first unless otherwise noted. General Cleaning IMPORTANT: Before cleaning, make sure knobs are cool. ■ Dishwasher (grates only, not caps): Use the most aggressive cycle. To avoid damage, do not use oven cleaners. These spills may remove numbers. Cleaning ...
...cookware. Do not remove seals under knobs, if present. Cleaning Method: Rub in direction of vegetable oil applied to order. Cooked-on burners while they will help them slide. ■ Steel-wool pad 19 Cleaning Method: ■ Self-Cleaning cycle: See "Self-Cleaning Cycle"...the oven and cooktop are suggested first unless otherwise noted. General Cleaning IMPORTANT: Before cleaning, make sure knobs are cool. ■ Dishwasher (grates only, not caps): Use the most aggressive cycle. To avoid damage, do not use oven cleaners. These spills may remove numbers. Cleaning ...

Owners Manual
Page 23
...according to instructions attached to or furnished with electrical or plumbing codes, or use of consumables or cleaning products not approved by Maytag. 5. SECOND THROUGH TENTH YEAR LIMITED WARRANTY (CERTAIN COMPONENT PARTS ONLY - This limited warranty is contrary to published user or ...of the original consumer purchase. MAYTAG SHALL NOT BE LIABLE FOR INCIDENTAL OR CONSEQUENTIAL DAMAGES. If you think you on the below named parts only and does not include labor. ■ Burner grates ■ Gas surface burners ■ Gas bake/broil burners (excludes convection element) YOUR ...
...according to instructions attached to or furnished with electrical or plumbing codes, or use of consumables or cleaning products not approved by Maytag. 5. SECOND THROUGH TENTH YEAR LIMITED WARRANTY (CERTAIN COMPONENT PARTS ONLY - This limited warranty is contrary to published user or ...of the original consumer purchase. MAYTAG SHALL NOT BE LIABLE FOR INCIDENTAL OR CONSEQUENTIAL DAMAGES. If you think you on the below named parts only and does not include labor. ■ Burner grates ■ Gas surface burners ■ Gas bake/broil burners (excludes convection element) YOUR ...

Installation Instructions
Page 3
... with literature package) Anti-tip bracket must conform to children and adults. Mobile Home - Additional Installation Requirements The installation of range near lower side) ■ Burner grates ■ Burner caps ■ Oven racks ■ 2 - #12 x 1⁵⁄₈" screws (for Manufactured Home Installations, ANSI A225.1/NFPA 501A or with the range, see "Install...
... with literature package) Anti-tip bracket must conform to children and adults. Mobile Home - Additional Installation Requirements The installation of range near lower side) ■ Burner grates ■ Burner caps ■ Oven racks ■ 2 - #12 x 1⁵⁄₈" screws (for Manufactured Home Installations, ANSI A225.1/NFPA 501A or with the range, see "Install...

Installation Instructions
Page 9
...Using 2 or more people, gently move range into position. 5. Complete connection 1. A. Place burner grates over burners and caps. When the cooktop control knob is turned to side; The first time a burner is indicated. WARNING Electrical Shock Hazard Plug into a grounded 3 prong outlet. NOTE: Range ...leveling legs up . If range is not level, pull range forward until range is under the range. Remove cooktop burner caps and grates from parts package. This sparking continues, as long as the control knob is installed, use pilotless igniters in place of...
...Using 2 or more people, gently move range into position. 5. Complete connection 1. A. Place burner grates over burners and caps. When the cooktop control knob is turned to side; The first time a burner is indicated. WARNING Electrical Shock Hazard Plug into a grounded 3 prong outlet. NOTE: Range ...leveling legs up . If range is not level, pull range forward until range is under the range. Remove cooktop burner caps and grates from parts package. This sparking continues, as long as the control knob is installed, use pilotless igniters in place of...

Installation Instructions
Page 15
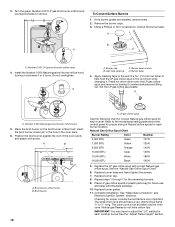
...adjust the "LO" setting for each cooktop burner. To Convert Surface Burners 1. Burner base screws D. Set the Natural gas orifice spud aside. B A C A. If the burner grates are installed, remove them. 2. Remove the burner caps. 3. Burner cap B. Burner base 4. Apply masking tape to follow these...BTU Green 14,000 BTU Red Number 64L 81L 97L 114L 5. Replace burner base and hand tighten the screws. 7. Repeat steps 1 through 7 for each burner location. Replace burner grates. 11. Complete installation. See "Make Gas Connection" and Electronic Ignition ...
...adjust the "LO" setting for each cooktop burner. To Convert Surface Burners 1. Burner base screws D. Set the Natural gas orifice spud aside. B A C A. If the burner grates are installed, remove them. 2. Remove the burner caps. 3. Burner cap B. Burner base 4. Apply masking tape to follow these...BTU Green 14,000 BTU Red Number 64L 81L 97L 114L 5. Replace burner base and hand tighten the screws. 7. Repeat steps 1 through 7 for each burner location. Replace burner grates. 11. Complete installation. See "Make Gas Connection" and Electronic Ignition ...
Installation Instructions
Page 18
... of a 7.0 mm) nut driver to ½" long. Number 0.054 Natural gas broil burner orifice hood 5. Broil burner orifice hood B. LP gas orifice spud Use the following chart for correct Natural gas orifice spud for each burner. Refer to remove. If the burner grates are installed, remove them. 2. A C B D A. Set the LP gas orifice spud aside. The...
... of a 7.0 mm) nut driver to ½" long. Number 0.054 Natural gas broil burner orifice hood 5. Broil burner orifice hood B. LP gas orifice spud Use the following chart for correct Natural gas orifice spud for each burner. Refer to remove. If the burner grates are installed, remove them. 2. A C B D A. Set the LP gas orifice spud aside. The...
Warranty Information
Page 1
... major appliance, to instruct you on the below named parts only and does not include labor. ■ Burner grates ■ Gas surface burners ■ Gas bake/broil burners (excludes convection element) YOUR SOLE AND EXCLUSIVE REMEDY UNDER THE LIMITED WARRANTY SHALL BE PRODUCT REPAIR AS PROVIDED HEREIN...location or is not installed in accordance with published installation instructions. 11. The cost of repair or replacement under this warranty. 8. MAYTAG® GAS RANGE LIMITED WARRANTY FIRST YEAR LIMITED WARRANTY (PARTS AND LABOR) For one year from the date of purchase, when ...
... major appliance, to instruct you on the below named parts only and does not include labor. ■ Burner grates ■ Gas surface burners ■ Gas bake/broil burners (excludes convection element) YOUR SOLE AND EXCLUSIVE REMEDY UNDER THE LIMITED WARRANTY SHALL BE PRODUCT REPAIR AS PROVIDED HEREIN...location or is not installed in accordance with published installation instructions. 11. The cost of repair or replacement under this warranty. 8. MAYTAG® GAS RANGE LIMITED WARRANTY FIRST YEAR LIMITED WARRANTY (PARTS AND LABOR) For one year from the date of purchase, when ...


