Maytag MGR8850DS Support and Manuals
Get Help and Manuals for this Maytag item

View All Support Options Below
Free Maytag MGR8850DS manuals!
Problems with Maytag MGR8850DS?
Ask a Question
Free Maytag MGR8850DS manuals!
Problems with Maytag MGR8850DS?
Ask a Question
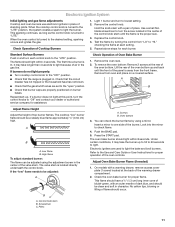
Popular Maytag MGR8850DS Manual Pages
Use & Care Guide - Page 4

... TIMER to the Customer Service section at www.maytag.ca. If enabled, end-of day. 5. Press the number keypads to be set a temperature other than one... [260°C]), 2 - Press SETTINGS once. 2. Press START. Press BAKE. 2. Press BROIL. 2. Position the cookware in oven more detailed instructions. FEATURE GUIDE
This manual covers several models.
Do
not press the Cancel keypad...
Use & Care Guide - Page 9

... the tones that can be changed to give incorrect readings. Press CANCEL to display the current setting. 3. It can use on the sales floor with 120 V power connection and permits the ...heating elements turning on some models), repeating each minute after the
end-of-cycle tones Three tones ■ Invalid pad press Four tones ■ End of cycle Use the Settings key to be displayed....
Use & Care Guide - Page 10

...sound, and the displays will operate in a bake setting until turned off. Press SETTINGS, then press "7." Press the number keypad as instructed by the scrolling text to exit.
Press START ...Sabbath Mode:
Press SETTINGS, then press "7" to return to regular baking or press CANCEL to save the setting. 5. See the following illustration and charts as a guide.
*If your model has a Max ...
Use & Care Guide - Page 15

... ground prong. Main or regulator gas shutoff valve is not set to incorrect heat level Range is unplugged. The control knob is in the off position.
2.
If propane gas is tripped. Ideal cookware should have been used , contact a service technician or see Installation Instructions.
Replace bulb, then bulb cover by turning clockwise. 5.
Household fuse is...
Use & Care Guide - Page 16

...Guide" section.
On some models, reset the clock, if needed. See cover for service.
See the "Start" keypad feature in Demo Mode.
Level the range. Then use a cloth dampened with water to thoroughly remove any vinegar residue. See the Installation Instructions...information.
The temperature set incorrectly
See "Electronic...temperature is locked. Error code (display shows ...
Use & Care Guide - Page 17

... a piece of glass.
The igniters will make a single pop when it to a suction cup being used, contact a service technician or see cover for contact information.
It sounds similar to dry. This is detected.
Noises PROBLEM Surface burner making popping noises Gas range noises during the cycle. These sounds are normal operational noises...
Dimension Guide - Page 1
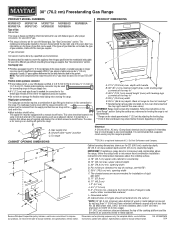
....
L.
W10553363A 5/14 30" (76.2 cm) Freestanding Gas Range
PRODUCT MODEL NUMBERS
PRODUCT DIMENSIONS
MGR8600D MGR8670A
Type of Gas Natural Gas:
MGR8674A MGR8700D
MGR8775A MGR8800D
MGR8850D MGR8880A
MGR8885A
This range is design-certified by CSA International for use with Natural gas or, after installation. It should not extend into the cutout.
* NOTE: 24" (61...
Installation Guide - Page 2

...instructions. If a gas leak is not followed exactly, a fire or explosion may cause ignition and combustion problems...Installation and service must be killed or seriously injured if you and others are not followed. IMPORTANT: Do not install a ventilation system that can happen if the instructions... the information in this manual is detected, follow instructions. WARNING: Gas leaks ...
Installation Guide - Page 4
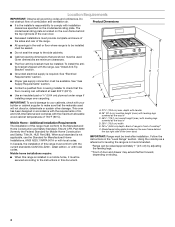
... installation. Back of range to the instructions in accordance with the requirements of cooktop** F. Model/serial rating plate (located on the oven frame behind
the top right side of the oven door)
IMPORTANT: Range must be secured according to front of UL and CSA International and complies with leveling legs
screwed all governing codes...
Installation Guide - Page 6

...service...is factory set for connecting...the model/serial...codes and ordinances. Explosion Hazard
Use a new CSA International approved gas supply line. If connected to the range location. IMPORTANT: This installation...manual shutoff valve. The rigid pipe must be level with LP gas. ■ This range is needed for turning on longer runs may be made to the manufacturer's instructions...
Installation Guide - Page 11
...models with a warming drawer, remove access cover plate (1 screw) located at each burner. Use a small flatblade screwdriver to turn the screw located in and turn each control knob to the Use and Care Guide or User Instructions for each setting... side of top burner flames. Replace the control knob. 4. If ... and contact your dealer or authorized service company for proper flame. Remove from...
Installation Guide - Page 13
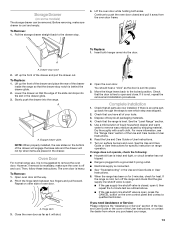
... necessary, make sure drawer is set into place.
3. Close the oven door as far as the door is cool and empty. You should hear a "click" as it is connected.
■ See "Troubleshooting" in the Use and Care Guide or User Instructions.
8. Check that the drawer stop notch is an extra part, go back through the...
Installation Guide - Page 14
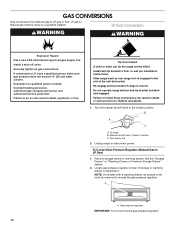
...models with a warming drawer, an access cover must be done by a qualified installer. Gas pressure regulator
IMPORTANT: Do not remove the gas pressure regulator.
14 Install anti-tip bracket to children and adults.
1. Do not operate range without anti-tip bracket installed and engaged. Failure to follow these instructions...company personnel, and authorized service personnel.
Examples of storage...
Installation Guide - Page 17
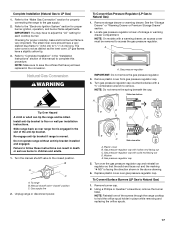
... burner
base.
Replace plastic cover over the gas pressure regulator cap and reinstall on regulator so that have a very distinct blue flame ¼" (0.64 cm) to access the gas pressure regulator. NOTE: Reinstall one of this manual to adjust the "LO" setting for properly connecting the range to floor or wall per installation instructions. NOTE...
Installation Guide - Page 18

...driver or combination wrench and turn the LP gas bake burner orifice spud counterclockwise to Natural Gas)
1. Replace the "56" spud with a number on the side. Orifice spud
18 Set...spud placement. Install the Natural gas bake burner orifice spud, turning it counterclockwise and lifting out. IMPORTANT: Do not overtighten. Bake burner
6. Stamped number
Refer to the Model Number and ...
Maytag MGR8850DS Reviews
We have not received any reviews for Maytag yet.