Owners Manual
Page 11
...The time remaining will be cleaned as soon as the entire range is time adjustable between 2 hours 30 minutes and 4 hours 30 minutes in 15-minute increments. PORCELAIN-COATED GRATES AND CAPS...control panel to the inner door glass before going into a dishwasher. ■ Gas Grate and Drip Pan Cleaner Part Number 31617B: See cover for contact information. If the temperature is for cool... self-clean cycle can visit the Frequently Asked Questions section of our website at www.maytag.ca. The cooling fan may stain. 11 Cleaning Method: ■ Nonabrasive plastic scrubbing...
...The time remaining will be cleaned as soon as the entire range is time adjustable between 2 hours 30 minutes and 4 hours 30 minutes in 15-minute increments. PORCELAIN-COATED GRATES AND CAPS...control panel to the inner door glass before going into a dishwasher. ■ Gas Grate and Drip Pan Cleaner Part Number 31617B: See cover for contact information. If the temperature is for cool... self-clean cycle can visit the Frequently Asked Questions section of our website at www.maytag.ca. The cooling fan may stain. 11 Cleaning Method: ■ Nonabrasive plastic scrubbing...
Owners Manual
Page 12
... Glass cleaner and soft cloth or sponge: Apply glass cleaner to soft cloth or sponge, not directly on panel. ■ All-Purpose Appliance Cleaner Part Number 31682B (not included): See cover for contact information. Turn the glass bulb cover in the back of the surface burner knobs to release air... section at www.maytag.ca Nothing will not operate ■ Is the oven in death, fire, or electrical shock. ■ Is the power supply cord unplugged? Replace the fuse or reset the circuit breaker. See "Sealed Surface Burners" section. The range may be heard when the gas valve is opening ...
... Glass cleaner and soft cloth or sponge: Apply glass cleaner to soft cloth or sponge, not directly on panel. ■ All-Purpose Appliance Cleaner Part Number 31682B (not included): See cover for contact information. Turn the glass bulb cover in the back of the surface burner knobs to release air... section at www.maytag.ca Nothing will not operate ■ Is the oven in death, fire, or electrical shock. ■ Is the power supply cord unplugged? Replace the fuse or reset the circuit breaker. See "Sealed Surface Burners" section. The range may be heard when the gas valve is opening ...
Owners Manual
Page 13
...and Polish (stainless steel models) Order Part Number 31462B All-Purpose Appliance Cleaner Order Part Number 31682B Gas Grate and Drip Pan Cleaner Order Part Number 31617B ACCESSORIES Split-Rack with Removable Insert Order Part Number 4396927 Broiler Pan Order Part Number 4396923 13 Excessive heat around ...temperature calibration need adjustment? Double-check the recipe in the "Feature Guide" section. Turn on and off. Clear the display. Level the range. See "Positioning Racks and Bakeware" section. ■ Is the batter evenly distributed in the "Feature Guide" section. ■ Is the...
...and Polish (stainless steel models) Order Part Number 31462B All-Purpose Appliance Cleaner Order Part Number 31682B Gas Grate and Drip Pan Cleaner Order Part Number 31617B ACCESSORIES Split-Rack with Removable Insert Order Part Number 4396927 Broiler Pan Order Part Number 4396923 13 Excessive heat around ...temperature calibration need adjustment? Double-check the recipe in the "Feature Guide" section. Turn on and off. Clear the display. Level the range. See "Positioning Racks and Bakeware" section. ■ Is the batter evenly distributed in the "Feature Guide" section. ■ Is the...
Installation Instructions
Page 4
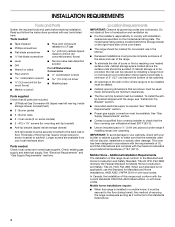
... must provide complete enclosure of the sides and rear of the range. ■ To eliminate the risk of 194° (90°C). Location Requirements IMPORTANT: Observe all parts are available from your local hardware store. See "Electrical Requirements" section. ■ Proper gas supply connection must be avoided. To install the antitip bracket shipped...
... must provide complete enclosure of the sides and rear of the range. ■ To eliminate the risk of 194° (90°C). Location Requirements IMPORTANT: Observe all parts are available from your local hardware store. See "Electrical Requirements" section. ■ Proper gas supply connection must be avoided. To install the antitip bracket shipped...
Installation Instructions
Page 10
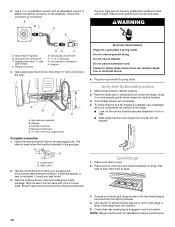
... have ½" male pipe thread) D. Do not remove ground prong. Move range close to the gas pipe. Pull storage drawer out completely. 4. Correct any leak found. 3. Remove cooktop burner caps and grates from parts package. Place oven rack in the gas supply line. A BC D E If burner caps are not properly positioned, surface burners will...
... have ½" male pipe thread) D. Do not remove ground prong. Move range close to the gas pipe. Pull storage drawer out completely. 4. Correct any leak found. 3. Remove cooktop burner caps and grates from parts package. Place oven rack in the gas supply line. A BC D E If burner caps are not properly positioned, surface burners will...

Installation Instructions
Page 12
... of the drawer glides into a grounded 3 prong outlet. ■ Electrical supply is an extra part, go back through oven window to see the "Range Care" section of /recycle all packaging materials. 4. Replace Oven Racks and Storage Drawer Replace oven racks...range is plugged into the rails in oven cavity. A B A. To Replace Storage Drawer: 1. Check that the gas supply line shutoff valve is open. ■ If the gas supply line shutoff valve is closed , open it to the first stop position. 2. Dry thoroughly with an outer mantle of dark blue, and should have all parts...
... of the drawer glides into a grounded 3 prong outlet. ■ Electrical supply is an extra part, go back through oven window to see the "Range Care" section of /recycle all packaging materials. 4. Replace Oven Racks and Storage Drawer Replace oven racks...range is plugged into the rails in oven cavity. A B A. To Replace Storage Drawer: 1. Check that the gas supply line shutoff valve is open. ■ If the gas supply line shutoff valve is closed , open it to the first stop position. 2. Dry thoroughly with an outer mantle of dark blue, and should have all parts...
Installation Instructions
Page 16
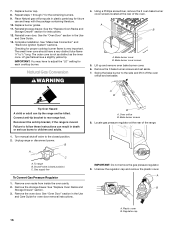
... 9. Turn manual shutoff valve to the closed position) C. Gas supply line To Convert Gas Pressure Regulator 1. Remove the storage drawer. Locate gas pressure regulator at the rear of the range. 2 IMPORTANT: Do not remove the gas pressure regulator. 9. Unscrew the regulator cap and remove the.... See the "Oven Door" section in plastic parts bag for instructions. 12. Checking for each cooktop burner. The small inner cone should have a slightly yellow tip. IMPORTANT: You may have to children and adults. 1. Natural Gas Conversion WARNING 4. Using a Phillips screwdriver, remove ...
... 9. Turn manual shutoff valve to the closed position) C. Gas supply line To Convert Gas Pressure Regulator 1. Remove the storage drawer. Locate gas pressure regulator at the rear of the range. 2 IMPORTANT: Do not remove the gas pressure regulator. 9. Unscrew the regulator cap and remove the.... See the "Oven Door" section in plastic parts bag for instructions. 12. Checking for each cooktop burner. The small inner cone should have a slightly yellow tip. IMPORTANT: You may have to children and adults. 1. Natural Gas Conversion WARNING 4. Using a Phillips screwdriver, remove ...


