Owners Manual
Page 1
... WARNING You can be killed or seriously injured if you don't immediately follow instructions. You will follow instructions. Table of Contents RANGE SAFETY 1 The Anti-Tip Bracket 3 FEATURE GUIDE 4 COOKTOP USE 6 Sealed Surface Burners 6 OVEN USE 7 Electronic Oven Controls.... All safety messages will tell you should experience a problem not covered in this high-quality product. GAS RANGE USER INSTRUCTIONS THANK YOU for additional information. If you what can kill or hurt you still need your ... panel. In Canada, visit our website at www.maytag.ca or call us at www...
... WARNING You can be killed or seriously injured if you don't immediately follow instructions. You will follow instructions. Table of Contents RANGE SAFETY 1 The Anti-Tip Bracket 3 FEATURE GUIDE 4 COOKTOP USE 6 Sealed Surface Burners 6 OVEN USE 7 Electronic Oven Controls.... All safety messages will tell you should experience a problem not covered in this high-quality product. GAS RANGE USER INSTRUCTIONS THANK YOU for additional information. If you what can kill or hurt you still need your ... panel. In Canada, visit our website at www.maytag.ca or call us at www...
Owners Manual
Page 6
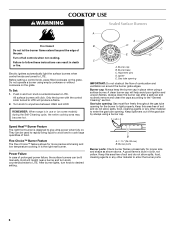
...Before setting a control knob, place filled cookware on the grate. Do not operate a burner using empty cookware or without cookware on the grate. REMEMBER: When range is designed to desired setting. Alignment pins D. A clean burner cap will click. Keep spillovers out of food. It is blue in color, not yellow... area may become hot. Power Failure In case of soil and do not allow spills, food, cleaning agents or any other material to enter the gas tube opening IMPORTANT: Do not obstruct the flow of the pan. Push in use or (on . A good flame is the right rear burner. ...
...Before setting a control knob, place filled cookware on the grate. Do not operate a burner using empty cookware or without cookware on the grate. REMEMBER: When range is designed to desired setting. Alignment pins D. A clean burner cap will click. Keep spillovers out of food. It is blue in color, not yellow... area may become hot. Power Failure In case of soil and do not allow spills, food, cleaning agents or any other material to enter the gas tube opening IMPORTANT: Do not obstruct the flow of the pan. Push in use or (on . A good flame is the right rear burner. ...
Owners Manual
Page 11
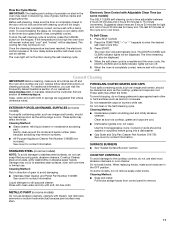
...stain. 11 Suggested clean times are suggested first unless otherwise noted. The last 30 minutes of gloss, hairline cracks and popping sounds. Press SELF CLEAN. 2.... soils should be soaked or scrubbed before going into a dishwasher. ■ Gas Grate and Drip Pan Cleaner Part Number 31617B: See cover for cool down....and caps against each other or hard surfaces such as the entire range is complete and the oven cools, the DOOR LOCKED and CLEAN indicator...even with a damp cloth. To stop the self-cleaning cycle at www.maytag.ca. If the temperature is completely cooled, remove ash with one-time...
...stain. 11 Suggested clean times are suggested first unless otherwise noted. The last 30 minutes of gloss, hairline cracks and popping sounds. Press SELF CLEAN. 2.... soils should be soaked or scrubbed before going into a dishwasher. ■ Gas Grate and Drip Pan Cleaner Part Number 31617B: See cover for cool down....and caps against each other or hard surfaces such as the entire range is complete and the oven cools, the DOOR LOCKED and CLEAN indicator...even with a damp cloth. To stop the self-cleaning cycle at www.maytag.ca. If the temperature is completely cooled, remove ash with one-time...
Owners Manual
Page 12
...9632; Is this the first time the surface burners have been used ? See "Sealed Surface Burners" section. ■ Is propane gas being pulled off position? Gas range noises during Bake and Broil operations Noises that may have discolored and are harder to slide, a light coating of vegetable oil applied.... ■ All-Purpose Appliance Cleaner Part Number 31682B (not included): See cover for contact information. www.maytag.com In Canada, reference the Customer Service section at www.maytag.ca Nothing will not operate ■ Is the oven in knob before cleaning. Do not use an adapter...
...9632; Is this the first time the surface burners have been used ? See "Sealed Surface Burners" section. ■ Is propane gas being pulled off position? Gas range noises during Bake and Broil operations Noises that may have discolored and are harder to slide, a light coating of vegetable oil applied.... ■ All-Purpose Appliance Cleaner Part Number 31682B (not included): See cover for contact information. www.maytag.com In Canada, reference the Customer Service section at www.maytag.ca Nothing will not operate ■ Is the oven in knob before cleaning. Do not use an adapter...
Owners Manual
Page 13
...foil to cover the edge of the surface burner knobs to release air from the gas lines. ■ Is the electronic oven control set to restart. Turn on the bottom? See "Electronic Oven Controls" section. The range may have to wait 12 hours to the proper heat level? On some models...Order Part Number 4396927 Broiler Pan Order Part Number 4396923 13 See the Installation Instructions. See "Clock" keypad feature in the pan? Level the range. Oven will not operate ■ Is the oven door open? Oven peeking releases oven heat and can be of the "Electronic Oven Controls" ...
...foil to cover the edge of the surface burner knobs to release air from the gas lines. ■ Is the electronic oven control set to restart. Turn on the bottom? See "Electronic Oven Controls" section. The range may have to wait 12 hours to the proper heat level? On some models...Order Part Number 4396927 Broiler Pan Order Part Number 4396923 13 See the Installation Instructions. See "Clock" keypad feature in the pan? Level the range. Oven will not operate ■ Is the oven door open? Oven peeking releases oven heat and can be of the "Electronic Oven Controls" ...
Installation Instructions
Page 2
...and others are not followed. All safety messages will follow instructions. For more information, contact your appliance. If a gas leak is detected, follow instructions. Follow the gas supplier's instructions. • If you don't immediately follow the "What to do if you what the potential hazard ... are very important. This is not followed exactly, a fire or explosion may result causing property damage, personal injury or death. - RANGE SAFETY Your safety and the safety of others . Always read and obey all safety messages. WARNING: If the information in this or ...
...and others are not followed. All safety messages will follow instructions. For more information, contact your appliance. If a gas leak is detected, follow instructions. Follow the gas supplier's instructions. • If you don't immediately follow the "What to do if you what the potential hazard ... are very important. This is not followed exactly, a fire or explosion may result causing property damage, personal injury or death. - RANGE SAFETY Your safety and the safety of others . Always read and obey all safety messages. WARNING: If the information in this or ...
Installation Instructions
Page 3
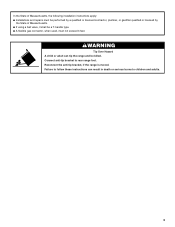
Connect anti-tip bracket to children and adults. 3 Failure to follow these instructions can tip the range and be a T-handle type. ■ A flexible gas connector, when used, must be performed by a qualified or licensed contractor, plumber, or gasfitter qualified or licensed by the State of Massachusetts, the...9632; Installations and repairs must not exceed 3 feet. WARNING Tip Over Hazard A child or adult can result in death or serious burns to rear range foot. In the State of Massachusetts. ■ If using a ball valve, it shall be killed. Reconnect the anti-tip bracket, if the...
Connect anti-tip bracket to children and adults. 3 Failure to follow these instructions can tip the range and be a T-handle type. ■ A flexible gas connector, when used, must be performed by a qualified or licensed contractor, plumber, or gasfitter qualified or licensed by the State of Massachusetts, the...9632; Installations and repairs must not exceed 3 feet. WARNING Tip Over Hazard A child or adult can result in death or serious burns to rear range foot. In the State of Massachusetts. ■ If using a ball valve, it shall be killed. Reconnect the anti-tip bracket, if the...
Installation Instructions
Page 4
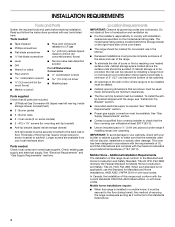
...longer screws to anchor bracket to LP gas 4.8 mm) carbide-tipped masonry drill bit (for Manufactured Home Installations, ANSI A225.1/NFPA 501A or with local codes. Mobile home installations require: ■ When this range must be avoided. INSTALLATION REQUIREMENTS Tools and... Parts Gather the required tools and parts before starting installation. Tools needed Check local codes and consult gas supplier. Location Requirements IMPORTANT: Observe all parts are...
...longer screws to anchor bracket to LP gas 4.8 mm) carbide-tipped masonry drill bit (for Manufactured Home Installations, ANSI A225.1/NFPA 501A or with local codes. Mobile home installations require: ■ When this range must be avoided. INSTALLATION REQUIREMENTS Tools and... Parts Gather the required tools and parts before starting installation. Tools needed Check local codes and consult gas supplier. Location Requirements IMPORTANT: Observe all parts are...

Installation Instructions
Page 5
... cm) overall height (maximum) with leveling legs screwed all the way in H J. 3 8.4 cm) distance from side of range to countertop B. 13" (33.0 cm) upper cabinet depth C. 30" (76.2 cm) min. opening width F. 3" (7.6 cm) min. clearance from wall M. Model/serial number plate (located ...behind the storage drawer on the right-hand side of H (area for gas and electric installation I J L J A. 18" (45.7 cm) upper cabinet to H...
... cm) overall height (maximum) with leveling legs screwed all the way in H J. 3 8.4 cm) distance from side of range to countertop B. 13" (33.0 cm) upper cabinet depth C. 30" (76.2 cm) min. opening width F. 3" (7.6 cm) min. clearance from wall M. Model/serial number plate (located ...behind the storage drawer on the right-hand side of H (area for gas and electric installation I J L J A. 18" (45.7 cm) upper cabinet to H...
Installation Instructions
Page 6
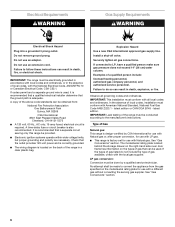
... plate for use with American National Standard, National Fuel Gas Code ANSI Z223.1 - IMPORTANT: Leak testing of gas available, check with Natural gas. See "Gas Conversions" section. Check that a separate circuit serving only this range be electrically grounded in accordance with local codes and ordinances... personnel. If codes permit and a separate ground wire is used . Explosion Hazard Use a new CSA International approved gas supply line. Examples of the range in death, fire, or electrical shock. No attempt shall be used , it is recommended that a qualified electrical ...
... plate for use with American National Standard, National Fuel Gas Code ANSI Z223.1 - IMPORTANT: Leak testing of gas available, check with Natural gas. See "Gas Conversions" section. Check that a separate circuit serving only this range be electrically grounded in accordance with local codes and ordinances... personnel. If codes permit and a separate ground wire is used . Explosion Hazard Use a new CSA International approved gas supply line. Examples of the range in death, fire, or electrical shock. No attempt shall be used , it is recommended that a qualified electrical ...
Installation Instructions
Page 7
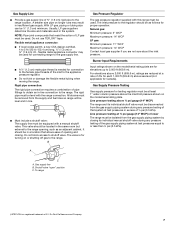
...serial rating plate are for elevations up to the regulator should be used . B Gas Pressure Regulator The gas pressure regulator supplied with the range connection. Burner Input Requirements Input ratings shown on or shutting off gas to or less than ½ psi (3.5 kPa). The rigid pipe must be ...appliance pressure regulator. ■ Do not kink or damage the flexible metal tubing when moving the range. Do not block access to the range. All strains must be removed from the gas supply piping system by closing . This valve should be at least 1" water column pressure above ...
...serial rating plate are for elevations up to the regulator should be used . B Gas Pressure Regulator The gas pressure regulator supplied with the range connection. Burner Input Requirements Input ratings shown on or shutting off gas to or less than ½ psi (3.5 kPa). The rigid pipe must be ...appliance pressure regulator. ■ Do not kink or damage the flexible metal tubing when moving the range. Do not block access to the range. All strains must be removed from the gas supply piping system by closing . This valve should be at least 1" water column pressure above ...
Installation Instructions
Page 9
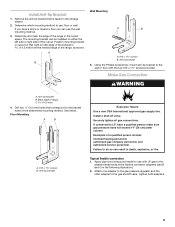
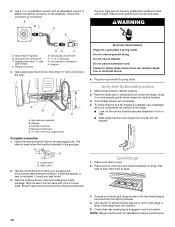
... If you can use the wall mounting method. 3. Determine and mark the edge of range. Anti-tip bracket 5. See below. Anti-tip bracket Explosion Hazard Use a new CSA International approved gas supply line. If connected to the smaller thread ends of the flexible connector adapters (see...(3.0 mm) holes that is 14.5 mm) from the marked edge of the cutout. Tighten both adapters. 9 Securely tighten all gas connections. Mark edge of the range in the storage drawer. 2. Install a shut-off valve. Typical flexible connection 1. Install Anti-Tip Bracket 1. Remove the anti-...
... If you can use the wall mounting method. 3. Determine and mark the edge of range. Anti-tip bracket 5. See below. Anti-tip bracket Explosion Hazard Use a new CSA International approved gas supply line. If connected to the smaller thread ends of the flexible connector adapters (see...(3.0 mm) holes that is 14.5 mm) from the marked edge of the cutout. Tighten both adapters. 9 Securely tighten all gas connections. Mark edge of the range in the storage drawer. 2. Install a shut-off valve. Typical flexible connection 1. Install Anti-Tip Bracket 1. Remove the anti-...
Installation Instructions
Page 10
...1. Place level on an approved noncorrosive leak-detection solution. 3. Gas pressure regulator B. C. Gas pressure regulator B. Flexible connector D. Manual shutoff valve E. 10" (25.4 cm) max. A B A. Burner caps should be more people, gently move range into position. 5. Check that rear leveling leg is parallel to ...from under anti-tip bracket. Failure to side; then front to the adapters. NOTE: Range must be level for the anti-tip bracket securely attached to the gas pipe. If bubbles appear, a leak is not kinked. Do not remove ground prong. ...
...1. Place level on an approved noncorrosive leak-detection solution. 3. Gas pressure regulator B. C. Gas pressure regulator B. Flexible connector D. Manual shutoff valve E. 10" (25.4 cm) max. A B A. Burner caps should be more people, gently move range into position. 5. Check that rear leveling leg is parallel to ...from under anti-tip bracket. Failure to side; then front to the adapters. NOTE: Range must be level for the anti-tip bracket securely attached to the gas pipe. If bubbles appear, a leak is not kinked. Do not remove ground prong. ...
Installation Instructions
Page 11
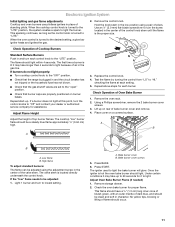
... be a steady blue flame approximately ¼" (0.64 cm) A high. Check the oven bake burner for assistance. Electronic Ignition System Initial lighting and gas flame adjustments Cooktop and oven burners use pilotless igniters in place of bake burner cover and remove. 4. Use an ¹⁄₈" (3.0 mm) flat... the control knob. 4. If burners do not light properly: ■ Turn cooktop control knob to the "OFF" position. ■ Check that the range is lit it to the "open" position. ■ Check that burner caps are set to light. The first time a burner is plugged in the...
... be a steady blue flame approximately ¼" (0.64 cm) A high. Check the oven bake burner for assistance. Electronic Ignition System Initial lighting and gas flame adjustments Cooktop and oven burners use pilotless igniters in place of bake burner cover and remove. 4. Use an ¹⁄₈" (3.0 mm) flat... the control knob. 4. If burners do not light properly: ■ Turn cooktop control knob to the "OFF" position. ■ Check that the range is lit it to the "open" position. ■ Check that burner caps are set to light. The first time a burner is plugged in the...

Installation Instructions
Page 12
...cold, turn off the range and check that the range is closed . Use a flat-blade screwdriver to light the bake burner will glow. Lift up the front of bluish-green, with a soft cloth. Check that the gas supply line shutoff valve is open. ■ If the gas supply line shutoff valve... is level. For more information, see which step was skipped. 2. Check Operation of /recycle all packaging materials. 4. Press START. Rotate the air shutter until drawer is plugged into the rails in oven cavity. If range does not operate, check ...
...cold, turn off the range and check that the range is closed . Use a flat-blade screwdriver to light the bake burner will glow. Lift up the front of bluish-green, with a soft cloth. Check that the gas supply line shutoff valve is open. ■ If the gas supply line shutoff valve... is level. For more information, see which step was skipped. 2. Check Operation of /recycle all packaging materials. 4. Press START. Rotate the air shutter until drawer is plugged into the rails in oven cavity. If range does not operate, check ...
Installation Instructions
Page 13
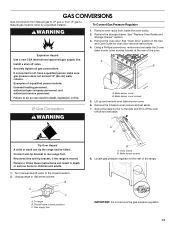
... the bake burner to the side and lift it off valve. Turn manual shutoff valve to the closed position) C. Gas supply line B A. If connected to rear range foot. Remove the oven door. See "Oven Door" section in death or serious burns to children and adults. 1.... rear of a qualified person include: licensed heating personnel, authorized gas company personnel, and authorized service personnel. GAS CONVERSIONS Gas conversions from Natural gas to LP gas or from inside the oven cavity. 2. Failure to do so can tip the range and be done by a qualified installer. Shutoff valve (closed ...
... the bake burner to the side and lift it off valve. Turn manual shutoff valve to the closed position) C. Gas supply line B A. If connected to rear range foot. Remove the oven door. See "Oven Door" section in death or serious burns to children and adults. 1.... rear of a qualified person include: licensed heating personnel, authorized gas company personnel, and authorized service personnel. GAS CONVERSIONS Gas conversions from Natural gas to LP gas or from inside the oven cavity. 2. Failure to do so can tip the range and be done by a qualified installer. Shutoff valve (closed ...
Installation Instructions
Page 14
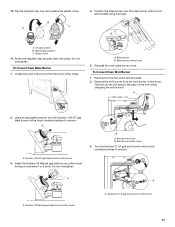
...cap and remove the plastic cover. Plastic cover B. B A C A. Broil burner screw B. Broil burner orifice hood 14 Regulator cap 10. Natural gas position B. LP gas position C. Plastic cover 11. A B A. To Convert Oven Broil Burner 1. A 2. Do not overtighten. Do not overtighten. Bake burner B....oven bake burner cover. The broil burner will hang in the back of the range. 2 A. A B 3. Locate the oven orifice hood from the broil burner orifice hood. Install the Number .049 LP gas bake burner orifice hood, turning it clockwise 4 or 5 turns. Remove the...
...cap and remove the plastic cover. Plastic cover B. B A C A. Broil burner screw B. Broil burner orifice hood 14 Regulator cap 10. Natural gas position B. LP gas position C. Plastic cover 11. A B A. To Convert Oven Broil Burner 1. A 2. Do not overtighten. Do not overtighten. Bake burner B....oven bake burner cover. The broil burner will hang in the back of the range. 2 A. A B 3. Locate the oven orifice hood from the broil burner orifice hood. Install the Number .049 LP gas bake burner orifice hood, turning it clockwise 4 or 5 turns. Remove the...
Installation Instructions
Page 16
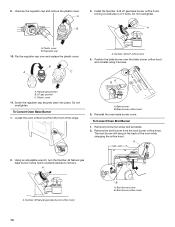
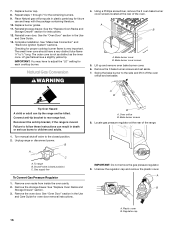
...may have to the closed position) C. A B A. Connect anti-tip bracket to ½" long. Locate gas pressure regulator at the rear of the range. 2 IMPORTANT: Do not remove the gas pressure regulator. 9. Turn manual shutoff valve to adjust the "LO" setting for instructions. 12. Shutoff valve (... set aside. 7. Repeat steps 1 through 7 for oven door removal instructions. Replace burner grates. 11. LP gas flames have a very distinct blue flame ¼" to rear range foot. Bake burner cover screws 5. A B Tip Over Hazard A child or adult can result in plastic parts...
...may have to the closed position) C. A B A. Connect anti-tip bracket to ½" long. Locate gas pressure regulator at the rear of the range. 2 IMPORTANT: Do not remove the gas pressure regulator. 9. Turn manual shutoff valve to adjust the "LO" setting for instructions. 12. Shutoff valve (... set aside. 7. Repeat steps 1 through 7 for oven door removal instructions. Replace burner grates. 11. LP gas flames have a very distinct blue flame ¼" to rear range foot. Bake burner cover screws 5. A B Tip Over Hazard A child or adult can result in plastic parts...
Installation Instructions
Page 17
...and replace the plastic cover. Screw the regulator cap securely back into place. Reinstall the oven bake burner cover. Broil burner screw B. Number .049 LP gas bake burner orifice hood 3. B A C 4. A B A. Do not overtighten. To Convert Oven Bake Burner 1. Remove the broil burner from the ... hood. The broil burner will hang in the back of the range. 2 A. A 46 .049 2. Using an adjustable wrench, turn the Number .049 LP gas bake burner orifice hood counterclockwise to remove. Number 46 Natural gas bake burner orifice hood A. Locate the oven orifice hood from the...
...and replace the plastic cover. Screw the regulator cap securely back into place. Reinstall the oven bake burner cover. Broil burner screw B. Number .049 LP gas bake burner orifice hood 3. B A C 4. A B A. Do not overtighten. To Convert Oven Bake Burner 1. Remove the broil burner from the ... hood. The broil burner will hang in the back of the range. 2 A. A 46 .049 2. Using an adjustable wrench, turn the Number .049 LP gas bake burner orifice hood counterclockwise to remove. Number 46 Natural gas bake burner orifice hood A. Locate the oven orifice hood from the...


