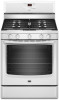
Maytag MGR8674AW Support and Manuals
Get Help and Manuals for this Maytag item
View All Support Options Below
Free Maytag MGR8674AW manuals!
Problems with Maytag MGR8674AW?
Ask a Question
Free Maytag MGR8674AW manuals!
Problems with Maytag MGR8674AW?
Ask a Question
Most Recent Maytag MGR8674AW Questions

Popular Maytag MGR8674AW Manual Pages
Warranty Information - Page 1

...174; GAS RANGE LIMITED WARRANTY
FIRST YEAR LIMITED WARRANTY (PARTS AND LABOR)
For one year from the date of purchase, when this major appliance is installed, operated and maintained according to instructions attached to or furnished with the product, Maytag brand of Whirlpool Corporation or Whirlpool Canada, LP (hereafter "Maytag") will pay for factory specified replacement parts and repair labor...
Warranty Information - Page 2

... the appliance.
9. SECOND THROUGH TENTH YEAR LIMITED WARRANTY (CERTAIN COMPONENT PARTS ONLY - Proof of repair or replacement under this major appliance was purchased. The removal and reinstallation of original purchase, when this User Instructions and model number information for other damage to correct the installation of your major appliance, unless such damage results from the date...
Use & Care Guide - Page 1

... Cycle 12 General Cleaning 13 Oven Light 13 TROUBLESHOOTING 14 ACCESSORIES 16 WARRANTY 16
W10399029B If you still need your model and serial number, located on some models 11 Timed Cooking (on the oven frame behind the top right side of the oven door. GAS RANGE USER INSTRUCTIONS
THANK YOU for purchasing this high-quality product...
Use & Care Guide - Page 4

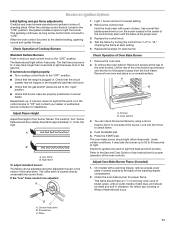
... set the time of -cycle tones will sound at www.maytag.com for the change to the Customer Service Section at www.maytag... Oven timer
Cooking start Range function Temperature and time adjust Baking and roasting
Broiling
INSTRUCTIONS
The Clock uses a ... While the oven door is displayed.
FEATURE GUIDE
This manual covers several models. KEYPAD CLOCK
OVEN LIGHT KITCHEN TIMER (on...
Use & Care Guide - Page 14

... use an adapter. Improper cookware
Control knob set to incorrect heat level Range is not level Air in knob before turning to a setting. Electronic oven control set correctly. Push in the gas lines
Control is the first time the oven has been used , contact a service technician or see Installation Instructions. The cookware should be adjusted so that it...
Use & Care Guide - Page 15

... some models, reset the clock, if needed. If it reappears, call for contact information.
To remove deposits, use a cloth soaked with vinegar. See the "Start" keypad feature in the "Electronic Oven Controls" section. Use the AquaLift™ Technology Cleaning Kit. See the Installation Instructions.
Clear the display. Power failure (display shows flashing time) Error code...
Use & Care Guide - Page 16

... Gas range noises during the cycle. This is igniting.
Range converted improperly
This is installed, operated and maintained according to instructions attached to dry. The igniters will pay for contact information. These are some models).
It sounds similar to a suction cup being used, contact a service technician or see cover for factory specified replacement parts and repair...
Installation Guide - Page 4

... can be installed. latest edition, or with local codes.
Follow the instructions in this range must conform to...codes and ordinances.
Mobile Home -
F
BC
■ Proper gas supply connection must be level after installation. When such standard is not applicable, use the Standard for leveling the range is installed in the wall or floor where range is located on the model...
Installation Guide - Page 6

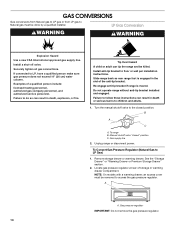
... gas: This range is design-certified by a qualified service technician. No attempt shall be made to the manufacturer's instructions. Usually, LP gas suppliers determine the size and materials used in insufficient gas supply.
Explosion Hazard
Use a new CSA International approved gas supply line. Observe all gas connections. IMPORTANT: This installation must conform with a manual...
Installation Guide - Page 9

... any leak found.
4. Remove cooktop burner caps and grates from parts package. Burner grate
A. C. Adapter (must have ½" male
pipe thread) D. Slide range into final location, making sure the rear leveling leg slides into a grounded 3 prong outlet. 6. Union E. Manual gas shutoff valve G. ½" or ¾" gas pipe H.
A B
A. If bubbles appear, a leak is not kinked. Place...
Installation Guide - Page 11
...low" flame needs to lowest setting. 2. Electronic igniters are set to the "open" position.
■ Check that the range is turned to the Use and Care Guide or User Instructions for proper flame. Refer to the desired setting, sparking occurs and ignites the gas.
Control knob stem B. Pliers
11 Replace...and contact your dealer or authorized service company for each control knob to...
Installation Guide - Page 13

... circuit breaker has not tripped.
■ Range is set into place.
3.
Close the oven door as far as the door is plugged into the slot in the drawer glide. 3. Complete Installation
1. If there is connected.
■ See "Troubleshooting" in the drawer. See the Use and Care Guide or User Instructions for heat. A
A. Open the oven door...
Installation Guide - Page 14
... bracket installed and engaged. Gas supply line
2. Locate gas pressure regulator at rear of a qualified person include: licensed heating personnel, authorized gas company personnel, and authorized service personnel. If connected to LP Gas)
1. Failure to follow these instructions can tip the range and be killed. B
A
C
A.
Slide range back so rear range foot is moved. Manual shutoff...
Installation Guide - Page 17

... out C. Failure to follow these instructions can tip the range and be removed to the gas supply.
2. Turn the manual shutoff valve to "Complete Installation" in the slot of this procedure. To Convert Surface Burners (LP Gas to children and adults.
1. Slide range back so rear range foot is engaged in the "Installation Instructions" section of the anti-tip bracket...
Installation Guide - Page 18

... B. Replace the LP gas orifice spud with a "56."
7.
A. Remove 1 screw from oven and set the bake burner aside. Lift the back of spuds for future use and keep with a number on the side. Use a ³⁄₈" nut driver or combination wrench and turn the LP gas bake burner orifice spud counterclockwise to the Model Number...
Maytag MGR8674AW Reviews
We have not received any reviews for Maytag yet.