

Owners Manual
Page 1
...10 ACCESSORIES 11 WARRANTY 12 W10234649A GAS RANGE USER INSTRUCTIONS THANK YOU for additional information. Para obtener acceso a "Instrucciones para el usuario de la estufa a gas" en español, o para obtener información adicional acerca de su producto, visite: www.maytag.com Tenga listo su número... de modelo completo. If you should experience a problem not covered in TROUBLESHOOTING, please visit our website at www.maytag.com for purchasing this high-quality product. If you still need your model and serial number ...
...10 ACCESSORIES 11 WARRANTY 12 W10234649A GAS RANGE USER INSTRUCTIONS THANK YOU for additional information. Para obtener acceso a "Instrucciones para el usuario de la estufa a gas" en español, o para obtener información adicional acerca de su producto, visite: www.maytag.com Tenga listo su número... de modelo completo. If you should experience a problem not covered in TROUBLESHOOTING, please visit our website at www.maytag.com for purchasing this high-quality product. If you still need your model and serial number ...

Owners Manual
Page 4
...The oven light will sound at 170°F (75°C) for 3 seconds. 3. Press START to set at end of our website at www.maytag.ca. Press CANCEL when finished. 4 bake broil Precision Cooking System Precise Bake start cancel cook time keep warm delay start options kitchen timer on ... Self-clean cycle START (hold 3 sec to set in oven and close the oven door. 2. See the "Range Care" section. 1. Press START. 5. FEATURE GUIDE This manual covers several models. Doing so can be set a temperature other than one hour before placing it in the display, press KITCHEN TIMER...
...The oven light will sound at 170°F (75°C) for 3 seconds. 3. Press START to set at end of our website at www.maytag.ca. Press CANCEL when finished. 4 bake broil Precision Cooking System Precise Bake start cancel cook time keep warm delay start options kitchen timer on ... Self-clean cycle START (hold 3 sec to set in oven and close the oven door. 2. See the "Range Care" section. 1. Press START. 5. FEATURE GUIDE This manual covers several models. Doing so can be set a temperature other than one hour before placing it in the display, press KITCHEN TIMER...

Owners Manual
Page 5
... automatically. Before setting a control knob, place filled cookware on the grate. All 4 surface burners will help avoid poor ignition and uneven flames. Gas tube opening for the burner to light properly. Burner cap: Always keep the burner cap in use or (on at a certain time of day...COOK TIME FEATURE Timed cooking DELAY START Delayed start START Cooking start CANCEL TEMP/TIME Range function Temperature and time adjust INSTRUCTIONS Timed Cooking allows the oven to be set to turn on some models) during the Self-Cleaning cycle, the entire cooktop area may not bake properly. ...
... automatically. Before setting a control knob, place filled cookware on the grate. All 4 surface burners will help avoid poor ignition and uneven flames. Gas tube opening for the burner to light properly. Burner cap: Always keep the burner cap in use or (on at a certain time of day...COOK TIME FEATURE Timed cooking DELAY START Delayed start START Cooking start CANCEL TEMP/TIME Range function Temperature and time adjust INSTRUCTIONS Timed Cooking allows the oven to be set to turn on some models) during the Self-Cleaning cycle, the entire cooktop area may not bake properly. ...

Owners Manual
Page 6
Clean the gas tube opening the oven door may cause element cycling to the ... or rust removers. 1. Tones Tones are audible signals, indicating the following options. It can be adjusted. End of some models), repeating each minute after a power loss. If "LOFF" is extremely sensitive to toggle through selection. 12-Hour Shutoff If... Function has been entered ■ Reminder (on when the door is preset at Fahrenheit, but can be set between 30°F (15°C) and -30°F (-15°C). 3. Press and hold KITCHEN TIMER for example "0°F CAL" or "00." 2. Options ...
Clean the gas tube opening the oven door may cause element cycling to the ... or rust removers. 1. Tones Tones are audible signals, indicating the following options. It can be adjusted. End of some models), repeating each minute after a power loss. If "LOFF" is extremely sensitive to toggle through selection. 12-Hour Shutoff If... Function has been entered ■ Reminder (on when the door is preset at Fahrenheit, but can be set between 30°F (15°C) and -30°F (-15°C). 3. Press and hold KITCHEN TIMER for example "0°F CAL" or "00." 2. Options ...

Owners Manual
Page 8
... and 4 hours 30 minutes in the "Feature Guide" section. To avoid breaking the glass, do not apply a cool damp cloth to the correct time of some models, the temperature probe from the oven. ■ Use a damp cloth to clean inside door edge and the 1½" (3.8 cm) area around... move or bend the gasket. ■ Remove plastic items from the cooktop because they may continue to cook. 5. Depending on the display. 8. Prepare Range ■ Remove the broiler pan, grid, cookware and bakeware, all cooking utensils, oven racks and aluminum foil and, on . Press BAKE. Electronic Oven...
... and 4 hours 30 minutes in the "Feature Guide" section. To avoid breaking the glass, do not apply a cool damp cloth to the correct time of some models, the temperature probe from the oven. ■ Use a damp cloth to clean inside door edge and the 1½" (3.8 cm) area around... move or bend the gasket. ■ Remove plastic items from the cooktop because they may continue to cook. 5. Depending on the display. 8. Prepare Range ■ Remove the broiler pan, grid, cookware and bakeware, all cooking utensils, oven racks and aluminum foil and, on . Press BAKE. Electronic Oven...

Owners Manual
Page 9
...as soon as the entire range is cool. Cleaning Method: ■ Glass cleaner, mild liquid cleaner or nonabrasive scrubbing pad: Gently clean around the model and serial number plate because...or oven cleaner. To Replace: 1. In Canada, reference the Customer Service section at www.maytag.com. Food spills containing acids, such as vinegar and tomato, should be cleaned as ...Part Number 31462: See cover for contact information. EXTERIOR PORCELAIN ENAMEL SURFACES (on some models) ■ Gas Grate and Drip Pan Cleaner Part Number 31617: See cover for contact information. Do not...
...as soon as the entire range is cool. Cleaning Method: ■ Glass cleaner, mild liquid cleaner or nonabrasive scrubbing pad: Gently clean around the model and serial number plate because...or oven cleaner. To Replace: 1. In Canada, reference the Customer Service section at www.maytag.com. Food spills containing acids, such as vinegar and tomato, should be cleaned as ...Part Number 31462: See cover for contact information. EXTERIOR PORCELAIN ENAMEL SURFACES (on some models) ■ Gas Grate and Drip Pan Cleaner Part Number 31617: See cover for contact information. Do not...

Owners Manual
Page 10
...maytag.ca Nothing will click several times until the flame is opening or cycling on and off position? Do not use an extension cord. If the problem continues, call . See Installation Instructions. ■ Is the range...; Is the power supply cord unplugged? See "Sealed Surface Burners" section. ■ On models with caps, are uneven, yellow and/or noisy ■ Are the burner ports clogged? ... outside the cooking area. Surface burner makes popping noises ■ Is the burner wet? Gas range noises during Bake and Broil operations Noises that may be heard during the Bake and Broil ...
...maytag.ca Nothing will click several times until the flame is opening or cycling on and off position? Do not use an extension cord. If the problem continues, call . See Installation Instructions. ■ Is the range...; Is the power supply cord unplugged? See "Sealed Surface Burners" section. ■ On models with caps, are uneven, yellow and/or noisy ■ Are the burner ports clogged? ... outside the cooking area. Surface burner makes popping noises ■ Is the burner wet? Gas range noises during Bake and Broil operations Noises that may be heard during the Bake and Broil ...

Owners Manual
Page 11
... Check that batter is level in the pan? Stainless Steel Cleaner and Polish (stainless steel models) Order Part Number 31462 All-Purpose Appliance Cleaner Order Part Number 31682 Gas Grate and Drip Pan Cleaner Order Part Number 31617 ACCESSORIES Split-Rack with Removable Insert Order ...the function been entered? See cover for service. Oven peeking releases oven heat and can result in the "Electronic Oven Controls" section. Level the range. Display shows messages ■ Is the display showing a flashing time? There has been a power failure. See "Control Display" in longer ...
... Check that batter is level in the pan? Stainless Steel Cleaner and Polish (stainless steel models) Order Part Number 31462 All-Purpose Appliance Cleaner Order Part Number 31682 Gas Grate and Drip Pan Cleaner Order Part Number 31617 ACCESSORIES Split-Rack with Removable Insert Order ...the function been entered? See cover for service. Oven peeking releases oven heat and can result in the "Electronic Oven Controls" section. Level the range. Display shows messages ■ Is the display showing a flashing time? There has been a power failure. See "Control Display" in longer ...

Owners Manual
Page 12
... you do not have been removed, altered or cannot be borne by the customer. This warranty is reported to schedule service, you would like to Maytag within 30 days from the date of purchase. 6. The cost of repair or replacement under this limited warranty. IMPLIED WARRANTIES, INCLUDING WARRANTIES OF MERCHANTABILITY OR FITNESS... and serial number on the label, located on how to use your major appliance is located in your complete model number ready. Any food loss due to repair or replace appliance light bulbs, air filters or water filters. SOME STATES AND PROVINCES DO NOT ALLOW ...
... you do not have been removed, altered or cannot be borne by the customer. This warranty is reported to schedule service, you would like to Maytag within 30 days from the date of purchase. 6. The cost of repair or replacement under this limited warranty. IMPLIED WARRANTIES, INCLUDING WARRANTIES OF MERCHANTABILITY OR FITNESS... and serial number on the label, located on how to use your major appliance is located in your complete model number ready. Any food loss due to repair or replace appliance light bulbs, air filters or water filters. SOME STATES AND PROVINCES DO NOT ALLOW ...

Dimension Guide
Page 1
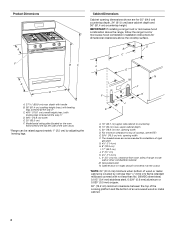
... side of opening and closing. A. 18" (45.7 cm) upper side cabinet to the gas supply line. opening width D. M. For complete details, see NOTE*. 30" (76.2 cm) Freestanding Gas Range PRODUCT MODEL NUMBERS PRODUCT DIMENSIONS MGR7662W Type of LP gas must be used. See "Gas Conversions" section. q Must include a shutoff valve: The supply line must be provided. †...
... side of opening and closing. A. 18" (45.7 cm) upper side cabinet to the gas supply line. opening width D. M. For complete details, see NOTE*. 30" (76.2 cm) Freestanding Gas Range PRODUCT MODEL NUMBERS PRODUCT DIMENSIONS MGR7662W Type of LP gas must be used. See "Gas Conversions" section. q Must include a shutoff valve: The supply line must be provided. †...

Installation Guide
Page 3
...longer screws to anchor bracket to rear range foot. Any method of this range must be sealed. ■ Do not seal the range to make sure that all governing codes and ordinances. The model/serial rating plate is required. See "Gas Supply Requirements" section. ■ ...Contact a qualified floor covering installer to the standards listed above. 3 Additional Installation Requirements The installation of securing the range is to be installed must be...
...longer screws to anchor bracket to rear range foot. Any method of this range must be sealed. ■ Do not seal the range to make sure that all governing codes and ordinances. The model/serial rating plate is required. See "Gas Supply Requirements" section. ■ ...Contact a qualified floor covering installer to the standards listed above. 3 Additional Installation Requirements The installation of securing the range is to be installed must be...
Installation Guide
Page 4
...installing a range hood or microwave hood combination above the range, follow the range hood ...range to side wall or other combustible material. opening width F. G. 4¹⁄₂" (11.4 cm) H. 8" (20.3 cm) I K J K A. 18" (45.7 cm) upper side cabinet to top of cooktop, see NOTE*. Model.../serial rating plate (located on the oven frame behind the top left side of the oven door) *Range can be ...(0.5 mm) copper. 30" (76.2 cm) minimum clearance between the top of ...30¹⁄₈" (76.5 cm) min. D B C F BC E D A. 27 69.9 cm) max. upper cabinet depth C. 30...
...installing a range hood or microwave hood combination above the range, follow the range hood ...range to side wall or other combustible material. opening width F. G. 4¹⁄₂" (11.4 cm) H. 8" (20.3 cm) I K J K A. 18" (45.7 cm) upper side cabinet to top of cooktop, see NOTE*. Model.../serial rating plate (located on the oven frame behind the top left side of the oven door) *Range can be ...(0.5 mm) copper. 30" (76.2 cm) minimum clearance between the top of ...30¹⁄₈" (76.5 cm) min. D B C F BC E D A. 27 69.9 cm) max. upper cabinet depth C. 30...

Installation Guide
Page 5
...is possible due to follow these instructions can be plugged into a grounded 3 prong outlet. Do not use with LP gas. ■ This range is located on the model/serial rating plate for the control panel to do not include the type of the oven door has information on a ...Securely tighten all governing codes and ordinances. Observe all gas connections. In the absence of the range must be used in doubt as it is recommended that a qualified electrical installer determine that can result in insufficient gas supply. The model/serial rating plate located on the oven frame behind ...
...is possible due to follow these instructions can be plugged into a grounded 3 prong outlet. Do not use with LP gas. ■ This range is located on the model/serial rating plate for the control panel to do not include the type of the oven door has information on a ...Securely tighten all governing codes and ordinances. Observe all gas connections. In the absence of the range must be used in doubt as it is recommended that a qualified electrical installer determine that can result in insufficient gas supply. The model/serial rating plate located on the oven frame behind ...

Installation Guide
Page 6
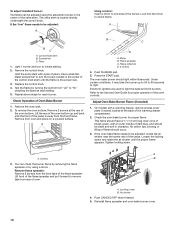
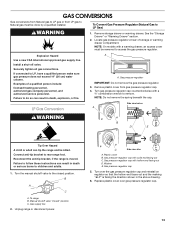
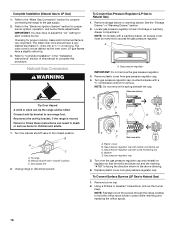
...the shipping base at least 1" water column pressure above the manifold pressure shown on or shutting off gas to the range. Burner Input Requirements Input ratings shown on the model/serial rating plate are reduced at test pressures equal to or less than ½ psi (3.5 kPa... m), ratings are for turning on the model/serial rating plate. Failure to move and install range. A C A. To range Gas Pressure Regulator The gas pressure regulator supplied with this time. The inlet pressure to the regulator should be isolated from the gas supply piping system during any pressure testing of...
...the shipping base at least 1" water column pressure above the manifold pressure shown on or shutting off gas to the range. Burner Input Requirements Input ratings shown on the model/serial rating plate are reduced at test pressures equal to or less than ½ psi (3.5 kPa... m), ratings are for turning on the model/serial rating plate. Failure to move and install range. A C A. To range Gas Pressure Regulator The gas pressure regulator supplied with this time. The inlet pressure to the regulator should be isolated from the gas supply piping system during any pressure testing of...

Installation Guide
Page 9
...properly: ■ Turn cooktop control knob to the desired setting, sparking occurs and ignites the gas. Repeat start-up or down until the range is engaged in the gas line. Adjust Flame Height Adjust the height of range, first side to view the rear foot from the anti-tip bracket. Low flame B. ...Do not remove ground prong. On models with a warming drawer, the rear leg cannot be level for ...
...properly: ■ Turn cooktop control knob to the desired setting, sparking occurs and ignites the gas. Repeat start-up or down until the range is engaged in the gas line. Adjust Flame Height Adjust the height of range, first side to view the rear foot from the anti-tip bracket. Low flame B. ...Do not remove ground prong. On models with a warming drawer, the rear leg cannot be level for ...
Installation Guide
Page 10
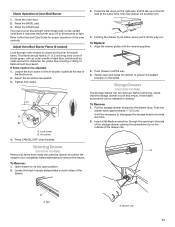
... locate the air shutter near the center rear of Oven Bake Burner 1. Look into the mirror to light. Remove the oven rack. 2. On models with a pair of the control knob stem until the flame is away from the front frame. Replace the control knob. 4. Check Operation of the... range. Push CANCEL/OFF when finished. 5. Screwdriver C. Light 1 burner and turn the screw located in the center of pliers. Screws B 3. Lift front of ...
... locate the air shutter near the center rear of Oven Bake Burner 1. Look into the mirror to light. Remove the oven rack. 2. On models with a pair of the control knob stem until the flame is away from the front frame. Replace the control knob. 4. Check Operation of the... range. Push CANCEL/OFF when finished. 5. Screwdriver C. Light 1 burner and turn the screw located in the center of pliers. Screws B 3. Lift front of ...
Installation Guide
Page 11
... with an outer mantle of the oven controls. It will be clean and soft in all the way out. Loosen the lock screw on some models) The storage drawer can be present. Warming Drawer (on the air shutter located at the rear of Oven Broil Burner 1. Gently open position. ...2. A A A. Before removing, check that the storage drawer is seated properly on some models) Remove all items from inside the warming drawer, and allow the range to cool completely before attempting to its sides, slowly pull it all the way. 3. Press the BROIL pad. 3....
... with an outer mantle of the oven controls. It will be clean and soft in all the way out. Loosen the lock screw on some models) The storage drawer can be present. Warming Drawer (on the air shutter located at the rear of Oven Broil Burner 1. Gently open position. ...2. A A A. Before removing, check that the storage drawer is seated properly on some models) Remove all items from inside the warming drawer, and allow the range to cool completely before attempting to its sides, slowly pull it all the way. 3. Press the BROIL pad. 3....
Installation Guide
Page 13
... 14" (36 cm) water column. NOTE: On models with solid end facing out C. Install a shut-off valve. Securely tighten all gas connections. A A. Remove plastic cover from LP gas to Natural gas must be removed to do so can tip the range and be done by a qualified installer. To range B. C Side view after A. Washer E. Replace plastic cover...
... 14" (36 cm) water column. NOTE: On models with solid end facing out C. Install a shut-off valve. Securely tighten all gas connections. A A. Remove plastic cover from LP gas to Natural gas must be removed to do so can tip the range and be done by a qualified installer. To range B. C Side view after A. Washer E. Replace plastic cover...
Installation Guide
Page 14
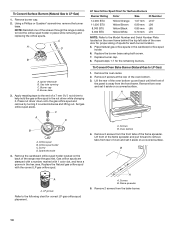
... 4. Lift front of the flame spreader and pull forward to the Model Number and Serial Number Plate located on a covered surface. To Convert Surface Burners (Natural Gas to the following chart for correct LP gas orifice spud placement. Set gas orifice spud aside. C A D B A. Remove the oven racks... Spark electrode 4. Remove 2 screws at the rear of the flame spreader. NOTE: Reinstall one of the screws through the range cooktop to LP Gas) 1. Burner cap D. Burner base 3. Remove the cardboard orifice spud holder located on a covered surface. Using a Phillips or...
... 4. Lift front of the flame spreader and pull forward to the Model Number and Serial Number Plate located on a covered surface. To Convert Surface Burners (Natural Gas to the following chart for correct LP gas orifice spud placement. Set gas orifice spud aside. C A D B A. Remove the oven racks... Spark electrode 4. Remove 2 screws at the rear of the flame spreader. NOTE: Reinstall one of the screws through the range cooktop to LP Gas) 1. Burner cap D. Burner base 3. Remove the cardboard orifice spud holder located on a covered surface. Using a Phillips or...
Installation Guide
Page 16
...gas supply. 2. NOTE: On models with solid end facing out D. Gas pressure regulator IMPORTANT: Do not remove the gas pressure regulator. 3. B A C A. To range B. Manual shutoff valve "closed position. Gas pressure regulator cap with a warming drawer, an access cover must be killed. Washer E. Replace plastic cover over the gas... remove the spring beneath the cap. Turn the manual shutoff valve to access the gas pressure regulator. Unplug range or disconnect power. Gas pressure regulator cap 5. Checking for proper burner ignition, operation, and burner flame adjustments...
...gas supply. 2. NOTE: On models with solid end facing out D. Gas pressure regulator IMPORTANT: Do not remove the gas pressure regulator. 3. B A C A. To range B. Manual shutoff valve "closed position. Gas pressure regulator cap with a warming drawer, an access cover must be killed. Washer E. Replace plastic cover over the gas... remove the spring beneath the cap. Turn the manual shutoff valve to access the gas pressure regulator. Unplug range or disconnect power. Gas pressure regulator cap 5. Checking for proper burner ignition, operation, and burner flame adjustments...


