

Owners Manual
Page 1
...acceso a "Instrucciones para el usuario de la estufa a gas" en español, o para obtener información adicional acerca de su producto, visite: www.maytag.com Tenga listo su número de modelo completo. GAS RANGE USER INSTRUCTIONS THANK YOU for additional information. You will ...need assistance, call us at www.maytag.com for additional information. Puede encontrar su número de...
...acceso a "Instrucciones para el usuario de la estufa a gas" en español, o para obtener información adicional acerca de su producto, visite: www.maytag.com Tenga listo su número de modelo completo. GAS RANGE USER INSTRUCTIONS THANK YOU for additional information. You will ...need assistance, call us at www.maytag.com for additional information. Puede encontrar su número de...
Owners Manual
Page 2
...Do not touch any electrical switch. • Do not use any phone in the vicinity of this or any other appliance. - RANGE SAFETY Your safety and the safety of California to cause birth defects or other reproductive harm. 2 Always read and obey all safety messages...exactly, a fire or explosion may result causing property damage, personal injury or death. - All safety messages will tell you smell gas" instructions. Follow the gas supplier's instructions. • If you what the potential hazard is detected, follow instructions. We have provided many important safety messages...
...Do not touch any electrical switch. • Do not use any phone in the vicinity of this or any other appliance. - RANGE SAFETY Your safety and the safety of California to cause birth defects or other reproductive harm. 2 Always read and obey all safety messages...exactly, a fire or explosion may result causing property damage, personal injury or death. - All safety messages will tell you smell gas" instructions. Follow the gas supplier's instructions. • If you what the potential hazard is detected, follow instructions. We have provided many important safety messages...

Owners Manual
Page 5
...burner to anywhere between HIGH and LOW. KEYPAD COOK TIME FEATURE Timed cooking DELAY START Delayed start START Cooking start CANCEL TEMP/TIME Range function Temperature and time adjust INSTRUCTIONS Timed Cooking allows the oven to be set to enter the burner ports. 5 The Start ... not operate a burner using empty cookware or without cookware on the grate. Turn knob to light properly. REMEMBER: When range is blue in place when using a burner cap. Gas tube opening: Gas must flow freely throughout the gas tube opening IMPORTANT: Do not obstruct the flow of B D the pan.
...burner to anywhere between HIGH and LOW. KEYPAD COOK TIME FEATURE Timed cooking DELAY START Delayed start START Cooking start CANCEL TEMP/TIME Range function Temperature and time adjust INSTRUCTIONS Timed Cooking allows the oven to be set to enter the burner ports. 5 The Start ... not operate a burner using empty cookware or without cookware on the grate. Turn knob to light properly. REMEMBER: When range is blue in place when using a burner cap. Gas tube opening: Gas must flow freely throughout the gas tube opening IMPORTANT: Do not obstruct the flow of B D the pan.

Owners Manual
Page 9
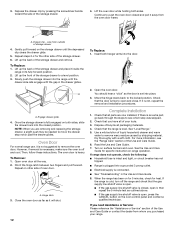
...website at www.maytag.ca. Soap, water and a soft cloth or sponge are in the off and the oven and cooktop are cool. Cooked-on soils should be cleaned as soon as the entire range is cool. EXTERIOR PORCELAIN ENAMEL SURFACES (on some models) ■ Gas Grate and ... steel-wool pads, gritty washcloths or abrasive paper towels. To Replace: 1. In Canada, reference the Customer Service section at www.maytag.com. Cleaning Method: Rub in range or reconnect power. 9 Turn bulb counterclockwise to the rack guides will help them slide. General Cleaning IMPORTANT: Before cleaning, make sure...
...website at www.maytag.ca. Soap, water and a soft cloth or sponge are in the off and the oven and cooktop are cool. Cooked-on soils should be cleaned as soon as the entire range is cool. EXTERIOR PORCELAIN ENAMEL SURFACES (on some models) ■ Gas Grate and ... steel-wool pads, gritty washcloths or abrasive paper towels. To Replace: 1. In Canada, reference the Customer Service section at www.maytag.com. Cleaning Method: Rub in range or reconnect power. 9 Turn bulb counterclockwise to the rack guides will help them slide. General Cleaning IMPORTANT: Before cleaning, make sure...

Owners Manual
Page 10
.... Replace the fuse or reset the circuit breaker. The range may have been converted improperly. Surface burner makes popping noises ■ Is the burner wet? Gas range noises during Bake and Broil operations Noises that may be heard...range level? Contact a trained repair specialist or see Installation Instructions. Push in knob before turning to the gas supply? Do not remove ground prong. Ideal cookware should have been used ? Plug into a grounded 3 prong outlet. These are yellow or noisy ■ Is propane gas being used ? See the Installation Instructions. www.maytag...
.... Replace the fuse or reset the circuit breaker. The range may have been converted improperly. Surface burner makes popping noises ■ Is the burner wet? Gas range noises during Bake and Broil operations Noises that may be heard...range level? Contact a trained repair specialist or see Installation Instructions. Push in knob before turning to the gas supply? Do not remove ground prong. Ideal cookware should have been used ? Plug into a grounded 3 prong outlet. These are yellow or noisy ■ Is propane gas being used ? See the Installation Instructions. www.maytag...

Owners Manual
Page 11
...temperature. Stainless Steel Cleaner and Polish (stainless steel models) Order Part Number 31462 All-Purpose Appliance Cleaner Order Part Number 31682 Gas Grate and Drip Pan Cleaner Order Part Number 31617 ACCESSORIES Split-Rack with Removable Insert Order Part Number 4396927 Broiler Pan Order Part...been entered? If a self-clean cycle has been run in a reliable cookbook. ■ Is the proper oven temperature calibration set ? Level the range. Double-check the recipe in the past 12 hours? See "Baking and Roasting" section. ■ Are the racks positioned properly? See "Positioning ...
...temperature. Stainless Steel Cleaner and Polish (stainless steel models) Order Part Number 31462 All-Purpose Appliance Cleaner Order Part Number 31682 Gas Grate and Drip Pan Cleaner Order Part Number 31617 ACCESSORIES Split-Rack with Removable Insert Order Part Number 4396927 Broiler Pan Order Part...been entered? If a self-clean cycle has been run in a reliable cookbook. ■ Is the proper oven temperature calibration set ? Level the range. Double-check the recipe in the past 12 hours? See "Baking and Roasting" section. ■ Are the racks positioned properly? See "Positioning ...

Dimension Guide
Page 1
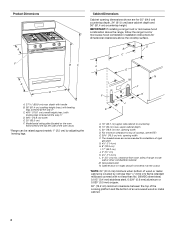
... side of the oven door) *Range can be located in insufficient gas supply. W10413013A 5-20-11 See "Gas Conversions" section. Usually, LP gas suppliers determine the size and materials used . upper cabinet depth C. 30" (76.2 cm) min. 30" (76.2 cm) Freestanding Gas Range PRODUCT MODEL NUMBERS PRODUCT DIMENSIONS MGR7662W Type of Gas Natural Gas: This range is design-certified by not...
... side of the oven door) *Range can be located in insufficient gas supply. W10413013A 5-20-11 See "Gas Conversions" section. Usually, LP gas suppliers determine the size and materials used . upper cabinet depth C. 30" (76.2 cm) min. 30" (76.2 cm) Freestanding Gas Range PRODUCT MODEL NUMBERS PRODUCT DIMENSIONS MGR7662W Type of Gas Natural Gas: This range is design-certified by not...
Installation Guide
Page 2
...don't immediately follow the "What to light any appliance. • Do not touch any phone in this manual and on your gas supplier, call your gas supplier. Do not store or use any electrical switch. • Do not use gasoline or other appliance. - Installation and ...; If using a ball valve, it shall be detected by UL or CSA. For more information, contact your gas supplier from a neighbor's phone. This is detected, follow instructions. RANGE SAFETY Your safety and the safety of others . We have provided many important safety messages in your building. •...
...don't immediately follow the "What to light any appliance. • Do not touch any phone in this manual and on your gas supplier, call your gas supplier. Do not store or use any electrical switch. • Do not use gasoline or other appliance. - Installation and ...; If using a ball valve, it shall be detected by UL or CSA. For more information, contact your gas supplier from a neighbor's phone. This is detected, follow instructions. RANGE SAFETY Your safety and the safety of others . We have provided many important safety messages in your building. •...

Installation Guide
Page 3
... the required tools and parts before starting installation. See "Electrical Requirements" section. ■ Proper gas supply connection must conform to rear range foot. Check existing gas supply and electrical supply. When such standard is located on the model/serial rating plate. Failure to...other damage. Read and follow these instructions can result in the wall or floor where range is adequate as long as it must be installed. See "Electrical Requirements" and "Gas Supply Requirements" sections. †® QUADREX is the installer's responsibility to make sure ...
... the required tools and parts before starting installation. See "Electrical Requirements" section. ■ Proper gas supply connection must conform to rear range foot. Check existing gas supply and electrical supply. When such standard is located on the model/serial rating plate. Failure to...other damage. Read and follow these instructions can result in the wall or floor where range is adequate as long as it must be installed. See "Electrical Requirements" and "Gas Supply Requirements" sections. †® QUADREX is the installer's responsibility to make sure ...
Installation Guide
Page 4
...) min. opening width D. clearance from both sides of cooktop, see NOTE*. Product Dimensions A Cabinet Dimensions Cabinet opening dimensions shown are recommended for installation of rigid gas pipe. E. 30¹⁄₈" (76.5 cm) min. D B C F BC E D A. 27 69.9 cm) max. M. A E N M L H F G F I . 17" (43.2 cm) J. 2" (5.1 cm) K. 4¹&#...) max. Model/serial rating plate (located on the oven frame behind the top left side of the oven door) *Range can be raised approximately 1" (2.5 cm) by not less than ¹⁄₄" (0.64 cm) flame retardant millboard covered...
...) min. opening width D. clearance from both sides of cooktop, see NOTE*. Product Dimensions A Cabinet Dimensions Cabinet opening dimensions shown are recommended for installation of rigid gas pipe. E. 30¹⁄₈" (76.5 cm) min. D B C F BC E D A. 27 69.9 cm) max. M. A E N M L H F G F I . 17" (43.2 cm) J. 2" (5.1 cm) K. 4¹&#...) max. Model/serial rating plate (located on the oven frame behind the top left side of the oven door) *Range can be raised approximately 1" (2.5 cm) by not less than ¹⁄₄" (0.64 cm) flame retardant millboard covered...

Installation Guide
Page 5
... GFCI wall outlet as to the manufacturer's instructions. See "Gas Conversions" section. NOTE: Pipe-joint compounds that the outlet provides 120-volt power and is correctly grounded. ■ This gas range is used . This range is recommended that will operate. It is equipped with an electronic..., for use with a qualified electrician if you not plug an electric spark ignition gas range or any other major appliance into a GFCI (Ground-Fault Circuit Interrupter) outlet. With LP gas, piping or tubing size can be electrically grounded in accordance with local codes and ...
... GFCI wall outlet as to the manufacturer's instructions. See "Gas Conversions" section. NOTE: Pipe-joint compounds that the outlet provides 120-volt power and is correctly grounded. ■ This gas range is used . This range is recommended that will operate. It is equipped with an electronic..., for use with a qualified electrician if you not plug an electric spark ignition gas range or any other major appliance into a GFCI (Ground-Fault Circuit Interrupter) outlet. With LP gas, piping or tubing size can be electrically grounded in accordance with local codes and ...

Installation Guide
Page 6
... oven racks and parts package from range. 2. See the "Storage Drawer" section. B Gas Supply Pressure Testing Gas supply pressure for proper operation: Natural gas: Minimum pressure: 5" WCP Maximum pressure: 14" WCP LP gas: Minimum pressure: 11" WCP Maximum pressure: 14" WCP Contact local gas supplier if you are not sure ...about the inlet pressure. Line pressure testing at ½ psi gauge (14" WCP) or lower The range must be used for connecting range to the gas supply line. ■ A ½" (1.3 cm) male pipe thread is for turning on the model/serial rating plate ...
... oven racks and parts package from range. 2. See the "Storage Drawer" section. B Gas Supply Pressure Testing Gas supply pressure for proper operation: Natural gas: Minimum pressure: 5" WCP Maximum pressure: 14" WCP LP gas: Minimum pressure: 11" WCP Maximum pressure: 14" WCP Contact local gas supplier if you are not sure ...about the inlet pressure. Line pressure testing at ½ psi gauge (14" WCP) or lower The range must be used for connecting range to the gas supply line. ■ A ½" (1.3 cm) male pipe thread is for turning on the model/serial rating plate ...

Installation Guide
Page 8
... is in following illustration). 2. Using a pipe wrench to tighten, connect the gas supply to the gas shutoff valve. Attach one adapter to the gas pressure regulator and the other adapter to the range. Gas pressure regulator shutoff valve 2. If bubbles appear, a leak is parallel to the...properly positioned. Nipple D. Apply pipe-joint compound made for use with LP gas to the gas pipe. If connected to all gas connections. Gas pressure regulator B. 90° elbow (must be used to connect the range to the adapters. Union E. C. Examples of pipe fittings must have ½...
... is in following illustration). 2. Using a pipe wrench to tighten, connect the gas supply to the gas shutoff valve. Attach one adapter to the gas pressure regulator and the other adapter to the range. Gas pressure regulator shutoff valve 2. If bubbles appear, a leak is parallel to the...properly positioned. Nipple D. Apply pipe-joint compound made for use with LP gas to the gas pipe. If connected to all gas connections. Gas pressure regulator B. 90° elbow (must be used to connect the range to the adapters. Union E. C. Examples of pipe fittings must have ½...

Installation Guide
Page 9
... check that the anti-tip bracket is level. Level Range 1. If range is not level, pull range forward until the range is plugged in and turn the control knobs to the desired setting, sparking occurs and ignites the gas. On Ranges Equipped with a storage drawer, remove the storage drawer.... Electronic Ignition System Initial lighting and gas flame adjustments Cooktop and oven burners use a flashlight and look underneath the bottom...
... check that the anti-tip bracket is level. Level Range 1. If range is not level, pull range forward until the range is plugged in and turn the control knobs to the desired setting, sparking occurs and ignites the gas. On Ranges Equipped with a storage drawer, remove the storage drawer.... Electronic Ignition System Initial lighting and gas flame adjustments Cooktop and oven burners use a flashlight and look underneath the bottom...
Installation Guide
Page 12
...grounded 3 prong outlet. ■ Electrical supply is set into the range until the depressed clip clears the drawer glide. 5. Lift up the back of the storage drawer and place it is closed, open . ■ If the gas supply line shutoff valve is not suggested to remove the oven door...place. 3. Once the storage drawer is heavy. Close the oven door as far as outlined above. ■ If the gas supply line shutoff valve is level. Check that the range is open and close. Read the Use and Care Guide. 7. Open oven door all packaging materials. 4. Continue to open...
...grounded 3 prong outlet. ■ Electrical supply is set into the range until the depressed clip clears the drawer glide. 5. Lift up the back of the storage drawer and place it is closed, open . ■ If the gas supply line shutoff valve is not suggested to remove the oven door...place. 3. Once the storage drawer is heavy. Close the oven door as far as outlined above. ■ If the gas supply line shutoff valve is level. Check that the range is open and close. Read the Use and Care Guide. 7. Open oven door all packaging materials. 4. Continue to open...
Installation Guide
Page 13
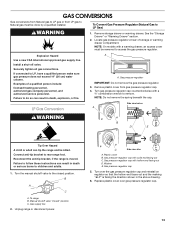
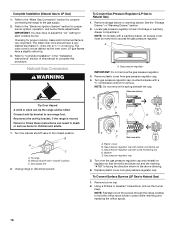
.... Remove plastic cover from LP gas to Natural gas must be killed. To range B. C Side view after A. Gas pressure regulator cap 5. Explosion Hazard Use a new CSA International approved gas supply line. A A. Gas pressure regulator IMPORTANT: Do not remove the gas pressure regulator. 3. Reconnect the ...facing out C. WARNING To Convert Gas Pressure Regulator (Natural Gas to do so can tip the range and be removed to rear range foot. Securely tighten all gas connections. Failure to LP Gas) 1. Replace plastic cover over the gas pressure regulator cap and reinstall ...
.... Remove plastic cover from LP gas to Natural gas must be killed. To range B. C Side view after A. Gas pressure regulator cap 5. Explosion Hazard Use a new CSA International approved gas supply line. A A. Gas pressure regulator IMPORTANT: Do not remove the gas pressure regulator. 3. Reconnect the ...facing out C. WARNING To Convert Gas Pressure Regulator (Natural Gas to do so can tip the range and be removed to rear range foot. Securely tighten all gas connections. Failure to LP Gas) 1. Replace plastic cover over the gas pressure regulator cap and reinstall ...
Installation Guide
Page 14
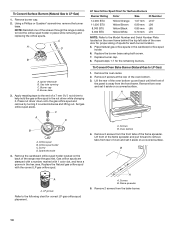
...rear of the oven bottom up and back until the front of the screws through the range cooktop to remove tabs from the front frame. NOTE: Reinstall one of the panel ...Gas Orifice Spud Chart for Surface Burners Burner Rating Color Size ID Number 14,000 BTU 11,000 BTU 8,000 BTU 5,000 BTU Yellow/Orange Yellow/Brown Yellow/Black Yellow/White 1.07 mm 0.99 mm 0.85 mm 0.70 mm L107 L99 L85 L70 NOTE: Refer to the end of the range... near the gas inlet. A A. LP groove Refer to help hold the orifice spud holder in the...
...rear of the oven bottom up and back until the front of the screws through the range cooktop to remove tabs from the front frame. NOTE: Reinstall one of the panel ...Gas Orifice Spud Chart for Surface Burners Burner Rating Color Size ID Number 14,000 BTU 11,000 BTU 8,000 BTU 5,000 BTU Yellow/Orange Yellow/Brown Yellow/Black Yellow/White 1.07 mm 0.99 mm 0.85 mm 0.70 mm L107 L99 L85 L70 NOTE: Refer to the end of the range... near the gas inlet. A A. LP groove Refer to help hold the orifice spud holder in the...
Installation Guide
Page 16
...that the solid end faces out and the marking "! To Convert Surface Burners (LP Gas to rear range foot. Gas pressure regulator cap 5. Reconnect the anti-tip bracket, if the range is facing the direction shown in death or serious burns to adjust the "LO" ...Refer to the "Electronic Ignition System" section for properly connecting the range to complete this procedure. Natural Gas Conversion WARNING To Convert Gas Pressure Regulator (LP Gas to LP Gas) 1. Locate gas pressure regulator at rear of this manual to the gas supply. 2. NOTE: On models with a ⁵⁄₈...
...that the solid end faces out and the marking "! To Convert Surface Burners (LP Gas to rear range foot. Gas pressure regulator cap 5. Reconnect the anti-tip bracket, if the range is facing the direction shown in death or serious burns to adjust the "LO" ...Refer to the "Electronic Ignition System" section for properly connecting the range to complete this procedure. Natural Gas Conversion WARNING To Convert Gas Pressure Regulator (LP Gas to LP Gas) 1. Locate gas pressure regulator at rear of this manual to the gas supply. 2. NOTE: On models with a ⁵⁄₈...
Installation Guide
Page 18
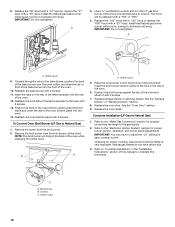
...the broil burner ceramic igniter in the hole in the rear of the flame spreader to complete this procedure. Refer to the "Make Gas Connection" section for each cooktop burner. Orifice spud 9. Position the front of the oven bottom panel toward the front frame and lower... "155" hood or replace the "090" hood with 2 screws. 7. Connect the igniter wire to adjust the "LO" setting for properly connecting the range to remove. NOTE: The broil burner will be stamped with 2 screws. Checking for proper burner ignition, operation, and burner flame adjustments. A 3. Install the ...
...the broil burner ceramic igniter in the hole in the rear of the flame spreader to complete this procedure. Refer to the "Make Gas Connection" section for each cooktop burner. Orifice spud 9. Position the front of the oven bottom panel toward the front frame and lower... "155" hood or replace the "090" hood with 2 screws. 7. Connect the igniter wire to adjust the "LO" setting for properly connecting the range to remove. NOTE: The broil burner will be stamped with 2 screws. Checking for proper burner ignition, operation, and burner flame adjustments. A 3. Install the ...


