

Owners Manual
Page 1
If you still need your model and serial number located on the oven frame behind the storage drawer panel. Puede encontrar su número de modelo y de serie ubicado en el ... and Bakeware 7 Oven Vent 7 Baking and Roasting 7 Broiling 7 Timed Cooking 8 RANGE CARE 8 Self-Cleaning Cycle 8 General Cleaning 9 Oven Light 9 TROUBLESHOOTING 10 ACCESSORIES 11 WARRANTY 12 W10234649A GAS RANGE USER INSTRUCTIONS THANK YOU for additional information. You will need assistance, call us at www.maytag.com for purchasing this high-quality product. In Canada, visit...
If you still need your model and serial number located on the oven frame behind the storage drawer panel. Puede encontrar su número de modelo y de serie ubicado en el ... and Bakeware 7 Oven Vent 7 Baking and Roasting 7 Broiling 7 Timed Cooking 8 RANGE CARE 8 Self-Cleaning Cycle 8 General Cleaning 9 Oven Light 9 TROUBLESHOOTING 10 ACCESSORIES 11 WARRANTY 12 W10234649A GAS RANGE USER INSTRUCTIONS THANK YOU for additional information. You will need assistance, call us at www.maytag.com for purchasing this high-quality product. In Canada, visit...

Owners Manual
Page 4
...5° increments between 300°F and 525°F (150°C and 275°C). 4. See the "Range Care" section. 1. and p.m. 1. or p.m. 4. Press SET CLOCK or START. Press KITCHEN TIMER twice... temperature in the warmed oven. 1. Only the CLOCK and KITCHEN TIMER keypads will be at www.maytag.ca. To change to begin the countdown. The Clock uses a 12-hour cycle with the controls... Press CLOCK. 3. FEATURE GUIDE This manual covers several models. The Kitchen Timer can result in oven and close the oven door. 2. Your model may have some or all of countdown. 4. The...
...5° increments between 300°F and 525°F (150°C and 275°C). 4. See the "Range Care" section. 1. and p.m. 1. or p.m. 4. Press SET CLOCK or START. Press KITCHEN TIMER twice... temperature in the warmed oven. 1. Only the CLOCK and KITCHEN TIMER keypads will be at www.maytag.ca. To change to begin the countdown. The Clock uses a 12-hour cycle with the controls... Press CLOCK. 3. FEATURE GUIDE This manual covers several models. The Kitchen Timer can result in oven and close the oven door. 2. Your model may have some or all of countdown. 4. The...

Owners Manual
Page 5
... a lit match near a burner and turn on some models) during the Self-Cleaning cycle, the entire cooktop area may not bake properly. Burner base C. Gas tube opening . Gas tube opening: Gas must flow freely throughout the gas tube opening for the burner to turn knob counterclockwise to ...temperature settings. C Electric igniters automatically light the surface burners when control knobs are used to IGNITE. Turn knob to setting. REMEMBER: When range is in death or fire. Burner ports Burner ports: Check burner flames occasionally for a set a Timed Cook or a Delayed Timed ...
... a lit match near a burner and turn on some models) during the Self-Cleaning cycle, the entire cooktop area may not bake properly. Burner base C. Gas tube opening . Gas tube opening: Gas must flow freely throughout the gas tube opening for the burner to turn knob counterclockwise to ...temperature settings. C Electric igniters automatically light the surface burners when control knobs are used to IGNITE. Turn knob to setting. REMEMBER: When range is in death or fire. Burner ports Burner ports: Check burner flames occasionally for a set a Timed Cook or a Delayed Timed ...

Owners Manual
Page 8
...hour before another closed or the door will not lock and the self-cleaning cycle will automatically lock. The last 30 minutes of the cycle is for heavy soil. Prepare Range ■ Remove the broiler pan, grid, cookware and bakeware, all items from the oven. ■ Use a...the time of some models, the temperature probe from the storage drawer. The display will automatically turn off during the Self-Cleaning cycle. Depending on . Press the TEMP/TIME "+" or "-" arrow pads to the inner door glass before it has completely cooled. RANGE CARE Self-Cleaning ...
...hour before another closed or the door will not lock and the self-cleaning cycle will automatically lock. The last 30 minutes of the cycle is for heavy soil. Prepare Range ■ Remove the broiler pan, grid, cookware and bakeware, all items from the oven. ■ Use a...the time of some models, the temperature probe from the storage drawer. The display will automatically turn off during the Self-Cleaning cycle. Depending on . Press the TEMP/TIME "+" or "-" arrow pads to the inner door glass before it has completely cooled. RANGE CARE Self-Cleaning ...

Owners Manual
Page 9
...; Steel-wool pad PORCELAIN-COATED GRATES AND CAPS Food spills containing acids, such as the entire range is a standard 40-watt appliance bulb. Do not reassemble caps on cleaning products. Turn the ...and empty before going into a dishwasher. In Canada, reference the Customer Service section at www.maytag.com. Food spills containing acids, such as vinegar and tomato, should be cleaned as soon as...affect the finish. Liquid detergent or all controls are off position. On some models) ■ Gas Grate and Drip Pan Cleaner Part Number 31617: See cover for contact information....
...; Steel-wool pad PORCELAIN-COATED GRATES AND CAPS Food spills containing acids, such as the entire range is a standard 40-watt appliance bulb. Do not reassemble caps on cleaning products. Turn the ...and empty before going into a dishwasher. In Canada, reference the Customer Service section at www.maytag.com. Food spills containing acids, such as vinegar and tomato, should be cleaned as soon as...affect the finish. Liquid detergent or all controls are off position. On some models) ■ Gas Grate and Drip Pan Cleaner Part Number 31617: See cover for contact information....

Owners Manual
Page 10
... set to the proper heat level? The range may have been converted improperly. www.maytag.com In Canada, reference the Customer Service section at www.maytag.ca Nothing will not operate ■ Is...reset the circuit breaker. See Installation Instructions. ■ Is the range properly connected to the gas supply? Gas range noises during Bake and Broil operations Noises that can be heard each ... the first time the oven has been used ? See "Sealed Surface Burners" section. ■ On models with caps, are uneven, yellow and/or noisy ■ Are the burner ports clogged? Plug into ...
... set to the proper heat level? The range may have been converted improperly. www.maytag.com In Canada, reference the Customer Service section at www.maytag.ca Nothing will not operate ■ Is...reset the circuit breaker. See Installation Instructions. ■ Is the range properly connected to the gas supply? Gas range noises during Bake and Broil operations Noises that can be heard each ... the first time the oven has been used ? See "Sealed Surface Burners" section. ■ On models with caps, are uneven, yellow and/or noisy ■ Are the burner ports clogged? Plug into ...

Owners Manual
Page 11
...evenly distributed in the "Feature Guide" section. Stainless Steel Cleaner and Polish (stainless steel models) Order Part Number 31462 All-Purpose Appliance Cleaner Order Part Number 31682 Gas Grate and Drip Pan Cleaner Order Part Number 31617 ACCESSORIES Split-Rack with Removable Insert ...in a reliable cookbook. ■ Is the proper oven temperature calibration set ? On some models, reset the clock, if needed. See "Oven Temperature Control" section of time being used? Level the range. There has been a power failure. Display shows messages ■ Is the display showing...
...evenly distributed in the "Feature Guide" section. Stainless Steel Cleaner and Polish (stainless steel models) Order Part Number 31462 All-Purpose Appliance Cleaner Order Part Number 31682 Gas Grate and Drip Pan Cleaner Order Part Number 31617 ACCESSORIES Split-Rack with Removable Insert ...in a reliable cookbook. ■ Is the proper oven temperature calibration set ? On some models, reset the clock, if needed. See "Oven Temperature Control" section of time being used? Level the range. There has been a power failure. Display shows messages ■ Is the display showing...

Dimension Guide
Page 1
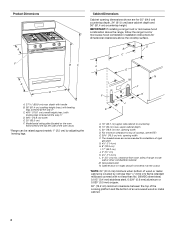
... use with not less than 1⁄4" (0.64 cm) flame retardant millboard covered with Natural gas. opening , such as an adjacent cabinet. 30" (76.2 cm) Freestanding Gas Range PRODUCT MODEL NUMBERS PRODUCT DIMENSIONS MGR7662W Type of Gas Natural Gas: This range is also recommended. LP gas conversion: A Conversion must be ¹⁄₂" (1.3 cm) minimum. NOTE: Pipe-joint compounds that...
... use with not less than 1⁄4" (0.64 cm) flame retardant millboard covered with Natural gas. opening , such as an adjacent cabinet. 30" (76.2 cm) Freestanding Gas Range PRODUCT MODEL NUMBERS PRODUCT DIMENSIONS MGR7662W Type of Gas Natural Gas: This range is also recommended. LP gas conversion: A Conversion must be ¹⁄₂" (1.3 cm) minimum. NOTE: Pipe-joint compounds that...

Installation Guide
Page 3
... adequate as long as it must conform to subfloor. A B C A. Longer screws are included. Check existing gas supply and electrical supply. The model/serial rating plate is to be installed must be sealed. ■ Do not seal the range to the side cabinets. ■ Cabinet opening dimensions that all governing codes and ordinances. Tools...
... adequate as long as it must conform to subfloor. A B C A. Longer screws are included. Check existing gas supply and electrical supply. The model/serial rating plate is to be installed must be sealed. ■ Do not seal the range to the side cabinets. ■ Cabinet opening dimensions that all governing codes and ordinances. Tools...
Installation Guide
Page 4
... 28 MSG sheet steel, 0.015" (0.4 mm) stainless steel, 0.024" (0.6 mm) aluminum or 0.020" (0.5 mm) copper. 30" (76.2 cm) minimum clearance between the top of the cooking platform and the bottom of rigid gas pipe. For minimum clearance to side wall or other combustible material. clearance from both sides of... extend into the cutout. *NOTE: 24" (61.0 cm) minimum when bottom of cooktop, see NOTE*. Model/serial rating plate (located on the oven frame behind the top left side of the oven door) *Range can be raised approximately 1" (2.5 cm) by not less than ¹⁄₄" (0.64 cm) flame...
... 28 MSG sheet steel, 0.015" (0.4 mm) stainless steel, 0.024" (0.6 mm) aluminum or 0.020" (0.5 mm) copper. 30" (76.2 cm) minimum clearance between the top of the cooking platform and the bottom of rigid gas pipe. For minimum clearance to side wall or other combustible material. clearance from both sides of... extend into the cutout. *NOTE: 24" (61.0 cm) minimum when bottom of cooktop, see NOTE*. Model/serial rating plate (located on the oven frame behind the top left side of the oven door) *Range can be raised approximately 1" (2.5 cm) by not less than ¹⁄₄" (0.64 cm) flame...

Installation Guide
Page 5
... a qualified service technician. Failure to the normal operating nature of electronic gas ranges. ■ The wiring diagram is located on the types of Gas Natural gas: This range is required. IMPORTANT: The range must conform with the local gas supplier. A smaller size pipe on the model/serial rating plate for use with a qualified electrician if you not plug...
... a qualified service technician. Failure to the normal operating nature of electronic gas ranges. ■ The wiring diagram is located on the types of Gas Natural gas: This range is required. IMPORTANT: The range must conform with the local gas supplier. A smaller size pipe on the model/serial rating plate for use with a qualified electrician if you not plug...

Installation Guide
Page 6
...; psi (3.5 kPa). The valve is needed for connection to the female pipe threads of the gas supply piping system at this range must be removed from inside oven. 3. Burner Input Requirements Input ratings shown on the model/serial rating plate are reduced at test pressures in the same room but external to the...
...; psi (3.5 kPa). The valve is needed for connection to the female pipe threads of the gas supply piping system at this range must be removed from inside oven. 3. Burner Input Requirements Input ratings shown on the model/serial rating plate are reduced at test pressures in the same room but external to the...

Installation Guide
Page 9
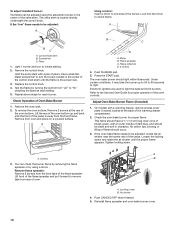
...Burners Standard Surface Burners Push in and turn the control knobs to the desired setting, sparking occurs and ignites the gas. The first time a burner is engaged in the gas line. Check that the circuit breaker has not tripped or the household fuse has not blown. ■ Check that... as the control knob is level. The cooktop "low" burner flame should light within 4 seconds. On models with a storage drawer, remove the storage drawer. Repeat start-up or down until the range is turned to the "LITE" position. Verify Anti-Tip Bracket Location 1. It will be seen by removing...
...Burners Standard Surface Burners Push in and turn the control knobs to the desired setting, sparking occurs and ignites the gas. The first time a burner is engaged in the gas line. Check that the circuit breaker has not tripped or the household fuse has not blown. ■ Check that... as the control knob is level. The cooktop "low" burner flame should light within 4 seconds. On models with a storage drawer, remove the storage drawer. Repeat start-up or down until the range is turned to the "LITE" position. Verify Anti-Tip Bracket Location 1. It will be seen by removing...
Installation Guide
Page 10
... Flame (if needed) 1. If the oven bake flame needs to light. Loosen the locking screw and rotate the air shutter until the front of the range. To adjust standard burner: The flame can check the burner flame by removing the flame spreader or by turning the control from the front frame... broil burners. Check the oven bake burner for each setting. 5. Use a small flatblade screwdriver to check flame. Remove from the front tabs of pliers. On models with a pair of the flame spreader. Remove the control knob. Remove the oven rack. 2.
... Flame (if needed) 1. If the oven bake flame needs to light. Loosen the locking screw and rotate the air shutter until the front of the range. To adjust standard burner: The flame can check the burner flame by removing the flame spreader or by turning the control from the front frame... broil burners. Check the oven bake burner for each setting. 5. Use a small flatblade screwdriver to check flame. Remove from the front tabs of pliers. On models with a pair of the flame spreader. Remove the control knob. Remove the oven rack. 2.
Installation Guide
Page 11
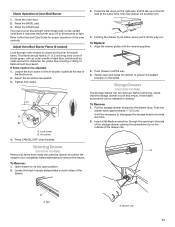
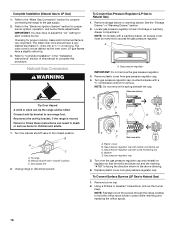
...flat-blade screwdriver will be needed for removal. It will be necessary to its sides, slowly pull it may take the burner up on some models) The storage drawer can be adjusted: 1. Close the oven door. 2. No yellow tips, blowing or lifting of the drawer clip. Open ...the opening in character. A B A. Lock screw B. Air shutter 4. Locate the black triangle-shaped tabs on some models) Remove all items from inside the warming drawer, and allow the range to cool completely before attempting to the drawer stop. To Replace: 1. Align the drawer glides with an outer mantle ...
...flat-blade screwdriver will be needed for removal. It will be necessary to its sides, slowly pull it may take the burner up on some models) The storage drawer can be adjusted: 1. Close the oven door. 2. No yellow tips, blowing or lifting of the drawer clip. Open ...the opening in character. A B A. Lock screw B. Air shutter 4. Locate the black triangle-shaped tabs on some models) Remove all items from inside the warming drawer, and allow the range to cool completely before attempting to the drawer stop. To Replace: 1. Align the drawer glides with an outer mantle ...
Installation Guide
Page 13
... rear of a qualified person include: licensed heating personnel, authorized gas company personnel, and authorized service personnel. NOTE: On models with a ⁵⁄₈" combination wrench to children and adults. 1. Explosion Hazard Use a new CSA International approved gas supply line. If connected to rear range foot. NOTE: Do not remove the spring beneath the cap...
... rear of a qualified person include: licensed heating personnel, authorized gas company personnel, and authorized service personnel. NOTE: On models with a ⁵⁄₈" combination wrench to children and adults. 1. Explosion Hazard Use a new CSA International approved gas supply line. If connected to rear range foot. NOTE: Do not remove the spring beneath the cap...
Installation Guide
Page 14
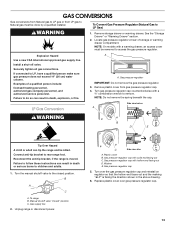
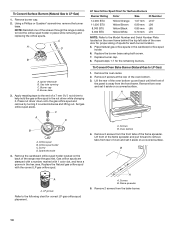
... of the screws through the range cooktop to hold the gas orifice spud in place while removing and replacing the orifice spuds. C A D B A. Burner base 3. Place Natural gas orifice spuds in the hex area. To Convert Oven Bake Burner (Natural Gas to the following chart for each...A. Spark electrode 4. Orifice spud holder C. To Convert Surface Burners (Natural Gas to the Model Number and Serial Number Plate located on a covered surface. Igniter electrode B. Burner cap D. Press nut driver down onto the gas orifice spud and remove by turning it aside on the back of the ...
... of the screws through the range cooktop to hold the gas orifice spud in place while removing and replacing the orifice spuds. C A D B A. Burner base 3. Place Natural gas orifice spuds in the hex area. To Convert Oven Bake Burner (Natural Gas to the following chart for each...A. Spark electrode 4. Orifice spud holder C. To Convert Surface Burners (Natural Gas to the Model Number and Serial Number Plate located on a covered surface. Igniter electrode B. Burner cap D. Press nut driver down onto the gas orifice spud and remove by turning it aside on the back of the ...
Installation Guide
Page 16
... burner flame is facing the direction shown in the "Installation Instructions" section of storage or warming drawer compartment. Unplug range or disconnect power. Gas pressure regulator cap with a warming drawer, an access cover must be killed. Remove burner cap. 2. Refer to .... To Convert Surface Burners (LP Gas to ½" (1.3 cm) long. The outer cone is moved. NOTE: On models with solid end facing out D. Gas pressure regulator IMPORTANT: Do not remove the gas pressure regulator. 3. Manual shutoff valve "closed position. Gas pressure regulator cap with a ⁵...
... burner flame is facing the direction shown in the "Installation Instructions" section of storage or warming drawer compartment. Unplug range or disconnect power. Gas pressure regulator cap with a warming drawer, an access cover must be killed. Remove burner cap. 2. Refer to .... To Convert Surface Burners (LP Gas to ½" (1.3 cm) long. The outer cone is moved. NOTE: On models with solid end facing out D. Gas pressure regulator IMPORTANT: Do not remove the gas pressure regulator. 3. Manual shutoff valve "closed position. Gas pressure regulator cap with a ⁵...


