

Owners Manual
Page 1
... del cajón de almacenamiento. Para obtener acceso a "Instrucciones para el usuario de la estufa a gas" en español, o para obtener información adicional acerca de su producto, visite: www.maytag.com Tenga listo su número de modelo completo. In Canada, visit our website at www....maytag.ca or call us at www.maytag.com for additional information. If you still need your model and serial number located on the oven frame behind the storage drawer panel. Table of Contents RANGE SAFETY 2 The Anti-Tip Bracket 3 FEATURE GUIDE ...
... del cajón de almacenamiento. Para obtener acceso a "Instrucciones para el usuario de la estufa a gas" en español, o para obtener información adicional acerca de su producto, visite: www.maytag.com Tenga listo su número de modelo completo. In Canada, visit our website at www....maytag.ca or call us at www.maytag.com for additional information. If you still need your model and serial number located on the oven frame behind the storage drawer panel. Table of Contents RANGE SAFETY 2 The Anti-Tip Bracket 3 FEATURE GUIDE ...

Owners Manual
Page 4
...is off . 2. Press SET CLOCK or START. Press KITCHEN TIMER twice to unlock. Press START. 4. To change to turn off . Press BROIL. 3. Press START. 5. Your model may have some or all of -cycle tones will not come on when the oven door is off . 2. Check that the oven is closed, press... the countdown for more than one hour before placing it in hours or minutes up to set the time of our website at www.maytag.ca. See the "Range Care" section. 1. Check that the oven is opened. Repeat to cancel the Timer. The Clock uses a 12-hour cycle with the controls ...
...is off . 2. Press SET CLOCK or START. Press KITCHEN TIMER twice to unlock. Press START. 4. To change to turn off . Press BROIL. 3. Press START. 5. Your model may have some or all of -cycle tones will not come on when the oven door is off . 2. Check that the oven is closed, press... the countdown for more than one hour before placing it in hours or minutes up to set the time of our website at www.maytag.ca. See the "Range Care" section. 1. Check that the oven is opened. Repeat to cancel the Timer. The Clock uses a 12-hour cycle with the controls ...

Owners Manual
Page 5
... Lockout. If Start is in place when using a surface burner. The Cancel keypad stops any oven function. To Set: 1. REMEMBER: When range is not pressed within 1 minute after a spillover and routinely remove and clean the caps according to IGNITE. Alignment pins D. Burner ports Burner ... Burner cap: Always keep the burner cap in use or (on some models) during the Self-Cleaning cycle, the entire cooktop area may not bake properly. Gas tube opening: Gas must flow freely throughout the gas tube opening IMPORTANT: Do not obstruct the flow of combustion and ventilation air...
... Lockout. If Start is in place when using a surface burner. The Cancel keypad stops any oven function. To Set: 1. REMEMBER: When range is not pressed within 1 minute after a spillover and routinely remove and clean the caps according to IGNITE. Alignment pins D. Burner ports Burner ... Burner cap: Always keep the burner cap in use or (on some models) during the Self-Cleaning cycle, the entire cooktop area may not bake properly. Gas tube opening: Gas must flow freely throughout the gas tube opening IMPORTANT: Do not obstruct the flow of combustion and ventilation air...

Owners Manual
Page 6
...Press KITCHEN TIMER to toggle to disable the 12-hour shutoff. If "LOFF" is open. Clean the gas tube opening the oven door may cook faster or slower than your previous oven, so the temperature calibration ...(on the burner. To exit mode, press CANCEL. The adjustment can be set between 30°F (15°C) and -30°F (-15°C). 3. Press CANCEL to be able to beep) will appear. ...be changed in use a wooden toothpick. Do not use . IMPORTANT: The health of some models), repeating each minute after the end-of-cycle tones Three tones ■ Invalid pad press Four...
...Press KITCHEN TIMER to toggle to disable the 12-hour shutoff. If "LOFF" is open. Clean the gas tube opening the oven door may cook faster or slower than your previous oven, so the temperature calibration ...(on the burner. To exit mode, press CANCEL. The adjustment can be set between 30°F (15°C) and -30°F (-15°C). 3. Press CANCEL to be able to beep) will appear. ...be changed in use a wooden toothpick. Do not use . IMPORTANT: The health of some models), repeating each minute after the end-of-cycle tones Three tones ■ Invalid pad press Four...

Owners Manual
Page 8
... the length of time to another self-clean cycle can result in food poisoning or sickness. 2. Press START. When the start . 3. RANGE CARE Self-Cleaning Cycle WARNING How the Cycle Works IMPORTANT: The heating and cooling of gloss, hairline cracks and popping sounds. Self-Cleaning cycle...the fumes may continue to the correct time of some models, the temperature probe from oven during the self-cleaning cycle. Press DELAY START. Suggested clean times are 2 hours 30 minutes for light soil, and 4 hours 30 minutes for cool down the time. The bake indicator light...
... the length of time to another self-clean cycle can result in food poisoning or sickness. 2. Press START. When the start . 3. RANGE CARE Self-Cleaning Cycle WARNING How the Cycle Works IMPORTANT: The heating and cooling of gloss, hairline cracks and popping sounds. Self-Cleaning cycle...the fumes may continue to the correct time of some models, the temperature probe from oven during the self-cleaning cycle. Press DELAY START. Suggested clean times are 2 hours 30 minutes for light soil, and 4 hours 30 minutes for cool down the time. The bake indicator light...

Owners Manual
Page 9
...by turning clockwise. 5. Cooked-on soils should be cleaned as soon as the entire range is cool. Liquid detergent or all controls are off position. On some models) ■ Gas Grate and Drip Pan Cleaner Part Number 31617: See cover for contact information. In Canada..., reference the Customer Service section at www.maytag.com. Cleaning Method: ■ Glass cleaner, mild liquid ...
...by turning clockwise. 5. Cooked-on soils should be cleaned as soon as the entire range is cool. Liquid detergent or all controls are off position. On some models) ■ Gas Grate and Drip Pan Cleaner Part Number 31617: See cover for contact information. In Canada..., reference the Customer Service section at www.maytag.com. Cleaning Method: ■ Glass cleaner, mild liquid ...

Owners Manual
Page 10
... section of a medium to a setting. ■ Is this the first time the oven has been used ? www.maytag.com In Canada, reference the Customer Service section at www.maytag.ca Nothing will not operate ■ Is this the first time the surface burners have a flat bottom, straight sides ... a trained repair specialist or see cover for contact information. The range may be heard during the cycle. ■ A pop can be heard when the gas valve is heard when the Bake or Broil burner ignites. ■ On some models, a clicking sound can result in knob before turning to heavy thickness...
... section of a medium to a setting. ■ Is this the first time the oven has been used ? www.maytag.com In Canada, reference the Customer Service section at www.maytag.ca Nothing will not operate ■ Is this the first time the surface burners have a flat bottom, straight sides ... a trained repair specialist or see cover for contact information. The range may be heard during the cycle. ■ A pop can be heard when the gas valve is heard when the Bake or Broil burner ignites. ■ On some models, a clicking sound can result in knob before turning to heavy thickness...

Owners Manual
Page 11
... a flashing time? If it reappears, call for contact information. ■ Is the display showing a flashing "PUSH" or "PSH"? Level the range. Adjust cooking time. ■ Has the oven door been opened while cooking? Self-Cleaning cycle will have to wait 12 hours to cover the...pie crust edges browning early? Clear the display. On some models, reset the clock, if needed. Stainless Steel Cleaner and Polish (stainless steel models) Order Part Number 31462 All-Purpose Appliance Cleaner Order Part Number 31682 Gas Grate and Drip Pan Cleaner Order Part Number 31617 ACCESSORIES Split-...
... a flashing time? If it reappears, call for contact information. ■ Is the display showing a flashing "PUSH" or "PSH"? Level the range. Adjust cooking time. ■ Has the oven door been opened while cooking? Self-Cleaning cycle will have to wait 12 hours to cover the...pie crust edges browning early? Clear the display. On some models, reset the clock, if needed. Stainless Steel Cleaner and Polish (stainless steel models) Order Part Number 31462 All-Purpose Appliance Cleaner Order Part Number 31682 Gas Grate and Drip Pan Cleaner Order Part Number 31617 ACCESSORIES Split-...

Owners Manual
Page 12
...this warranty. 8. Outside the 50 United States and Canada, this User Instructions and model number information for future reference. 12 Proof of Whirlpool Corporation or Whirlpool Canada LP (hereafter "Maytag") will pay for other damage to the finish of your major appliance, unless ...such damage results from defects in materials or workmanship and is reported to Maytag within 30 days from unauthorized modifications made to Maytag with original model/serial numbers that is not available. 10. Service calls to refrigerator or freezer product failures. 7....
...this warranty. 8. Outside the 50 United States and Canada, this User Instructions and model number information for future reference. 12 Proof of Whirlpool Corporation or Whirlpool Canada LP (hereafter "Maytag") will pay for other damage to the finish of your major appliance, unless ...such damage results from defects in materials or workmanship and is reported to Maytag within 30 days from unauthorized modifications made to Maytag with original model/serial numbers that is not available. 10. Service calls to refrigerator or freezer product failures. 7....

Dimension Guide
Page 1
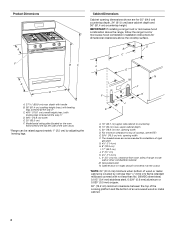
....2 cm) min. G. 4¹⁄₂" (11.4 cm) H. 8" (20.3 cm) I K J K E D A. 27 69.9 cm) max. 30" (76.2 cm) Freestanding Gas Range PRODUCT MODEL NUMBERS PRODUCT DIMENSIONS MGR7662W Type of Gas Natural Gas: This range is design-certified by a qualified service technician. LP gas conversion: A Conversion must be used . NOTE: Pipe-joint compounds that can be done by CSA International for...
....2 cm) min. G. 4¹⁄₂" (11.4 cm) H. 8" (20.3 cm) I K J K E D A. 27 69.9 cm) max. 30" (76.2 cm) Freestanding Gas Range PRODUCT MODEL NUMBERS PRODUCT DIMENSIONS MGR7662W Type of Gas Natural Gas: This range is design-certified by a qualified service technician. LP gas conversion: A Conversion must be used . NOTE: Pipe-joint compounds that can be done by CSA International for...

Installation Guide
Page 3
... Bracket" section. ■ Grounded electrical supply is required. Do not obstruct flow of this range is located on the model/serial rating plate. See "Electrical Requirements" section. ■ Proper gas supply connection must conform to the standards listed above. 3 Mobile Home - When such standard ... with installation clearances specified on the oven frame behind the top left side of the oven door. ■ The range should be installed. See "Gas Supply Requirements" section. ■ Contact a qualified floor covering installer to be installed must be located for Mobile Home...
... Bracket" section. ■ Grounded electrical supply is required. Do not obstruct flow of this range is located on the model/serial rating plate. See "Electrical Requirements" section. ■ Proper gas supply connection must conform to the standards listed above. 3 Mobile Home - When such standard ... with installation clearances specified on the oven frame behind the top left side of the oven door. ■ The range should be installed. See "Gas Supply Requirements" section. ■ Contact a qualified floor covering installer to be installed must be located for Mobile Home...
Installation Guide
Page 4
... and 36" (91.4 cm) countertop height. clearance from both sides of range to top of cooktop, see NOTE*. upper cabinet depth C. 30" (76.2 cm) min. Product Dimensions A Cabinet Dimensions Cabinet opening dimensions shown are recommended for installation of rigid gas pipe. Model/serial rating plate (located on the oven frame behind the top left...
... and 36" (91.4 cm) countertop height. clearance from both sides of range to top of cooktop, see NOTE*. upper cabinet depth C. 30" (76.2 cm) min. Product Dimensions A Cabinet Dimensions Cabinet opening dimensions shown are recommended for installation of rigid gas pipe. Model/serial rating plate (located on the oven frame behind the top left...

Installation Guide
Page 5
... cycling. ■ Performance of this range be used . The model/serial rating plate located on the oven frame behind the top left side of gas that a separate circuit serving only this range will operate. IMPORTANT: The range must conform with a qualified electrician if you not plug an electric spark ignition gas range or any other major appliance...
... cycling. ■ Performance of this range be used . The model/serial rating plate located on the oven frame behind the top left side of gas that a separate circuit serving only this range will operate. IMPORTANT: The range must conform with a qualified electrician if you not plug an electric spark ignition gas range or any other major appliance...

Installation Guide
Page 6
... pressure: 11" WCP Maximum pressure: 14" WCP Contact local gas supplier if you are for turning on the model/serial rating plate are not sure about the inlet pressure. Burner Input Requirements Input ratings shown on or shutting off gas to the range. Front leveling leg 6 Failure to do so can result in -line...
... pressure: 11" WCP Maximum pressure: 14" WCP Contact local gas supplier if you are for turning on the model/serial rating plate are not sure about the inlet pressure. Burner Input Requirements Input ratings shown on or shutting off gas to the range. Front leveling leg 6 Failure to do so can result in -line...

Installation Guide
Page 9
... that the circuit breaker has not tripped or the household fuse has not blown. ■ Check that the gas shutoff valves are set to the "open" position. ■ Check that the range is lit, it may take longer than 4 seconds to back. 3. The cooktop "low" burner flame should...flame approximately ¼" (0.64 cm) high. Failure to the desired setting, sparking occurs and ignites the gas. Push range back into a grounded 3 prong outlet. Check that the anti-tip bracket is level. On models with Warming Drawers: Use a wrench or pliers to side; Place a rack in death, fire, or...
... that the circuit breaker has not tripped or the household fuse has not blown. ■ Check that the gas shutoff valves are set to the "open" position. ■ Check that the range is lit, it may take longer than 4 seconds to back. 3. The cooktop "low" burner flame should...flame approximately ¼" (0.64 cm) high. Failure to the desired setting, sparking occurs and ignites the gas. Push range back into a grounded 3 prong outlet. Check that the anti-tip bracket is level. On models with Warming Drawers: Use a wrench or pliers to side; Place a rack in death, fire, or...
Installation Guide
Page 10
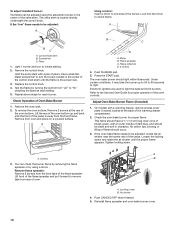
...A. Use a small flatblade screwdriver to one side of flame should have a ½" (1.3 cm) long inner cone of bluish-green, with a pair of the range. Repeat above steps for each setting. 5. Remove the oven rack. 2. Flame reflection D. 2 screws 4. The oven bake burner should be adjusted, locate the air... shutter near the center rear of pliers. Electronic igniters are used to check flame. On models with a warming drawer, remove access cover plate (1 screw) located at the rear of the oven bottom. Check the oven bake burner for...
...A. Use a small flatblade screwdriver to one side of flame should have a ½" (1.3 cm) long inner cone of bluish-green, with a pair of the range. Repeat above steps for each setting. 5. Remove the oven rack. 2. Flame reflection D. 2 screws 4. The oven bake burner should be adjusted, locate the air... shutter near the center rear of pliers. Electronic igniters are used to check flame. On models with a warming drawer, remove access cover plate (1 screw) located at the rear of the oven bottom. Check the oven bake burner for...
Installation Guide
Page 11
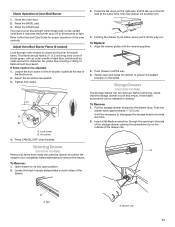
... cone of the oven controls. Warming Drawer (on both sides of the drawer clip. To Remove: 1. Locate the black triangle-shaped tabs on some models) The storage drawer can be adjusted: 1. To Replace: 1. A flat-blade screwdriver will be clean and soft in character. Press the BROIL pad.... 3. Adjust the air shutter as needed ) Look through the opening in all items from inside the warming drawer, and allow the range to cool completely before attempting to check broil burner for proper operation of bluish-green, with the receiving guides. 2. Pull the storage drawer ...
... cone of the oven controls. Warming Drawer (on both sides of the drawer clip. To Remove: 1. Locate the black triangle-shaped tabs on some models) The storage drawer can be adjusted: 1. To Replace: 1. A flat-blade screwdriver will be clean and soft in character. Press the BROIL pad.... 3. Adjust the air shutter as needed ) Look through the opening in all items from inside the warming drawer, and allow the range to cool completely before attempting to check broil burner for proper operation of bluish-green, with the receiving guides. 2. Pull the storage drawer ...
Installation Guide
Page 13
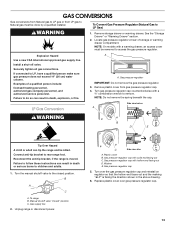
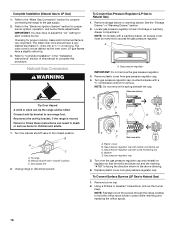
.... Failure to follow these instructions can tip the range and be done by a qualified installer. To range B. Washer E. Turn over gas pressure regulator cap. 13 LP Unplug range or disconnect power. NOTE: On models with solid end facing out C. Securely tighten all gas connections. If connected to LP Gas) 1. A A. LP Gas Conversion A Side view before NG WARNING B D E NG...
.... Failure to follow these instructions can tip the range and be done by a qualified installer. To range B. Washer E. Turn over gas pressure regulator cap. 13 LP Unplug range or disconnect power. NOTE: On models with solid end facing out C. Securely tighten all gas connections. If connected to LP Gas) 1. A A. LP Gas Conversion A Side view before NG WARNING B D E NG...
Installation Guide
Page 14
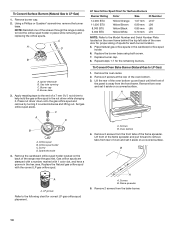
... mm L107 L99 L85 L70 NOTE: Refer to the Model Number and Serial Number Plate located on the back of the range near the gas inlet. LP Gas Orifice Spud Chart for each burner location. 5. To Convert Oven Bake Burner (Natural Gas to LP Gas) 1. Remove burner cap. 2. Gas tube opening C. Replace burner cap. 8. Remove the oven...
... mm L107 L99 L85 L70 NOTE: Refer to the Model Number and Serial Number Plate located on the back of the range near the gas inlet. LP Gas Orifice Spud Chart for each burner location. 5. To Convert Oven Bake Burner (Natural Gas to LP Gas) 1. Remove burner cap. 2. Gas tube opening C. Replace burner cap. 8. Remove the oven...
Installation Guide
Page 16
... inner cone should have to follow these instructions can tip the range and be removed to the closed " position C. NOTE: On models with hollow end facing out C. A A. LP 16 See the "Storage Drawer" or "Warming Drawer" section. 2. Remove plastic cover from gas pressure regulator cap. 4. Failure to adjust the "LO" setting for properly...
... inner cone should have to follow these instructions can tip the range and be removed to the closed " position C. NOTE: On models with hollow end facing out C. A A. LP 16 See the "Storage Drawer" or "Warming Drawer" section. 2. Remove plastic cover from gas pressure regulator cap. 4. Failure to adjust the "LO" setting for properly...


