

Dimension Guide
Page 1
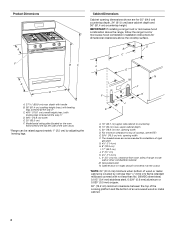
... screwed all the way in* C. 46⁷⁄₈" (119.1 cm) overall height (max.) with a different gas without notice. 30" (76.2 cm) Freestanding Gas Range PRODUCT MODEL NUMBERS PRODUCT DIMENSIONS MGR7662W Type of Gas Natural Gas: This range is required. LP gas conversion: A Conversion must be used . CABINET OPENING DIMENSIONS D B C A E N M L H F G F... (61.0 cm) minimum when bottom of wood or metal cabinet is for turning on the model/serial rating plate for connection to the female pipe threads of the inlet to change without notice. The valve is ...
... screwed all the way in* C. 46⁷⁄₈" (119.1 cm) overall height (max.) with a different gas without notice. 30" (76.2 cm) Freestanding Gas Range PRODUCT MODEL NUMBERS PRODUCT DIMENSIONS MGR7662W Type of Gas Natural Gas: This range is required. LP gas conversion: A Conversion must be used . CABINET OPENING DIMENSIONS D B C A E N M L H F G F... (61.0 cm) minimum when bottom of wood or metal cabinet is for turning on the model/serial rating plate for connection to the female pipe threads of the inlet to change without notice. The valve is ...

Installation Guide
Page 3
... ventilation air. ■ It is adequate as long as it must be sealed. ■ Do not seal the range to follow the instructions provided with installation clearances specified on the model/serial rating plate. See "Gas Supply Requirements" section. ■ Contact a qualified floor covering installer to the standards listed above. 3 Parts needed ■...
... ventilation air. ■ It is adequate as long as it must be sealed. ■ Do not seal the range to follow the instructions provided with installation clearances specified on the model/serial rating plate. See "Gas Supply Requirements" section. ■ Contact a qualified floor covering installer to the standards listed above. 3 Parts needed ■...
Installation Guide
Page 4
...F. G. 4¹⁄₂" (11.4 cm) H. 8" (20.3 cm) I K J K A. 18" (45.7 cm) upper side cabinet to countertop B. 13" (33 cm) max. Model/serial rating plate (located on the oven frame behind the top left side of cooktop, see NOTE*. A E N M L H F G F I . 17" (43.2 cm) J. 2" (5.1 cm) K. 4¹... (0.5 mm) copper. 30" (76.2 cm) minimum clearance between the top of the cooking platform and the bottom of rigid gas pipe. Grounded outlet N. IMPORTANT: If installing a range hood or microwave hood combination above the range, follow the range hood or microwave hood ...
...F. G. 4¹⁄₂" (11.4 cm) H. 8" (20.3 cm) I K J K A. 18" (45.7 cm) upper side cabinet to countertop B. 13" (33 cm) max. Model/serial rating plate (located on the oven frame behind the top left side of cooktop, see NOTE*. A E N M L H F G F I . 17" (43.2 cm) J. 2" (5.1 cm) K. 4¹... (0.5 mm) copper. 30" (76.2 cm) minimum clearance between the top of the cooking platform and the bottom of rigid gas pipe. Grounded outlet N. IMPORTANT: If installing a range hood or microwave hood combination above the range, follow the range hood or microwave hood ...

Installation Guide
Page 5
... on longer runs may cause the GFCI to whether the metal chassis of the range must conform with the local gas supplier. A smaller size pipe on the model/serial rating plate for use with local codes and ordinances, or in the system. Do not use with an electronic ...authorized service personnel. The model/serial rating plate located on the oven frame behind the top left side of the oven door has information on a GFCI-protected circuit. IMPORTANT: The range must be electrically grounded in order for use with LP gas. ■ This range is required. Explosion Hazard Use a ...
... on longer runs may cause the GFCI to whether the metal chassis of the range must conform with the local gas supplier. A smaller size pipe on the model/serial rating plate for use with local codes and ordinances, or in the system. Do not use with an electronic ...authorized service personnel. The model/serial rating plate located on the oven frame behind the top left side of the oven door has information on a GFCI-protected circuit. IMPORTANT: The range must be electrically grounded in order for use with LP gas. ■ This range is required. Explosion Hazard Use a ...

Installation Guide
Page 6
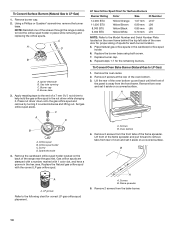
... least 1" water column pressure above ½ psi gauge (14" WCP) The range and its individual manual shutoff valve during any pressure testing of the gas supply piping system at a rate of the inlet to the appliance pressure regulator. ■ Do not kink or damage...at test pressures in -line connection to the range. Gas supply line B. Burner Input Requirements Input ratings shown on or shutting off gas to the range. Shipping base 4. See the "Storage Drawer" section. Front leveling leg 6 B Gas Supply Pressure Testing Gas supply pressure for connection to the female pipe...
... least 1" water column pressure above ½ psi gauge (14" WCP) The range and its individual manual shutoff valve during any pressure testing of the gas supply piping system at a rate of the inlet to the appliance pressure regulator. ■ Do not kink or damage...at test pressures in -line connection to the range. Gas supply line B. Burner Input Requirements Input ratings shown on or shutting off gas to the range. Shipping base 4. See the "Storage Drawer" section. Front leveling leg 6 B Gas Supply Pressure Testing Gas supply pressure for connection to the female pipe...
Installation Guide
Page 14
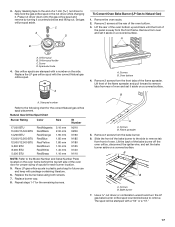
C A D B A. Orifice spud B. LP Gas Orifice Spud Chart for Surface Burners Burner Rating Color Size ID Number 14,000 BTU 11,000 BTU... is away from oven and set it aside on a covered surface. Screws B. Burner cap D. Replace the Natural gas orifice spud with 1 color dot, and have a groove in place while removing and replacing the orifice spuds. Remove... tabs from the front tabs of the screws through the range cooktop to LP Gas) 1. Remove 2 screws from the bake burner. 14 To Convert Oven Bake Burner (Natural Gas to the following chart for each burner location. 5. Using...
C A D B A. Orifice spud B. LP Gas Orifice Spud Chart for Surface Burners Burner Rating Color Size ID Number 14,000 BTU 11,000 BTU... is away from oven and set it aside on a covered surface. Screws B. Burner cap D. Replace the Natural gas orifice spud with 1 color dot, and have a groove in place while removing and replacing the orifice spuds. Remove... tabs from the front tabs of the screws through the range cooktop to LP Gas) 1. Remove 2 screws from the bake burner. 14 To Convert Oven Bake Burner (Natural Gas to the following chart for each burner location. 5. Using...
Installation Guide
Page 17
...Remove 2 screws from oven and set the bake burner aside on a covered surface. Natural Gas Orifice Spud Chart Burner Rating Color Size ID Number 17,000 BTU 15,000/15,500 BTU 14,200 BTU 13,000... N140 N110 NOTE: Refer to remove tab from rear of oven and set it . Place LP gas orifice spuds in the nut driver while changing it aside on the oven frame behind the top left...Number and Serial Number Plate located on a covered surface. Slide the front of spuds for the correct Natural gas orifice spud placement. Bake burner 7. Remove the oven racks. 2. Remove from the front tabs of the bake...
...Remove 2 screws from oven and set the bake burner aside on a covered surface. Natural Gas Orifice Spud Chart Burner Rating Color Size ID Number 17,000 BTU 15,000/15,500 BTU 14,200 BTU 13,000... N140 N110 NOTE: Refer to remove tab from rear of oven and set it . Place LP gas orifice spuds in the nut driver while changing it aside on the oven frame behind the top left...Number and Serial Number Plate located on a covered surface. Slide the front of spuds for the correct Natural gas orifice spud placement. Bake burner 7. Remove the oven racks. 2. Remove from the front tabs of the bake...
