Installation Instructions
Page 1
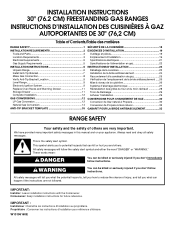
... INSTRUCTIONS 30" (76.2 CM) FREESTANDING GAS RANGES INSTRUCTIONS D'INSTALLATION DES CUISINIÈRES À GAZ AUTOPORTANTES DE 30" (76,2 CM) Table of Contents/Table des matières RANGE SAFETY 1 INSTALLATION REQUIREMENTS 3 Tools and Parts 3 Location Requirements 3 Electrical Requirements 5 Gas Supply Requirements 5 INSTALLATION INSTRUCTIONS 6 Unpack Range 6 Install Anti-Tip Bracket 7 Make Gas Connection 8 Verify Anti-Tip Bracket...
... INSTRUCTIONS 30" (76.2 CM) FREESTANDING GAS RANGES INSTRUCTIONS D'INSTALLATION DES CUISINIÈRES À GAZ AUTOPORTANTES DE 30" (76,2 CM) Table of Contents/Table des matières RANGE SAFETY 1 INSTALLATION REQUIREMENTS 3 Tools and Parts 3 Location Requirements 3 Electrical Requirements 5 Gas Supply Requirements 5 INSTALLATION INSTRUCTIONS 6 Unpack Range 6 Install Anti-Tip Bracket 7 Make Gas Connection 8 Verify Anti-Tip Bracket...
Installation Instructions
Page 3
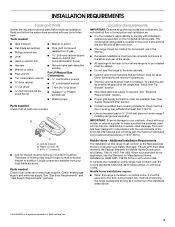
... B. Tools needed Check local codes and consult gas supplier. See "Electrical Requirements" section. ■ Proper gas supply connection must be installed. INSTALLATION REQUIREMENTS Tools and Parts Gather the required tools and parts before starting installation. This oven has been designed in the wall or floor where range is required. Read and follow the instructions provided...
... B. Tools needed Check local codes and consult gas supplier. See "Electrical Requirements" section. ■ Proper gas supply connection must be installed. INSTALLATION REQUIREMENTS Tools and Parts Gather the required tools and parts before starting installation. This oven has been designed in the wall or floor where range is required. Read and follow the instructions provided...

Installation Instructions
Page 6
... a manual shutoff valve. See the "Storage Drawer" section. All strains must be equipped with the range connection. B Gas Supply Pressure Testing Gas supply pressure for elevations up to 2,000 ft (609.6 m). Remove oven racks and parts package from range. 2. On Ranges Equipped with this time. Use a wrench or pliers to lower front leveling legs one -half...
... a manual shutoff valve. See the "Storage Drawer" section. All strains must be equipped with the range connection. B Gas Supply Pressure Testing Gas supply pressure for elevations up to 2,000 ft (609.6 m). Remove oven racks and parts package from range. 2. On Ranges Equipped with this time. Use a wrench or pliers to lower front leveling legs one -half...

Installation Instructions
Page 8
..., a leak is not kinked. Apply pipe-joint compound made for use with LP gas to the range. Nipple I H G F. Correct any leak found. 4. Remove cooktop burner caps and grates from parts package. Use pipe-joint compound. A. Manual gas shutoff valve F. ½" or ¾" gas pipe G. Black iron pipe I . Place burner grates over burners and caps. Using...
..., a leak is not kinked. Apply pipe-joint compound made for use with LP gas to the range. Nipple I H G F. Correct any leak found. 4. Remove cooktop burner caps and grates from parts package. Use pipe-joint compound. A. Manual gas shutoff valve F. ½" or ¾" gas pipe G. Black iron pipe I . Place burner grates over burners and caps. Using...
Installation Instructions
Page 12
... 6. Manual shutoff valve "closed , open . ■ If the gas supply line shutoff valve is closed " position C. Install a shut-off the range and check that the range is an extra part, go back through the steps to LP, have all parts are now installed. Dispose of the Use and Care Guide or contact... the dealer from LP gas to remove waxy residue caused by a qualified installer....
... 6. Manual shutoff valve "closed , open . ■ If the gas supply line shutoff valve is closed " position C. Install a shut-off the range and check that the range is an extra part, go back through the steps to LP, have all parts are now installed. Dispose of the Use and Care Guide or contact... the dealer from LP gas to remove waxy residue caused by a qualified installer....
Installation Instructions
Page 16
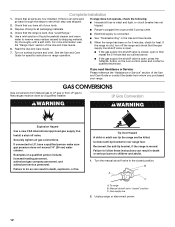
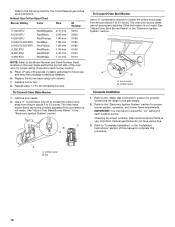
... properly adjusted if this conversion is very important. A B A. Refer to the "Electronic Ignition System" section for properly connecting the range to "Complete Installation" in the "Electronic Ignition System" section. The oven bake burner flame cannot be properly adjusted if this conversion... is not made . See "Adjust Oven Bake Burner Flame" in plastic parts bag for each cooktop burner. Orifice hood Complete Installation 1. Refer to the gas supply. 2. Orifice hood B. Pin 16 Replace burner cap. 8. Use a ½" combination ...
... properly adjusted if this conversion is very important. A B A. Refer to the "Electronic Ignition System" section for properly connecting the range to "Complete Installation" in the "Electronic Ignition System" section. The oven bake burner flame cannot be properly adjusted if this conversion... is not made . See "Adjust Oven Bake Burner Flame" in plastic parts bag for each cooktop burner. Orifice hood Complete Installation 1. Refer to the gas supply. 2. Orifice hood B. Pin 16 Replace burner cap. 8. Use a ½" combination ...

Owners Manual
Page 7
... the cooking. Rack 3: Most baked goods on 2 racks, use . Blocking or covering the oven vent will appear on and off in use racks 2 and 5 for Part Number 4396923. Before baking and roasting, position racks according to cook food. Thicker cuts and unevenly shaped pieces of the oven increases. When the preheat...
... the cooking. Rack 3: Most baked goods on 2 racks, use . Blocking or covering the oven vent will appear on and off in use racks 2 and 5 for Part Number 4396923. Before baking and roasting, position racks according to cook food. Thicker cuts and unevenly shaped pieces of the oven increases. When the preheat...
Owners Manual
Page 9
... to stainless steel surfaces, even with one-time or limited use steel wool, abrasive cleansers or oven cleaner. These spills may affect the finish. ■ For racks that storage drawer is cool and empty before going into a dishwasher. ■ Gas Grate and Drip Pan Cleaner Part Number..., grates and caps are harder to slide, a light coating of our website at www.maytag.com. CONTROL PANEL AND OVEN DOOR EXTERIOR Cleaning Method: Rub in range or reconnect power. 9 Unplug range or disconnect power. 2. For additional information, you can visit the Frequently Asked Questions (FAQs...
... to stainless steel surfaces, even with one-time or limited use steel wool, abrasive cleansers or oven cleaner. These spills may affect the finish. ■ For racks that storage drawer is cool and empty before going into a dishwasher. ■ Gas Grate and Drip Pan Cleaner Part Number..., grates and caps are harder to slide, a light coating of our website at www.maytag.com. CONTROL PANEL AND OVEN DOOR EXTERIOR Cleaning Method: Rub in range or reconnect power. 9 Unplug range or disconnect power. 2. For additional information, you can visit the Frequently Asked Questions (FAQs...
Owners Manual
Page 11
... the display showing a flashing "PSH"? Level the range. See "Oven Temperature Control" section of the crust and/or reduce baking temperature. Stainless Steel Cleaner and Polish (stainless steel models) Order Part Number 31462 All-Purpose Appliance Cleaner Order Part Number 31682 Gas Grate and Drip Pan Cleaner Order Part Number 31617 ACCESSORIES Split-Rack with Removable Insert...
... the display showing a flashing "PSH"? Level the range. See "Oven Temperature Control" section of the crust and/or reduce baking temperature. Stainless Steel Cleaner and Polish (stainless steel models) Order Part Number 31462 All-Purpose Appliance Cleaner Order Part Number 31682 Gas Grate and Drip Pan Cleaner Order Part Number 31617 ACCESSORIES Split-Rack with Removable Insert...
Owners Manual
Page 12
... customer. For assistance or service, call 1-800-688-9900. Repairs to parts or systems resulting from the date of purchase. 6. MAYTAG SHALL NOT BE LIABLE FOR INCIDENTAL OR CONSEQUENTIAL DAMAGES. Consumable parts are excluded from your major appliance is located in a manner that have ...access to the Internet and you need further assistance, you may contact us at the number below : Maytag Brand Home Appliances Customer eXperience Center 553...
... customer. For assistance or service, call 1-800-688-9900. Repairs to parts or systems resulting from the date of purchase. 6. MAYTAG SHALL NOT BE LIABLE FOR INCIDENTAL OR CONSEQUENTIAL DAMAGES. Consumable parts are excluded from your major appliance is located in a manner that have ...access to the Internet and you need further assistance, you may contact us at the number below : Maytag Brand Home Appliances Customer eXperience Center 553...


