Installation Guide
Page 1
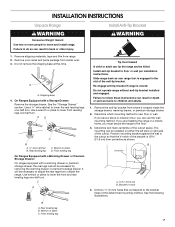
... D'INSTALLATION CUISINIÈRE À GAZ AUTOPORTANTE DE 30" (76,2 CM) Table of Contents/Table des matières RANGE SAFETY 1 INSTALLATION REQUIREMENTS 3 Tools and Parts 3 Location Requirements 3 Electrical Requirements 5 Gas Supply Requirements 5 INSTALLATION INSTRUCTIONS 7 Unpack Range 7 Install Anti-Tip Bracket 7 Make Gas Connection 8 Verify Anti-Tip Bracket Is Installed and...
... D'INSTALLATION CUISINIÈRE À GAZ AUTOPORTANTE DE 30" (76,2 CM) Table of Contents/Table des matières RANGE SAFETY 1 INSTALLATION REQUIREMENTS 3 Tools and Parts 3 Location Requirements 3 Electrical Requirements 5 Gas Supply Requirements 5 INSTALLATION INSTRUCTIONS 7 Unpack Range 7 Install Anti-Tip Bracket 7 Make Gas Connection 8 Verify Anti-Tip Bracket Is Installed and...
Installation Guide
Page 3
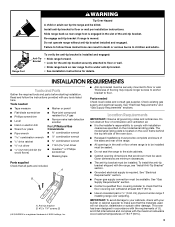
...½" combination wrench combination wrench ■ 7 mm nut driver ■ Quadrex®† or Phillips screwdriver ■ Masking tape Parts supplied Check that are included. See "Electrical Requirements" section. ■ Proper gas supply connection must be securely mounted to floor or ...installing range over carpeting. Do not operate range without anti-tip bracket installed and engaged. Location Requirements IMPORTANT: Observe all parts are shown must be installed. See "Gas Supply Requirements" section. ■ Contact a qualified floor covering installer to ...
...½" combination wrench combination wrench ■ 7 mm nut driver ■ Quadrex®† or Phillips screwdriver ■ Masking tape Parts supplied Check that are included. See "Electrical Requirements" section. ■ Proper gas supply connection must be securely mounted to floor or ...installing range over carpeting. Do not operate range without anti-tip bracket installed and engaged. Location Requirements IMPORTANT: Observe all parts are shown must be installed. See "Gas Supply Requirements" section. ■ Contact a qualified floor covering installer to ...
Installation Guide
Page 4
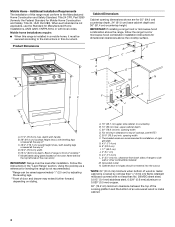
.... Back of range to top of cooktop** F. Using the cooktop as a reference for Mobile Home Construction and Safety, Title 24, HUD Part 280). For minimum clearance to front of cooktop, see NOTE*. Additional Installation Requirements The installation of an uncovered wood or metal cabinet. 4 depth... platform and the bottom of this range must be secured according to the Manufactured Home Construction and Safety Standard, Title 24 CFR, Part 3280 (formerly the Federal Standard for leveling the range is not applicable, use the Standard for installation of range to countertop B. 13...
.... Back of range to top of cooktop** F. Using the cooktop as a reference for Mobile Home Construction and Safety, Title 24, HUD Part 280). For minimum clearance to front of cooktop, see NOTE*. Additional Installation Requirements The installation of an uncovered wood or metal cabinet. 4 depth... platform and the bottom of this range must be secured according to the Manufactured Home Construction and Safety Standard, Title 24 CFR, Part 3280 (formerly the Federal Standard for leveling the range is not applicable, use the Standard for installation of range to countertop B. 13...
Installation Guide
Page 7
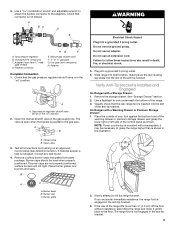
... Range Install Anti-Tip Bracket WARNING Excessive Weight Hazard Use two or more people to floor or wall per installation instructions. Remove oven racks and parts package from inside the storage drawer, warming drawer, or premium storage drawer. 2. See the "Storage Drawer" section. Rear leveling leg C. C A Tip Over Hazard A child or...
... Range Install Anti-Tip Bracket WARNING Excessive Weight Hazard Use two or more people to floor or wall per installation instructions. Remove oven racks and parts package from inside the storage drawer, warming drawer, or premium storage drawer. 2. See the "Storage Drawer" section. Rear leveling leg C. C A Tip Over Hazard A child or...
Installation Guide
Page 9
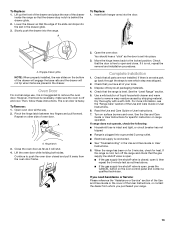
... is mounted with a backsplash, it may be level when properly positioned. Test all connections by brushing on " position 2. Remove cooktop burner caps and grates from parts package. Burner base B. A A. Plug into a grounded 3 prong outlet. Slide range into final location, making sure the rear leveling leg slides into the slot of the...
... is mounted with a backsplash, it may be level when properly positioned. Test all connections by brushing on " position 2. Remove cooktop burner caps and grates from parts package. Burner base B. A A. Plug into a grounded 3 prong outlet. Slide range into final location, making sure the rear leveling leg slides into the slot of the...
Installation Guide
Page 13
... hinge latch between two fingers and pull forward. Close the oven door as far as it is behind the drawer glide. 2. If you have all parts are placed in the drawer glide. 3. Lift up the front of the drawer and place the rear of the drawer inside the range so that... that the gas supply line shutoff valve is open. ■ If the gas supply line shutoff valve is closed and pull it is an extra part, go back through the steps to remove the oven door. A A. Insert both sides. To Remove: 1.
... hinge latch between two fingers and pull forward. Close the oven door as far as it is behind the drawer glide. 2. If you have all parts are placed in the drawer glide. 3. Lift up the front of the drawer and place the rear of the drawer inside the range so that... that the gas supply line shutoff valve is open. ■ If the gas supply line shutoff valve is closed and pull it is an extra part, go back through the steps to remove the oven door. A A. Insert both sides. To Remove: 1.
Installation Guide
Page 18
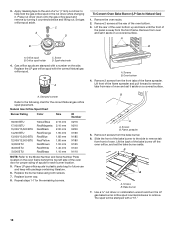
... the oven bottom up and back until the front of the flame spreader and pull forward to help hold the gas orifice spud in plastic parts bag for future use and keep with the correct Natural gas orifice spud. Screw D. Replace the LP gas orifice spud with package containing literature. 6. Replace...
... the oven bottom up and back until the front of the flame spreader and pull forward to help hold the gas orifice spud in plastic parts bag for future use and keep with the correct Natural gas orifice spud. Screw D. Replace the LP gas orifice spud with package containing literature. 6. Replace...


