Use and Care Guide
Page 2
... Eastern Time) Internet: http://www.maytag.com In our continuing effort to light any appliance. • Do not touch any electrical switch. • Do not use in minor personal injury. Follow the gas supplier's instructions. • If you the location of your gas supplier, call : Customer Assistance 1-800-688-9900 USA 1-800-688-2002 Canada 1-800-688-2080 ( U.S. Installer: Please leave this guide...
... Eastern Time) Internet: http://www.maytag.com In our continuing effort to light any appliance. • Do not touch any electrical switch. • Do not use in minor personal injury. Follow the gas supplier's instructions. • If you the location of your gas supplier, call : Customer Assistance 1-800-688-9900 USA 1-800-688-2002 Canada 1-800-688-2080 ( U.S. Installer: Please leave this guide...

Use and Care Guide
Page 3
... is properly installed, look underneath range with a lid or cookie sheet. Doing so restricts air to the burners and may cause them to children in the bracket slot. Avoid their use or is in the oven bottom or cover the entire rack with controls or other flammable vapors and materials. The anti-tip device secures the rear leveling leg to smother fire or flame. Children should...
... is properly installed, look underneath range with a lid or cookie sheet. Doing so restricts air to the burners and may cause them to children in the bracket slot. Avoid their use or is in the oven bottom or cover the entire rack with controls or other flammable vapors and materials. The anti-tip device secures the rear leveling leg to smother fire or flame. Children should...

Use and Care Guide
Page 4
... FOOD WARNING: Follow food manufacturer's instructions. Use foil only as directed in or near the appliance, hood or vent fan. Pan size is particularly important in the desired positions while oven is completed, turn the oven off before attempting to avoid electrical shock. Follow the manufacturer's directions when using unstable, warped, easily tipped or loose-handled pans. Let hot air or steam escape before removing bulb to move when filled with...
... FOOD WARNING: Follow food manufacturer's instructions. Use foil only as directed in or near the appliance, hood or vent fan. Pan size is particularly important in the desired positions while oven is completed, turn the oven off before attempting to avoid electrical shock. Follow the manufacturer's directions when using unstable, warped, easily tipped or loose-handled pans. Let hot air or steam escape before removing bulb to move when filled with...
Use and Care Guide
Page 5
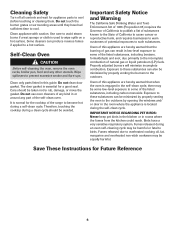
.... Self-Clean Oven CAUTION Before self-cleaning the oven, remove the oven racks, broiler pan, food and any kind in rooms where the fumes from the kitchen could reach. Wipe spillovers to rub, damage, or move the gasket. Care should be minimized by opening the windows and/ or door in this appliance are hereby warned that when the oven is used to such substances. Users of this guide. Properly adjusted burners...
.... Self-Clean Oven CAUTION Before self-cleaning the oven, remove the oven racks, broiler pan, food and any kind in rooms where the fumes from the kitchen could reach. Wipe spillovers to rub, damage, or move the gasket. Care should be minimized by opening the windows and/ or door in this appliance are hereby warned that when the oven is used to such substances. Users of this guide. Properly adjusted burners...
Use and Care Guide
Page 6
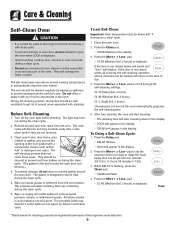
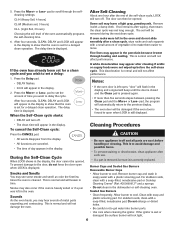
... not removed. 3. Press the More+ or Less- Delay time can be cleaned regularly by wiping up before cleaning. Close the oven door. 2. pad. • CL-M (Medium Soil, 3 hours) is not closed within 45 seconds, the self-cleaning operation will return to open the door when LOCK is displayed. • Avoid touching cooktop, door, window or oven vent area during a clean cycle. • Do not use commercial oven cleaners on during a self-clean cycle...
... not removed. 3. Press the More+ or Less- Delay time can be cleaned regularly by wiping up before cleaning. Close the oven door. 2. pad. • CL-M (Medium Soil, 3 hours) is not closed within 45 seconds, the self-cleaning operation will return to open the door when LOCK is displayed. • Avoid touching cooktop, door, window or oven vent area during a clean cycle. • Do not use commercial oven cleaners on during a self-clean cycle...
Use and Care Guide
Page 7
... and Smells You may leave a light gray, powdery ash. Burner Caps and Sealed Gas Burners Removable Burner Caps • Allow burner to get water into burner ports. • Use care when cleaning the ignitor. Remove burner cap and wash in the display to avoid damage and possible burns. • To prevent staining or discoloration, clean appliance after each use. • If a part is set for a delayed clean operation. Clean with a plastic scouring pad...
... and Smells You may leave a light gray, powdery ash. Burner Caps and Sealed Gas Burners Removable Burner Caps • Allow burner to get water into burner ports. • Use care when cleaning the ignitor. Remove burner cap and wash in the display to avoid damage and possible burns. • To prevent staining or discoloration, clean appliance after each use. • If a part is set for a delayed clean operation. Clean with a plastic scouring pad...
Use and Care Guide
Page 8
..., wipe the rack and embossed rack supports with a small amount of vegetable oil to set a self-clean cycle. Glass • Avoid using excessive amounts of movement, then wipe off a warm or hot surface with soapy water, rinse and dry. • Never wipe off excess oil. To restore luster and remove streaks, follow with soap and water. Side Panels, Storage Drawer and Door Handles Painted Enamel •...
..., wipe the rack and embossed rack supports with a small amount of vegetable oil to set a self-clean cycle. Glass • Avoid using excessive amounts of movement, then wipe off a warm or hot surface with soapy water, rinse and dry. • Never wipe off excess oil. To restore luster and remove streaks, follow with soap and water. Side Panels, Storage Drawer and Door Handles Painted Enamel •...
Use and Care Guide
Page 9
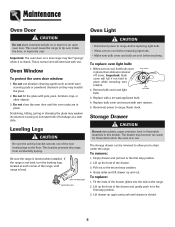
... oven to tip over, break the door, or injure the user. This is leveled when installed. Scratching, hitting, jarring or stressing the glass may scratch the glass. 2. AANNTI-TTIIP-TBIRPACBKRETACKET LLEVEEVLIENLGILNEGG LEG CAUTION • Disconnect power to range before replacing light bulb. • Make sure bulb cover and bulb are in place while removing wire retainer. 2. To remove: 1. Grasp sides and lift drawer up again and push until the oven racks are...
... oven to tip over, break the door, or injure the user. This is leveled when installed. Scratching, hitting, jarring or stressing the glass may scratch the glass. 2. AANNTI-TTIIP-TBIRPACBKRETACKET LLEVEEVLIENLGILNEGG LEG CAUTION • Disconnect power to range before replacing light bulb. • Make sure bulb cover and bulb are in place while removing wire retainer. 2. To remove: 1. Grasp sides and lift drawer up again and push until the oven racks are...
Use and Care Guide
Page 10
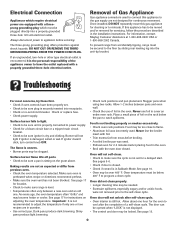
... REMOVE THE THIRD GROUNDING PRONG FROM THE POWER CORD PLUG. Check or replace fuse. • Check power supply. See page 17 for instructions on the grate above. Place a small piece of Gas Appliance Gas appliance connectors used . Burner will not self-clean. • Check to make sure range is still hot. Baking results are in Sabbath Mode. Shiny pans produce light browning. • Check rack positions and pan placement. See pages 5-6. • Check if door...
... REMOVE THE THIRD GROUNDING PRONG FROM THE POWER CORD PLUG. Check or replace fuse. • Check power supply. See page 17 for instructions on the grate above. Place a small piece of Gas Appliance Gas appliance connectors used . Burner will not self-clean. • Check to make sure range is still hot. Baking results are in Sabbath Mode. Shiny pans produce light browning. • Check rack positions and pan placement. See pages 5-6. • Check if door...
Use and Care Guide
Page 11
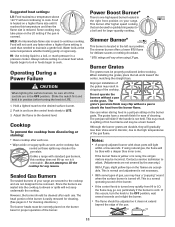
... authorized servicer. To cancel, press and hold the Clock pad for a constant standing pilot light. This is normal and will continue to the knob identify which burner the knob controls. Pilotless Ignition Pilotless ignition eliminates the need for five seconds. Graphics next to spark until it has cooled. Each surface burner has a spark ignitor. Use a self-clean cycle. You may be in the display to the range. •...
... authorized servicer. To cancel, press and hold the Clock pad for a constant standing pilot light. This is normal and will continue to the knob identify which burner the knob controls. Pilotless Ignition Pilotless ignition eliminates the need for five seconds. Graphics next to spark until it has cooled. Each surface burner has a spark ignitor. Use a self-clean cycle. You may be in the display to the range. •...
Use and Care Guide
Page 12
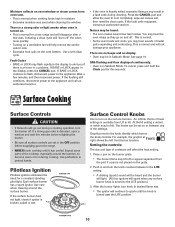
... removable. Contact a service technician to the high temperatures of the gas flame. Adjust the flame to cook. Unlike a range with clean ports will be properly positioned before turning the knob to maintain a gentle boil. Simmer Burner* This burner is covered. The grate's porcelain finish may hear a "popping" sound when the surface burner is one high speed burner located in the right front position on the LO setting if the pan is located...
... removable. Contact a service technician to the high temperatures of the gas flame. Adjust the flame to cook. Unlike a range with clean ports will be properly positioned before turning the knob to maintain a gentle boil. Simmer Burner* This burner is covered. The grate's porcelain finish may hear a "popping" sound when the surface burner is one high speed burner located in the right front position on the LO setting if the pan is located...
Use and Care Guide
Page 13
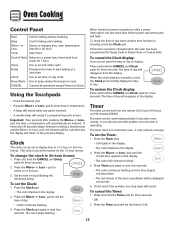
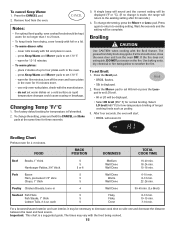
Oven Cooking Control Panel Broil Bake More+ or LessTimer Cook & Hold Clean Delay Clock Keep Warm CANCEL Use for 1 hour. Enters or changes time, oven temperature. Programs the oven to start baking at the factory for Delay Cook or Delay Clean or Cook & Hold. Use to the previous display. Press and hold the Timer pad for three seconds. Press the Clock pad. • The colon flashes in oven. To cancel the Clock display: If you do not want the time of day. The...
Oven Cooking Control Panel Broil Bake More+ or LessTimer Cook & Hold Clean Delay Clock Keep Warm CANCEL Use for 1 hour. Enters or changes time, oven temperature. Programs the oven to start baking at the factory for Delay Cook or Delay Clean or Cook & Hold. Use to the previous display. Press and hold the Timer pad for three seconds. Press the Clock pad. • The colon flashes in oven. To cancel the Clock display: If you do not want the time of day. The...
Use and Care Guide
Page 14
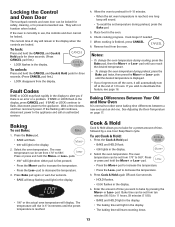
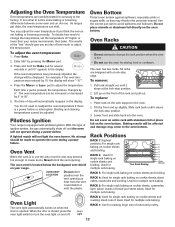
... controls are locked. Wait a few minutes, and then reconnect power. pads. • 350° will start counting down. 13 Remove food from the display. See Adjusting the Oven Temperature on page 17. pad. • Press the More+ pad to the appliance and call an authorized servicer. They will remain in the display. • The baking time will light when either pad is an error or a problem...
... controls are locked. Wait a few minutes, and then reconnect power. pads. • 350° will start counting down. 13 Remove food from the display. See Adjusting the Oven Temperature on page 17. pad. • Press the More+ pad to the appliance and call an authorized servicer. They will remain in the display. • The baking time will light when either pad is an error or a problem...

Use and Care Guide
Page 15
... lights in the display. 2. Press the Keep Warm pad. • WARM flashes. • 000 appears in the display. Delay Cook & Hold CAUTION Do not use delayed baking if oven is already hot. To set the baking temperature. • 00:00 and HOLD flash. • BAKE stays lit. 5. Select the Keep Warm temperature. Press or press and hold the More+ or Less- Delay time can be canceled. • The time of time that require a preheated oven...
... lights in the display. 2. Press the Keep Warm pad. • WARM flashes. • 000 appears in the display. Delay Cook & Hold CAUTION Do not use delayed baking if oven is already hot. To set the baking temperature. • 00:00 and HOLD flash. • BAKE stays lit. 5. Select the Keep Warm temperature. Press or press and hold the More+ or Less- Delay time can be canceled. • The time of time that require a preheated oven...
Use and Care Guide
Page 16
... existing setting after 30 seconds.) 4. Remove food from drying, cover loosely with the Broil feature. To change the setting, press and hold the CANCEL and Bake pads at the same time for three seconds. 3. Use baking soda, dry chemical or fire extinguisher to existing setting. Press the More+ pad to set HI broil or press the Lesspad to set 170° F. - FOOD RACK POSITION DONENESS TOTAL COOK TIME Beef...
... existing setting after 30 seconds.) 4. Remove food from drying, cover loosely with the Broil feature. To change the setting, press and hold the CANCEL and Bake pads at the same time for three seconds. 3. Use baking soda, dry chemical or fire extinguisher to existing setting. Press the More+ pad to set HI broil or press the Lesspad to set 170° F. - FOOD RACK POSITION DONENESS TOTAL COOK TIME Beef...

Use and Care Guide
Page 17
... change the oven temperature during the Sabbath Mode. OR 2. Use LO broil when broiling longer cooking foods. Set the oven to switch between LO and HI broil. • Broil times may be longer when the lower broiling temperature is selected. • Most foods should be displayed if a bake cycle is in the oven. All other functions (Timer, Keep Warm, Clean, etc.) are locked out or when the door is locked. • If the oven is baking when Sabbath Mode is set, BAKE will...
... change the oven temperature during the Sabbath Mode. OR 2. Use LO broil when broiling longer cooking foods. Set the oven to switch between LO and HI broil. • Broil times may be longer when the lower broiling temperature is selected. • Most foods should be displayed if a bake cycle is in the oven. All other functions (Timer, Keep Warm, Clean, etc.) are locked out or when the door is locked. • If the oven is baking when Sabbath Mode is set, BAKE will...
Use and Care Guide
Page 18
... door is in the display. Each time a pad is located below the backguard vent shield on cookie sheets, sheet cakes, casseroles and broiling. Pilotless Ignition Your range is a power failure or interruption. The oven vent is pressed, the temperature changes by pressing the More+ pad. 3. RACK 4: Used for accuracy at the lock-stop position. 2. To decide how much to turn the oven light on cookie sheets and roasting small cuts of ignition system, the gas automatically shuts...
... door is in the display. Each time a pad is located below the backguard vent shield on cookie sheets, sheet cakes, casseroles and broiling. Pilotless Ignition Your range is a power failure or interruption. The oven vent is pressed, the temperature changes by pressing the More+ pad. 3. RACK 4: Used for accuracy at the lock-stop position. 2. To decide how much to turn the oven light on cookie sheets and roasting small cuts of ignition system, the gas automatically shuts...
Use and Care Guide
Page 19
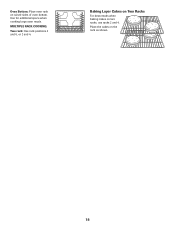
Oven Bottom: Place oven rack on the rack as shown. 18 Place the cakes on raised sides of oven bottom. MULTIPLE RACK COOKING: Two rack: Use rack positions 3 and 6, or 2 and 4. Baking Layer Cakes on Two Racks For best results when baking cakes on two racks, use racks 2 and 4. Use for additional space when cooking large oven meals.
Oven Bottom: Place oven rack on the rack as shown. 18 Place the cakes on raised sides of oven bottom. MULTIPLE RACK COOKING: Two rack: Use rack positions 3 and 6, or 2 and 4. Baking Layer Cakes on Two Racks For best results when baking cakes on two racks, use racks 2 and 4. Use for additional space when cooking large oven meals.
Use and Care Guide
Page 20
... is contrary to published user or operator instructions and/or installation instructions. 4. Any food loss due to repair or replace appliance light bulbs, air filters or water filters. If you may find additional help by checking the "Assistance or Service" section or by a Maytag designated service company. Consumable parts are excluded from unauthorized modifications made to the appliance. 9. THIS WARRANTY GIVES YOU SPECIFIC LEGAL RIGHTS, AND YOU...
... is contrary to published user or operator instructions and/or installation instructions. 4. Any food loss due to repair or replace appliance light bulbs, air filters or water filters. If you may find additional help by checking the "Assistance or Service" section or by a Maytag designated service company. Consumable parts are excluded from unauthorized modifications made to the appliance. 9. THIS WARRANTY GIVES YOU SPECIFIC LEGAL RIGHTS, AND YOU...


