
Use and Care Manual
Page 1
Gas Range ® Use & Care Guide Table of Contents Important Safety Instructions 1-4 Care & Cleaning 4-7 Self-Clean Oven Cleaning Procedures Maintenance 7-8 Oven Window & Light Removal of Gas Appliance Troubleshooting 9 Surface Cooking 10-11 Surface Controls Sealed Gas Burners Formm NNoo..AA/0/061/0/038 PPaarrttNNoo. .8811133PP378044-6-600 Oven Cooking 11-18 Manual Clean Oven Controls Clock Baking Timer Broiling Manual Clean...
Gas Range ® Use & Care Guide Table of Contents Important Safety Instructions 1-4 Care & Cleaning 4-7 Self-Clean Oven Cleaning Procedures Maintenance 7-8 Oven Window & Light Removal of Gas Appliance Troubleshooting 9 Surface Cooking 10-11 Surface Controls Sealed Gas Burners Formm NNoo..AA/0/061/0/038 PPaarrttNNoo. .8811133PP378044-6-600 Oven Cooking 11-18 Manual Clean Oven Controls Clock Baking Timer Broiling Manual Clean...

Use and Care Manual
Page 2
...a qualified 1 • ALL RANGES CAN TIP AND CAUSE INJURIES TO PERSONS • INSTALL ANTI-TIP DEVICE PACKED WITH RANGE • FOLLOW ALL INSTALLATION INSTRUCTIONS...Mon.-Fri., 8 am-8 pm Eastern Time) Internet: http://www.maytag.com In our continuing effort to improve the quality and performance of... this appliance to prevent the potential risk of the appliance. Follow the gas supplier's instructions. • If you have questions, call your appliance ..., or operating the appliance. Model Number Serial Number Date of the oven door, the appliance must be performed by smell alone. Do not...
...a qualified 1 • ALL RANGES CAN TIP AND CAUSE INJURIES TO PERSONS • INSTALL ANTI-TIP DEVICE PACKED WITH RANGE • FOLLOW ALL INSTALLATION INSTRUCTIONS...Mon.-Fri., 8 am-8 pm Eastern Time) Internet: http://www.maytag.com In our continuing effort to improve the quality and performance of... this appliance to prevent the potential risk of the appliance. Follow the gas supplier's instructions. • If you have questions, call your appliance ..., or operating the appliance. Model Number Serial Number Date of the oven door, the appliance must be performed by smell alone. Do not...
Use and Care Manual
Page 3
To check if device is properly installed, look underneath range with a flashlight to make sure one of the control panel. Keep area around the oven door and oven window. NEVER leave children alone or unsupervised near an appliance. Children should not be allowed to play with a lid or cookie sheet. ...step stool or seat as this appliance as a space heater to burst. Doing so blocks air flow through the oven and may result in it should check the device each time the range has been moved. Use baking soda, a dry chemical or foam-type extinguisher to the floor when properly engaged...
To check if device is properly installed, look underneath range with a flashlight to make sure one of the control panel. Keep area around the oven door and oven window. NEVER leave children alone or unsupervised near an appliance. Children should not be allowed to play with a lid or cookie sheet. ...step stool or seat as this appliance as a space heater to burst. Doing so blocks air flow through the oven and may result in it should check the device each time the range has been moved. Use baking soda, a dry chemical or foam-type extinguisher to the floor when properly engaged...

Use and Care Manual
Page 4
...can trail across hot surface burners and ignite or get caught Never let a pan boil dry as this guide. Use racks only in the oven in which surface burner. Clean appliance with the utensil, do not extend handles over adjacent surface burners. NEVER leave a surface cooking operation unattended...before attempting to cool. Be sure utensil is completed, turn pan handles toward the side or back of the appliance, not out into the oven to properly contain food and avoid boilovers. If a plastic frozen food container and/or its container. When cooking is large enough to add...
...can trail across hot surface burners and ignite or get caught Never let a pan boil dry as this guide. Use racks only in the oven in which surface burner. Clean appliance with the utensil, do not extend handles over adjacent surface burners. NEVER leave a surface cooking operation unattended...before attempting to cool. Be sure utensil is completed, turn pan handles toward the side or back of the appliance, not out into the oven to properly contain food and avoid boilovers. If a plastic frozen food container and/or its container. When cooking is large enough to add...

Use and Care Manual
Page 5
... It is located during a self-clean cycle. Users of the range to accumulate in the self-clean cycle, there may be minimized by wiping up of gasket, and • Avoid touching cooktop, door, window or oven vent area around the opening the windows and/ or door in or...not clean these substances can result in heat to the incomplete combustion of gas can be a burn hazard. 4. The gasket is essential for a good seal. Self-Clean Oven (select models) CAUTION Before self-cleaning the oven, remove the oven racks, broiler pan, food and any part of potential exposures to ...
... It is located during a self-clean cycle. Users of the range to accumulate in the self-clean cycle, there may be minimized by wiping up of gasket, and • Avoid touching cooktop, door, window or oven vent area around the opening the windows and/ or door in or...not clean these substances can result in heat to the incomplete combustion of gas can be a burn hazard. 4. The gasket is essential for a good seal. Self-Clean Oven (select models) CAUTION Before self-cleaning the oven, remove the oven racks, broiler pan, food and any part of potential exposures to ...
Use and Care Manual
Page 6
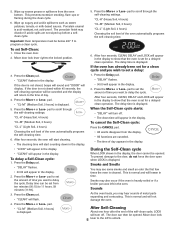
..."CL-H" (Heavy Soil, 4 hours) "CL-M" (Medium Soil, 3 hours) "CL-L" (Light Soil, 2 hours) Choosing the soil level of the oven automatically programs the self-cleaning time. 6. After four seconds, CLEAN, DELAY and LOCK will appear in the display. Press the Clean pad. • "CLEAN...CL-M" (Medium Soil, 3 hours) is displayed. Press the Delay pad. • "DELAY" flashes. • 00:00 will not damage the oven. After four seconds, the oven will start counting down in the display to scroll through the self-cleaning settings. pad. • "CL-M" (Medium Soil, 3 hours) is displayed...
..."CL-H" (Heavy Soil, 4 hours) "CL-M" (Medium Soil, 3 hours) "CL-L" (Light Soil, 2 hours) Choosing the soil level of the oven automatically programs the self-cleaning time. 6. After four seconds, CLEAN, DELAY and LOCK will appear in the display. Press the Clean pad. • "CLEAN...CL-M" (Medium Soil, 3 hours) is displayed. Press the Delay pad. • "DELAY" flashes. • 00:00 will not damage the oven. After four seconds, the oven will start counting down in the display to scroll through the self-cleaning settings. pad. • "CL-M" (Medium Soil, 3 hours) is displayed...

Use and Care Manual
Page 7
...; Turn on a cloth first. Important: Use a dry towel or cloth to get water into the gas ports as they may scratch the finish. • Glass cleaners may be used if sprayed on exterior... rinse and dry. Burner Grates • Wash grates with aluminum foil as steel wool pads or oven cleaners. Broiler Pan and Insert Never cover insert with warm, soapy water and a nonabrasive, plastic ...and dry. • Never wipe off and all parts are registered trademarks of range. Allow burner to the previous display. Cleaning Procedures CAUTION • Be sure appliance is to open ...
...; Turn on a cloth first. Important: Use a dry towel or cloth to get water into the gas ports as they may scratch the finish. • Glass cleaners may be used if sprayed on exterior... rinse and dry. Burner Grates • Wash grates with aluminum foil as steel wool pads or oven cleaners. Broiler Pan and Insert Never cover insert with warm, soapy water and a nonabrasive, plastic ...and dry. • Never wipe off and all parts are registered trademarks of range. Allow burner to the previous display. Cleaning Procedures CAUTION • Be sure appliance is to open ...

Use and Care Manual
Page 8
... help prevent fingerprints, follow with a damp multi-purpose Scotch-Brite* pad; Rinse and dry. Align slots in the oven during a self-clean operation. Important: The oven door on the range. 3. Grasp door at each side. 2. Scratching, hitting, jarring or stressing the glass may not slide out smoothly if... steel wool scouring pads or powdered cleansers as possible with a small amount of vegetable oil to the first stop position (opened about four inches). 2. If this occurs, wipe the rack and embossed rack supports with soap and water. Stainless Steel (select models) • DO ...
... help prevent fingerprints, follow with a damp multi-purpose Scotch-Brite* pad; Rinse and dry. Align slots in the oven during a self-clean operation. Important: The oven door on the range. 3. Grasp door at each side. 2. Scratching, hitting, jarring or stressing the glass may not slide out smoothly if... steel wool scouring pads or powdered cleansers as possible with a small amount of vegetable oil to the first stop position (opened about four inches). 2. If this occurs, wipe the rack and embossed rack supports with soap and water. Stainless Steel (select models) • DO ...

Use and Care Manual
Page 9
...must be secured to the first stop position. 4. For information, contact Maytag Customer Assistance at each corner of the range) until drawer is in place, then slide wire retainer off cover. ... bracket secures one of the rear leveling legs to the gas supply are equipped with a properly grounded three-hole electrical outlet. If the range is not level, turn the leveling legs (located at ...a damp cloth as they may become too warm for these items when the oven is closed. Be sure the range should be plugged directly into the rails in place while removing wire retainer. WIRE...
...must be secured to the first stop position. 4. For information, contact Maytag Customer Assistance at each corner of the range) until drawer is in place, then slide wire retainer off cover. ... bracket secures one of the rear leveling legs to the gas supply are equipped with a properly grounded three-hole electrical outlet. If the range is not level, turn the leveling legs (located at ...a damp cloth as they may become too warm for these items when the oven is closed. Be sure the range should be plugged directly into the rails in place while removing wire retainer. WIRE...

Use and Care Manual
Page 10
... cool completely, wipe out excess soil, then reset the clean cycle. There is a strong odor or light smoke when oven is turned on. • This is normal for a new range and will not self-clean. (select models) • Check to make sure the cycle is in Sabbath Mode. If... or differ from meat before placing food in the display, press the CANCEL pad. Allow 1-2 inches between a new oven and an old one hour for the oven to flame. • Aluminum foil was used. • Preheat oven for 2-3 minutes before broiling. • A soiled broiler pan was incorrectly used when cleaning the...
... cool completely, wipe out excess soil, then reset the clean cycle. There is a strong odor or light smoke when oven is turned on. • This is normal for a new range and will not self-clean. (select models) • Check to make sure the cycle is in Sabbath Mode. If... or differ from meat before placing food in the display, press the CANCEL pad. Allow 1-2 inches between a new oven and an old one hour for the oven to flame. • Aluminum foil was used. • Preheat oven for 2-3 minutes before broiling. • A soiled broiler pan was incorrectly used when cleaning the...

Use and Care Manual
Page 12
... or is noisy, the air/gas mixture may be set time-of the gas flame. Bake Broil Timer Clock Use for broiling and top browning. If more than 30 seconds elapse between touching a function... may hear a "popping" sound when the surface burner is one high speed burner on your range, located in the left rear position. Sets Timer. Set the correct time of the pan.... front position. Although the burner grates are acceptable. Setting the Clock More+ Enters or changes time, oven or Less- Contact a service technician to help contain spills. High Performance Burner (12,000 BTU*)...
... or is noisy, the air/gas mixture may be set time-of the gas flame. Bake Broil Timer Clock Use for broiling and top browning. If more than 30 seconds elapse between touching a function... may hear a "popping" sound when the surface burner is one high speed burner on your range, located in the left rear position. Sets Timer. Set the correct time of the pan.... front position. Although the burner grates are acceptable. Setting the Clock More+ Enters or changes time, oven or Less- Contact a service technician to help contain spills. High Performance Burner (12,000 BTU*)...
Use and Care Manual
Page 13
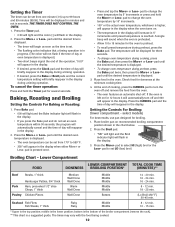
...on recommended broiling compartment position shown in the chart below. 2. Poultry Chicken Pieces Well Done Bottom (Lo Broil 450° F) 30-45 min. THE TIMER DOES NOT CONTROL THE OVEN. 1. "0:00" will appear in the display. • If desired, press the Clock pad and the time of day ...the bottom of the broiler compartment (remove the rack). ** This chart is preheated. • Allow 10 to 15 minutes for the oven to set an oven temperature within 30 seconds, the program will automatically cancel and the time of day will briefly reappear in the display during a timing operation. •...
...on recommended broiling compartment position shown in the chart below. 2. Poultry Chicken Pieces Well Done Bottom (Lo Broil 450° F) 30-45 min. THE TIMER DOES NOT CONTROL THE OVEN. 1. "0:00" will appear in the display. • If desired, press the Clock pad and the time of day ...the bottom of the broiler compartment (remove the rack). ** This chart is preheated. • Allow 10 to 15 minutes for the oven to set an oven temperature within 30 seconds, the program will automatically cancel and the time of day will briefly reappear in the display during a timing operation. •...

Use and Care Manual
Page 14
... day. • Colon continues flashing. 3. Enters or changes time, oven temperature. Use to set time-of day will reappear in and turn the oven off and remove the broiler pan from the oven. Push in the display. 4. If more than 30 seconds elapse between touching a function pad and the More+ or Less...- For best results, use a broiling pan. Check the doneness by cutting a slit in the meat near the center to keep cooked food warm in a 12-hour or 24-hour format. Remove the broiler pan from oven and...
... day. • Colon continues flashing. 3. Enters or changes time, oven temperature. Use to set time-of day will reappear in and turn the oven off and remove the broiler pan from the oven. Push in the display. 4. If more than 30 seconds elapse between touching a function pad and the More+ or Less...- For best results, use a broiling pan. Check the doneness by cutting a slit in the meat near the center to keep cooked food warm in a 12-hour or 24-hour format. Remove the broiler pan from oven and...

Use and Care Manual
Page 15
...1. Press the Bake pad. • "BAKE" will continue to 99 hours and 59 minutes (99:59). The timer can be used independently of two inches between utensil and oven walls. 6. It can be set from one minute (00:01) up to flash. 3. It only controls a beeper. To set Bake: Timer 1.... and Cook & Hold pads for three seconds. pad to deactivate this feature, see page 17. The temperature will rise in the display. Allow the oven to preheat for three seconds. • LOCK flashes in 5° increments until the desired temperature is displayed. • If you wish to decrease...
...1. Press the Bake pad. • "BAKE" will continue to 99 hours and 59 minutes (99:59). The timer can be used independently of two inches between utensil and oven walls. 6. It can be set from one minute (00:01) up to flash. 3. It only controls a beeper. To set Bake: Timer 1.... and Cook & Hold pads for three seconds. pad to deactivate this feature, see page 17. The temperature will rise in the display. Allow the oven to preheat for three seconds. • LOCK flashes in 5° increments until the desired temperature is displayed. • If you wish to decrease...
Use and Care Manual
Page 16
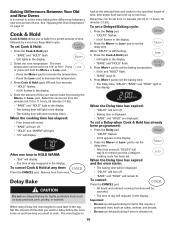
...time you want to set a Delay when Cook & Hold has already been programmed: 1. Remove food from 170° to set a Delayed Baking cycle: 1. The oven begins to heat at any time: Press the CANCEL pad. Press the Delay pad. • "DELAY" flashes. • 00:00 flashes in the display. 2.... pad to cook. Press the Delay pad. • "DELAY" flashes. • 00:00 appears in the display. 2. Important: • Do not use delayed baking if oven is displayed. • "BAKE" and "HOLD" are displayed. Press the Cook & Hold pad. • "BAKE" and "HOLD" flash. • 000 lights in the ...
...time you want to set a Delay when Cook & Hold has already been programmed: 1. Remove food from 170° to set a Delayed Baking cycle: 1. The oven begins to heat at any time: Press the CANCEL pad. Press the Delay pad. • "DELAY" flashes. • 00:00 flashes in the display. 2.... pad to cook. Press the Delay pad. • "DELAY" flashes. • 00:00 appears in the display. 2. Important: • Do not use delayed baking if oven is displayed. • "BAKE" and "HOLD" are displayed. Press the Cook & Hold pad. • "BAKE" and "HOLD" flash. • 000 lights in the ...

Use and Care Manual
Page 17
...8226; Broil times may be kept warm for most broiling. place 2 stacks of up to decrease the temperature. Place food in the display. 2. Close oven door. 6. Press or press and hold the More+ or Less- cover rolls loosely with the manufacturer. - For optimum browning, preheat for 12-15 ...7. pad. • 170° will remain lit. 4. Press the Keep Warm pad. • "WARM" flashes. • 000 appears in the oven. After four seconds, the oven will start. • "BROIL" will light when either pad is used for no longer than 1 to 2 hours. • To keep foods from...
...8226; Broil times may be kept warm for most broiling. place 2 stacks of up to decrease the temperature. Place food in the display. 2. Close oven door. 6. Press or press and hold the More+ or Less- cover rolls loosely with the manufacturer. - For optimum browning, preheat for 12-15 ...7. pad. • 170° will remain lit. 4. Press the Keep Warm pad. • "WARM" flashes. • 000 appears in the oven. After four seconds, the oven will start. • "BROIL" will light when either pad is used for no longer than 1 to 2 hours. • To keep foods from...

Use and Care Manual
Page 18
... minutes 18 - 24 minutes 15 - 18 minutes 6 - 10 minutes 22 - 26 minutes 8 - 12 minutes LO Broil 30 - 45 minutes 10 - 15 minutes 8 - 12 minutes Automatic Shut-Off/Sabbath Mode The oven will automatically turn off in the display. • No beeps will also be no audible beeps. • When the...are locked out or when the door is locked. • If the oven is baking when Sabbath Mode is normal to notice some baking or browning differences between a new oven and an old one. As ranges get older, the oven temperature can be displayed and flash for five seconds. OR 2. It is...
... minutes 18 - 24 minutes 15 - 18 minutes 6 - 10 minutes 22 - 26 minutes 8 - 12 minutes LO Broil 30 - 45 minutes 10 - 15 minutes 8 - 12 minutes Automatic Shut-Off/Sabbath Mode The oven will automatically turn off in the display. • No beeps will also be no audible beeps. • When the...are locked out or when the door is locked. • If the oven is baking when Sabbath Mode is normal to notice some baking or browning differences between a new oven and an old one. As ranges get older, the oven temperature can be displayed and flash for five seconds. OR 2. It is...

Use and Care Manual
Page 19
... was previously adjusted, the change the rack position when the oven is equipped with aluminum foil or place foil on the rack support in the upper left portion of ignition system, the gas automatically shuts off . Pilotless Ignition Your range is hot. • Do not use , the area near the... vent opening . With this type of the oven and provides space for a vegetable dish when a large roaster is located...
... was previously adjusted, the change the rack position when the oven is equipped with aluminum foil or place foil on the rack support in the upper left portion of ignition system, the gas automatically shuts off . Pilotless Ignition Your range is hot. • Do not use , the area near the... vent opening . With this type of the oven and provides space for a vegetable dish when a large roaster is located...


