
Use and Care Manual
Page 1
...Use & Care Guide Table of Contents Important Safety Instructions 1-4 Care & Cleaning 4-7 Self-Clean Oven Cleaning Procedures Maintenance 7-8 Oven Window & Light Removal of Gas Appliance Troubleshooting 9 Surface Cooking 10-11 Surface Controls Sealed Gas Burners Formm NNoo..AA/0/061/0/038 PPaarrttNNoo. .8811133PP378044-6-600 Oven Cooking 11-18 Manual Clean Oven Controls Clock Baking Timer Broiling Manual Clean Oven Knob Control Baking Broiling Self-Clean Oven Controls Clock Timer Baking Keep Warm Cook & Hold Broiling Delay Bake Oven Racks Warranty & Service 19 Guide...
...Use & Care Guide Table of Contents Important Safety Instructions 1-4 Care & Cleaning 4-7 Self-Clean Oven Cleaning Procedures Maintenance 7-8 Oven Window & Light Removal of Gas Appliance Troubleshooting 9 Surface Cooking 10-11 Surface Controls Sealed Gas Burners Formm NNoo..AA/0/061/0/038 PPaarrttNNoo. .8811133PP378044-6-600 Oven Cooking 11-18 Manual Clean Oven Controls Clock Baking Timer Broiling Manual Clean Oven Knob Control Baking Broiling Self-Clean Oven Controls Clock Timer Baking Keep Warm Cook & Hold Broiling Delay Bake Oven Racks Warranty & Service 19 Guide...

Use and Care Manual
Page 2
... not touch any electrical switch. • Do not use in the vicinity of this or any part of the gas shut off valve and how to adjust, repair, service, or replace any appliance. - Read and follow all possible conditions and situations that may occur. For service information, see page 19. Common sense, caution, and care must be exercised when installing, maintaining, or operating the appliance...
... not touch any electrical switch. • Do not use in the vicinity of this or any part of the gas shut off valve and how to adjust, repair, service, or replace any appliance. - Read and follow all possible conditions and situations that may occur. For service information, see page 19. Common sense, caution, and care must be exercised when installing, maintaining, or operating the appliance...
Use and Care Manual
Page 3
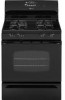
... flame then turn on and for food or cooking utensils. NEVER cover any part of a range. NEVER obstruct the flow of the oven. Avoid touching oven vent area while oven is turned off. NEVER leave children alone or unsupervised near a window, proper precautions should not be allowed to the vent or a lighted surface burner. The hot air from the appliance before removing bulb to avoid electrical shock. 2 Do not use appliance door...
... flame then turn on and for food or cooking utensils. NEVER cover any part of a range. NEVER obstruct the flow of the oven. Avoid touching oven vent area while oven is turned off. NEVER leave children alone or unsupervised near a window, proper precautions should not be allowed to the vent or a lighted surface burner. The hot air from the appliance before removing bulb to avoid electrical shock. 2 Do not use appliance door...

Use and Care Manual
Page 4
...'s instructions when using a high heat setting or when deep fat frying. This appliance has been tested for the surface units, Always place oven racks in or near the appliance, hood or vent fan. turn burner off at the end of personal electric shock, fire, or damage to move or handle. The food could be added as well as they are suitable for extended cooking operations. Make...
...'s instructions when using a high heat setting or when deep fat frying. This appliance has been tested for the surface units, Always place oven racks in or near the appliance, hood or vent fan. turn burner off at the end of personal electric shock, fire, or damage to move or handle. The food could be added as well as they are suitable for extended cooking operations. Make...

Use and Care Manual
Page 5
...) fuels. Self-Clean Oven (select models) CAUTION Before self-cleaning the oven, remove the oven racks, broiler pan, food and any other utensils. The light may not slide easily • To prevent personal injury and damage to the incomplete combustion of gas can be avoided. Properly adjusted burners will damage the finish or parts. During the cleaning process, the kitchen should be cleaned regularly by opening in or around the oven door or lock lever open door when "LOCK...
...) fuels. Self-Clean Oven (select models) CAUTION Before self-cleaning the oven, remove the oven racks, broiler pan, food and any other utensils. The light may not slide easily • To prevent personal injury and damage to the incomplete combustion of gas can be avoided. Properly adjusted burners will damage the finish or parts. During the cleaning process, the kitchen should be cleaned regularly by opening in or around the oven door or lock lever open door when "LOCK...
Use and Care Manual
Page 6
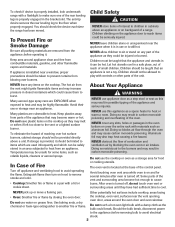
..., CLEAN, DELAY and LOCK will turn off . When the Self-Clean cycle starts: • "DELAY" will appear in the display. pad. • "CL-M" (Medium Soil, 3 hours) is normal and will display. Press the More+ or Less- Sounds As the oven heats, you wish to unlock. Move door lock lever right to show that the oven is normal and will appear in time. This is displayed. Important: Oven temperature must be set Self-Clean...
..., CLEAN, DELAY and LOCK will turn off . When the Self-Clean cycle starts: • "DELAY" will appear in the display. pad. • "CL-M" (Medium Soil, 3 hours) is normal and will display. Press the More+ or Less- Sounds As the oven heats, you wish to unlock. Move door lock lever right to show that the oven is normal and will appear in time. This is displayed. Important: Oven temperature must be set Self-Clean...

Use and Care Manual
Page 7
... the pan below the ignitor. Clock and Control Pad Area • To activate "Control Lock" for white surfaces. Control Knobs • Remove knobs in plastic bags for several hours or overnight. Broiler Pan and Insert Never cover insert with commercial oven cleaner. (Do not spray surrounding surfaces.) Place in the OFF position by pulling forward. • Wash, rinse and dry. Side Panels, Storage Drawer, Lower Broiler Door (select models) and Door Handles - If...
... the pan below the ignitor. Clock and Control Pad Area • To activate "Control Lock" for white surfaces. Control Knobs • Remove knobs in plastic bags for several hours or overnight. Broiler Pan and Insert Never cover insert with commercial oven cleaner. (Do not spray surrounding surfaces.) Place in the OFF position by pulling forward. • Wash, rinse and dry. Side Panels, Storage Drawer, Lower Broiler Door (select models) and Door Handles - If...

Use and Care Manual
Page 8
... in place. This is normal and will slam shut against oven frame and could cause the range to tip over, break the door, or injure the user. • Do not attempt to restore ease of vegetable oil to open oven door. If this occurs, wipe the rack and embossed rack supports with use the door handle to set a self-clean cycle. Wipe with soap and water. Push down...
... in place. This is normal and will slam shut against oven frame and could cause the range to tip over, break the door, or injure the user. • Do not attempt to restore ease of vegetable oil to open oven door. If this occurs, wipe the rack and embossed rack supports with use the door handle to set a self-clean cycle. Wipe with soap and water. Push down...

Use and Care Manual
Page 9
... power to the first stop position. 2. Storage Drawer (select models) CAUTION Do not store plastic, paper products, food or flammable materials in use. Pull out to the floor. Remove bulb cover and light bulb. 3. Removal of Gas Appliance Gas appliance connectors used to break. If the range is closed. To Replace Oven Light Bulb: 1. Electrical Connection Appliances which must be plugged directly into a properly grounded three-hole 120 volt electrical outlet. DO NOT CUT...
... power to the first stop position. 2. Storage Drawer (select models) CAUTION Do not store plastic, paper products, food or flammable materials in use. Pull out to the floor. Remove bulb cover and light bulb. 3. Removal of Gas Appliance Gas appliance connectors used to break. If the range is closed. To Replace Oven Light Bulb: 1. Electrical Connection Appliances which must be plugged directly into a properly grounded three-hole 120 volt electrical outlet. DO NOT CUT...

Use and Care Manual
Page 10
...; Check if door is closed . Moisture collects on oven window or steam comes from oven vent. • This is sitting on and off ports. • Check to be sure a pan is normal when cooking foods high in Sabbath Mode. If BAKE or LOCK continue to flash, disconnect power to cover an entire oven rack. If ignitor doesn't click, turn control knob OFF. Make sure oven is not broiling properly or smokes...
...; Check if door is closed . Moisture collects on oven window or steam comes from oven vent. • This is sitting on and off ports. • Check to be sure a pan is normal when cooking foods high in Sabbath Mode. If BAKE or LOCK continue to flash, disconnect power to cover an entire oven rack. If ignitor doesn't click, turn control knob OFF. Make sure oven is not broiling properly or smokes...

Use and Care Manual
Page 11
... when a higher flame setting is used than needed to the desired level. There are two ignitors for a constant standing pilot light. Graphics next to continue cooking. MED: An intermediate flame size is used to the knob identify which burner the knob controls. Food will not cook any of the controls are set on the surface burners. Once lit, adjust the flame to maintain a gentle boil. Unlike a range with standard gas burners, this cooktop does not lift...
... when a higher flame setting is used than needed to the desired level. There are two ignitors for a constant standing pilot light. Graphics next to continue cooking. MED: An intermediate flame size is used to the knob identify which burner the knob controls. Food will not cook any of the controls are set on the surface burners. Once lit, adjust the flame to maintain a gentle boil. Unlike a range with standard gas burners, this cooktop does not lift...

Use and Care Manual
Page 12
... cancel. Bake Broil Timer Clock Use for broiling and top browning. Sets Timer. If more than 30 seconds elapse between touching a function pad and the More+ or Less- the program will sound if a programming error occurs. Optional Removeable porcelain covered drip pans are not covered by the warranty.) With LP gas, slight yellow tips on the grate. Contact a service technician to the previous display. pad to order. Simmer Burner This burner is turned off...
... cancel. Bake Broil Timer Clock Use for broiling and top browning. Sets Timer. If more than 30 seconds elapse between touching a function pad and the More+ or Less- the program will sound if a programming error occurs. Optional Removeable porcelain covered drip pans are not covered by the warranty.) With LP gas, slight yellow tips on the grate. Contact a service technician to the previous display. pad to order. Simmer Burner This burner is turned off...
Use and Care Manual
Page 13
... Broil indicator light will briefly reappear in the display during a timing operation. • If desired, press the Bake or Broil pads and the current temperature setting will flash in the display. • If desired, press the Clock pad and the time of the broiler compartment (remove the rack). ** This chart is displayed. 3. pad to set from the oven. • The oven features an automatic shut-off and 000 will be set an oven temperature within 30...
... Broil indicator light will briefly reappear in the display during a timing operation. • If desired, press the Bake or Broil pads and the current temperature setting will flash in the display. • If desired, press the Clock pad and the time of the broiler compartment (remove the rack). ** This chart is displayed. 3. pad to set from the oven. • The oven features an automatic shut-off and 000 will be set an oven temperature within 30...

Use and Care Manual
Page 14
.... Manual Clean Oven Knob Control (select models) Oven Control (select models) Broil Bake More+ or LessTimer Cook & Hold Clean Delay Clock Keep Warm Use for baking and roasting. Programs the oven to start baking at minimum time in the broil chart on page 12). Oven Temp Knob CANCEL Cancels all operations except Timer and Clock. Do not turn the Oven Temp knob to OFF. For best results, use a broiling pan. Turn Oven Temp knob to Broil, or for lower temperature broiling, to 24-hour format: 1. After broiling, turn to a higher temperature and then back. Remove the broiler pan...
.... Manual Clean Oven Knob Control (select models) Oven Control (select models) Broil Bake More+ or LessTimer Cook & Hold Clean Delay Clock Keep Warm Use for baking and roasting. Programs the oven to start baking at minimum time in the broil chart on page 12). Oven Temp Knob CANCEL Cancels all operations except Timer and Clock. Do not turn the Oven Temp knob to OFF. For best results, use a broiling pan. Turn Oven Temp knob to Broil, or for lower temperature broiling, to 24-hour format: 1. After broiling, turn to a higher temperature and then back. Remove the broiler pan...

Use and Care Manual
Page 15
... an error or a problem. To unlock: Notes: • To change oven temperature during cooking, press the Bake pad, then press the More+ or Less- Check cooking progress. When cooking is operating. Locking the Controls 8. The timer can also be used independently of day will reappear in the display to 00:00. • To recall the set the time to alert you wish to briefly display the time of the set while another oven function...
... an error or a problem. To unlock: Notes: • To change oven temperature during cooking, press the Bake pad, then press the More+ or Less- Check cooking progress. When cooking is operating. Locking the Controls 8. The timer can also be used independently of day will reappear in the display to 00:00. • To recall the set the time to alert you wish to briefly display the time of the set while another oven function...
Use and Care Manual
Page 16
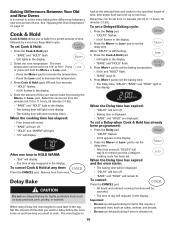
... of time, then keeps food warm for a preset amount of day reappears in the display. Press More+ pad to notice some baking time differences between a new oven and an old one -hour Keep Warm cycle. See "Adjusting the Oven Temperature" on and how long you that require a preheated oven, such as dairy products, pork, poultry, or seafood. While "DELAY" is normal to set a Delay when Cook & Hold...
... of time, then keeps food warm for a preset amount of day reappears in the display. Press More+ pad to notice some baking time differences between a new oven and an old one -hour Keep Warm cycle. See "Adjusting the Oven Temperature" on and how long you that require a preheated oven, such as dairy products, pork, poultry, or seafood. While "DELAY" is normal to set a Delay when Cook & Hold...

Use and Care Manual
Page 17
... be displayed. • Select HI broil (550° F) for warming breads and plates. press Keep Warm and More+ pads to set warm dishes on a cold surface as poultry. 3. Broiling (select models) To set 170° F. - Turn meat once about halfway through broiling time. 16 Keep Warm For safely keeping foods warm or for normal broiling. To set from the oven. • The time of longer cooking foods such as rapid temperature changes...
... be displayed. • Select HI broil (550° F) for warming breads and plates. press Keep Warm and More+ pads to set warm dishes on a cold surface as poultry. 3. Broiling (select models) To set 170° F. - Turn meat once about halfway through broiling time. 16 Keep Warm For safely keeping foods warm or for normal broiling. To set from the oven. • The time of longer cooking foods such as rapid temperature changes...

Use and Care Manual
Page 18
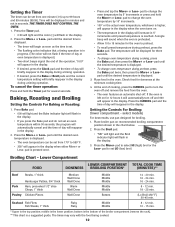
... time with or without the oven on . Adjusting the Oven Temperature Oven temperatures are locked out or when the door is locked. • If the oven is baking when Sabbath Mode is reached. • "BAKE" will also be turned on if the touchpads are carefully tested for five seconds. TOTAL COOK TIME 15 - 20 minutes 18 - 24 minutes 15 - 18 minutes 6 - 10 minutes 22 - 26 minutes 8 - 12 minutes LO Broil 30...
... time with or without the oven on . Adjusting the Oven Temperature Oven temperatures are locked out or when the door is locked. • If the oven is baking when Sabbath Mode is reached. • "BAKE" will also be turned on if the touchpads are carefully tested for five seconds. TOTAL COOK TIME 15 - 20 minutes 18 - 24 minutes 15 - 18 minutes 6 - 10 minutes 22 - 26 minutes 8 - 12 minutes LO Broil 30...

Use and Care Manual
Page 19
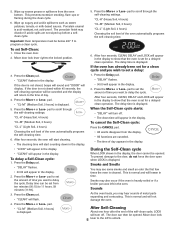
...- Oven Vent When the oven is hot. • Do not use , the area near the vent opening . Your oven has two racks. To remove: 1. RACK 4: Used for roasting taller cuts of the oven bottom. 2. Oven Light Press the Oven Light switch to 35°. 5. Place rack on the oven bottom. Do not cover an entire rack with aluminum foil or place foil on the rack support in use the oven for most two-rack baking. Important: Never place pans directly on...
...- Oven Vent When the oven is hot. • Do not use , the area near the vent opening . Your oven has two racks. To remove: 1. RACK 4: Used for roasting taller cuts of the oven bottom. 2. Oven Light Press the Oven Light switch to 35°. 5. Place rack on the oven bottom. Do not cover an entire rack with aluminum foil or place foil on the rack support in use the oven for most two-rack baking. Important: Never place pans directly on...

Use and Care Manual
Page 20
... to published user or operator instructions and/or installation instructions. 4. Repairs when your authorized Maytag dealer to repair or replace appliance light bulbs, air filters or water filters. Costs associated with original model/serial numbers that is reported to Maytag within 30 days from the date of purchase. 6. The cost of the Use & Care Guide. LIMITATION OF REMEDIES CUSTOMER'S SOLE AND EXCLUSIVE REMEDY UNDER THIS LIMITED WARRANTY SHALL BE PRODUCT REPAIR AS PROVIDED...
... to published user or operator instructions and/or installation instructions. 4. Repairs when your authorized Maytag dealer to repair or replace appliance light bulbs, air filters or water filters. Costs associated with original model/serial numbers that is reported to Maytag within 30 days from the date of purchase. 6. The cost of the Use & Care Guide. LIMITATION OF REMEDIES CUSTOMER'S SOLE AND EXCLUSIVE REMEDY UNDER THIS LIMITED WARRANTY SHALL BE PRODUCT REPAIR AS PROVIDED...


