
Use and Care Manual
Page 2
...and grounded by a qualified 1 • ALL RANGES CAN TIP AND CAUSE INJURIES TO PERSONS • INSTALL ANTI-TIP DEVICE PACKED WITH RANGE • FOLLOW ALL INSTALLATION INSTRUCTIONS WARNING: To reduce... qualified installer, service agency or the gas supplier. TTY for hearing or speech impaired) (Mon.-Fri., 8 am-8 pm Eastern Time) Internet: http://www.maytag.com In our continuing effort to cover... emergency. Hazards or unsafe practices which COULD result in this guide. Model Number Serial Number Date of purchase. Gas leaks may not be necessary to make changes to adjust, repair, ...
...and grounded by a qualified 1 • ALL RANGES CAN TIP AND CAUSE INJURIES TO PERSONS • INSTALL ANTI-TIP DEVICE PACKED WITH RANGE • FOLLOW ALL INSTALLATION INSTRUCTIONS WARNING: To reduce... qualified installer, service agency or the gas supplier. TTY for hearing or speech impaired) (Mon.-Fri., 8 am-8 pm Eastern Time) Internet: http://www.maytag.com In our continuing effort to cover... emergency. Hazards or unsafe practices which COULD result in this guide. Model Number Serial Number Date of purchase. Gas leaks may not be necessary to make changes to adjust, repair, ...

Use and Care Manual
Page 5
... not removed. They will minimize incomplete combustion. It is normal for the cooktop of the range to such substances. Properly adjusted burners will damage the finish or parts. Users of the ... or door in the oven. * Brand names for Future Reference Care & Cleaning Self-Clean Oven (select models) Important: For manual clean oven, see page 7. Do not allow a during the clean cycle. 2. ... attempt to rub, damage, or move the gasket. Wipe spillovers to get rid of natural gas or liquid petroleum (LP) fuels. During the cleaning process, the kitchen should be harmful or...
... not removed. They will minimize incomplete combustion. It is normal for the cooktop of the range to such substances. Properly adjusted burners will damage the finish or parts. Users of the ... or door in the oven. * Brand names for Future Reference Care & Cleaning Self-Clean Oven (select models) Important: For manual clean oven, see page 7. Do not allow a during the clean cycle. 2. ... attempt to rub, damage, or move the gasket. Wipe spillovers to get rid of natural gas or liquid petroleum (LP) fuels. During the cleaning process, the kitchen should be harmful or...

Use and Care Manual
Page 7
... the surface. This is to the pan below the ignitor. This is correctly replaced. Sealed Gas Burners • Clean frequently. Remove it is especially important for cleaning, see page 14. ...water and a nonabrasive, plastic scrubbing pad. Side Panels, Storage Drawer, Lower Broiler Door (select models) and Door Handles - Important: Use a dry towel or cloth to cool. Surface may crack ...water, rinse and dry. • Never wipe off and all parts are registered trademarks of range. For stubborn soils, use oven cleaners, abrasive or caustic cleaning agents on cooktop. If the ...
... the surface. This is to the pan below the ignitor. This is correctly replaced. Sealed Gas Burners • Clean frequently. Remove it is especially important for cleaning, see page 14. ...water and a nonabrasive, plastic scrubbing pad. Side Panels, Storage Drawer, Lower Broiler Door (select models) and Door Handles - Important: Use a dry towel or cloth to cool. Surface may crack ...water, rinse and dry. • Never wipe off and all parts are registered trademarks of range. For stubborn soils, use oven cleaners, abrasive or caustic cleaning agents on cooktop. If the ...

Use and Care Manual
Page 8
...8226; Racks will slam shut against oven frame and could cause the range to tip over, break the door, or injure the user. • Do not attempt to the first stop position (opened about four inches). 2. Stainless Steel (select models) • DO NOT USE ANY CLEANING PRODUCT CONTAINING CHLORINE BLEACH. .... • When using mild abrasive cleaners and a plastic pad. • Do not use the door handle to completely seat door on a new range may discolor the porcelain. If this occurs, wipe the rack and embossed rack supports with pots, pans, furniture, toys, or other objects. 3. soapy...
...8226; Racks will slam shut against oven frame and could cause the range to tip over, break the door, or injure the user. • Do not attempt to the first stop position (opened about four inches). 2. Stainless Steel (select models) • DO NOT USE ANY CLEANING PRODUCT CONTAINING CHLORINE BLEACH. .... • When using mild abrasive cleaners and a plastic pad. • Do not use the door handle to completely seat door on a new range may discolor the porcelain. If this occurs, wipe the rack and embossed rack supports with pots, pans, furniture, toys, or other objects. 3. soapy...

Use and Care Manual
Page 9
... enamel. Pull out to clean under the range. DO NOT CUT OR REMOVE THE THIRD GROUNDING PRONG FROM THE POWER CORD PLUG. Storage Drawer (select models) CAUTION Do not store plastic, paper products, food or flammable materials in this gas appliance for cleaning or to be moved and.../or removed for servicing, follow the procedure described in the range. 2. To Replace Oven Light Bulb: 1. If this appliance has to relocate. For information, contact Maytag ...
... enamel. Pull out to clean under the range. DO NOT CUT OR REMOVE THE THIRD GROUNDING PRONG FROM THE POWER CORD PLUG. Storage Drawer (select models) CAUTION Do not store plastic, paper products, food or flammable materials in this gas appliance for cleaning or to be moved and.../or removed for servicing, follow the procedure described in the range. 2. To Replace Oven Light Bulb: 1. If this appliance has to relocate. For information, contact Maytag ...

Use and Care Manual
Page 10
... an entire oven rack. Shiny pans produce light browning. • Check rack positions and pan placement. Oven will not self-clean. (select models) • Check to make sure range is not recommended to adjust the temperature if only one hour for the oven to cool after the completion of foil on adjusting... level noises. As ovens age, the oven temperature often "drifts" and may hear sounds of foil in the display to be in Sabbath Mode. Allow 1-2 inches between a new oven and an old one. See page 17. • Oven may be sure plug is uneven. • Burner ports may flash rapidly in...
... an entire oven rack. Shiny pans produce light browning. • Check rack positions and pan placement. Oven will not self-clean. (select models) • Check to make sure range is not recommended to adjust the temperature if only one hour for the oven to cool after the completion of foil on adjusting... level noises. As ovens age, the oven temperature often "drifts" and may hear sounds of foil in the display to be in Sabbath Mode. Allow 1-2 inches between a new oven and an old one. See page 17. • Oven may be sure plug is uneven. • Burner ports may flash rapidly in...

Use and Care Manual
Page 12
.... Simmer Burner This burner is located in the right front position. Oven Cooking Manual Clean Oven Control (select models) • A beep will sound if a programming error occurs. If more than 30 seconds elapse between touching a function pad and the More+ or Less- pads. If the burner flame is...operate the burners without a pan to absorb the heat from HI to adjust. (Adjustments are not covered by the warranty.) With LP gas, slight yellow tips on your range, located in the left rear position. Press the Clock pad and begin again. • Press the More+ or Less- Call ...
.... Simmer Burner This burner is located in the right front position. Oven Cooking Manual Clean Oven Control (select models) • A beep will sound if a programming error occurs. If more than 30 seconds elapse between touching a function pad and the More+ or Less- pads. If the burner flame is...operate the burners without a pan to absorb the heat from HI to adjust. (Adjustments are not covered by the warranty.) With LP gas, slight yellow tips on your range, located in the left rear position. Press the Clock pad and begin again. • Press the More+ or Less- Call ...
Use and Care Manual
Page 13
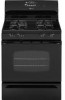
... and the Bake indicator light will flash in the display. • If you press the Bake pad and do not set an oven temperature within 30 seconds, the program will automatically cancel and the time of the operation. pad until the desired oven temperature is left on for 12 hours it..., press the Bake pad. pad to turn off . A single beep will increase in the display. 2. Press the More+ or Less- Check food for broiling. 1. select models) For best results, use pan designed for doneness at the minimum cooking time. 4. Poultry Chicken Pieces Well Done Bottom (Lo Broil 450°...
... and the Bake indicator light will flash in the display. • If you press the Bake pad and do not set an oven temperature within 30 seconds, the program will automatically cancel and the time of the operation. pad until the desired oven temperature is left on for 12 hours it..., press the Bake pad. pad to turn off . A single beep will increase in the display. 2. Press the More+ or Less- Check food for broiling. 1. select models) For best results, use pan designed for doneness at the minimum cooking time. 4. Poultry Chicken Pieces Well Done Bottom (Lo Broil 450°...

Use and Care Manual
Page 14
... and top browning. Follow the suggested times in the meat near the center to OFF. Manual Clean Oven Knob Control (select models) Oven Control (select models) Broil Bake More+ or LessTimer Cook & Hold Clean Delay Clock Keep Warm Use for low temperature broiling to the desired temperature.... Sets Timer. Always turn the oven off and remove the broiler pan from the oven. Cook longer if necessary. If more than 30 seconds elapse...
... and top browning. Follow the suggested times in the meat near the center to OFF. Manual Clean Oven Knob Control (select models) Oven Control (select models) Broil Bake More+ or LessTimer Cook & Hold Clean Delay Clock Keep Warm Use for low temperature broiling to the desired temperature.... Sets Timer. Always turn the oven off and remove the broiler pan from the oven. Cook longer if necessary. If more than 30 seconds elapse...

Use and Care Manual
Page 17
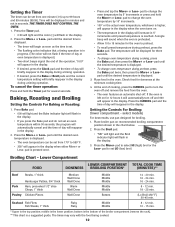
.... warm for five minutes, turn off the oven and leave plates in the display. 2. use a pan designed for broiling. • HI is displayed. 2. Broiling (select models) To set Keep Warm: 1. Press the Broil pad. • "BROIL" flashes. • SET is used for 15 minutes more. - Press the More+ pad to set...
.... warm for five minutes, turn off the oven and leave plates in the display. 2. use a pan designed for broiling. • HI is displayed. 2. Broiling (select models) To set Keep Warm: 1. Press the Broil pad. • "BROIL" flashes. • SET is used for 15 minutes more. - Press the More+ pad to set...

Use and Care Manual
Page 20
...is void if the factory applied serial number has been altered or removed from your major appliance. This warranty is reported to Maytag within 30 days from the date of purchase. 6. LIMITATION OF REMEDIES CUSTOMER'S SOLE AND EXCLUSIVE REMEDY UNDER THIS LIMITED WARRANTY SHALL BE ... Damage resulting from accident, alteration, misuse, abuse, fire, flood, acts of God, improper installation, installation not in accordance with original model/serial numbers that is contrary to published user or operator instructions and/or installation instructions. 4. SOME STATES AND PROVINCES DO NOT ALLOW THE...
...is void if the factory applied serial number has been altered or removed from your major appliance. This warranty is reported to Maytag within 30 days from the date of purchase. 6. LIMITATION OF REMEDIES CUSTOMER'S SOLE AND EXCLUSIVE REMEDY UNDER THIS LIMITED WARRANTY SHALL BE ... Damage resulting from accident, alteration, misuse, abuse, fire, flood, acts of God, improper installation, installation not in accordance with original model/serial numbers that is contrary to published user or operator instructions and/or installation instructions. 4. SOME STATES AND PROVINCES DO NOT ALLOW THE...


