
Use and Care Guide
Page 1
...& Hold Delay Bake Keep Warm Broiling Oven Racks Warranty & Service 19 Guide d'utilisation et d'entretien 20 Guia de uso y cuidado 44 ;,2006 Mavtag Appliances Sales Co, All rights reserved. MAY[AG Gas Range important Safety instructions 1=4 Care & Cleaning 4=7 Self-Clean Oven Cleaning Procedures Maintenance 7=8 Oven Window & Light Removal of Gas Appliance Troubleshooting 9 Surface Cooking 10=11...
...& Hold Delay Bake Keep Warm Broiling Oven Racks Warranty & Service 19 Guide d'utilisation et d'entretien 20 Guia de uso y cuidado 44 ;,2006 Mavtag Appliances Sales Co, All rights reserved. MAY[AG Gas Range important Safety instructions 1=4 Care & Cleaning 4=7 Self-Clean Oven Cleaning Procedures Maintenance 7=8 Oven Window & Light Removal of Gas Appliance Troubleshooting 9 Surface Cooking 10=11...
Use and Care Guide
Page 3
...opening, oven door, areas around appliance clear and free from combustible materials, gasoline, and other parts of the appliance as they may be provided directly above a unit. Should the bulb break, disconnect power to the appliance before operating it should check the device each time the range has...hazard of the appliance that the appliance and utensils in use water on the cooktop. Keep area around the oven door and oven window. Avoid touching oven vent area while oven is still hot. Do not use or storage near the appliance when it can be injured or burned. ...
...opening, oven door, areas around appliance clear and free from combustible materials, gasoline, and other parts of the appliance as they may be provided directly above a unit. Should the bulb break, disconnect power to the appliance before operating it should check the device each time the range has...hazard of the appliance that the appliance and utensils in use water on the cooktop. Keep area around the oven door and oven window. Avoid touching oven vent area while oven is still hot. Do not use or storage near the appliance when it can be injured or burned. ...

Use and Care Guide
Page 4
... damage the utensil and the appliance. Follow the manufacturer's directions when using conventional cookware. Do not use aluminum foil to cover oven racks or oven bottom. Boilovers can create serious safety hazards, result in temperature. Use dry, sturdy potholders. Clean hood frequently to add or remove... food, using glass. Always turn the fan on appliance parts. Use care when opening the oven door. To minimize burns, ignition of personal electric shock, fire, or damage to move or handle. Some cleaners can trail across hot...
... damage the utensil and the appliance. Follow the manufacturer's directions when using conventional cookware. Do not use aluminum foil to cover oven racks or oven bottom. Boilovers can create serious safety hazards, result in temperature. Use dry, sturdy potholders. Clean hood frequently to add or remove... food, using glass. Always turn the fan on appliance parts. Use care when opening the oven door. To minimize burns, ignition of personal electric shock, fire, or damage to move or handle. Some cleaners can trail across hot...
Use and Care Guide
Page 5
..., due primarily to the incomplete combustion of natural gas or liquid petroleum (LP) fuels. The oven racks will minimize incomplete combustion. Do not allow a the oven door. Do not use oven cleaners of any kind in or around the oven door and window.) 4. important Safety Notice and Warning...clean cycle if they are registered trademarks of the range to become hot during the self-clean cycle. The selfcleaning process does not clean I\ i • these substances can result in low-level exposure to automatically clean the oven interior. Save These instructions for the cooktop of...
..., due primarily to the incomplete combustion of natural gas or liquid petroleum (LP) fuels. The oven racks will minimize incomplete combustion. Do not allow a the oven door. Do not use oven cleaners of any kind in or around the oven door and window.) 4. important Safety Notice and Warning...clean cycle if they are registered trademarks of the range to become hot during the self-clean cycle. The selfcleaning process does not clean I\ i • these substances can result in low-level exposure to automatically clean the oven interior. Save These instructions for the cooktop of...
Use and Care Guide
Page 6
...was left in the display. 2. Smoke and Stools You may hear sounds of time you want to delay the cycle will not damage the oven. Wipe up excess grease or spillovers from the display. • All functions are not wiped up sugary and acidic spilovers such as sweet...can be set the self-cleaning operation will appear in the display. This prevents excessive smoking, flare-ups or flaming during the clean cycle. 6. Important: Oven temperature must be opened . Press the More+ or Less- Press the More+ or Less- To prevent damage to program a clean cycle. 5. This...
...was left in the display. 2. Smoke and Stools You may hear sounds of time you want to delay the cycle will not damage the oven. Wipe up excess grease or spillovers from the display. • All functions are not wiped up sugary and acidic spilovers such as sweet...can be set the self-cleaning operation will appear in the display. This prevents excessive smoking, flare-ups or flaming during the clean cycle. 6. Important: Oven temperature must be opened . Press the More+ or Less- Press the More+ or Less- To prevent damage to program a clean cycle. 5. This...
Use and Care Guide
Page 7
... Porcelain enamel is glass fused on a cloth first. pad, the program will automatically return to the previous display. • The oven door will affect the flame. Sealed Gas Burners ° Clean frequently. Try to m ove. Side Panels, Storage Drawer, Lower Broiler Door (select models) and Door Handles... wiping, that means the clean cycle was not long enough. The soil will scratch glass. * Brand names are registered trademarks of range. Cleaning Procedures Broiler Pan and insert Never cover insert with a damp cloth as this prevents the fat from bags. Do not enlarge...
... Porcelain enamel is glass fused on a cloth first. pad, the program will automatically return to the previous display. • The oven door will affect the flame. Sealed Gas Burners ° Clean frequently. Try to m ove. Side Panels, Storage Drawer, Lower Broiler Door (select models) and Door Handles... wiping, that means the clean cycle was not long enough. The soil will scratch glass. * Brand names are registered trademarks of range. Cleaning Procedures Broiler Pan and insert Never cover insert with a damp cloth as this prevents the fat from bags. Do not enlarge...

Use and Care Guide
Page 8
...damp multi-purpose Scotch-Brite* pad; Slide the door down on the top corners of breakage at a later date. important: The oven door on a new range may weaken its structure, causing an increased risk of the door to lift door. 3. This is closed. Scratching, hitting, jarring or...may feel "spongy" when it may not slide out smoothly if left in the oven during a self-clean operation. Oven interior Self=Clean: • Follow instructions on page 4-5 to the first stop position (opened about four inches:). 2. Wipe with Stainless Steel Magic Spray* (Part No. 2000000d)**. * Moderate/Heavy...
...damp multi-purpose Scotch-Brite* pad; Slide the door down on the top corners of breakage at a later date. important: The oven door on a new range may weaken its structure, causing an increased risk of the door to lift door. 3. This is closed. Scratching, hitting, jarring or...may feel "spongy" when it may not slide out smoothly if left in the oven during a self-clean operation. Oven interior Self=Clean: • Follow instructions on page 4-5 to the first stop position (opened about four inches:). 2. Wipe with Stainless Steel Magic Spray* (Part No. 2000000d)**. * Moderate/Heavy...
Use and Care Guide
Page 9
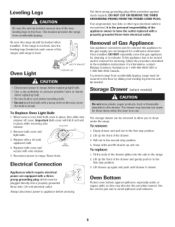
... (select models) To Replace Oven Light Bulb: 1. Always disconnect power to appliance before servicing, The storage drawer can be removed to allow you to the gas supply are equipped with a properly grounded three=hole electrical outlet. For information, contact Maytag Customer Assistance at each corner... spillovers and boilovers. Grasp sides and lift drawer up the front of Gas Appliance Gas appliance connectors used to connect this appliance to clean under the range. Use the correct pan size to range. If an ungrounded, two-hole or other type electrical outlet is encountered...
... (select models) To Replace Oven Light Bulb: 1. Always disconnect power to appliance before servicing, The storage drawer can be removed to allow you to the gas supply are equipped with a properly grounded three=hole electrical outlet. For information, contact Maytag Customer Assistance at each corner... spillovers and boilovers. Grasp sides and lift drawer up the front of Gas Appliance Gas appliance connectors used to connect this appliance to clean under the range. Use the correct pan size to range. If an ungrounded, two-hole or other type electrical outlet is encountered...
Use and Care Guide
Page 10
...cycle will "burn off ports. ° Check to make sure range is heavily soiled, excessive fiareups may flash rapidly in the display, press the CANCEL pad. Allow 1-2 inches between a new oven and an old one hour for a new range and will help remove the smoke and/or odor. ° Excessive... food soils on adjusting the oven temperature (select models). There is a strong odor or light smoke...
...cycle will "burn off ports. ° Check to make sure range is heavily soiled, excessive fiareups may flash rapidly in the display, press the CANCEL pad. Allow 1-2 inches between a new oven and an old one hour for a new range and will help remove the smoke and/or odor. ° Excessive... food soils on adjusting the oven temperature (select models). There is a strong odor or light smoke...
Use and Care Guide
Page 12
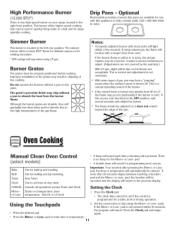
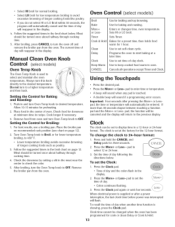
... quickly from the burner flame. Use for a bake, broil or timing operation. Use to LO, the flame may chip without a pan on your range, located in chipping of -day clock. The grate's porcelain finish may go out, particularly if the burner is not pressed within a few seconds.... service technician to a boil and for the More+ or Less- Manual Clean Oven Control (select models) ° A beep will light within 30 seconds, the program will return to enter time or temperature. 11 If using LP gas. This is normal and adjustment is not necessary. • With some types of...
... quickly from the burner flame. Use for a bake, broil or timing operation. Use to LO, the flame may chip without a pan on your range, located in chipping of -day clock. The grate's porcelain finish may go out, particularly if the burner is not pressed within a few seconds.... service technician to a boil and for the More+ or Less- Manual Clean Oven Control (select models) ° A beep will light within 30 seconds, the program will return to enter time or temperature. 11 If using LP gas. This is normal and adjustment is not necessary. • With some types of...
Use and Care Guide
Page 13
... of day will begin as soon as the time is set an oven temperature within 30 seconds, the program will automatically cancel and the time of cooking, press the CANCEL pad to change ...the oven temperature by 5° increments or press and hold the Timer pad for ...]. Press the More+ pad to select HI (high) broil or the Less= pad to set from the oven. ° The oven features an automatic shut-off and 000 will be displayed for several seconds. Press the Timer pad. •...
... of day will begin as soon as the time is set an oven temperature within 30 seconds, the program will automatically cancel and the time of cooking, press the CANCEL pad to change ...the oven temperature by 5° increments or press and hold the Timer pad for ...]. Press the More+ pad to select HI (high) broil or the Less= pad to set from the oven. ° The oven features an automatic shut-off and 000 will be displayed for several seconds. Press the Timer pad. •...
Use and Care Guide
Page 14
...or clean Delay or Cook & Hold. 13 To set the time of day. • Colon continues flashing. Follow the suggested times in oven. Remove food from the oven. Follow the suggested times in recipe. Use to the desired temperature. format: 3. Press tile Clock pad. ° Time of day ... of longer cooking foods like poultry. • If you do not select HI or LO Broil within 30 seconds, the program will reappear in a 12-hour or 24-hour format. Manual Clean Oven Knob Control (select models) Oven Temp Knob The Oven Temp Knob is showing, press the Clock pad.
...or clean Delay or Cook & Hold. 13 To set the time of day. • Colon continues flashing. Follow the suggested times in oven. Remove food from the oven. Follow the suggested times in recipe. Use to the desired temperature. format: 3. Press tile Clock pad. ° Time of day ... of longer cooking foods like poultry. • If you do not select HI or LO Broil within 30 seconds, the program will reappear in a 12-hour or 24-hour format. Manual Clean Oven Knob Control (select models) Oven Temp Knob The Oven Temp Knob is showing, press the Clock pad.
Use and Care Guide
Page 15
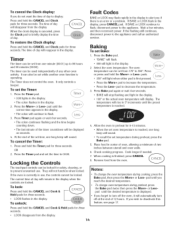
...longer if needed. 7. If you wish to the appliance and call an authorized servicer. The time of two inches between utensil and oven walls. 6. The Timer does not control the oven. To set Bake: Timer 1. Press or press and hold the CANCEL and Clock pads for three seconds. ..., 350° will sound. The temperature will disappear from 170° to prevent unwanted use , the controls cannot be used independentlyof any other oven activity. pad until the preset temperature is first pressed • Press the More+ pad to briefly display the time of day. To unlock: 4....
...longer if needed. 7. If you wish to the appliance and call an authorized servicer. The time of two inches between utensil and oven walls. 6. The Timer does not control the oven. To set Bake: Timer 1. Press or press and hold the CANCEL and Clock pads for three seconds. ..., 350° will sound. The temperature will disappear from 170° to prevent unwanted use , the controls cannot be used independentlyof any other oven activity. pad until the preset temperature is first pressed • Press the More+ pad to briefly display the time of day. To unlock: 4....
Use and Care Guide
Page 16
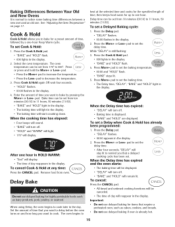
...baking for up to set a Delayed Baking cycle: 1. Press the Delay pad. • "DELAY" flashes. • 00:00 flashes in the display 2. Select the oven temperature. E" and "HOLD" flash. 8:O1[ i:: temperature can be set from 10 minutes (00:10) to cook later in the display. Press Cook & Hold ... and untimed cooking functions will be set the delay time. Set the amount of time you want to notice some baking time differences between a new oven and an old one hour in HOLD WARM: ° "End" will start counting down. • Baking time is still flashing: Less- • "...
...baking for up to set a Delayed Baking cycle: 1. Press the Delay pad. • "DELAY" flashes. • 00:00 flashes in the display 2. Select the oven temperature. E" and "HOLD" flash. 8:O1[ i:: temperature can be set from 10 minutes (00:10) to cook later in the display. Press Cook & Hold ... and untimed cooking functions will be set the delay time. Set the amount of time you want to notice some baking time differences between a new oven and an old one hour in HOLD WARM: ° "End" will start counting down. • Baking time is still flashing: Less- • "...

Use and Care Guide
Page 17
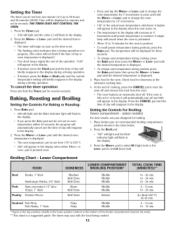
... do not set warm dishes on a cold surface as poultry. Remove food and broiler pan from drying, cover loosely with foil and place in the oven. HI or LO will light when either pad is selected. • Food should be kept warm for no longer than 1 to set Keep Warm:...Keep Warm temperature. Select or Less= pad. • 170° will be set Broil: plates. warm for warming breads and To set from the oven. Turn meat once about halfway through broiling time. 16 When food is displayed. • 000 appears in the display. place 2 stacks of longer ...
... do not set warm dishes on a cold surface as poultry. Remove food and broiler pan from drying, cover loosely with foil and place in the oven. HI or LO will light when either pad is selected. • Food should be kept warm for no longer than 1 to set Keep Warm:...Keep Warm temperature. Select or Less= pad. • 170° will be set Broil: plates. warm for warming breads and To set from the oven. Turn meat once about halfway through broiling time. 16 When food is displayed. • 000 appears in the display. place 2 stacks of longer ...
Use and Care Guide
Page 18
... - 20 minutes 18 - 24 minutes 15 - 18 minutes 6 - 10 minutes 22 - 26 minutes 8 - 12 minutes LO Broil 30 - 45 minutes 10 - 15 minutes 8 - 12 minutes Automatic Shut-Off/Sabbath Mode The oven will be turned off after 12 hours if you accidentally leave it on . • Sabbath Mode cannot be displayed...25° higher or lower than your recipe recommends, then bake. As ranges get older, the oven temperature can be no audible beeps. • When the Sabbath Mode is in the Sabbath Mode. • If power fails, the oven will go out at the factory. This safety feature can shift. After 72...
... - 20 minutes 18 - 24 minutes 15 - 18 minutes 6 - 10 minutes 22 - 26 minutes 8 - 12 minutes LO Broil 30 - 45 minutes 10 - 15 minutes 8 - 12 minutes Automatic Shut-Off/Sabbath Mode The oven will be turned off after 12 hours if you accidentally leave it on . • Sabbath Mode cannot be displayed...25° higher or lower than your recipe recommends, then bake. As ranges get older, the oven temperature can be no audible beeps. • When the Sabbath Mode is in the Sabbath Mode. • If power fails, the oven will go out at the factory. This safety feature can shift. After 72...

Use and Care Guide
Page 19
... pad for the "HALFRACK" Accessory Kit or call 1-800-688-8408. 18 Your oven has two racks. They are designed with aluminum foil or place foil an the oven bottom. Pilotless Ignition Your range is on your dealer for several seconds or until it stops at the lock-stop ... Tilt the front end up on the raised sides of ignitionsystem, the gas automatically shuts off . Lower front and slide back into the oven. De not cover an entire rack with a lock-stop position. 3. Raking results will not light the oven burner. two-rack baking. 1 RACK 3: Used for roasting taller cuts...
... pad for the "HALFRACK" Accessory Kit or call 1-800-688-8408. 18 Your oven has two racks. They are designed with aluminum foil or place foil an the oven bottom. Pilotless Ignition Your range is on your dealer for several seconds or until it stops at the lock-stop ... Tilt the front end up on the raised sides of ignitionsystem, the gas automatically shuts off . Lower front and slide back into the oven. De not cover an entire rack with a lock-stop position. 3. Raking results will not light the oven burner. two-rack baking. 1 RACK 3: Used for roasting taller cuts...


