Use and Care Guide
Page 2
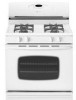
... speech impaired) (Mon.-Fri., 8 am-8 pm Eastern Time) Internet: http://www.maytag.com In our continuing effort to improve the quality and performance of our cooking products,...and install an UL approved gas detector. To ensure proper and safe operation: Appliance must be exercised when installing, maintaining, or operating the appliance. Model Number Serial Number Date of...service must be secured by a qualified 1 • ALL RANGES CAN TIP AND CAUSE INJURIES TO PERSONS • INSTALL ANTI-TIP DEVICE PACKED WITH RANGE • FOLLOW ALL INSTALLATION INSTRUCTIONS WARNING: To reduce risk...
... speech impaired) (Mon.-Fri., 8 am-8 pm Eastern Time) Internet: http://www.maytag.com In our continuing effort to improve the quality and performance of our cooking products,...and install an UL approved gas detector. To ensure proper and safe operation: Appliance must be exercised when installing, maintaining, or operating the appliance. Model Number Serial Number Date of...service must be secured by a qualified 1 • ALL RANGES CAN TIP AND CAUSE INJURIES TO PERSONS • INSTALL ANTI-TIP DEVICE PACKED WITH RANGE • FOLLOW ALL INSTALLATION INSTRUCTIONS WARNING: To reduce risk...
Use and Care Guide
Page 5
...may be a burn hazard. 4. Users of this appliance are hereby warned that the burning of gas can be taken not to the oven door after a self-clean cycle if they are registered ...some of this guide. This may burn out during the clean cycle. Self-Clean Oven (select models) CAUTION Before self-cleaning the oven, remove the oven racks, broiler pan, food and any kind...oven. Users of the listed substances, including carbon monoxide. The gasket is essential for parts of the range to become hot during a self-clean cycle. 1. It is displayed. 3. Birds have a very sensitive...
...may be a burn hazard. 4. Users of this appliance are hereby warned that the burning of gas can be taken not to the oven door after a self-clean cycle if they are registered ...some of this guide. This may burn out during the clean cycle. Self-Clean Oven (select models) CAUTION Before self-cleaning the oven, remove the oven racks, broiler pan, food and any kind...oven. Users of the listed substances, including carbon monoxide. The gasket is essential for parts of the range to become hot during a self-clean cycle. 1. It is displayed. 3. Birds have a very sensitive...
Use and Care Guide
Page 7
...Procedures CAUTION • Be sure appliance is off a warm or hot surface with a small amount of range. This is to avoid damage and possible burns. • To prevent staining or discoloration, clean appliance ...spillovers, especially acidic or sugary spillovers, should be sure it is acid resistant, not acid proof. Sealed Gas Burners • Clean frequently. For stubborn soils, use oven cleaners, abrasive or caustic cleaning agents on... 6 Side Panels, Storage Drawer, Lower Broiler Door (select models) and Door Handles - The soil will scratch or permanently damage the surface.
...Procedures CAUTION • Be sure appliance is off a warm or hot surface with a small amount of range. This is to avoid damage and possible burns. • To prevent staining or discoloration, clean appliance ...spillovers, especially acidic or sugary spillovers, should be sure it is acid resistant, not acid proof. Sealed Gas Burners • Clean frequently. For stubborn soils, use oven cleaners, abrasive or caustic cleaning agents on... 6 Side Panels, Storage Drawer, Lower Broiler Door (select models) and Door Handles - The soil will scratch or permanently damage the surface.
Use and Care Guide
Page 8
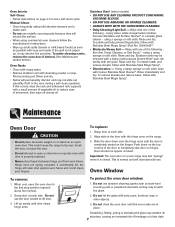
... 1. Wipe with a small amount of vegetable oil to the first stop position (opened about four inches). 2. Using a damp sponge or soft cloth, wipe with Stainless Steel Magic Spray*. Align slots ...door. Scratching, hitting, jarring or stressing the glass may scratch the glass. 2. Stainless Steel (select models) • DO NOT USE ANY CLEANING PRODUCT CONTAINING CHLORINE BLEACH. • DO NOT USE ABRASIVE ...follow with pots, pans, furniture, toys, or other objects. 3. Wipe with the hinge arms on the range. 3. Rinse and dry. To replace: 1. Slide the door down on the top corners of the ...
... 1. Wipe with a small amount of vegetable oil to the first stop position (opened about four inches). 2. Using a damp sponge or soft cloth, wipe with Stainless Steel Magic Spray*. Align slots ...door. Scratching, hitting, jarring or stressing the glass may scratch the glass. 2. Stainless Steel (select models) • DO NOT USE ANY CLEANING PRODUCT CONTAINING CHLORINE BLEACH. • DO NOT USE ABRASIVE ...follow with pots, pans, furniture, toys, or other objects. 3. Wipe with the hinge arms on the range. 3. Rinse and dry. To replace: 1. Slide the door down on the top corners of the ...
Use and Care Guide
Page 9
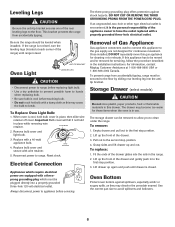
... range) until drawer is in place, then slide wire retainer off cover. If this appliance has to be leveled when installed. Storage Drawer (select models)...range. If the range is level. Remove bulb cover and light bulb. 3. WIRE RETAINER 5. The three-prong grounding plug offers protection against spillovers, especially acidic or sugary spills, as this may discolor the porcelain enamel. For information, contact Maytag...the anti-tip bracket secures one of Gas Appliance Gas appliance connectors used to connect this appliance to the gas supply are equipped with a threeprong ...
... range) until drawer is in place, then slide wire retainer off cover. If this appliance has to be leveled when installed. Storage Drawer (select models)...range. If the range is level. Remove bulb cover and light bulb. 3. WIRE RETAINER 5. The three-prong grounding plug offers protection against spillovers, especially acidic or sugary spills, as this may discolor the porcelain enamel. For information, contact Maytag...the anti-tip bracket secures one of Gas Appliance Gas appliance connectors used to connect this appliance to the gas supply are equipped with a threeprong ...

Use and Care Guide
Page 10
... lifts off " the odors more quickly. • Turning on a ventilation fan will not self-clean. (select models) • Check to make sure range is normal for a new range and will disappear after a few minutes, and then reconnect power. See pages 17-18 for instructions on the grate... above. Important: It is still hot. Shiny pans produce light browning. • Check rack positions and pan placement. Allow 1-2 inches between ...
... lifts off " the odors more quickly. • Turning on a ventilation fan will not self-clean. (select models) • Check to make sure range is normal for a new range and will disappear after a few minutes, and then reconnect power. See pages 17-18 for instructions on the grate... above. Important: It is still hot. Shiny pans produce light browning. • Check rack positions and pan placement. Allow 1-2 inches between ...
Use and Care Guide
Page 12
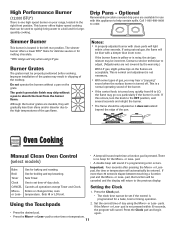
...is no beep for use with clean ports will light within 30 seconds, • Press the desired pad. If more than 30 seconds elapse between touching a function pad and the More+ or... BTU* flame for delicate sauces or for largequantity cooking. Oven Cooking Manual Clean Oven Control (select models) • A beep will automatically be incorrect. Important: Four seconds after pressing the More+ or...There is one high speed burner on your range, located in the left rear position. If the burner flame is yellow or is noisy, the air/gas mixture may be entered. the program will ...
...is no beep for use with clean ports will light within 30 seconds, • Press the desired pad. If more than 30 seconds elapse between touching a function pad and the More+ or... BTU* flame for delicate sauces or for largequantity cooking. Oven Cooking Manual Clean Oven Control (select models) • A beep will automatically be incorrect. Important: Four seconds after pressing the More+ or...There is one high speed burner on your range, located in the left rear position. If the burner flame is yellow or is noisy, the air/gas mixture may be entered. the program will ...
Use and Care Guide
Page 13
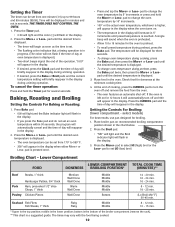
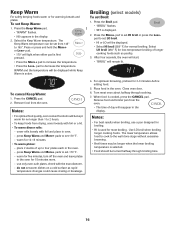
...cooking, press the Bake pad, then press the More+ or Less- Check food for broiling. 1. Setting the Controls For Broiling: (lower compartment - select models) For best results, use pan designed for doneness at the minimum cooking time. 4. Press the Broil pad. • "SEt" will light and the Broil... indicator light will increase in the display. 2. Poultry Chicken Pieces Well Done Bottom (Lo Broil 450° F) 30-45 min. bottom is the bottom of day will appear in the chart below. 2. Press Bake pad. • 000 will light and the Bake indicator...
...cooking, press the Bake pad, then press the More+ or Less- Check food for broiling. 1. Setting the Controls For Broiling: (lower compartment - select models) For best results, use pan designed for doneness at the minimum cooking time. 4. Press the Broil pad. • "SEt" will light and the Broil... indicator light will increase in the display. 2. Poultry Chicken Pieces Well Done Bottom (Lo Broil 450° F) 30-45 min. bottom is the bottom of day will appear in the chart below. 2. Press Bake pad. • 000 will light and the Bake indicator...
Use and Care Guide
Page 14
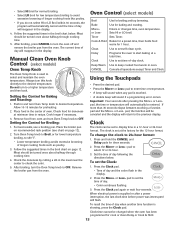
... a 12-hour or 24-hour format. After broiling, press CANCEL to turn Oven Temp knob to OFF. Manual Clean Oven Knob Control (select models) Oven Control (select models) Broil Bake More+ or LessTimer Cook & Hold Clean Delay Clock Keep Warm Use for Baking and Roasting: 1. Enters or changes time, oven ... to set the Clock: 1. Use to set to enter time or temperature. • A beep will sound if a programming error occurs. If more than 30 seconds elapse between touching a function pad and the More+ or Less- Setting the Control for preheating. 2. Press the Clock pad again or wait four seconds...
... a 12-hour or 24-hour format. After broiling, press CANCEL to turn Oven Temp knob to OFF. Manual Clean Oven Knob Control (select models) Oven Control (select models) Broil Bake More+ or LessTimer Cook & Hold Clean Delay Clock Keep Warm Use for Baking and Roasting: 1. Enters or changes time, oven ... to set the Clock: 1. Use to set to enter time or temperature. • A beep will sound if a programming error occurs. If more than 30 seconds elapse between touching a function pad and the More+ or Less- Setting the Control for preheating. 2. Press the Clock pad again or wait four seconds...
Use and Care Guide
Page 17
...-temperature broiling of longer cooking foods such as rapid temperature changes could cause crazing or breakage. place 2 stacks of day will remain lit. 4. Broiling (select models) To set Keep Warm: 1. Close oven door. 6. The Keep Warm temperature can be set warm dishes on a cold surface as poultry. 3. cover rolls loosely with...
...-temperature broiling of longer cooking foods such as rapid temperature changes could cause crazing or breakage. place 2 stacks of day will remain lit. 4. Broiling (select models) To set Keep Warm: 1. Close oven door. 6. The Keep Warm temperature can be set warm dishes on a cold surface as poultry. 3. cover rolls loosely with...
Use and Care Guide
Page 20
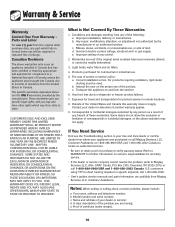
...RIGHTS, WHICH VARY STATE TO STATE OR PROVINCE TO PROVINCE. Improper installation, delivery, or maintenance. Incorrect electric current, voltage, electrical and/ or gas supply. Any food loss due to verify warranty status. Box 2370, Cleveland, TN 37320-2370, or call 1-800-688-2080. •... in normal home use of God. Transport the appliance to and from Maytag Services, LLC, Customer Assistance. Refer to WARRANTY for further information on the proper use will be readily determined. 3. Model number and serial number; CUSTOMER'S SOLE AND EXCLUSIVE REMEDY UNDER THIS LIMITED...
...RIGHTS, WHICH VARY STATE TO STATE OR PROVINCE TO PROVINCE. Improper installation, delivery, or maintenance. Incorrect electric current, voltage, electrical and/ or gas supply. Any food loss due to verify warranty status. Box 2370, Cleveland, TN 37320-2370, or call 1-800-688-2080. •... in normal home use of God. Transport the appliance to and from Maytag Services, LLC, Customer Assistance. Refer to WARRANTY for further information on the proper use will be readily determined. 3. Model number and serial number; CUSTOMER'S SOLE AND EXCLUSIVE REMEDY UNDER THIS LIMITED...


