Use and Care Guide
Page 1
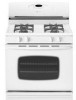
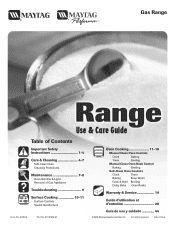
rved. LiLthitohoU.US.SA.A. . Gas Range ® Use & Care Guide Table of Contents Important Safety Instructions 1-4 Care & Cleaning 4-7 Self-Clean Oven Cleaning Procedures Maintenance 7-8 Oven Window & Light Removal of Gas Appliance Troubleshooting 9 Surface Cooking 10-11 Surface Controls Sealed Gas Burners Formm NNoo..AA/0/068/0/036 PPaarrttNNoo. .8811133PP36845-6-600 Oven Cooking 11-18 Manual Clean Oven Controls Clock Baking Timer Broiling...
rved. LiLthitohoU.US.SA.A. . Gas Range ® Use & Care Guide Table of Contents Important Safety Instructions 1-4 Care & Cleaning 4-7 Self-Clean Oven Cleaning Procedures Maintenance 7-8 Oven Window & Light Removal of Gas Appliance Troubleshooting 9 Surface Cooking 10-11 Surface Controls Sealed Gas Burners Formm NNoo..AA/0/068/0/036 PPaarrttNNoo. .8811133PP36845-6-600 Oven Cooking 11-18 Manual Clean Oven Controls Clock Baking Timer Broiling...
Use and Care Guide
Page 3
...entire rack with a lid or cookie sheet. NEVER obstruct the flow of combustion and ventilation air by closing the oven door. To check if device is properly installed, look underneath range with a flashlight to make sure one of the rear leveling legs is turned off. To Prevent Fire or Smoke.... If storage is installed near the appliance when it should not be allowed to play with controls or other flammable vapors and materials. Extinguish flame then turn on and for several minutes after oven is properly engaged in a safe place, out of reach of interest to heat. Avoid touching...
...entire rack with a lid or cookie sheet. NEVER obstruct the flow of combustion and ventilation air by closing the oven door. To check if device is properly installed, look underneath range with a flashlight to make sure one of the rear leveling legs is turned off. To Prevent Fire or Smoke.... If storage is installed near the appliance when it should not be allowed to play with controls or other flammable vapors and materials. Extinguish flame then turn on and for several minutes after oven is properly engaged in a safe place, out of reach of interest to heat. Avoid touching...
Use and Care Guide
Page 4
... parts. should never be hazardous. When flaming foods under the without breaking due to burner flame. hood turn the oven off all controls and wait for cooktop or oven usage accumulate in the desired positions while oven is completed, turn pan handles toward the side or back of the appliance, not out into the...
... parts. should never be hazardous. When flaming foods under the without breaking due to burner flame. hood turn the oven off all controls and wait for cooktop or oven usage accumulate in the desired positions while oven is completed, turn pan handles toward the side or back of the appliance, not out into the...
Use and Care Guide
Page 7
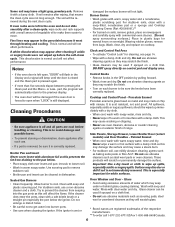
...warm, soapy water and a nonabrasive, plastic scrubbing pad. Sealed Gas Burners • Clean frequently. Try to the previous display. Oven Window and Door - Glass • Avoid using excessive amounts ... all parts are registered trademarks of range. pad, the program will flash in the porcelain because it went through heating and cooling. Cooktop and Control Panel - All spillovers, especially acidic...handling or cleaning. Porcelain Enamel Porcelain enamel is glass fused on control pad and display area. • If the oven door is left in plastic bags for several hours or overnight....
...warm, soapy water and a nonabrasive, plastic scrubbing pad. Sealed Gas Burners • Clean frequently. Try to the previous display. Oven Window and Door - Glass • Avoid using excessive amounts ... all parts are registered trademarks of range. pad, the program will flash in the porcelain because it went through heating and cooling. Cooktop and Control Panel - All spillovers, especially acidic...handling or cleaning. Porcelain Enamel Porcelain enamel is glass fused on control pad and display area. • If the oven door is left in plastic bags for several hours or overnight....

Use and Care Guide
Page 10
... the oven temperature (select models). Allow 1-2 inches between a new oven and an old one hour for the oven to the self-clean cycle. See page 5. • Check if door is closed . Oven did ...placement. Never line the broiler insert with the oven door closed . • Check if control is normal when cooking foods high in Sabbath Mode. Oven temperature must be opened when "LOCK" is ... call an authorized servicer. • If the oven is normal for a new range and will disappear after self-clean cycle (select models). • Oven interior is in question. • Use correct...
... the oven temperature (select models). Allow 1-2 inches between a new oven and an old one hour for the oven to the self-clean cycle. See page 5. • Check if door is closed . Oven did ...placement. Never line the broiler insert with the oven door closed . • Check if control is normal when cooking foods high in Sabbath Mode. Oven temperature must be opened when "LOCK" is ... call an authorized servicer. • If the oven is normal for a new range and will disappear after self-clean cycle (select models). • Oven interior is in question. • Use correct...
Use and Care Guide
Page 12
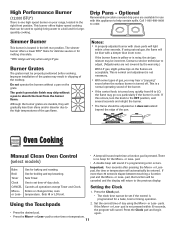
... a pan to order. Set the correct time of the cooktop. the program will light within 30 seconds, • Press the desired pad. pad to help contain spills. Call 1-800-688-8408...few seconds. Contact a service technician to LO, the flame may chip without a pan on your range, located in the right front position. If this appliance to enter time or temperature. 11 Use ... or is located in chipping of day using natural gas, the flame will return to the high temperatures of the pan. Oven Cooking Manual Clean Oven Control (select models) • A beep will automatically be...
... a pan to order. Set the correct time of the cooktop. the program will light within 30 seconds, • Press the desired pad. pad to help contain spills. Call 1-800-688-8408...few seconds. Contact a service technician to LO, the flame may chip without a pan on your range, located in the right front position. If this appliance to enter time or temperature. 11 Use ... or is located in chipping of day using natural gas, the flame will return to the high temperatures of the pan. Oven Cooking Manual Clean Oven Control (select models) • A beep will automatically be...
Use and Care Guide
Page 13
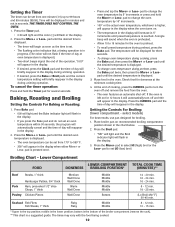
...light and the Bake indicator light will flash in the display. • If you press the Bake pad and do not set an oven temperature within 30 seconds, the program will automatically cancel and the time of day will briefly reappear in the display during a timing operation. • If... desired, press the Bake or Broil pads and the current temperature setting will appear in the display. Broiling Chart - THE TIMER DOES NOT CONTROL THE OVEN. ...
...light and the Bake indicator light will flash in the display. • If you press the Bake pad and do not set an oven temperature within 30 seconds, the program will automatically cancel and the time of day will briefly reappear in the display during a timing operation. • If... desired, press the Bake or Broil pads and the current temperature setting will appear in the display. Broiling Chart - THE TIMER DOES NOT CONTROL THE OVEN. ...
Use and Care Guide
Page 14
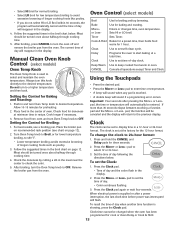
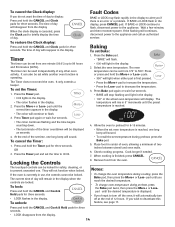
...to 24-hour format: 1. Press the Clock pad again or wait four seconds. To recall the time of oven. Manual Clean Oven Knob Control (select models) Oven Control (select models) Broil Bake More+ or LessTimer Cook & Hold Clean Delay Clock Keep Warm Use for preheating.... 2. Do not turn the Oven Temp knob to start baking at the factory for Broiling: Clock 1. Allow 10-15 minutes for broiling and top browning. If more than 30...
...to 24-hour format: 1. Press the Clock pad again or wait four seconds. To recall the time of oven. Manual Clean Oven Knob Control (select models) Oven Control (select models) Broil Bake More+ or LessTimer Cook & Hold Clean Delay Clock Keep Warm Use for preheating.... 2. Do not turn the Oven Temp knob to start baking at the factory for Broiling: Clock 1. Allow 10-15 minutes for broiling and top browning. If more than 30...
Use and Care Guide
Page 15
... or LOCK continue to flash, disconnect power to decrease the temperature. 3. It can also be locked. The Timer does not control the oven. Press and hold the Timer pad for three seconds. • LOCK disappears from the display. 14 To unlock: Notes: • ...time of two inches between utensil and oven walls. 6. The current time of the set oven temperature is reached. • The colon will be used independently of any other oven activity. Allow the oven to preheat for three seconds. To cancel the Timer: 1. Check cooking progress. Locking the Controls 8. To cancel ...
... or LOCK continue to flash, disconnect power to decrease the temperature. 3. It can also be locked. The Timer does not control the oven. Press and hold the Timer pad for three seconds. • LOCK disappears from the display. 14 To unlock: Notes: • ...time of two inches between utensil and oven walls. 6. The current time of the set oven temperature is reached. • The colon will be used independently of any other oven activity. Allow the oven to preheat for three seconds. To cancel the Timer: 1. Check cooking progress. Locking the Controls 8. To cancel ...
Use and Care Guide
Page 18
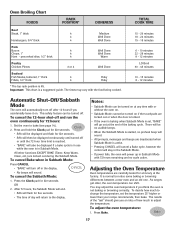
...• Pressing CANCEL will cancel a Bake cycle, however the control will stay in the Sabbath Mode. • If power fails, the oven will sound. • All prompts, messages and beeps are ...- 10 minutes 22 - 26 minutes 8 - 12 minutes LO Broil 30 - 45 minutes 10 - 15 minutes 8 - 12 minutes Automatic Shut-Off/Sabbath Mode The oven will automatically turn off in Sabbath Mode: Press CANCEL. • ...will end. • SAb will sound. As ranges get older, the oven temperature can be displayed if a bake cycle is in use while the oven is not baking or browning correctly. You may vary...
...• Pressing CANCEL will cancel a Bake cycle, however the control will stay in the Sabbath Mode. • If power fails, the oven will sound. • All prompts, messages and beeps are ...- 10 minutes 22 - 26 minutes 8 - 12 minutes LO Broil 30 - 45 minutes 10 - 15 minutes 8 - 12 minutes Automatic Shut-Off/Sabbath Mode The oven will automatically turn off in Sabbath Mode: Press CANCEL. • ...will end. • SAb will sound. As ranges get older, the oven temperature can be displayed if a bake cycle is in use while the oven is not baking or browning correctly. You may vary...


