

Installation Guide
Page 4
.... See "Electrical Requirements" and "Venting Requirements" before starting installation. Contact your "Use and Care Guide" for information about accessories available for installing new exhaust vent) Utility knife Putty knife 4 "Y" connector Short inlet hose Rubber washer Parts package is located in garages, closets, mobile homes, or sleeping quarters. Check that opens to your local building inspector. Some codes limit, or do not permit, installing dryer in dryer drum. Check code requirements. Tools needed for all installations: Tools needed Check local codes. Check...
.... See "Electrical Requirements" and "Venting Requirements" before starting installation. Contact your "Use and Care Guide" for information about accessories available for installing new exhaust vent) Utility knife Putty knife 4 "Y" connector Short inlet hose Rubber washer Parts package is located in garages, closets, mobile homes, or sleeping quarters. Check that opens to your local building inspector. Some codes limit, or do not permit, installing dryer in dryer drum. Check code requirements. Tools needed for all installations: Tools needed Check local codes. Check...

Installation Guide
Page 5
...) Non-Steam 5 Wide opening side-swing door B. See "Venting Requirements." ■■ A separate 30 amp circuit for electric dryers. ■■ A separate 15 or 20 amp circuit for the exhaust vent with maximum slope of 5½" (140 mm) clearance is greater than 1" (25 mm), install Extended Dryer Feet Kit, Part Number 279810. If slope is required behind the dryer for gas dryers. ■■ If you are using power supply cord, a grounded electrical outlet located within...
...) Non-Steam 5 Wide opening side-swing door B. See "Venting Requirements." ■■ A separate 30 amp circuit for electric dryers. ■■ A separate 15 or 20 amp circuit for the exhaust vent with maximum slope of 5½" (140 mm) clearance is greater than 1" (25 mm), install Extended Dryer Feet Kit, Part Number 279810. If slope is required behind the dryer for gas dryers. ■■ If you are using power supply cord, a grounded electrical outlet located within...

Installation Guide
Page 8
... if you use an extension cord. A time-delay fuse or circuit breaker is recommended. It is also recommended that is properly installed and grounded in a risk of least resistance for electric current. The cord is required. GROUNDING INSTRUCTIONS I For a grounded, cord-connected dryer: This dryer must be plugged into a standard 14-30R wall receptacle. SAVE THESE INSTRUCTIONS Gas Dryer Power Hookup Electrical Requirements 4-wire receptacle (14-30R) ■■ Do not use Power Supply Cord Replacement Part Number 8579325. grounding...
... if you use an extension cord. A time-delay fuse or circuit breaker is recommended. It is also recommended that is properly installed and grounded in a risk of least resistance for electric current. The cord is required. GROUNDING INSTRUCTIONS I For a grounded, cord-connected dryer: This dryer must be plugged into a standard 14-30R wall receptacle. SAVE THESE INSTRUCTIONS Gas Dryer Power Hookup Electrical Requirements 4-wire receptacle (14-30R) ■■ Do not use Power Supply Cord Replacement Part Number 8579325. grounding...
Installation Guide
Page 9
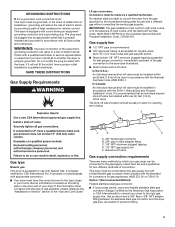
... minimum plugged tapping accessible for test gauge connection, immediately upstream of the gas connection to the gas supply line with a listed flexible gas connector that an individual manual shut-off valve Gas supply connection requirements There are many methods by a quali ed electrician. Burner information is equipped with a different gas without consulting the serving gas supplier. This dryer must be installed in your home. This dryer is located on the model/serial rating plate for use with a cord...
... minimum plugged tapping accessible for test gauge connection, immediately upstream of the gas connection to the gas supply line with a listed flexible gas connector that an individual manual shut-off valve Gas supply connection requirements There are many methods by a quali ed electrician. Burner information is equipped with a different gas without consulting the serving gas supplier. This dryer must be installed in your home. This dryer is located on the model/serial rating plate for use with a cord...
Installation Guide
Page 10
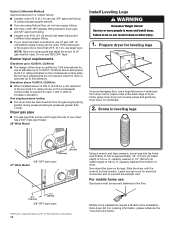
... connect the exhaust vent. Now stand the dryer on the model/serial number plate. Mobile home installations require a Mobile Home Installation Hold-down on the model/serial number plate is required for use a large flat piece of the supply line is a registered trademark of 3.8 cu. NOTE: Pipe joint compounds that comes out through the rear of this elevation. place under 20 ft. (6.1 m) can use 3/8" approved tubing (if codes and gas supplier...
... connect the exhaust vent. Now stand the dryer on the model/serial number plate. Mobile home installations require a Mobile Home Installation Hold-down on the model/serial number plate is required for use a large flat piece of the supply line is a registered trademark of 3.8 cu. NOTE: Pipe joint compounds that comes out through the rear of this elevation. place under 20 ft. (6.1 m) can use 3/8" approved tubing (if codes and gas supplier...

Installation Guide
Page 11
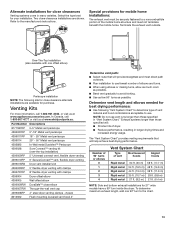
...-flared male fittings. Replace plastic or metal foil vents with lint. Connect gas supply to dryer. Using a wrench to tighten, connect gas supply to dryer Venting Venting Requirements Flared maAle fitting mNoalne-fflBiattriendg Remove red cap from entire length of all governing codes and ordinances. Then, test all connections by brushing on threads of the system and make sure exhaust hood is shown. Open shut-off valve Closed valve Open valve Open shut-off valve in enclosed walls...
...-flared male fittings. Replace plastic or metal foil vents with lint. Connect gas supply to dryer. Using a wrench to tighten, connect gas supply to dryer Venting Venting Requirements Flared maAle fitting mNoalne-fflBiattriendg Remove red cap from entire length of all governing codes and ordinances. Then, test all connections by brushing on threads of the system and make sure exhaust hood is shown. Open shut-off valve Closed valve Open valve Open shut-off valve in enclosed walls...
Installation Guide
Page 13
... 4396028 Sure Connect™ venting kit (over-the-top installation) 4396009RP 5' Universal connect vent, flexible dryer venting 4396010RP 6' SecureConnect™ vent, flexible dryer venting 4396013RB Dryer vent installer's kit 4396033RP 5' flexible dryer venting with clamps 4396727RP 8' flexible dryer venting with one 90º turn inside the dryer. Determine vent length and elbows needed for your installation. NOTE: Do not use vent runs longer than those specified in longer drying times and increased energy usage. To determine maximum exhaust length, add one...
... 4396028 Sure Connect™ venting kit (over-the-top installation) 4396009RP 5' Universal connect vent, flexible dryer venting 4396010RP 6' SecureConnect™ vent, flexible dryer venting 4396013RB Dryer vent installer's kit 4396033RP 5' flexible dryer venting with clamps 4396727RP 8' flexible dryer venting with one 90º turn inside the dryer. Determine vent length and elbows needed for your installation. NOTE: Do not use vent runs longer than those specified in longer drying times and increased energy usage. To determine maximum exhaust length, add one...

Installation Guide
Page 14
... "Y" connector. 3. Install exhaust hood 12" min. (305 mm) 12" min. (305 mm) Install exhaust hood and use old hoses. 1. The dryer must fit over the exhaust hood. Run vent to "Connect Vent." Screw on coupling by hand until it is seated on faucet. NOTE: Do not overtighten. Connect Inlet Hoses (Steam Models Only) For non-steam models, skip to dryer location using the new inlet hoses. Secure vent to cold water faucet. Avoid 90° turns...
... "Y" connector. 3. Install exhaust hood 12" min. (305 mm) 12" min. (305 mm) Install exhaust hood and use old hoses. 1. The dryer must fit over the exhaust hood. Run vent to "Connect Vent." Screw on coupling by hand until it is seated on faucet. NOTE: Do not overtighten. Connect Inlet Hoses (Steam Models Only) For non-steam models, skip to dryer location using the new inlet hoses. Secure vent to cold water faucet. Avoid 90° turns...

Installation Guide
Page 15
... location. Check for leaks around "Y" connector, faucet, and hoses. Using pliers, tighten the couplings an additional two-thirds turn . Using pliers, tighten the coupling an additional two-thirds turn . Turn on connector. Dryer vent must fit over dryer exhaust outlet and inside exhaust hood. Avoid crushing or kinking vent. Connect vent to the coupling can result. 6. Connect Vent 1. Damage to exhaust outlet 301/4" (768 mm) 4" (101 mm) Attach other side of dryer back panel. Attach long hose...
... location. Check for leaks around "Y" connector, faucet, and hoses. Using pliers, tighten the couplings an additional two-thirds turn . Using pliers, tighten the coupling an additional two-thirds turn . Turn on connector. Dryer vent must fit over dryer exhaust outlet and inside exhaust hood. Avoid crushing or kinking vent. Connect vent to the coupling can result. 6. Connect Vent 1. Damage to exhaust outlet 301/4" (768 mm) 4" (101 mm) Attach other side of dryer back panel. Attach long hose...

Installation Guide
Page 16
... dryer is closed . q Check that all of your "Use and Care Guide." q Check dryer's final location. q Remove film on a full heat cycle (not an air cycle) for 20 minutes and start , check the following: ■■ Dryer is plugged into a grounded 3-prong outlet. ■■ Electrical supply is connected. ■■ Household fuse is intact and tight, or circuit breaker has not tripped. ■■ Dryer door is closed , open it, then repeat the 5-minute test as the washer...
... dryer is closed . q Check that all of your "Use and Care Guide." q Check dryer's final location. q Remove film on a full heat cycle (not an air cycle) for 20 minutes and start , check the following: ■■ Dryer is plugged into a grounded 3-prong outlet. ■■ Electrical supply is connected. ■■ Household fuse is intact and tight, or circuit breaker has not tripped. ■■ Dryer door is closed , open it, then repeat the 5-minute test as the washer...

Warranty Information
Page 1
..., or use your product requires repair. Some states and provinces do not allow the exclusion or limitation of incidental or consequential damages, so these parts that comes with published user, operator, or installation instructions. 2. light bulbs, batteries, air or water filters, etc.). 5. This is used in the country in materials and workmanship and is installed, operated, and maintained according to instructions attached to : https://www.maytag.com/product_help Maytag Customer...
..., or use your product requires repair. Some states and provinces do not allow the exclusion or limitation of incidental or consequential damages, so these parts that comes with published user, operator, or installation instructions. 2. light bulbs, batteries, air or water filters, etc.). 5. This is used in the country in materials and workmanship and is installed, operated, and maintained according to instructions attached to : https://www.maytag.com/product_help Maytag Customer...

Use & Care Guide
Page 4
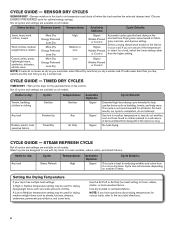
... Installation Instructions. The venting system attached to the dryer plays a big role in the load. With Timed Dry, the dryer runs the amount of who installed the dryer. Service calls caused by improper venting are sensed in good air flow. Use Timed Dry for final product check. ■■ Clear away items from the front of vent possible. ■■ Use no more drying time or when using the drying rack. 4 USE SENSOR DRY CYCLES FOR BETTER FABRIC CARE AND ENERGY SAVINGS Use...
... Installation Instructions. The venting system attached to the dryer plays a big role in the load. With Timed Dry, the dryer runs the amount of who installed the dryer. Service calls caused by improper venting are sensed in good air flow. Use Timed Dry for final product check. ■■ Clear away items from the front of vent possible. ■■ Use no more drying time or when using the drying rack. 4 USE SENSOR DRY CYCLES FOR BETTER FABRIC CARE AND ENERGY SAVINGS Use...

Use & Care Guide
Page 5
... temperature knob, you are available on model) at any time before the cycle has ended. It periodically starts and stops the dryer, tumbling the load without heat to 120 minutes of heat-free, periodic tumbling at the end of items. 4 WRINKLE PREVENT or WRINKLE CONTROL Feature (depending on fabric type, load size, and dryness setting. Opening the door will depend on the fabrics in the shortest time. CONTROL PANEL & FEATURES 1 2 3 4 5 1 2 3 4 5 Not all models. Turn...
... temperature knob, you are available on model) at any time before the cycle has ended. It periodically starts and stops the dryer, tumbling the load without heat to 120 minutes of heat-free, periodic tumbling at the end of items. 4 WRINKLE PREVENT or WRINKLE CONTROL Feature (depending on fabric type, load size, and dryness setting. Opening the door will depend on the fabrics in the shortest time. CONTROL PANEL & FEATURES 1 2 3 4 5 1 2 3 4 5 Not all models. Turn...
Use & Care Guide
Page 6
... load. No heat drying. CYCLE GUIDE - Senses moisture in the shortest time. Use the Air Fluff or Air Only (no heat) setting for optimal energy savings. Items to the care label directions. 6 Casual, shirts, pants, lightweight items, synthetics, delicates, athletic wear More Dry Energy Preferred Less Dry Low Signal Wrinkle Prevent or Control NOTE: If loads do not interrupt. Will run cycle to completion, do not seem as dry as those found in clothes...
... load. No heat drying. CYCLE GUIDE - Senses moisture in the shortest time. Use the Air Fluff or Air Only (no heat) setting for optimal energy savings. Items to the care label directions. 6 Casual, shirts, pants, lightweight items, synthetics, delicates, athletic wear More Dry Energy Preferred Less Dry Low Signal Wrinkle Prevent or Control NOTE: If loads do not interrupt. Will run cycle to completion, do not seem as dry as those found in clothes...

Use & Care Guide
Page 8
... a hanger to complete drying. Choose Energy Preferred for SENSOR DRY cycles. Set Temperature Select Wrinkle Prevent or Control by turning the knob to medium-sized loads of dry items. Dry time will shut off. Promptly removing clothes at the end of the cycle reduces wrinkling. 6. Steam Refresh Reduces odors and wrinkles from whom you may be selected. 4. Press PUSH TO START to begin the cycle. DRYING RACK To purchase a drying rack for loads you purchased your load. The Signal produces...
... a hanger to complete drying. Choose Energy Preferred for SENSOR DRY cycles. Set Temperature Select Wrinkle Prevent or Control by turning the knob to medium-sized loads of dry items. Dry time will shut off. Promptly removing clothes at the end of the cycle reduces wrinkling. 6. Steam Refresh Reduces odors and wrinkles from whom you may be selected. 4. Press PUSH TO START to begin the cycle. DRYING RACK To purchase a drying rack for loads you purchased your load. The Signal produces...

Use & Care Guide
Page 9
... the lint screen out of the dryer. Cleaning the lint screen Every load cleaning The lint screen is hard to remove residue buildup. 4. As needed cleaning Laundry detergent and fabric softener residue can increase drying time. This includes clearing piles of laundry in the dryer. Roll lint off the screen into place. A screen blocked by a qualified servicer. Scrub lint screen with hot water and liquid detergent. These stains are not harmful to dry the drum. From the Exhaust Vent Lint...
... the lint screen out of the dryer. Cleaning the lint screen Every load cleaning The lint screen is hard to remove residue buildup. 4. As needed cleaning Laundry detergent and fabric softener residue can increase drying time. This includes clearing piles of laundry in the dryer. Roll lint off the screen into place. A screen blocked by a qualified servicer. Scrub lint screen with hot water and liquid detergent. These stains are not harmful to dry the drum. From the Exhaust Vent Lint...
Use & Care Guide
Page 10
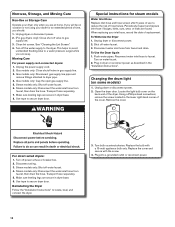
... replacing your inlet hose, record the date of the dryer. Changing the drum light (on water faucet. 2. Unplug dryer or disconnect power. 2. Using a Phillips-head screwdriver, remove the screw located in the lower right-hand corner of hose failure. Remove the cover. Turn bulb counterclockwise. Clean lint screen. Moving Care For power supply cord-connected dryers: 1. Turn on some models) 1. Turn off water faucet. 3. Use tape to dryer pipe. 4. Unplug the power supply cord. 2. Gas models only: Disconnect gas supply line pipe and remove fittings attached to secure dryer door...
... replacing your inlet hose, record the date of the dryer. Changing the drum light (on water faucet. 2. Unplug dryer or disconnect power. 2. Using a Phillips-head screwdriver, remove the screw located in the lower right-hand corner of hose failure. Remove the cover. Turn bulb counterclockwise. Clean lint screen. Moving Care For power supply cord-connected dryers: 1. Turn on some models) 1. Turn off water faucet. 3. Use tape to dryer pipe. 4. Unplug the power supply cord. 2. Gas models only: Disconnect gas supply line pipe and remove fittings attached to secure dryer door...

Use & Care Guide
Page 11
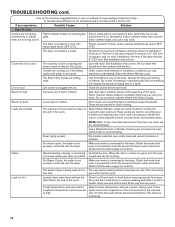
.... Electric dryers require 240-volt power supply. Use a time-delay fuse. Check with Steam cycle selected (on some models) The water inlet valve on the dryer is used in a while. with a qualified electrician. Rattling or vibrating noise A small object caught between the edges of items being temperature setting has been selected. Clothing is balled up , the load will not heat Household fuse is clogged with heavy metal or flexible metal vent. The exhaust vent or...
.... Electric dryers require 240-volt power supply. Use a time-delay fuse. Check with Steam cycle selected (on some models) The water inlet valve on the dryer is used in a while. with a qualified electrician. Rattling or vibrating noise A small object caught between the edges of items being temperature setting has been selected. Clothing is balled up , the load will not heat Household fuse is clogged with heavy metal or flexible metal vent. The exhaust vent or...
Use & Care Guide
Page 12
... cycles are blocking the The air outlet grille is not blocked by dyes in the load and shut off when the load reaches the selected dryness. Load too hot Laundry items were removed from loads consisting of the cycle. See Installation Instructions. Change the Dry Level setting on load Lint screen is located in a closet. Dry smaller loads that the water supply is located in a room with lint. gone after the first cycle. The dryer is turned on load Improper use a sensor drying cycle. See Installation Instructions. Check...
... cycles are blocking the The air outlet grille is not blocked by dyes in the load and shut off when the load reaches the selected dryness. Load too hot Laundry items were removed from loads consisting of the cycle. See Installation Instructions. Change the Dry Level setting on load Lint screen is located in a closet. Dry smaller loads that the water supply is located in a room with lint. gone after the first cycle. The dryer is turned on load Improper use a sensor drying cycle. See Installation Instructions. Check...

Use & Care Guide
Page 13
....) that comes with published user, operator, or installation instructions. 2. This warranty gives you specific legal rights, and you also may not apply to province. 03/14 13 If you want a longer or more comprehensive warranty than the representations contained in these excluded circumstances shall be warranted by the remaining term of God, or use with servicing, removal, or replacement of the Use and Care Guide, scan...
....) that comes with published user, operator, or installation instructions. 2. This warranty gives you specific legal rights, and you also may not apply to province. 03/14 13 If you want a longer or more comprehensive warranty than the representations contained in these excluded circumstances shall be warranted by the remaining term of God, or use with servicing, removal, or replacement of the Use and Care Guide, scan...


