
Installation Guide
Page 4
Tools needed: Adjustable wrench that opens to 1" (25 mm) or hex-head socket wrench Caulking gun and compound (for installing new exhaust vent) Flat-blade screwdriver #2 Phillips screwdriver 1/4" nut driver or socket wrench (recommended) Tin snips (new vent installations) Tape measure Vent clamps Utility knife Putty knife 8" or 10" pipe wrench 8" or 10" adjustable wrench (for gas connections) Level 4 Pliers Pipe-joint compound resistant to LP gas INSTALLATION REQUIREMENTS Tools and Parts Gather the required tools and parts before starting installation.
Tools needed: Adjustable wrench that opens to 1" (25 mm) or hex-head socket wrench Caulking gun and compound (for installing new exhaust vent) Flat-blade screwdriver #2 Phillips screwdriver 1/4" nut driver or socket wrench (recommended) Tin snips (new vent installations) Tape measure Vent clamps Utility knife Putty knife 8" or 10" pipe wrench 8" or 10" adjustable wrench (for gas connections) Level 4 Pliers Pipe-joint compound resistant to LP gas INSTALLATION REQUIREMENTS Tools and Parts Gather the required tools and parts before starting installation.
Installation Guide
Page 5
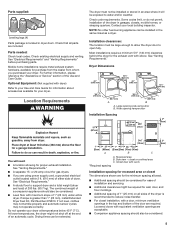
...accessories available for gas dryers. ■■ If you purchased your local building inspector. See "Electrical Requirements" and "Venting Requirements" before purchasing parts. Large opening hamper door Installation Spacing 18"* (457 mm) 14" max.* (356 mm) 48 in.2* (310 cm ) 2 3"* (76...minimum ventilation openings in garages, closets, mobile homes, or sleeping quarters. Check that all sides of the door are required. Parts needed: Check local codes. Check existing electrical supply and venting. Mobile home installations require metal exhaust system hardware, available for ...
...accessories available for gas dryers. ■■ If you purchased your local building inspector. See "Electrical Requirements" and "Venting Requirements" before purchasing parts. Large opening hamper door Installation Spacing 18"* (457 mm) 14" max.* (356 mm) 48 in.2* (310 cm ) 2 3"* (76...minimum ventilation openings in garages, closets, mobile homes, or sleeping quarters. Check that all sides of the door are required. Parts needed: Check local codes. Check existing electrical supply and venting. Mobile home installations require metal exhaust system hardware, available for ...
Installation Guide
Page 6
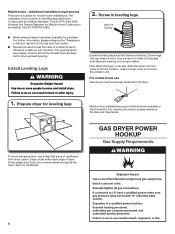
... as a nearby window) should be securely fastened to the Manufactured Home Construction and Safety Standard, Title 24 CFR, Part 3280 (formerly the Federal Standard for Mobile Home Construction and Safety, Title 24, HUD Part 280). ■■ Metal exhaust system hardware, available for purchase. Install Leveling Legs 2. Use a wrench to finish turning...
... as a nearby window) should be securely fastened to the Manufactured Home Construction and Safety Standard, Title 24 CFR, Part 3280 (formerly the Federal Standard for Mobile Home Construction and Safety, Title 24, HUD Part 280). ■■ Metal exhaust system hardware, available for purchase. Install Leveling Legs 2. Use a wrench to finish turning...
Installation Guide
Page 10
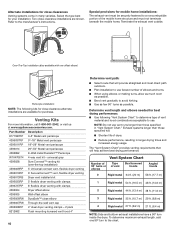
... dryer venting with clamps 4396727RP 8' flexible dryer venting with one 90º turn inside the dryer. NOTE: Do not use . Terminate the exhaust vent outside. Part Number Description 8171587RP 0-5" Metal vent periscope 4396037RP 0"-18" Metal vent periscope 4396011RP 18"-29" Metal vent periscope 4396014 29"-50" Metal vent periscope 4392892 In...
... dryer venting with clamps 4396727RP 8' flexible dryer venting with one 90º turn inside the dryer. NOTE: Do not use . Terminate the exhaust vent outside. Part Number Description 8171587RP 0-5" Metal vent periscope 4396037RP 0"-18" Metal vent periscope 4396011RP 18"-29" Metal vent periscope 4396014 29"-50" Metal vent periscope 4392892 In...
Installation Guide
Page 12
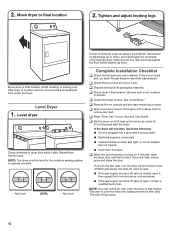
..., prop up or down, and check again for levelness. Not Level LEVEL Not Level If dryer is in your tools. q Check that you have all parts are now installed. Be sure vent is open, contact a qualified technician. q Remove film on console and any dust. q Wipe dryer drum interior thoroughly with a... Dryer 1. q Check that all of your Use and Care Guide. See "Level Dryer." NOTE: You may notice an odor when the dryer is an extra part, go away. 12 q Dispose of dryer from front to adjust legs up using a wood block. q Read "Dryer Use" in place, remove corner posts ...
..., prop up or down, and check again for levelness. Not Level LEVEL Not Level If dryer is in your tools. q Check that you have all parts are now installed. Be sure vent is open, contact a qualified technician. q Remove film on console and any dust. q Wipe dryer drum interior thoroughly with a... Dryer 1. q Check that all of your Use and Care Guide. See "Level Dryer." NOTE: You may notice an odor when the dryer is an extra part, go away. 12 q Dispose of dryer from front to adjust legs up using a wood block. q Read "Dryer Use" in place, remove corner posts ...
Installation Guide
Page 13
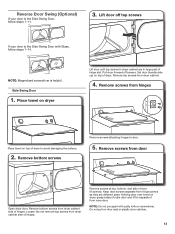
... hinges to avoid damaging the surface. 2. Remove bottom screws from dryer cabinet. 4. Holding door over towel on dryer Lift door until top screws in large part of hinges. Loosen (do not remove) top screws from inner door. Set door (handle side up) on door seal or plastic door catches. 13 Remove...
... hinges to avoid damaging the surface. 2. Remove bottom screws from dryer cabinet. 4. Holding door over towel on dryer Lift door until top screws in large part of hinges. Loosen (do not remove) top screws from inner door. Set door (handle side up) on door seal or plastic door catches. 13 Remove...
Installation Guide
Page 15
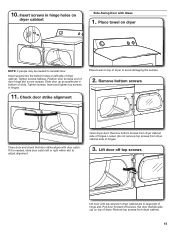
...) top screws from dryer cabinet side of dryer. Pull door forward off top screws Lift door until top screws in dryer cabinet are in large part of dryer to reinstall door. Tighten screws halfway. Place towel on dryer cabinet Side-Swing Door with door catch. Position door so large end of...
...) top screws from dryer cabinet side of dryer. Pull door forward off top screws Lift door until top screws in dryer cabinet are in large part of dryer to reinstall door. Tighten screws halfway. Place towel on dryer cabinet Side-Swing Door with door catch. Position door so large end of...
Use & Care Guide
Page 12
...appliance is used in a manner that existed when this major appliance was purchased. Replacement parts or repair labor if this major appliance is used for in accordance with Maytag published installation instructions. 10. This warranty gives you specific legal rights, and you ... repair service, first see the "Troubleshooting" section of the Use & Care Guide. Consumable parts are unable to be borne by an authorized Maytag servicer is not available. 9. MAYTAG SHALL NOT BE LIABLE FOR INCIDENTAL OR CONSEQUENTIAL DAMAGES. Write down the following information about the...
...appliance is used in a manner that existed when this major appliance was purchased. Replacement parts or repair labor if this major appliance is used for in accordance with Maytag published installation instructions. 10. This warranty gives you specific legal rights, and you ... repair service, first see the "Troubleshooting" section of the Use & Care Guide. Consumable parts are unable to be borne by an authorized Maytag servicer is not available. 9. MAYTAG SHALL NOT BE LIABLE FOR INCIDENTAL OR CONSEQUENTIAL DAMAGES. Write down the following information about the...


