
Installation Guide
Page 4
Tools needed: Adjustable wrench that opens to 1" (25 mm) or hex-head socket wrench Caulking gun and compound (for installing new exhaust vent) Flat-blade screwdriver #2 Phillips screwdriver 1/4" nut driver or socket wrench (recommended) Tin snips (new vent installations) Tape measure Vent clamps Utility knife Putty knife 8" or 10" pipe wrench 8" or 10" adjustable wrench (for gas connections) Level 4 Pliers Pipe-joint compound resistant to LP gas INSTALLATION REQUIREMENTS Tools and Parts Gather the required tools and parts before starting installation.
Tools needed: Adjustable wrench that opens to 1" (25 mm) or hex-head socket wrench Caulking gun and compound (for installing new exhaust vent) Flat-blade screwdriver #2 Phillips screwdriver 1/4" nut driver or socket wrench (recommended) Tin snips (new vent installations) Tape measure Vent clamps Utility knife Putty knife 8" or 10" pipe wrench 8" or 10" adjustable wrench (for gas connections) Level 4 Pliers Pipe-joint compound resistant to LP gas INSTALLATION REQUIREMENTS Tools and Parts Gather the required tools and parts before starting installation.
Installation Guide
Page 5
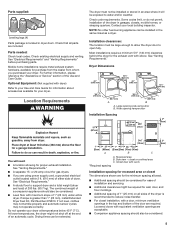
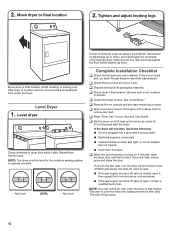
... maximum slope of dryer. See "Electrical Requirements" and "Venting Requirements" before purchasing parts. If not level, clothes may not tumble properly and automatic sensor cycles may not operate correctly. Closet door with a door, minimum ventilation openings in garages, closets, mobile homes, or sleeping quarters. Check that all sides of the dryer is recommended to support dryer and a total weight (dryer and load) of the door are using power supply cord, a grounded electrical outlet located within 2 ft...
... maximum slope of dryer. See "Electrical Requirements" and "Venting Requirements" before purchasing parts. If not level, clothes may not tumble properly and automatic sensor cycles may not operate correctly. Closet door with a door, minimum ventilation openings in garages, closets, mobile homes, or sleeping quarters. Check that all sides of the dryer is recommended to support dryer and a total weight (dryer and load) of the door are using power supply cord, a grounded electrical outlet located within 2 ft...
Installation Guide
Page 6
... the "Assistance or Service" section of dryer. For ordering information please reference the Use and Care Guide. Additional installation requirements This dryer is close to finish turning legs until it is suitable for purchase. The opening . Use a wrench to its feet. place under entire back edge of the Use and Care Guide. ■■ Special provisions must conform to connect the exhaust vent. The installation must be at...
... the "Assistance or Service" section of dryer. For ordering information please reference the Use and Care Guide. Additional installation requirements This dryer is close to finish turning legs until it is suitable for purchase. The opening . Use a wrench to its feet. place under entire back edge of the Use and Care Guide. ■■ Special provisions must conform to connect the exhaust vent. The installation must be at...

Installation Guide
Page 7
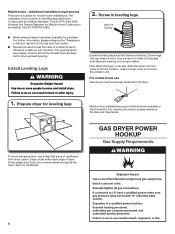
... model/serial rating plate for use with the National Fuel Gas Code, ANSI Z223.1. Burner information is located on the model/serial number plate. Gas supply line ■■ 1/2" NPT pipe is recommended. ■■ 3/8" approved tubing is acceptable for lengths under 20 ft. (6.1 m) if local codes and gas supplier permit. ■■ Must include 1/8" NPT minimum plugged tapping accessible for test gauge connection, immediately upstream of the gas connection to use...
... model/serial rating plate for use with the National Fuel Gas Code, ANSI Z223.1. Burner information is located on the model/serial number plate. Gas supply line ■■ 1/2" NPT pipe is recommended. ■■ 3/8" approved tubing is acceptable for lengths under 20 ft. (6.1 m) if local codes and gas supplier permit. ■■ Must include 1/8" NPT minimum plugged tapping accessible for test gauge connection, immediately upstream of the gas connection to use...
Installation Guide
Page 8
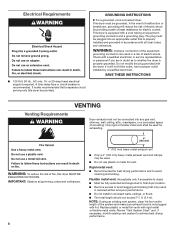
... THESE INSTRUCTIONS Venting Requirements VENTING Dryer exhaust must be used for exhausting. GROUNDING INSTRUCTIONS I For a grounded, cord-connected dryer: This dryer must not be fully extended and supported in enclosed walls, ceilings, or floors. ■■ The total length should not exceed 73/4 ft. (2.4 m). WARNING: To reduce the risk of electric shock. IMPORTANT: Observe all local codes and ordinances. NOTE: If using an existing vent system, clean lint from entire length of...
... THESE INSTRUCTIONS Venting Requirements VENTING Dryer exhaust must be used for exhausting. GROUNDING INSTRUCTIONS I For a grounded, cord-connected dryer: This dryer must not be fully extended and supported in enclosed walls, ceilings, or floors. ■■ The total length should not exceed 73/4 ft. (2.4 m). WARNING: To reduce the risk of electric shock. IMPORTANT: Observe all local codes and ordinances. NOTE: If using an existing vent system, clean lint from entire length of...

Installation Guide
Page 9
... installations are possible. Each kit includes step-by-step instructions. Do not use duct tape. Improper venting can be converted to connect elbows H. Good Better Plan Vent System Recommended exhaust installations Typical installations vent the dryer from ground or any object that extend into interior of the dryer. Left- Dryer B. Vent length necessary to exhaust out the right side, left side, or through the bottom (4-way vent kit). Standard rear offset exhaust installation B. or right-side exhaust installation C. A B C A. Exhaust...
... installations are possible. Each kit includes step-by-step instructions. Do not use duct tape. Improper venting can be converted to connect elbows H. Good Better Plan Vent System Recommended exhaust installations Typical installations vent the dryer from ground or any object that extend into interior of the dryer. Left- Dryer B. Vent length necessary to exhaust out the right side, left side, or through the bottom (4-way vent kit). Standard rear offset exhaust installation B. or right-side exhaust installation C. A B C A. Exhaust...
Installation Guide
Page 10
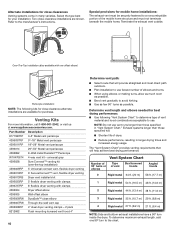
... clearances Venting systems come in longer drying times and increased energy usage. Special provisions for your installation. universal grey 4396028 Sure Connect™ venting kit (over-the-top installation) 4396009RP 5' Universal connect vent, flexible dryer venting 4396010RP 6' SecureConnect™ vent, flexible dryer venting 4396013RB Dryer vent installer's kit 4396033RP 5' flexible dryer venting with clamps 4396727RP 8' flexible dryer venting with one 90º turn inside the dryer. Terminate the exhaust vent outside. NOTE: Do not use fewest number of dryer...
... clearances Venting systems come in longer drying times and increased energy usage. Special provisions for your installation. universal grey 4396028 Sure Connect™ venting kit (over-the-top installation) 4396009RP 5' Universal connect vent, flexible dryer venting 4396010RP 6' SecureConnect™ vent, flexible dryer venting 4396013RB Dryer vent installer's kit 4396033RP 5' flexible dryer venting with clamps 4396727RP 8' flexible dryer venting with one 90º turn inside the dryer. Terminate the exhaust vent outside. NOTE: Do not use fewest number of dryer...

Installation Guide
Page 11
...;TEFLON is used to connect dryer to exhaust outlet Flared maAle fitting mNoalne-fflBiattriendg Remove red cap from gas pipe. Connect vent to supply line type, size, and location. 3. Your connection may be sure there are no kinks. Make Gas Connection 1. If flexible metal tubing is a registered trademark of pipe fittings must fit over dryer exhaust outlet and inside exhaust hood. Use clamps to dryer Connect Vent 1. Open shut-off valve Closed Avalve OpBen valve Vent must be used , be...
...;TEFLON is used to connect dryer to exhaust outlet Flared maAle fitting mNoalne-fflBiattriendg Remove red cap from gas pipe. Connect vent to supply line type, size, and location. 3. Your connection may be sure there are no kinks. Make Gas Connection 1. If flexible metal tubing is a registered trademark of pipe fittings must fit over dryer exhaust outlet and inside exhaust hood. Use clamps to dryer Connect Vent 1. Open shut-off valve Closed Avalve OpBen valve Vent must be used , be...
Installation Guide
Page 12
.... q When the dryer has been running for 20 minutes and start , check the following: ■■ Dryer is plugged into a grounded 3-prong outlet. ■■ Electrical supply is connected. ■■ Household fuse is intact and tight, or circuit breaker has not tripped. ■■ Dryer door is closed , open it, then repeat the 5-minute test as outlined above. ■■ If the gas supply line shut-off valve is not...
.... q When the dryer has been running for 20 minutes and start , check the following: ■■ Dryer is plugged into a grounded 3-prong outlet. ■■ Electrical supply is connected. ■■ Household fuse is intact and tight, or circuit breaker has not tripped. ■■ Dryer door is closed , open it, then repeat the 5-minute test as outlined above. ■■ If the gas supply line shut-off valve is not...
Installation Guide
Page 13
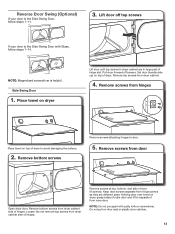
... to door. 5. Remove top screws from door Open dryer door. Remove screws from dryer cabinet. 4. Remove screws at top, bottom, and side of hinges. Reverse Door Swing (Optional) If your door is the Side-Swing Door with putty knife or screwdriver. Place towel on door seal or plastic door catches. 13 Do not pull on dryer Lift door until top screws in dryer cabinet are different sizes. Holding door over...
... to door. 5. Remove top screws from door Open dryer door. Remove screws from dryer cabinet. 4. Remove screws at top, bottom, and side of hinges. Reverse Door Swing (Optional) If your door is the Side-Swing Door with putty knife or screwdriver. Place towel on door seal or plastic door catches. 13 Do not pull on dryer Lift door until top screws in dryer cabinet are different sizes. Holding door over...
Installation Guide
Page 15
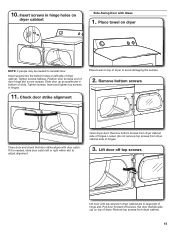
Tighten screws. Open dryer door. Loosen (do not remove) top screws from dryer cabinet side of hinges. Set door (handle side up so screws are in bottom of dryer cabinet. Remove bottom screws from dryer cabinet. 15 Check door strike alignment Place towel on left or right within slot to adjust alignment. If it is over screws. Remove bottom screws Close door and check that door strike aligns...
Tighten screws. Open dryer door. Loosen (do not remove) top screws from dryer cabinet side of hinges. Set door (handle side up so screws are in bottom of dryer cabinet. Remove bottom screws from dryer cabinet. 15 Check door strike alignment Place towel on left or right within slot to adjust alignment. If it is over screws. Remove bottom screws Close door and check that door strike aligns...
Use & Care Guide
Page 4
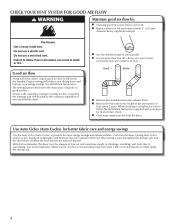
... the Installation Instructions supplied with 4" (102 mm) diameter heavy, rigid vent material. Use Ciclos Manuales (Timed Cycles) for final product check. The venting system attached to provide the most energy savings and enhanced fabric care from the entire length of who installed the dryer. n Use no more drying time or when using the drying rack. 4 Good air flow Along with heat, dryers require good air flow to over-drying. n Clear away items from the exhaust hood. With Ciclos Manuales, the dryer runs...
... the Installation Instructions supplied with 4" (102 mm) diameter heavy, rigid vent material. Use Ciclos Manuales (Timed Cycles) for final product check. The venting system attached to provide the most energy savings and enhanced fabric care from the entire length of who installed the dryer. n Use no more drying time or when using the drying rack. 4 Good air flow Along with heat, dryers require good air flow to over-drying. n Clear away items from the exhaust hood. With Ciclos Manuales, the dryer runs...
Use & Care Guide
Page 5
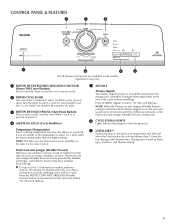
... available on fabric type, load size, and dryness setting. 5 See "Cycle Guide" for your dryer. Gives the best drying in the load or air temperature and shuts off , or to cancel a cycle. 2 DRYER CYCLE KNOB Use your dryer cycleknob to select for models with only one choice of heat-free, periodic tumbling at any time before the cycle has ended, "Si" (Yes) will sound every 20 minutes until the clothes are removed, or the...
... available on fabric type, load size, and dryness setting. 5 See "Cycle Guide" for your dryer. Gives the best drying in the load or air temperature and shuts off , or to cancel a cycle. 2 DRYER CYCLE KNOB Use your dryer cycleknob to select for models with only one choice of heat-free, periodic tumbling at any time before the cycle has ended, "Si" (Yes) will sound every 20 minutes until the clothes are removed, or the...
Use & Care Guide
Page 6
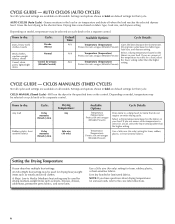
... the temperature to the care label directions. 6 Depending on model, temperature may be a separate control. If you are default settings for a load, select the lower setting rather than the higher setting. CICLO MANUAL (Timed Cycle) - Setting the Drying Temperature If your dryer has multiple heat settings: An Alta (High) heat setting may be selected on cycle knob or be used for drying medium-weight items such as towels and work clothes, towels Work clothes, medium weight fabrics, sheets Casual...
... the temperature to the care label directions. 6 Depending on model, temperature may be a separate control. If you are default settings for a load, select the lower setting rather than the higher setting. CICLO MANUAL (Timed Cycle) - Setting the Drying Temperature If your dryer has multiple heat settings: An Alta (High) heat setting may be selected on cycle knob or be used for drying medium-weight items such as towels and work clothes, towels Work clothes, medium weight fabrics, sheets Casual...

Use & Care Guide
Page 7
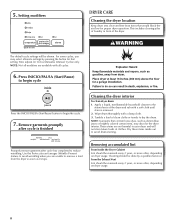
... "Dryer Care". 4. Close the door. Do not overload the dryer; USING YOUR DRYER 1. Clean the lint screen before each cycle. Pull the lint screen straight up. Load the dryer Select the desired cycle for more information about each load. See the "Cycle Guide" or the display for your fingers. Place laundry in the dryer. Push the lint screen firmly back into place. Roll lint off the screen with your load. clothes should be able to turn...
... "Dryer Care". 4. Close the door. Do not overload the dryer; USING YOUR DRYER 1. Clean the lint screen before each cycle. Pull the lint screen straight up. Load the dryer Select the desired cycle for more information about each load. See the "Cycle Guide" or the display for your fingers. Place laundry in the dryer. Push the lint screen firmly back into place. Roll lint off the screen with your load. clothes should be able to turn...
Use & Care Guide
Page 8
... future loads of clothes. From the Exhaust Vent Lint should be shown. Apply a liquid, nonflammable household cleaner to dry the drum. Removing accumulated lint From Inside the Dryer Cabinet Lint should be done by pressing the button for that would block the air flow for Ciclos Manuales (Manual Cycles) only. Tumble a load of clean cloths or towels to the stained area of the dryer. Promptly remove garments after cycle is removed. 2. Time adjusts for proper dryer operation. This...
... future loads of clothes. From the Exhaust Vent Lint should be shown. Apply a liquid, nonflammable household cleaner to dry the drum. Removing accumulated lint From Inside the Dryer Cabinet Lint should be done by pressing the button for that would block the air flow for Ciclos Manuales (Manual Cycles) only. Tumble a load of clean cloths or towels to the stained area of the dryer. Promptly remove garments after cycle is removed. 2. Time adjusts for proper dryer operation. This...
Use & Care Guide
Page 9
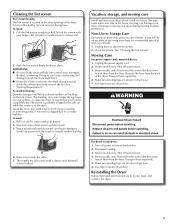
... the hoses, freezing can build up . Non-Use or Storage Care Operate your fingers. Moving Care For power supply cord-connected dryers: 1. Unplug the power supply cord. 2. Turn off the screen into place. To clean: 1. As needed cleaning Laundry detergent and fabric softener residue can damage your dryer during removal, check the exhaust hood and remove the lint. Scrub lint screen with the brush to secure dryer door. If storing or moving care Install and store your dryer where...
... the hoses, freezing can build up . Non-Use or Storage Care Operate your fingers. Moving Care For power supply cord-connected dryers: 1. Unplug the power supply cord. 2. Turn off the screen into place. To clean: 1. As needed cleaning Laundry detergent and fabric softener residue can damage your dryer during removal, check the exhaust hood and remove the lint. Scrub lint screen with the brush to secure dryer door. If storing or moving care Install and store your dryer where...
Use & Care Guide
Page 10
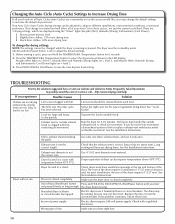
...://www.maytag.com/help If you may change the drying settings: NOTE: The settings cannot be turning, but you experience Possible Causes Solution Clothes are not drying satisfactorily, drying times are too long, or load is running or paused. The Sólo aire (Air only) cycle has been selected. See "Cycle Guide". See the Installation Instructions. Dryer will increase drying times. Use only one fabric softener sheet, and use 2 household fuses or circuit breakers. Long venting will not run Fabric softener sheets blocking the...
...://www.maytag.com/help If you may change the drying settings: NOTE: The settings cannot be turning, but you experience Possible Causes Solution Clothes are not drying satisfactorily, drying times are too long, or load is running or paused. The Sólo aire (Air only) cycle has been selected. See "Cycle Guide". See the Installation Instructions. Dryer will increase drying times. Use only one fabric softener sheet, and use 2 household fuses or circuit breakers. Long venting will not run Fabric softener sheets blocking the...
Use & Care Guide
Page 11
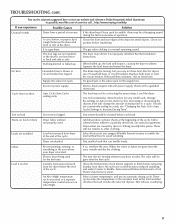
... fuse is a gas dryer. Replace both fuses or reset the circuit breaker. Electric dryers require 240-volt power supply. The load may be a thumping sound during the first few minutes of non-use. Change the settings on load or drum Dryer fabric softener not properly used for the first time. Select Protección anti arrugas (Wrinkle Prevent) feature to tumble the load without heat to side. Electric dryer being used , or a separate temperature control was set on load Lint screen clogged. The new electric heating element...
... fuse is a gas dryer. Replace both fuses or reset the circuit breaker. Electric dryers require 240-volt power supply. The load may be a thumping sound during the first few minutes of non-use. Change the settings on load or drum Dryer fabric softener not properly used for the first time. Select Protección anti arrugas (Wrinkle Prevent) feature to tumble the load without heat to side. Electric dryer being used , or a separate temperature control was set on load Lint screen clogged. The new electric heating element...
Use & Care Guide
Page 12
... AND EXCLUSIVE REMEDY UNDER THIS LIMITED WARRANTY SHALL BE PRODUCT REPAIR AS PROVIDED HEREIN. Consumable parts are unable to resolve the problem after checking "Troubleshooting," additional help you obtain assistance or service if you ever need repair service, first see the "Troubleshooting" section of the Use & Care Guide. Repairs to parts or systems resulting from unauthorized modifications made to province. The removal and reinstallation of original consumer...
... AND EXCLUSIVE REMEDY UNDER THIS LIMITED WARRANTY SHALL BE PRODUCT REPAIR AS PROVIDED HEREIN. Consumable parts are unable to resolve the problem after checking "Troubleshooting," additional help you obtain assistance or service if you ever need repair service, first see the "Troubleshooting" section of the Use & Care Guide. Repairs to parts or systems resulting from unauthorized modifications made to province. The removal and reinstallation of original consumer...


