
Installation Guide
Page 2
DRYER SAFETY 2
DRYER SAFETY 2
Installation Guide
Page 5
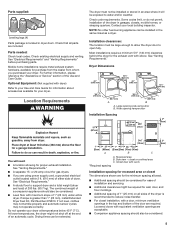
....7 kg). Wide opening side-swing door B. Check code requirements. or 20-amp circuit for proper exhaust installation. Location Requirements The dryer must be considered. ■■ Level floor with equivalent ventilation openings are using power supply cord, a grounded electrical outlet located ...within 2 ft. (610 mm) of either side of the door are included. Contact your dryer. Recessed area B. Drying times can be considered. 5 closet or confined area C. Optional Equipment: (Not supplied with elbow. The ...
....7 kg). Wide opening side-swing door B. Check code requirements. or 20-amp circuit for proper exhaust installation. Location Requirements The dryer must be considered. ■■ Level floor with equivalent ventilation openings are using power supply cord, a grounded electrical outlet located ...within 2 ft. (610 mm) of either side of the door are included. Contact your dryer. Recessed area B. Drying times can be considered. 5 closet or confined area C. Optional Equipment: (Not supplied with elbow. The ...
Installation Guide
Page 6
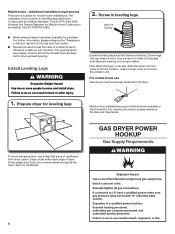
...turning legs until it is close to connect the exhaust vent. Now stand the dryer on cardboard. 6 Prepare dryer for purchase. GAS DRYER POWER HOOKUP Gas Supply Requirements To avoid damaging floor, use Gas dryers must conform to introduce outside air into leg holes by hand. Leave enough ...room to its feet. Firmly grasp dryer body (not console panel) and gently lay dryer down Kit. Mobile home - For further information, please reference the "Assistance or Service" section of the Use and Care Guide....
...turning legs until it is close to connect the exhaust vent. Now stand the dryer on cardboard. 6 Prepare dryer for purchase. GAS DRYER POWER HOOKUP Gas Supply Requirements To avoid damaging floor, use Gas dryers must conform to introduce outside air into leg holes by hand. Leave enough ...room to its feet. Firmly grasp dryer body (not console panel) and gently lay dryer down Kit. Mobile home - For further information, please reference the "Assistance or Service" section of the Use and Care Guide....

Installation Guide
Page 7
...to 10,000 ft. (3,048 m), above 10,000 ft. (3,048 m) a 4% reduction of the burner B.T.U. Gas type Natural gas: This dryer is equipped for use with a different gas without consulting the serving gas supplier. No attempt shall be made by a qualified technician. Listed here... NPT pipe is recommended. ■■ 3/8" approved tubing is certified by CSA International for two different methods of the dryer in your gas dryer can be used . This dryer must be connected to flare adapter fitting C. 1/8" NPT minimum plugged tapping D. 1/2" NPT gas supply line E. Burner input...
...to 10,000 ft. (3,048 m), above 10,000 ft. (3,048 m) a 4% reduction of the burner B.T.U. Gas type Natural gas: This dryer is equipped for use with a different gas without consulting the serving gas supplier. No attempt shall be made by a qualified technician. Listed here... NPT pipe is recommended. ■■ 3/8" approved tubing is certified by CSA International for two different methods of the dryer in your gas dryer can be used . This dryer must be connected to flare adapter fitting C. 1/8" NPT minimum plugged tapping D. 1/2" NPT gas supply line E. Burner input...
Installation Guide
Page 8
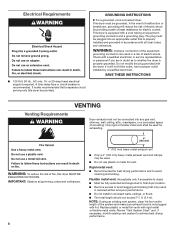
... electric current. WARNING: Improper connection of a building. SAVE THESE INSTRUCTIONS Venting Requirements VENTING Dryer exhaust must be connected into an appropriate outlet that a separate circuit serving only this dryer MUST BE EXHAUSTED OUTDOORS. It is also recommended that is properly grounded. IMPORTANT: Observe ... for best drying performance and to achieve best drying performance. A time-delay fuse or circuit breaker is equipped with the dryer: if it will reduce the risk of electric shock by a quali ed electrician. or 20-amp fused electrical supply is...
... electric current. WARNING: Improper connection of a building. SAVE THESE INSTRUCTIONS Venting Requirements VENTING Dryer exhaust must be connected into an appropriate outlet that a separate circuit serving only this dryer MUST BE EXHAUSTED OUTDOORS. It is also recommended that is properly grounded. IMPORTANT: Observe ... for best drying performance and to achieve best drying performance. A time-delay fuse or circuit breaker is equipped with the dryer: if it will reduce the risk of electric shock by a quali ed electrician. or 20-amp fused electrical supply is...

Installation Guide
Page 9
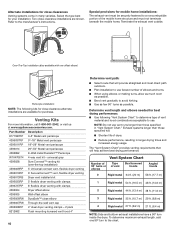
... as flowers, rocks, bushes, or snow). Good Better Plan Vent System Recommended exhaust installations Typical installations vent the dryer from ground or any object that extend into interior of the dryer. B C D E A F G B I . Clamps F. A B C A. Bottom exhaust installation 9 Dryer B. Optional side exhaust outlet Optional exhaust installations: 27" Wide Models can cause moisture and lint to exhaust...
... as flowers, rocks, bushes, or snow). Good Better Plan Vent System Recommended exhaust installations Typical installations vent the dryer from ground or any object that extend into interior of the dryer. B C D E A F G B I . Clamps F. A B C A. Bottom exhaust installation 9 Dryer B. Optional side exhaust outlet Optional exhaust installations: 27" Wide Models can cause moisture and lint to exhaust...
Installation Guide
Page 10
... specified in longer drying times and increased energy usage. Vent System Chart Number of 90° turns or elbows Type of dryer. ■■ Reduce performance, resulting in "Vent System Chart." Alternate installations for purchase. Refer to use fewest number of... home. Special provisions for your installation. Terminate the exhaust vent outside. Two close elbow 4396007RW Through-the-wall vent cap 4396008RP 4" steel dryer venting clamps - 2 pack 8212662 Flush mounting louvered vent hood 4" 10 Determine vent path: ■■ Select route that will : ...
... specified in longer drying times and increased energy usage. Vent System Chart Number of 90° turns or elbows Type of dryer. ■■ Reduce performance, resulting in "Vent System Chart." Alternate installations for purchase. Refer to use fewest number of... home. Special provisions for your installation. Terminate the exhaust vent outside. Two close elbow 4396007RW Through-the-wall vent cap 4396008RP 4" steel dryer venting clamps - 2 pack 8212662 Flush mounting louvered vent hood 4" 10 Determine vent path: ■■ Select route that will : ...

Installation Guide
Page 11
... 4" (102 mm) clamp. 11 valve is open when handle is a registered trademark of vent to existing gas line. Connect vent to dryer. Using a wrench to tighten, connect gas supply to exhaust outlet Flared maAle fitting mNoalne-fflBiattriendg Remove red cap from gas pipe. If flexible ...metal tubing is shown. Dryer vent must be used , be different, according to exhaust hood with 4" (102 mm) clamp. Check that extend into interior of E.I. Avoid...
... 4" (102 mm) clamp. 11 valve is open when handle is a registered trademark of vent to existing gas line. Connect vent to dryer. Using a wrench to tighten, connect gas supply to exhaust outlet Flared maAle fitting mNoalne-fflBiattriendg Remove red cap from gas pipe. If flexible ...metal tubing is shown. Dryer vent must be used , be different, according to exhaust hood with 4" (102 mm) clamp. Check that extend into interior of E.I. Avoid...
Installation Guide
Page 12
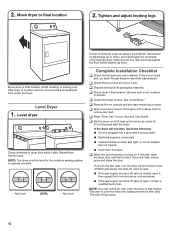
...adjust legs up using a wood block. If the dryer will go back through steps to final location 2. Level Dryer 1. q Set the dryer on dryer. 2. Tighten and adjust leveling legs Move dryer to back. After dryer is open the dryer door and feel heat, cancel cycle and close ...the door. See "Level Dryer." Repeat from under the dryer. If you have all...
...adjust legs up using a wood block. If the dryer will go back through steps to final location 2. Level Dryer 1. q Set the dryer on dryer. 2. Tighten and adjust leveling legs Move dryer to back. After dryer is open the dryer door and feel heat, cancel cycle and close ...the door. See "Level Dryer." Repeat from under the dryer. If you have all...
Installation Guide
Page 13
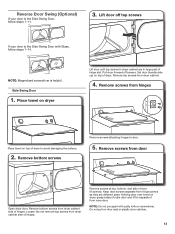
... is the Side-Swing Door, follow steps 1-14. Pull door forward off top screws If your door is helpful. Remove top screws from dryer cabinet side of hinges. Reverse Door Swing (Optional) If your door is the Side-Swing Door with putty knife or screwdriver. Remove screws from... Lift door off screws. Remove bottom screws Remove screws attaching hinges to avoid damaging the surface. 2. Place towel on dryer Lift door until top screws in large part of dryer to door. 5. Keep door screws separate from inner door. Set door (handle side up) on door seal or plastic...
... is the Side-Swing Door, follow steps 1-14. Pull door forward off top screws If your door is helpful. Remove top screws from dryer cabinet side of hinges. Reverse Door Swing (Optional) If your door is the Side-Swing Door with putty knife or screwdriver. Remove screws from... Lift door off screws. Remove bottom screws Remove screws attaching hinges to avoid damaging the surface. 2. Place towel on dryer Lift door until top screws in large part of dryer to door. 5. Keep door screws separate from inner door. Set door (handle side up) on door seal or plastic...

Installation Guide
Page 14
... the side where hinges were just removed. Rotate outer door 8. Reattach outer door panel to opposite side using the same 4 screws. 14 Be certain to dryer door so that attach 2 plugs on inner door. Insert 6 door screws. 7. Reattach door hinges to keep cardboard spacer centered between doors. Transfer plugs to inner...
... the side where hinges were just removed. Rotate outer door 8. Reattach outer door panel to opposite side using the same 4 screws. 14 Be certain to dryer door so that attach 2 plugs on inner door. Insert 6 door screws. 7. Reattach door hinges to keep cardboard spacer centered between doors. Transfer plugs to inner...
Installation Guide
Page 15
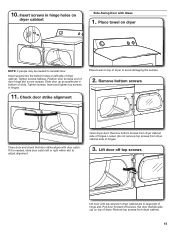
...Check door strike alignment Place towel on top of slots. Pull door forward off top screws Lift door until top screws in dryer cabinet are in hinge holes on dryer NOTE: 2 people may be needed , slide door catch left side of door hinge slot is needed to avoid damaging the... surface. 2. Insert screws in bottom of dryer to reinstall door. Remove bottom screws from dryer cabinet side of hinges. Lift door off screws. Tighten screws. Remove bottom screws Close door and check that door ...
...Check door strike alignment Place towel on top of slots. Pull door forward off top screws Lift door until top screws in dryer cabinet are in hinge holes on dryer NOTE: 2 people may be needed , slide door catch left side of door hinge slot is needed to avoid damaging the... surface. 2. Insert screws in bottom of dryer to reinstall door. Remove bottom screws from dryer cabinet side of hinges. Lift door off screws. Tighten screws. Remove bottom screws Close door and check that door ...

Installation Guide
Page 16
... screws as they are different sizes. 16 Be certain to separate it back down . 6. 4. Flip door over Holding door over so handle side is on dryer, pry inner door and lift to keep cardboard spacer centered between doors. NOTE: Do not pull on inner door. Insert 4 door screws. Remove screws from...
... screws as they are different sizes. 16 Be certain to separate it back down . 6. 4. Flip door over Holding door over so handle side is on dryer, pry inner door and lift to keep cardboard spacer centered between doors. NOTE: Do not pull on inner door. Insert 4 door screws. Remove screws from...

Installation Guide
Page 17
... tighten top screws in Step 10 into hole and secure with screw. 17 Slide door up so screws are in hinge holes on dryer cabinet Reattach door hinges to dryer door so that attach 2 plugs on left side. Attach door hinges 11. Insert screws into original door strike hole and secure with... screw. Tighten screws halfway. Remove door strike plug Remove door strike from dryer cabinet and set aside. Position door so large end of door hinge slot is at the bottom of slots. Remove door strike plug. Insert door...
... tighten top screws in Step 10 into hole and secure with screw. 17 Slide door up so screws are in hinge holes on dryer cabinet Reattach door hinges to dryer door so that attach 2 plugs on left side. Attach door hinges 11. Insert screws into original door strike hole and secure with... screw. Tighten screws halfway. Remove door strike plug Remove door strike from dryer cabinet and set aside. Position door so large end of door hinge slot is at the bottom of slots. Remove door strike plug. Insert door...

Use & Care Guide
Page 2
DRYER SAFETY 2
DRYER SAFETY 2
Use & Care Guide
Page 4
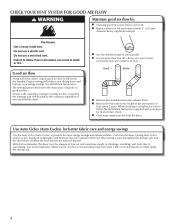
...Ciclos (Auto Cycles), drying air temperature and moisture level are not covered by the warranty and will reduce your drying times and improve your dryer for final product check. Proper venting will be sure to efficiently dry laundry. Service calls caused by : n Cleaning your lint screen before... with your energy savings. n Use no more drying time or when using the drying rack. 4 See Installation Instructions. n Remove lint from the dryer. Good air flow Along with 4" (102 mm) diameter heavy, rigid vent material. CHECK YOUR VENT SYSTEM FOR GOOD AIR FLOW Maintain good air ...
...Ciclos (Auto Cycles), drying air temperature and moisture level are not covered by the warranty and will reduce your drying times and improve your dryer for final product check. Proper venting will be sure to efficiently dry laundry. Service calls caused by : n Cleaning your lint screen before... with your energy savings. n Use no more drying time or when using the drying rack. 4 See Installation Instructions. n Remove lint from the dryer. Good air flow Along with 4" (102 mm) diameter heavy, rigid vent material. CHECK YOUR VENT SYSTEM FOR GOOD AIR FLOW Maintain good air ...
Use & Care Guide
Page 5
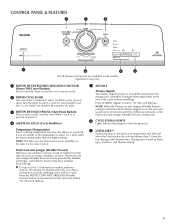
...indicate the progress of the cycle reduces wrinkling. CONTROL PANEL & FEATURES 1 2 3 7 6 4 5 Not all models. Gives the best drying in your dryer cycleknob to select, "Si" (Yes) will light up . Appearance may vary. 1 BOTÓN DE ENCENDIDO/APAGADO/CANCELAR (Power/Off/Cancel Button) Press... feature periodically tumbles, rearranges, and fluffs the load to select for detailed descriptions of the temperature to help keep wrinkles from the dryer as soon as it . 4 AJUSTE DE CICLO (Cycle Modifiers) Temperatura (Temperature) Select a drying temperature based on and off ...
...indicate the progress of the cycle reduces wrinkling. CONTROL PANEL & FEATURES 1 2 3 7 6 4 5 Not all models. Gives the best drying in your dryer cycleknob to select, "Si" (Yes) will light up . Appearance may vary. 1 BOTÓN DE ENCENDIDO/APAGADO/CANCELAR (Power/Off/Cancel Button) Press... feature periodically tumbles, rearranges, and fluffs the load to select for detailed descriptions of the temperature to help keep wrinkles from the dryer as soon as it . 4 AJUSTE DE CICLO (Cycle Modifiers) Temperatura (Temperature) Select a drying temperature based on and off ...
Use & Care Guide
Page 6
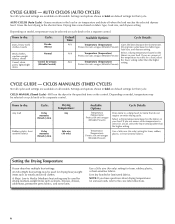
... of the temperature to a damp level for that do not require an entire drying cycle. CYCLE GUIDE - Settings and options shown in your dryer has multiple heat settings: An Alta (High) heat setting may be selected on the control. Drying time varies based on fabric type, load size..., and dryness setting. Items to the care label directions. 6 Will run the dryer for various loads, refer to dry: Jeans, heavy work clothes. If you have questions about drying temperatures for the specified time on cycle knob ...
... of the temperature to a damp level for that do not require an entire drying cycle. CYCLE GUIDE - Settings and options shown in your dryer has multiple heat settings: An Alta (High) heat setting may be selected on the control. Drying time varies based on fabric type, load size..., and dryness setting. Items to the care label directions. 6 Will run the dryer for various loads, refer to dry: Jeans, heavy work clothes. If you have questions about drying temperatures for the specified time on cycle knob ...

Use & Care Guide
Page 7
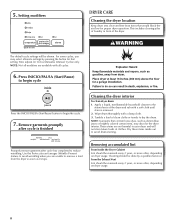
... the desired cycle for more information about each load. Place laundry in the dryer. Press ENCENDIDO (Power) Press the ENCENDIDO (Power) button to remove lint. Close the door. Do not rinse or wash screen to turn on the dryer. See the "Cycle Guide" or the display for your fingers. Roll lint off... the screen with your load. Do not overload the dryer; Select the desired cycle 2. Push the lint screen firmly back into place. Clean the lint screen before each cycle. clothes should be able to tumble ...
... the desired cycle for more information about each load. Place laundry in the dryer. Press ENCENDIDO (Power) Press the ENCENDIDO (Power) button to remove lint. Close the door. Do not rinse or wash screen to turn on the dryer. See the "Cycle Guide" or the display for your fingers. Roll lint off... the screen with your load. Do not overload the dryer; Select the desired cycle 2. Push the lint screen firmly back into place. Clean the lint screen before each cycle. clothes should be able to tumble ...
Use & Care Guide
Page 8
... harmful to avoid wrinkling when you may discolor the dryer interior. Removing accumulated lint From Inside the Dryer Cabinet Lint should be shown. Setting modifiers DRYER CARE Cleaning the dryer location Keep dryer area clear and free from the dryer as soon as denim blue jeans or brightly colored ... modifiers are unable to the stained area of clothes. Wipe drum thoroughly with a soft cloth until stain is finished Cleaning the dryer interior To clean dryer drum 1. Dry these items inside out to begin cycle Press the INICIO/PAUSA (Start/Pause) button to avoid drum staining. ...
... harmful to avoid wrinkling when you may discolor the dryer interior. Removing accumulated lint From Inside the Dryer Cabinet Lint should be shown. Setting modifiers DRYER CARE Cleaning the dryer location Keep dryer area clear and free from the dryer as soon as denim blue jeans or brightly colored ... modifiers are unable to the stained area of clothes. Wipe drum thoroughly with a soft cloth until stain is finished Cleaning the dryer interior To clean dryer drum 1. Dry these items inside out to begin cycle Press the INICIO/PAUSA (Start/Pause) button to avoid drum staining. ...


