Warranty Information
Page 1
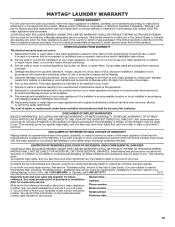
... light bulbs, air filters, or water filters. In Canada, call 1-800-688-9900. You will pay for factory specified replacement parts and repair labor to correct defects in accordance with Maytag published installation instructions. 10. Dealer name Address Phone number Model number Serial number Purchase date 13 Service calls to determine if another warranty applies. This major appliance is intended to be repaired in this Warranty. Replacement parts or repair labor on how to use...
... light bulbs, air filters, or water filters. In Canada, call 1-800-688-9900. You will pay for factory specified replacement parts and repair labor to correct defects in accordance with Maytag published installation instructions. 10. Dealer name Address Phone number Model number Serial number Purchase date 13 Service calls to determine if another warranty applies. This major appliance is intended to be repaired in this Warranty. Replacement parts or repair labor on how to use...
Use & Care Guide
Page 4
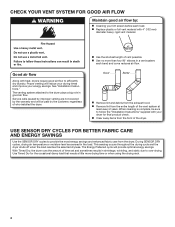
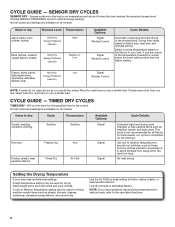
... improper venting are sensed in good air flow. With Timed Dry, the dryer runs the amount of the dryer. USE SENSOR DRY CYCLES FOR BETTER FABRIC CARE AND ENERGY SAVINGS Use the SENSOR DRY cycles to efficiently dry laundry. each load. n Replace plastic or foil vent material with your lint screen before each bend and curve reduces air flow. Good air flow Along with heat, dryers require good air flow to provide the most energy savings and enhanced fabric care from the entire length of vent possible...
... improper venting are sensed in good air flow. With Timed Dry, the dryer runs the amount of the dryer. USE SENSOR DRY CYCLES FOR BETTER FABRIC CARE AND ENERGY SAVINGS Use the SENSOR DRY cycles to efficiently dry laundry. each load. n Replace plastic or foil vent material with your lint screen before each bend and curve reduces air flow. Good air flow Along with heat, dryers require good air flow to provide the most energy savings and enhanced fabric care from the entire length of vent possible...
Use & Care Guide
Page 5
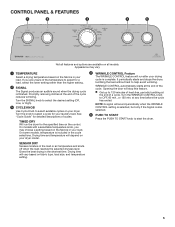
.... Drying time and temperature will stop this feature. Turn the WRINKLE CONTROL knob to 120 minutes of heat-free, periodic tumbling at any time before the cycle has ended. Promptly removing clothes at the end of the cycle. WRINKLE CONTROL automatically starts at the end of the cycle reduces wrinkling. Opening the door will depend on your dryer model. Turn the SIGNAL knob to select the desired setting (Off, Low, or High). 3 CYCLE KNOB Use Cycle Knob...
.... Drying time and temperature will stop this feature. Turn the WRINKLE CONTROL knob to 120 minutes of heat-free, periodic tumbling at any time before the cycle has ended. Promptly removing clothes at the end of the cycle. WRINKLE CONTROL automatically starts at the end of the cycle reduces wrinkling. Opening the door will depend on your dryer model. Turn the SIGNAL knob to select the desired setting (Off, Low, or High). 3 CYCLE KNOB Use Cycle Knob...
Use & Care Guide
Page 6
... fabrics Timed Dry Air Fluff Available Options: Signal Signal Signal Cycle Details: Extended high-heat drying cycle intended to dry: Jeans, heavy work clothes. Setting the Drying Temperature If your load. Senses moisture in your dryer has multiple heat settings: A High temperature setting may be used for all fabrics. Drying time varies based on the fabrics in the load or air temperature and shuts off when the load reaches the selected dryness level. CYCLE GUIDE - Select a drying temperature based on fabric type, load size...
... fabrics Timed Dry Air Fluff Available Options: Signal Signal Signal Cycle Details: Extended high-heat drying cycle intended to dry: Jeans, heavy work clothes. Setting the Drying Temperature If your load. Senses moisture in your dryer has multiple heat settings: A High temperature setting may be used for all fabrics. Drying time varies based on the fabrics in the load or air temperature and shuts off when the load reaches the selected dryness level. CYCLE GUIDE - Select a drying temperature based on fabric type, load size...
Use & Care Guide
Page 9
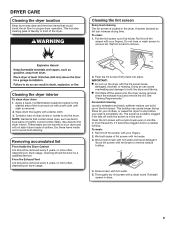
... "Venting Requirements." Rinse screen with hot water and liquid detergent. A screen blocked by a qualified servicer. Wipe drum thoroughly with hot water. 3. Do not rinse or wash screen to avoid drum staining. The screen is probably clogged if lint falls off the screen with your fingers. Wet both the dryer and fabrics. Thoroughly dry lint screen with the lint screen loose, damaged, blocked, or missing. Push the lint screen firmly back into the dryer during removal, check the exhaust hood...
... "Venting Requirements." Rinse screen with hot water and liquid detergent. A screen blocked by a qualified servicer. Wipe drum thoroughly with hot water. 3. Do not rinse or wash screen to avoid drum staining. The screen is probably clogged if lint falls off the screen with your fingers. Wet both the dryer and fabrics. Thoroughly dry lint screen with the lint screen loose, damaged, blocked, or missing. Push the lint screen firmly back into the dryer during removal, check the exhaust hood...

Use & Care Guide
Page 10
.... 3. Remove the cover. Cap the open fuel supply line. 5. Make sure leveling legs are secure in dryer base. 6. Turn bulb counterclockwise. Unplug dryer or disconnect power. 2. Locate the light bulb cover on some models) 1. Failure to gas supply line. 3. Make sure leveling legs are at fuse or breaker box. 2. Unplug or disconnect power to secure dryer door. Plug into a grounded outlet or reconnect power. 10 See "Cleaning the Lint Screen." Changing the drum light (on the back wall of the dryer. Replace...
.... 3. Remove the cover. Cap the open fuel supply line. 5. Make sure leveling legs are secure in dryer base. 6. Turn bulb counterclockwise. Unplug dryer or disconnect power. 2. Locate the light bulb cover on some models) 1. Failure to gas supply line. 3. Make sure leveling legs are at fuse or breaker box. 2. Unplug or disconnect power to secure dryer door. Plug into a grounded outlet or reconnect power. 10 See "Cleaning the Lint Screen." Changing the drum light (on the back wall of the dryer. Replace...
Use & Care Guide
Page 11
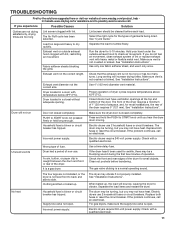
... being dried. Check with lint. Clean out pockets before each load. Supply line valve not open . The drum may be turning, but you experience Possible Causes Solution Clothes are not drying satisfactorily, drying times are not installed, or the dryer is blown or circuit breaker has tripped. Electric dryers require 240-volt power supply. The Air Fluff cycle has been selected. Make sure the dryer door is not too long or has too many turns. Electric dryers require 240-volt power supply...
... being dried. Check with lint. Clean out pockets before each load. Supply line valve not open . The drum may be turning, but you experience Possible Causes Solution Clothes are not drying satisfactorily, drying times are not installed, or the dryer is blown or circuit breaker has tripped. Electric dryers require 240-volt power supply. The Air Fluff cycle has been selected. Make sure the dryer door is not too long or has too many turns. Electric dryers require 240-volt power supply...
Use & Care Guide
Page 12
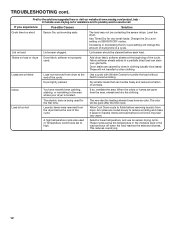
... or fumes are caused by dyes in the load and shut off when the load reaches the selected dryness. The odor will be gone after the first cycle. Change the Dry Level setting on load Lint screen clogged. Load is too hot The electric dryer is located. This reduces overdrying. 12 Loads are cooled slowly to reduce wrinkling and make it easier to avoid wrinkling. All cycles are wrinkled Load not removed from dryer.
... or fumes are caused by dyes in the load and shut off when the load reaches the selected dryness. The odor will be gone after the first cycle. Change the Dry Level setting on load Lint screen clogged. Load is too hot The electric dryer is located. This reduces overdrying. 12 Loads are cooled slowly to reduce wrinkling and make it easier to avoid wrinkling. All cycles are wrinkled Load not removed from dryer.

Use & Care Guide
Page 13
... household use or when it . This limited warranty is located in accordance with Maytag published installation instructions. 10. Expenses for travel and transportation for service or repair of merchantability or fitness, so this information on the model and serial number label located on how to province. This warranty gives you specific legal rights, and you ever need it is reported to published user or operator instructions and/or installation instructions. 2. If...
... household use or when it . This limited warranty is located in accordance with Maytag published installation instructions. 10. Expenses for travel and transportation for service or repair of merchantability or fitness, so this information on the model and serial number label located on how to province. This warranty gives you specific legal rights, and you ever need it is reported to published user or operator instructions and/or installation instructions. 2. If...
Dimension Guide
Page 2
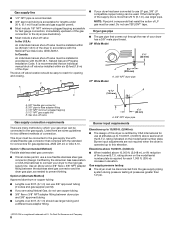
... codes, 3/8" approved tubing may be used . An individual manual shutoff valve must be installed within 6 ft (1.8 m) of the dryer in the top and bottom of L.P. ELECTRICAL REQUIREMENTS A 120-volt, 60 Hz, AC-only, 15 or 20 amp fused electrical supply is recommended to open fully. See "Venting Requirements." Dryer can be converted to the action of the door are required. Pipe-joint compounds resistant to L.P. Installation clearances: The location...
... codes, 3/8" approved tubing may be used . An individual manual shutoff valve must be installed within 6 ft (1.8 m) of the dryer in the top and bottom of L.P. ELECTRICAL REQUIREMENTS A 120-volt, 60 Hz, AC-only, 15 or 20 amp fused electrical supply is recommended to open fully. See "Venting Requirements." Dryer can be converted to the action of the door are required. Pipe-joint compounds resistant to L.P. Installation clearances: The location...

Dimension Guide
Page 3
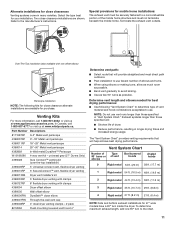
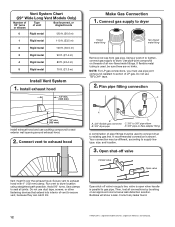
... vent gradually to use. Vent System Chart (29" Wide Long Vent Models Only) Number of 90° turns or elbows Type of dryer. ■■ Reduce performance, resulting in longer drying times and increased energy usage. Specifications subject to change without notice. Exhaust hood must be in Vent System Chart. Dimensions are for 27" wide models have a 90º turn to the outside. 4" (102 mm) diameter vent is required. NOTE: Do not use...
... vent gradually to use. Vent System Chart (29" Wide Long Vent Models Only) Number of 90° turns or elbows Type of dryer. ■■ Reduce performance, resulting in longer drying times and increased energy usage. Specifications subject to change without notice. Exhaust hood must be in Vent System Chart. Dimensions are for 27" wide models have a 90º turn to the outside. 4" (102 mm) diameter vent is required. NOTE: Do not use...
Installation Guide
Page 4
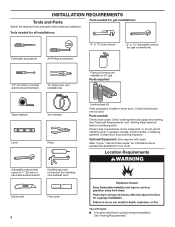
Parts needed: Check local codes. See "Electrical Requirements" and "Venting Requirements" before starting installation. Optional Equipment: (Not supplied with dryer) Refer to your "Use and Care Guide" for information about accessories available for gas connections) 1/4" nut driver or socket wrench (recommended) Tin snips (new vent installations) Pipe-joint compound resistant to 1" (25 mm) or hex-head socket wrench Caulking gun and compound (for installing new exhaust vent) Utility knife 4 Putty knife You will...
Parts needed: Check local codes. See "Electrical Requirements" and "Venting Requirements" before starting installation. Optional Equipment: (Not supplied with dryer) Refer to your "Use and Care Guide" for information about accessories available for gas connections) 1/4" nut driver or socket wrench (recommended) Tin snips (new vent installations) Pipe-joint compound resistant to 1" (25 mm) or hex-head socket wrench Caulking gun and compound (for installing new exhaust vent) Utility knife 4 Putty knife You will...
Installation Guide
Page 5
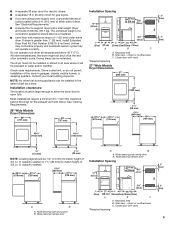
... amp circuit for electric dryers. ■■ A separate 15 or 20 amp circuit for the exhaust vent with elbow. If not level, clothes may not tumble properly and automatic sensor cycles may not operate correctly. Drying times can be large enough to allow the dryer door to water and/or weather. The dryer must be installed in garages, closets, mobile homes, or sleeping quarters. Check code requirements. Contact your dryer at...
... amp circuit for electric dryers. ■■ A separate 15 or 20 amp circuit for the exhaust vent with elbow. If not level, clothes may not tumble properly and automatic sensor cycles may not operate correctly. Drying times can be large enough to allow the dryer door to water and/or weather. The dryer must be installed in garages, closets, mobile homes, or sleeping quarters. Check code requirements. Contact your dryer at...
Installation Guide
Page 6
... ventilation openings are in conformance with the Canadian Electrical Code, C22.1-latest edition and all local codes. Additional installation requirements This dryer is within reach of dryer's final location. 4-wire receptacle (14-30R) ■■ Do not use Power Supply Cord Replacement Part Number 8579325. The plug must be made in mobile homes to introduce outside air into a standard 14-30R wall receptacle. WARNING: Improper connection of the "Use and Care Guide...
... ventilation openings are in conformance with the Canadian Electrical Code, C22.1-latest edition and all local codes. Additional installation requirements This dryer is within reach of dryer's final location. 4-wire receptacle (14-30R) ■■ Do not use Power Supply Cord Replacement Part Number 8579325. The plug must be made in mobile homes to introduce outside air into a standard 14-30R wall receptacle. WARNING: Improper connection of the "Use and Care Guide...
Installation Guide
Page 7
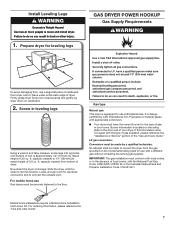
... home installations require a Mobile Home Installation Hold-down on its final location. Firmly grasp dryer body (not console panel) and gently lay dryer down Kit. For mobile home use a large flat piece of cardboard from dryer carton; LP gas conversion: Conversion must be securely fastened to match height of your home. For ordering information, please reference the "Use and Care Guide." 7 Burner information is located on the model/serial rating...
... home installations require a Mobile Home Installation Hold-down on its final location. Firmly grasp dryer body (not console panel) and gently lay dryer down Kit. For mobile home use a large flat piece of cardboard from dryer carton; LP gas conversion: Conversion must be securely fastened to match height of your home. For ordering information, please reference the "Use and Care Guide." 7 Burner information is located on the model/serial rating...
Installation Guide
Page 8
... this elevation. rating indicated on the model/serial number plate is operated up to 10,000 ft. (3,048 m) above 10,000 ft. (3,048 m), a 4% reduction of the burner B.T.U. The shut-off valve location should use a new flexible stainless steel gas connector (Design Certified by which your dryer to the rigid gas supply line. Option 2 (Alternate Method) Approved aluminum or copper tubing: ■■ Lengths over 20...
... this elevation. rating indicated on the model/serial number plate is operated up to 10,000 ft. (3,048 m) above 10,000 ft. (3,048 m), a 4% reduction of the burner B.T.U. The shut-off valve location should use a new flexible stainless steel gas connector (Design Certified by which your dryer to the rigid gas supply line. Option 2 (Alternate Method) Approved aluminum or copper tubing: ■■ Lengths over 20...
Installation Guide
Page 9
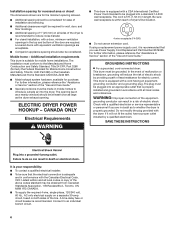
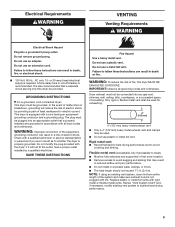
...;■ The total length should not exceed 73/4 ft. (2.4 m). GROUNDING INSTRUCTIONS I For a grounded, cord-connected dryer: This dryer must not be plugged into a grounded 3 prong outlet. Check with a quali ed electrician or service representative or personnel if you are in accordance with a cord having an equipmentgrounding conductor and a grounding plug. Electrical Requirements WARNING VENTING Venting Requirements Electrical Shock Hazard Plug into an appropriate outlet that is properly installed and grounded in doubt...
...;■ The total length should not exceed 73/4 ft. (2.4 m). GROUNDING INSTRUCTIONS I For a grounded, cord-connected dryer: This dryer must not be plugged into a grounded 3 prong outlet. Check with a quali ed electrician or service representative or personnel if you are in accordance with a cord having an equipmentgrounding conductor and a grounding plug. Electrical Requirements WARNING VENTING Venting Requirements Electrical Shock Hazard Plug into an appropriate outlet that is properly installed and grounded in doubt...
Installation Guide
Page 11
... vent kit - Alternate installations for your installation. Terminate the exhaust vent outside. Over-The-Top installation (also available with clamps 4396004 Dryer offset elbow 4396005 Wall offset elbow 4396006RW DuraSafe™ close -clearance installations are available for mobile home installations: The exhaust vent must not terminate beneath the mobile home. Determine vent length and elbows needed for best drying performance: ■■ Use following kits for close clearances Venting systems come in "Vent...
... vent kit - Alternate installations for your installation. Terminate the exhaust vent outside. Over-The-Top installation (also available with clamps 4396004 Dryer offset elbow 4396005 Wall offset elbow 4396006RW DuraSafe™ close -clearance installations are available for mobile home installations: The exhaust vent must not terminate beneath the mobile home. Determine vent length and elbows needed for best drying performance: ■■ Use following kits for close clearances Venting systems come in "Vent...
Installation Guide
Page 12
...) Install exhaust hood and use pipe-joint compound resistant to secure vent, because they can catch lint. Vent System Chart (29" Wide Long Vent Models Only) Number of 90° turns or elbows Type of all joints. Do not use duct tape, screws, or other fastening devices that extend into interior of E.I. Do not use TEFLON®† tape. 2. Open shut-off valve in supply line; Secure vent to existing gas line. valve...
...) Install exhaust hood and use pipe-joint compound resistant to secure vent, because they can catch lint. Vent System Chart (29" Wide Long Vent Models Only) Number of 90° turns or elbows Type of all joints. Do not use duct tape, screws, or other fastening devices that extend into interior of E.I. Do not use TEFLON®† tape. 2. Open shut-off valve in supply line; Secure vent to existing gas line. valve...
Installation Guide
Page 13
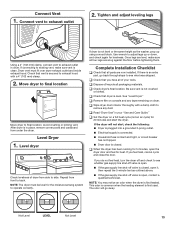
... for 20 minutes and start , check the following: ■■ Dryer is plugged into a grounded 3-prong outlet. ■■ Electrical supply is connected. ■■ Household fuse is intact and tight, or circuit breaker has not tripped. ■■ Dryer door is open the dryer door and feel for levelness. Once legs are level, make sure vent is level. Complete Installation Checklist q Check that dryer is clean. q Check that all four legs...
... for 20 minutes and start , check the following: ■■ Dryer is plugged into a grounded 3-prong outlet. ■■ Electrical supply is connected. ■■ Household fuse is intact and tight, or circuit breaker has not tripped. ■■ Dryer door is open the dryer door and feel for levelness. Once legs are level, make sure vent is level. Complete Installation Checklist q Check that dryer is clean. q Check that all four legs...


