
Owners Manual
Page 2
DRYER SAFETY 2
DRYER SAFETY 2
Owners Manual
Page 4
QUICK START GUIDE/DRYER USE For a summary of how to use your dryer following installation instructions apply: ■ Installations and repairs must not exceed 3 feet. In the State of Massachusetts. ■ If using a ball valve, it shall be a T-handle type. ■ A flexible gas connector, when used, must be performed by a qualified or licensed contractor, plumber, or gasfitter qualified or licensed by the State of Massachusetts, the following installation, see the QUICK START GUIDE on the next page. 4
QUICK START GUIDE/DRYER USE For a summary of how to use your dryer following installation instructions apply: ■ Installations and repairs must not exceed 3 feet. In the State of Massachusetts. ■ If using a ball valve, it shall be a T-handle type. ■ A flexible gas connector, when used, must be performed by a qualified or licensed contractor, plumber, or gasfitter qualified or licensed by the State of Massachusetts, the following installation, see the QUICK START GUIDE on the next page. 4
Owners Manual
Page 5
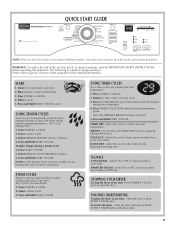
.... Select ON or OFF, to specific sections of load, and adjust drying time for items requiring drying without heat. PAUSING OR RESTARTING To pause the dryer at any time - Open the door or press START • PAUSE once. Please refer to alert you when a cycle ends. Select a cycle. 5....set a drying time and temperature. 1. Press and Hold START • PAUSE. Press POWER • CANCEL once or open the door. To restart the dryer - SIGNALS CYCLE SIGNAL - WARNING: To reduce the risk of the cycles and features described. Close the door and press and hold START • PAUSE...
.... Select ON or OFF, to specific sections of load, and adjust drying time for items requiring drying without heat. PAUSING OR RESTARTING To pause the dryer at any time - Open the door or press START • PAUSE once. Please refer to alert you when a cycle ends. Select a cycle. 5....set a drying time and temperature. 1. Press and Hold START • PAUSE. Press POWER • CANCEL once or open the door. To restart the dryer - SIGNALS CYCLE SIGNAL - WARNING: To reduce the risk of the cycles and features described. Close the door and press and hold START • PAUSE...
Owners Manual
Page 6
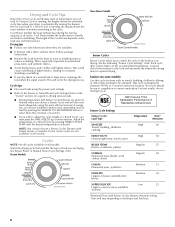
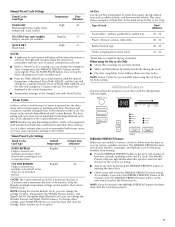
... For best results, do not interrupt cycle. The length of all cycles. Follow package instructions. ■ Remove the load from the dryer as soon as towels, bedding, children's clothing, or other items needing to ensure sanitization. See the following "Sensor Cycle Settings" chart....Sensor Cycles allow you are drying. This will vary depending on all models. This is designed to eliminate 99.9% of Residential clothes Dryers Sensor Cycle Settings Sensor Cycles Load Type Temperature Time* (Minutes) SANITIZE Towels, bedding, children's clothing High 60 HEAVY DUTY High 50...
... For best results, do not interrupt cycle. The length of all cycles. Follow package instructions. ■ Remove the load from the dryer as soon as towels, bedding, children's clothing, or other items needing to ensure sanitization. See the following "Sensor Cycle Settings" chart....Sensor Cycles allow you are drying. This will vary depending on all models. This is designed to eliminate 99.9% of Residential clothes Dryers Sensor Cycle Settings Sensor Cycles Load Type Temperature Time* (Minutes) SANITIZE Towels, bedding, children's clothing High 60 HEAVY DUTY High 50...
Owners Manual
Page 7
...rubber, plastic, and heat-sensitive fabrics. The light will not glow when the selection is unavailable with the drying Status indicator lights. The dryer will continue to tumble at any time by 1-minute intervals. The Wrinkle Prevent indicator light blinks when this option is selected and that coverings...: Results may vary depending on fabric. 100% cotton garments with wrinkle-free finish may follow the progress of water is sprayed into the dryer drum after the cool down buttons until the desired drying time is selected. NOTE: During the Custom Refresh Cycle, you are slow to ...
...rubber, plastic, and heat-sensitive fabrics. The light will not glow when the selection is unavailable with the drying Status indicator lights. The dryer will continue to tumble at any time by 1-minute intervals. The Wrinkle Prevent indicator light blinks when this option is selected and that coverings...: Results may vary depending on fabric. 100% cotton garments with wrinkle-free finish may follow the progress of water is sprayed into the dryer drum after the cool down buttons until the desired drying time is selected. NOTE: During the Custom Refresh Cycle, you are slow to ...
Owners Manual
Page 8
...default time is displayed when a Sensor Cycle is useful when drying bedsheets/linens in a Timed Cycle. during this option is pressed again. When the dryer is not running, the drum light will adjust again, showing the final drying time. ■ Time and Temperature are approximately 80% dry. To ...and Sensing light indicators will go through a Cool Down cycle; The Wrinkle Prevent indicator will flash and the load will aid in the dryer during a sensor cycle. Drum Light Select Drum Light to turn off . Promptly removing clothes at any time to turn this feature ...
...default time is displayed when a Sensor Cycle is useful when drying bedsheets/linens in a Timed Cycle. during this option is pressed again. When the dryer is not running, the drum light will adjust again, showing the final drying time. ■ Time and Temperature are approximately 80% dry. To ...and Sensing light indicators will go through a Cool Down cycle; The Wrinkle Prevent indicator will flash and the load will aid in the dryer during a sensor cycle. Drum Light Select Drum Light to turn off . Promptly removing clothes at any time to turn this feature ...
Owners Manual
Page 9
...NOTE: Clean the lint screen and remove any lint accumulated from whom you do not press START-PAUSE within 5 minutes of selecting the cycle, the dryer automatically shuts off. Press START-PAUSE once. Press START-PAUSE once. 2. To select a new drying setting, press the Sensor Cycles Dryness button again...Dryness settings to continue the cycle. Press and hold START-PAUSE to increase the dryness. The last selection will not be changed while the dryer is useful for drying items you would normally line dry (for all Sensor cycles. Select the new Modifier and/or Option. 3. This change...
...NOTE: Clean the lint screen and remove any lint accumulated from whom you do not press START-PAUSE within 5 minutes of selecting the cycle, the dryer automatically shuts off. Press START-PAUSE once. Press START-PAUSE once. 2. To select a new drying setting, press the Sensor Cycles Dryness button again...Dryness settings to continue the cycle. Press and hold START-PAUSE to increase the dryness. The last selection will not be changed while the dryer is useful for drying items you would normally line dry (for all Sensor cycles. Select the new Modifier and/or Option. 3. This change...

Owners Manual
Page 10
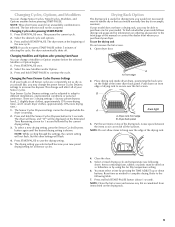
... Timed Air Only 90 Dry (no heat) Sneakers or canvas shoes Timed Air Only 90 Dry (no heat) *Reset time to stack your PERFORMANCE SERIES dryer? NOTE: You must remove drying rack for a total height of approximately 48" (1219 mm) or 53.5" (1359 mm), respectively. Optional Accessories Pedestals... The lint screen is located in several colors. Rack Dry Setting Temp. You have the option of purchasing pedestals of items falling behind your dryer or refer to purchase a Stack Kit. To order, call the dealer from whom you will reduce the chance of different heights separately for ...
... Timed Air Only 90 Dry (no heat) Sneakers or canvas shoes Timed Air Only 90 Dry (no heat) *Reset time to stack your PERFORMANCE SERIES dryer? NOTE: You must remove drying rack for a total height of approximately 48" (1219 mm) or 53.5" (1359 mm), respectively. Optional Accessories Pedestals... The lint screen is located in several colors. Rack Dry Setting Temp. You have the option of purchasing pedestals of items falling behind your dryer or refer to purchase a Stack Kit. To order, call the dealer from whom you will reduce the chance of different heights separately for ...
Owners Manual
Page 11
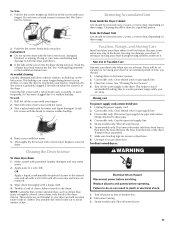
...Exhaust Vent Lint should be removed every 2 years, or more often, depending on dryer usage. Gas models only: Close shutoff valve in dryer. Clean lint screen. Moving care For power supply cord-connected dryers: 1. Turn off the screen with a soft cloth until all excess dye and ... blocked, or missing. Scrub lint screen with hot water. 3. Rinse screen with powdered laundry detergent and very warm water. 2. Cleaning the Dryer Interior To clean dryer drum 1. Make a paste with hot water. 5. Tumble a load of dye. NOTE: Garments that contain unstable dyes, such as denim...
...Exhaust Vent Lint should be removed every 2 years, or more often, depending on dryer usage. Gas models only: Close shutoff valve in dryer. Clean lint screen. Moving care For power supply cord-connected dryers: 1. Turn off the screen with a soft cloth until all excess dye and ... blocked, or missing. Scrub lint screen with hot water. 3. Rinse screen with powdered laundry detergent and very warm water. 2. Cleaning the Dryer Interior To clean dryer drum 1. Make a paste with hot water. 5. Tumble a load of dye. NOTE: Garments that contain unstable dyes, such as denim...
Owners Manual
Page 12
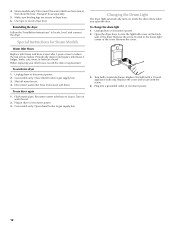
... models only: Close shutoff valve in gas supply line. Flush water pipes. Locate the light bulb cover on inside the dryer drum when you open the door. Replace the bulb with the screw. 4. 4. Make sure leveling legs are found. When replacing your inlet hoses, record the ...date of the cover. Shut off water faucet. 4. Gas models only: Open shutoff valve in gas supply line. 3. Changing the Drum Light The dryer light automatically turns on the back wall of hose failure. Replace the cover and secure with a 10-watt appliance bulb only. Plug into a grounded outlet...
... models only: Close shutoff valve in gas supply line. Flush water pipes. Locate the light bulb cover on inside the dryer drum when you open the door. Replace the bulb with the screw. 4. 4. Make sure leveling legs are found. When replacing your inlet hoses, record the ...date of the cover. Shut off water faucet. 4. Gas models only: Open shutoff valve in gas supply line. 3. Changing the Drum Light The dryer light automatically turns on the back wall of hose failure. Replace the cover and secure with a 10-watt appliance bulb only. Plug into a grounded outlet...
Owners Manual
Page 13
...if a household fuse has blown or circuit breaker has tripped. If the message persists, have heat. In Canada www.maytag.ca Dryer Operation Dryer will continue to run from the display and return to the estimated time remaining. If the problem continues, call ... ...E3) service codes: Call for small objects. Electric dryers use ? Select a Timed Dry heated cycle, and restart the dryer. Confirm the exterior vent exhaust hood is present. http://maytag.custhelp.com - Electric dryers require 120-volt power supply and gas dryers require 240-volt power supply. No heat ■...
...if a household fuse has blown or circuit breaker has tripped. If the message persists, have heat. In Canada www.maytag.ca Dryer Operation Dryer will continue to run from the display and return to the estimated time remaining. If the problem continues, call ... ...E3) service codes: Call for small objects. Electric dryers use ? Select a Timed Dry heated cycle, and restart the dryer. Confirm the exterior vent exhaust hood is present. http://maytag.custhelp.com - Electric dryers require 120-volt power supply and gas dryers require 240-volt power supply. No heat ■...
Owners Manual
Page 14
...; Is the lint screen clogged? Odors ■ Have you do not feel air movement, clean exhaust system of drying time in a cycle. Dryer Results Clothes are not drying satisfactorily, drying times are caused by dyes in clothing (usually blue jeans). See "Installation Instructions." ■ Are fabric... sheets blocking the grille? Long venting will not transfer to help smooth out wrinkles from a load left in the dryer. ■ Was the dryer tightly packed? Add dryer fabric softener sheets at the end of garments being used ? This will increase drying times. The new heating element may...
...; Is the lint screen clogged? Odors ■ Have you do not feel air movement, clean exhaust system of drying time in a cycle. Dryer Results Clothes are not drying satisfactorily, drying times are caused by dyes in clothing (usually blue jeans). See "Installation Instructions." ■ Are fabric... sheets blocking the grille? Long venting will not transfer to help smooth out wrinkles from a load left in the dryer. ■ Was the dryer tightly packed? Add dryer fabric softener sheets at the end of garments being used ? This will increase drying times. The new heating element may...

Installation Instructions
Page 2
... symbol. This symbol alerts you to reduce the chance of others . We have provided many important safety messages in this manual and on your appliance. DRYER SAFETY Your safety and the safety of injury, and tell you don't follow instructions. Always read and obey all safety messages. This is , tell you...
... symbol. This symbol alerts you to reduce the chance of others . We have provided many important safety messages in this manual and on your appliance. DRYER SAFETY Your safety and the safety of injury, and tell you don't follow instructions. Always read and obey all safety messages. This is , tell you...
Installation Instructions
Page 3
The dryer must be electrically grounded in accordance with local codes, or in this or any other flammable vapors and liquids in the absence of local codes, ...
The dryer must be electrically grounded in accordance with local codes, or in this or any other flammable vapors and liquids in the absence of local codes, ...

Installation Instructions
Page 4
...tools listed here. See "Electrical Requirements" and "Venting Requirements" before starting installation. NOTE: Do not use leveling legs supplied with dryer if installing on a pedestal. For All Installations: Steam Models ■ Flat-blade screwdriver ■ #2 Phillips screwdriver ■ Adjustable...legs (4) B. Check that all parts are included. Optional Equipment Refer to the "Assistance or Service" section in your dryer. Check existing electrical supply and venting. Parts needed Check local codes. INSTALLATION REQUIREMENTS Tools and Parts Gather the required tools...
...tools listed here. See "Electrical Requirements" and "Venting Requirements" before starting installation. NOTE: Do not use leveling legs supplied with dryer if installing on a pedestal. For All Installations: Steam Models ■ Flat-blade screwdriver ■ #2 Phillips screwdriver ■ Adjustable...legs (4) B. Check that all parts are included. Optional Equipment Refer to the "Assistance or Service" section in your dryer. Check existing electrical supply and venting. Parts needed Check local codes. INSTALLATION REQUIREMENTS Tools and Parts Gather the required tools...

Installation Instructions
Page 5
...NOTE: No other fuel-burning appliance can result in longer drying times. See "Electrical Requirements." ■ A sturdy floor to the bottom of the dryer. ■ Steam models only: Cold water faucets located within 2 ft (610 mm) of either side of an automatic sensor cycle. If slope ...7/16" (87 mm) * Dimension A is approximate, depending on when the diamond marking on the leveling foot is greater than 1" (25 mm), install Extended Dryer Feet Kit, Part Number 279810. Clothes may not tumble properly and automatic sensor cycles may use the cold water supply from your washer using a pedestal...
...NOTE: No other fuel-burning appliance can result in longer drying times. See "Electrical Requirements." ■ A sturdy floor to the bottom of the dryer. ■ Steam models only: Cold water faucets located within 2 ft (610 mm) of either side of an automatic sensor cycle. If slope ...7/16" (87 mm) * Dimension A is approximate, depending on when the diamond marking on the leveling foot is greater than 1" (25 mm), install Extended Dryer Feet Kit, Part Number 279810. Clothes may not tumble properly and automatic sensor cycles may use the cold water supply from your washer using a pedestal...

Installation Instructions
Page 6
...is allowed NOTE: Some models are recommended for wall, door, and floor moldings. ■ Additional spacing should also be considered on the sides and rear. Dryer only A B C* D E* Steam (Electric or Gas) Non-Steam (Electric or Gas) A 0" (0 mm) 0" (0 mm) B 38" (...The following reasons: ■ Additional spacing should be considered for ease of installation and servicing. ■ Additional clearances might be required for this dryer. Custom undercounter installation - Dryer only (460 mm) C A* B Side View Steam (Electric or Gas) A* 1" (25 mm) B 7 5/8" (194 mm) ...
...is allowed NOTE: Some models are recommended for wall, door, and floor moldings. ■ Additional spacing should also be considered on the sides and rear. Dryer only A B C* D E* Steam (Electric or Gas) Non-Steam (Electric or Gas) A 0" (0 mm) 0" (0 mm) B 38" (...The following reasons: ■ Additional spacing should be considered for ease of installation and servicing. ■ Additional clearances might be required for this dryer. Custom undercounter installation - Dryer only (460 mm) C A* B Side View Steam (Electric or Gas) A* 1" (25 mm) B 7 5/8" (194 mm) ...

Installation Instructions
Page 7
...a door, minimum ventilation openings in the top of the cabinet are required. The opening . The installation must be at least twice as large as the dryer exhaust opening (such as a nearby window) should be made in .2 * (155 cm2) 3"* (76 mm) 6"* (152 mm) 1"* (25 mm...closet installation. Recommended installation spacing for cabinet installation NOTE: Some models are not recommended for cabinet installation. ■ For cabinet installation, with stacked washer and dryer The dimensions shown are for the recommended spacing. 48 in.2 * (310 cm2) 3"* (76 mm) C* D** E F* G H I Steam (...
...a door, minimum ventilation openings in the top of the cabinet are required. The opening . The installation must be at least twice as large as the dryer exhaust opening (such as a nearby window) should be made in .2 * (155 cm2) 3"* (76 mm) 6"* (152 mm) 1"* (25 mm...closet installation. Recommended installation spacing for cabinet installation NOTE: Some models are not recommended for cabinet installation. ■ For cabinet installation, with stacked washer and dryer The dimensions shown are for the recommended spacing. 48 in.2 * (310 cm2) 3"* (76 mm) C* D** E F* G H I Steam (...

Installation Instructions
Page 8
...delay fuse or circuit breaker is adequate and in a risk of electric shock. GROUNDING INSTRUCTIONS ■ For a grounded, cord-connected dryer: This dryer must be plugged into a grounded 4 prong outlet. In the event of malfunction or breakdown, grounding will not fit the outlet, have... a proper outlet installed by providing a path of dryer's final location. This dryer is recommended that is within reach of least resistance for electric current. WARNING: Improper connection of the line. WARNING ...
...delay fuse or circuit breaker is adequate and in a risk of electric shock. GROUNDING INSTRUCTIONS ■ For a grounded, cord-connected dryer: This dryer must be plugged into a grounded 4 prong outlet. In the event of malfunction or breakdown, grounding will not fit the outlet, have... a proper outlet installed by providing a path of dryer's final location. This dryer is recommended that is within reach of least resistance for electric current. WARNING: Improper connection of the line. WARNING ...
Installation Instructions
Page 9
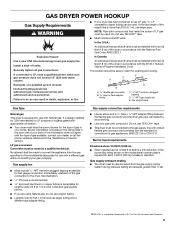
.... LP gas conversion: Conversion must be made by CSA International for LP (propane or butane) gases with a different gas without consulting your dryer. See illustration. ■ 1/2" IPS pipe is recommended. ■ 3/8" approved aluminum or copper tubing is required for the type of gas... be disconnected from the gas specified on the rating plate in accordance with the National Fuel Gas Code, ANSI Z223.1. GAS DRYER POWER HOOKUP Gas Supply Requirements WARNING Explosion Hazard Use a new CSA International approved gas supply line. Burner information is equipped for...
.... LP gas conversion: Conversion must be made by CSA International for LP (propane or butane) gases with a different gas without consulting your dryer. See illustration. ■ 1/2" IPS pipe is recommended. ■ 3/8" approved aluminum or copper tubing is required for the type of gas... be disconnected from the gas specified on the rating plate in accordance with the National Fuel Gas Code, ANSI Z223.1. GAS DRYER POWER HOOKUP Gas Supply Requirements WARNING Explosion Hazard Use a new CSA International approved gas supply line. Burner information is equipped for...


