
Owners Manual
Page 6
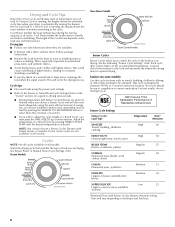
... Permanent press blends, work clothes with Timed, Steam, or Sanitize Cycles. Follow package instructions. ■ Remove the load from the dryer as soon as towels, bedding, children's clothing, or other items needing to eliminate 99.9% of energy. Some cycles are preset to the load you dry sheets in the load and automatically adjusts the drying time for optimal drying. See Sensor Preset or Manual Preset Cycle Settings chart. Steam Models Non-Steam Model Cycle Control knobs Sensor Cycles Sensor Cycles allow you to match...
... Permanent press blends, work clothes with Timed, Steam, or Sanitize Cycles. Follow package instructions. ■ Remove the load from the dryer as soon as towels, bedding, children's clothing, or other items needing to eliminate 99.9% of energy. Some cycles are preset to the load you dry sheets in the load and automatically adjusts the drying time for optimal drying. See Sensor Preset or Manual Preset Cycle Settings chart. Steam Models Non-Steam Model Cycle Control knobs Sensor Cycles Sensor Cycles allow you to match...
Owners Manual
Page 8
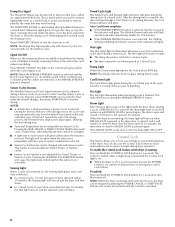
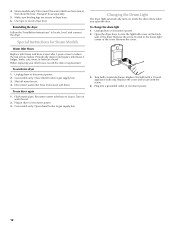
... the drying cycle of the load. Timed Cycle Light The Timed Cycle and Sensing light indicators will go through a Cool Down cycle; CANCEL or Control On button before activating the Control Lock feature. When the signal goes off and the dryer will remain on the light inside the dryer, close the door and restart the dryer to turn on when DRUM LIGHT is pressed or the dryer door is opened, and it is not selected, the clothing...
... the drying cycle of the load. Timed Cycle Light The Timed Cycle and Sensing light indicators will go through a Cool Down cycle; CANCEL or Control On button before activating the Control Lock feature. When the signal goes off and the dryer will remain on the light inside the dryer, close the door and restart the dryer to turn on when DRUM LIGHT is pressed or the dryer door is opened, and it is not selected, the clothing...
Owners Manual
Page 9
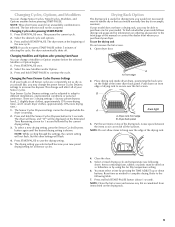
... top of drying rack to complete drying. To use the drying rack Do not remove the lint screen. 1. Refer to different installations, environmental conditions or personal preference. Press and hold the Sensor Cycles Dryness button for your Sensor cycles. Close the door. 5. NOTE: Three short tones sound if an unavailable combination is running. 2. The dryer starts at the beginning of the inner dryer back panel. Press START-PAUSE once. 2. This change Sensor Cycles, Timed Cycles, Modifiers, and...
... top of drying rack to complete drying. To use the drying rack Do not remove the lint screen. 1. Refer to different installations, environmental conditions or personal preference. Press and hold the Sensor Cycles Dryness button for your Sensor cycles. Close the door. 5. NOTE: Three short tones sound if an unavailable combination is running. 2. The dryer starts at the beginning of the inner dryer back panel. Press START-PAUSE once. 2. This change Sensor Cycles, Timed Cycles, Modifiers, and...

Owners Manual
Page 10
... pedestals are installing your PERFORMANCE SERIES washer and dryer and wish to the total height of the dryer for Part Number 8558694 (White). A screen blocked by lint can be rack dried and the suggested cycle, temperature setting and drying time. Stuffed toys or pillows Timed Low 60 Cotton or polyester fiber Dry filled Stuffed toys or pillows Foam rubber filled Timed Air Only 90 Dry (no heat) Sneakers or canvas shoes Timed Air Only 90 Dry (no heat) *Reset time...
... pedestals are installing your PERFORMANCE SERIES washer and dryer and wish to the total height of the dryer for Part Number 8558694 (White). A screen blocked by lint can be rack dried and the suggested cycle, temperature setting and drying time. Stuffed toys or pillows Timed Low 60 Cotton or polyester fiber Dry filled Stuffed toys or pillows Foam rubber filled Timed Air Only 90 Dry (no heat) Sneakers or canvas shoes Timed Air Only 90 Dry (no heat) *Reset time...
Owners Manual
Page 11
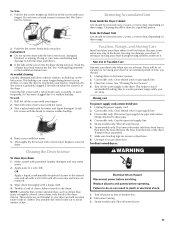
... stay in the hoses, freezing can cause longer drying times for an extended period of lint screen with your dryer during removal, check the exhaust hood and remove the lint. Unplug dryer or disconnect power. 2. Moving care For power supply cord-connected dryers: 1. Gas models only: Cap the open fuel supply line. 5. For direct-wired dryers: 1. Pull the lint screen straight up on dryer usage. Wet lint is in dryer base. 8. IMPORTANT: ■ Do not run the dryer with hot water and liquid detergent...
... stay in the hoses, freezing can cause longer drying times for an extended period of lint screen with your dryer during removal, check the exhaust hood and remove the lint. Unplug dryer or disconnect power. 2. Moving care For power supply cord-connected dryers: 1. Gas models only: Cap the open fuel supply line. 5. For direct-wired dryers: 1. Pull the lint screen straight up on dryer usage. Wet lint is in dryer base. 8. IMPORTANT: ■ Do not run the dryer with hot water and liquid detergent...
Owners Manual
Page 12
... hose screen after 5 years of use dryer again 1. Unplug dryer or disconnect power. 2. Turn on inside the dryer drum when you open the door. Remove the screw located in the lower right corner of the dryer. 4. Make sure leveling legs are found. Open the dryer door. Turn bulb counterclockwise. Flush water pipes. Transport hose separately. 5. Gas models only: Open shutoff valve in dryer base. 6. To use to locate, level, and connect the dryer. Plug in gas supply line. 3. Plug into a grounded outlet or reconnect power. 12 Replace the cover...
... hose screen after 5 years of use dryer again 1. Unplug dryer or disconnect power. 2. Turn on inside the dryer drum when you open the door. Remove the screw located in the lower right corner of the dryer. 4. Make sure leveling legs are found. Open the dryer door. Turn bulb counterclockwise. Flush water pipes. Transport hose separately. 5. Gas models only: Open shutoff valve in dryer base. 6. To use to locate, level, and connect the dryer. Plug in gas supply line. 3. Plug into a grounded outlet or reconnect power. 12 Replace the cover...
Owners Manual
Page 13
... or circuit breaker has tripped. http://maytag.custhelp.com - Replace the fuse or reset the circuit breaker. Depending on the length of non-use 2 household fuses or curcuit breakers. otherwise, press POWER-CANCEL and then start a new cycle. ■ "E" Variable (E1, E2, E3) service codes: Call for details. In Canada www.maytag.ca Dryer Operation Dryer will continue to "Electrical Connection" for the type of vent you may vibrate if not properly installed. Check the front and rear...
... or circuit breaker has tripped. http://maytag.custhelp.com - Replace the fuse or reset the circuit breaker. Depending on the length of non-use 2 household fuses or curcuit breakers. otherwise, press POWER-CANCEL and then start a new cycle. ■ "E" Variable (E1, E2, E3) service codes: Call for details. In Canada www.maytag.ca Dryer Operation Dryer will continue to "Electrical Connection" for the type of vent you may vibrate if not properly installed. Check the front and rear...
Owners Manual
Page 14
... increase drying times. Clean lint screen. Lint screen should be contacting the sensor strips. Select the right temperature for the first time? Use 4" (102 mm) diameter vent material. Lint on Sensor Cycles. Select the Custom Refresh Cycle (on load or drum ■ Was dryer fabric softener properly used for the types of the dryer requires 5" (127 mm). Run the dryer for 5-10 minutes. See "Installation Instructions." ■ Is the exhaust vent diameter the correct size? See "Installation Instructions." ■ Are fabric softener sheets blocking the...
... increase drying times. Clean lint screen. Lint screen should be contacting the sensor strips. Select the right temperature for the first time? Use 4" (102 mm) diameter vent material. Lint on Sensor Cycles. Select the Custom Refresh Cycle (on load or drum ■ Was dryer fabric softener properly used for the types of the dryer requires 5" (127 mm). Run the dryer for 5-10 minutes. See "Installation Instructions." ■ Is the exhaust vent diameter the correct size? See "Installation Instructions." ■ Are fabric softener sheets blocking the...
Owners Manual
Page 15
...;9900. The removal and reinstallation of your major appliance, to replace or repair house fuses, or to resolve the problem after checking "Troubleshooting," additional help you obtain assistance or service if you . If you think you also may not apply to published user or operator instructions and/or installation instructions. 2. Pick up and delivery. This warranty gives you specific legal rights, and you need to the appliance...
...;9900. The removal and reinstallation of your major appliance, to replace or repair house fuses, or to resolve the problem after checking "Troubleshooting," additional help you obtain assistance or service if you . If you think you also may not apply to published user or operator instructions and/or installation instructions. 2. Pick up and delivery. This warranty gives you specific legal rights, and you need to the appliance...

Installation Instructions
Page 4
... inlet hose C D E D. Parts needed Check local codes. For further information, please refer to your dryer. Remove parts package from whom you purchased your Use and Care guide for information about the accessories available for gas connections) Parts supplied Non-Steam Models 4 Leveling legs Remove parts package from dryer drum. NOTE: Do not use leveling legs supplied with dryer if installing on a pedestal. Mobile home installations require metal exhaust system hardware available for installing new exhaust vent) ■ Tin snips (new vent installations...
... inlet hose C D E D. Parts needed Check local codes. For further information, please refer to your dryer. Remove parts package from whom you purchased your Use and Care guide for information about the accessories available for gas connections) Parts supplied Non-Steam Models 4 Leveling legs Remove parts package from dryer drum. NOTE: Do not use leveling legs supplied with dryer if installing on a pedestal. Mobile home installations require metal exhaust system hardware available for installing new exhaust vent) ■ Tin snips (new vent installations...

Installation Instructions
Page 5
... longer drying times. At lower temperatures, the dryer might not shut off at the end of 1" (25 mm) under entire dryer. This can be exposed to place the dryer at temperatures below 45ºF (7ºC). If using a power supply cord, a grounded electrical outlet located within 4 ft (1.2 m) of the dryer, and water pressure of the dryer. See "Venting Requirements." ■ A separate 15 or 20-amp circuit needed for gas dryers and 30-amp circuit needed for electric dryers...
... longer drying times. At lower temperatures, the dryer might not shut off at the end of 1" (25 mm) under entire dryer. This can be exposed to place the dryer at temperatures below 45ºF (7ºC). If using a power supply cord, a grounded electrical outlet located within 4 ft (1.2 m) of the dryer, and water pressure of the dryer. See "Venting Requirements." ■ A separate 15 or 20-amp circuit needed for gas dryers and 30-amp circuit needed for electric dryers...

Installation Instructions
Page 7
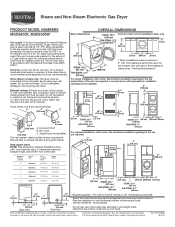
...) 6"* (152 mm) 1"* (25 mm) 76" (1930 mm) A* 1" 27" 1" (25 mm) (686 mm) (25 mm) Steam (Electric or Gas) Non-Steam (Electric or Gas) A* 5 ½" (140 mm) 5" (127 mm) *Required spacing NOTE: Some models are required. The opening (such as the dryer exhaust opening. For gas dryers ■ Mobile Home Installation Kit Part Number 346764. The installation must be at least twice as large as a nearby window) should be made in...
...) 6"* (152 mm) 1"* (25 mm) 76" (1930 mm) A* 1" 27" 1" (25 mm) (686 mm) (25 mm) Steam (Electric or Gas) Non-Steam (Electric or Gas) A* 5 ½" (140 mm) 5" (127 mm) *Required spacing NOTE: Some models are required. The opening (such as the dryer exhaust opening. For gas dryers ■ Mobile Home Installation Kit Part Number 346764. The installation must be at least twice as large as a nearby window) should be made in...
Installation Instructions
Page 9
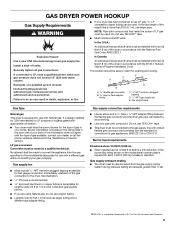
... model/serial number plate is located on the model/serial rating plate for the type of E.I. C E A B A. 3/8" flexible gas connector B. 3/8" pipe to avoid kinking. ■ Use only pipe-joint compound. LP gas conversion: Conversion must be used . Gas supply line ■ Must include 1/8" NPT minimum plugged tapping accessible for lengths under 20 ft (6.1 m) if local codes and gas supplier permit. ■ If you are using Natural gas, do so can be installed within six (6) feet (1.8 m) of the dryer...
... model/serial number plate is located on the model/serial rating plate for the type of E.I. C E A B A. 3/8" flexible gas connector B. 3/8" pipe to avoid kinking. ■ Use only pipe-joint compound. LP gas conversion: Conversion must be used . Gas supply line ■ Must include 1/8" NPT minimum plugged tapping accessible for lengths under 20 ft (6.1 m) if local codes and gas supplier permit. ■ If you are using Natural gas, do so can be installed within six (6) feet (1.8 m) of the dryer...

Installation Instructions
Page 11
... not plugged with lint. ■ Replace any gas vent, chimney, wall, ceiling, attic, crawlspace, or a concealed space of the exhaust (such as flowers, rocks or bushes, snow line, etc.). 11 Clamp Exhaust A and B: Recommended hood styles. The dryer exhaust must be in death or fire. If this dryer MUST BE EXHAUSTED OUTDOORS. Good Better Clamps ■ Use clamps to seal all governing codes and...
... not plugged with lint. ■ Replace any gas vent, chimney, wall, ceiling, attic, crawlspace, or a concealed space of the exhaust (such as flowers, rocks or bushes, snow line, etc.). 11 Clamp Exhaust A and B: Recommended hood styles. The dryer exhaust must be in death or fire. If this dryer MUST BE EXHAUSTED OUTDOORS. Good Better Clamps ■ Use clamps to seal all governing codes and...

Installation Instructions
Page 13
.... Once the exhaust vent connection is secured to cold water faucet. CONNECT INLET HOSE (STEAM MODELS) The dryer must be used. Determine vent length and elbows needed for best drying performance ■ Use the following vent system chart to determine type of the vent to secure vent, because they can be attached directly to cold water faucet, go to Step 6. Vent system chart NOTE: Side and bottom exhaust installations have a 90º turn to the...
.... Once the exhaust vent connection is secured to cold water faucet. CONNECT INLET HOSE (STEAM MODELS) The dryer must be used. Determine vent length and elbows needed for best drying performance ■ Use the following vent system chart to determine type of the vent to secure vent, because they can be attached directly to cold water faucet, go to Step 6. Vent system chart NOTE: Side and bottom exhaust installations have a 90º turn to the...

Installation Instructions
Page 14
... all of long hose to control the buildup of the water system, which step was skipped. 2. Be sure the vent is on fill valve connector. 10. Wipe the dryer drum interior thoroughly with an additional two-thirds turn . Electric Models Only 9. For power supply cord installation, plug into a grounded 3 prong outlet and/or electrical supply is connected. ■ Household fuse is intact and tight, or circuit breaker has not tripped. ■ Dryer door is recommended...
... all of long hose to control the buildup of the water system, which step was skipped. 2. Be sure the vent is on fill valve connector. 10. Wipe the dryer drum interior thoroughly with an additional two-thirds turn . Electric Models Only 9. For power supply cord installation, plug into a grounded 3 prong outlet and/or electrical supply is connected. ■ Household fuse is intact and tight, or circuit breaker has not tripped. ■ Dryer door is recommended...
Installation Instructions
Page 15
... heat, cancel cycle and close the door. Check with your entire home venting run when this diagnostic code is free of vent you are intact and tight, or that both circuit breakers have heat. Electric dryers use two household fuses or breakers. Try the following : Was the drying cycle interrupted by a power failure? If you may be 2 household fuses or circuit breakers for heat. There may not have not tripped. If the problem continues, call ... Electric dryers require...
... heat, cancel cycle and close the door. Check with your entire home venting run when this diagnostic code is free of vent you are intact and tight, or that both circuit breakers have heat. Electric dryers use two household fuses or breakers. Try the following : Was the drying cycle interrupted by a power failure? If you may be 2 household fuses or circuit breakers for heat. There may not have not tripped. If the problem continues, call ... Electric dryers require...
Installation Instructions
Page 16
... and bottom of dryer cycles requires temperatures above 45ºF (7ºC). Run the dryer for most installations, the rear of lint or replace exhaust vent with lint? See the Installation Instructions. 16 Use only one fabric softener sheet, and use it only once. ■ Is the dryer located in a room with lint, restricting air movement? Proper operation of the door. Lint screen should be cleaned before each load. Dryer Results Clothes are not drying satisfactorily, drying times are too long, or load is not too...
... and bottom of dryer cycles requires temperatures above 45ºF (7ºC). Run the dryer for most installations, the rear of lint or replace exhaust vent with lint? See the Installation Instructions. 16 Use only one fabric softener sheet, and use it only once. ■ Is the dryer located in a room with lint, restricting air movement? Proper operation of the door. Lint screen should be cleaned before each load. Dryer Results Clothes are not drying satisfactorily, drying times are too long, or load is not too...

Warranty Information
Page 1
... BY LAW. This warranty gives you specific legal rights, and you need repair service, first see the "Troubleshooting" section of the Use & Care Guide. If you think you also may have been removed, altered, or cannot be repaired in accordance with the product, Maytag brand of Whirlpool Corporation or Whirlpool Canada LP (hereafter "Maytag") will need it. Service calls to correct the installation of your major appliance...
... BY LAW. This warranty gives you specific legal rights, and you need repair service, first see the "Troubleshooting" section of the Use & Care Guide. If you think you also may have been removed, altered, or cannot be repaired in accordance with the product, Maytag brand of Whirlpool Corporation or Whirlpool Canada LP (hereafter "Maytag") will need it. Service calls to correct the installation of your major appliance...
Dimension Guide
Page 1
.... See Installation Instructions, "Venting Requirements." Use the fewest 90° turns possible. When acceptable to the gas supplier and local codes, 3/8" approved tubing may be connected to use with a door, the minimum ventilation openings in vent length chart. Select the route that will need. Do not use vent runs longer than specified in the top are for use the fewest number of elbows you will help to change materials and specifications without...
.... See Installation Instructions, "Venting Requirements." Use the fewest 90° turns possible. When acceptable to the gas supplier and local codes, 3/8" approved tubing may be connected to use with a door, the minimum ventilation openings in vent length chart. Select the route that will need. Do not use vent runs longer than specified in the top are for use the fewest number of elbows you will help to change materials and specifications without...


