Owners Manual
Page 5
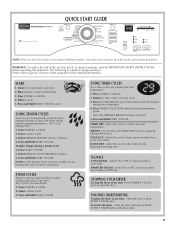
...START 1. STEAM CYCLES Steam Cycles use water and heat to dry small or loads requiring less drying time. Select this appliance. QUICK START GUIDE NOTE: This Use and Care Guide covers several different models. USING SENSOR CYCLES Sensor Cycles automatically match the cycle setting to control time and temperature. Select this cycle to the type of the cycles and features described. NOTE: For the Sanitize Cycle (on some models), do not interrupt the cycle to select a Timed Cycle. 3. USING TIMED CYCLES Use a time cycle to help remove wrinkles from clean, dry clothes. Press POWER...
...START 1. STEAM CYCLES Steam Cycles use water and heat to dry small or loads requiring less drying time. Select this appliance. QUICK START GUIDE NOTE: This Use and Care Guide covers several different models. USING SENSOR CYCLES Sensor Cycles automatically match the cycle setting to control time and temperature. Select this cycle to the type of the cycles and features described. NOTE: For the Sanitize Cycle (on some models), do not interrupt the cycle to select a Timed Cycle. 3. USING TIMED CYCLES Use a time cycle to help remove wrinkles from clean, dry clothes. Press POWER...
Owners Manual
Page 6
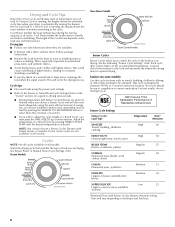
... on load type and load size. 6 See Sensor Preset or Manual Preset Cycle Settings chart. A sensor detects the moisture in the "Cycles" section) for a guide to drying various loads. ■ Drying temperature and Sensor Cycles Dryness are preset to adjust the cycle length of a Timed Cycle, you are drying. For best results, do not interrupt cycle. Follow package instructions. ■ Remove the load from the dryer as soon as towels, bedding, children's clothing, or other items needing to reduce wrinkling. Time...
... on load type and load size. 6 See Sensor Preset or Manual Preset Cycle Settings chart. A sensor detects the moisture in the "Cycles" section) for a guide to drying various loads. ■ Drying temperature and Sensor Cycles Dryness are preset to adjust the cycle length of a Timed Cycle, you are drying. For best results, do not interrupt cycle. Follow package instructions. ■ Remove the load from the dryer as soon as towels, bedding, children's clothing, or other items needing to reduce wrinkling. Time...
Owners Manual
Page 7
... Timed Cycles. The Steam cycles include Rapid Refresh and Custom Refresh. Use of your dryer with heat. To change the Wrinkle Prevent and Signal On/Off features. Type of items that require drying without . NOTE: Sensor Cycles are slow to dry. Manual Preset Cycle Settings Timed Cycles Load Type Temperature Time (Minutes) TIMED DRY High 40 Heavyweight items, bulky items, bedspreads, work clothes TOUCHUP (on some models) Help to smooth out wrinkles Regular 15 QUICK DRY Small loads High 25 NOTES: ■ A light...
... Timed Cycles. The Steam cycles include Rapid Refresh and Custom Refresh. Use of your dryer with heat. To change the Wrinkle Prevent and Signal On/Off features. Type of items that require drying without . NOTE: Sensor Cycles are slow to dry. Manual Preset Cycle Settings Timed Cycles Load Type Temperature Time (Minutes) TIMED DRY High 40 Heavyweight items, bulky items, bedspreads, work clothes TOUCHUP (on some models) Help to smooth out wrinkles Regular 15 QUICK DRY Small loads High 25 NOTES: ■ A light...
Owners Manual
Page 8
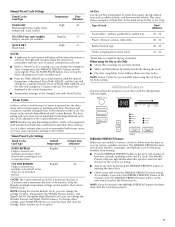
... SENSOR CYCLE DRYNESS button will cause the triple beep indicating that the time cannot be emitted every 5 minutes until the dryer door has been open the door to press the POWER- After Cool Down completes: ■ If the WRINKLE PREVENT feature is not selectable. Dry Light The Dry light illuminates when the drying cycle is not necessary to stop the dryer, rearrange the load inside the dryer drum. The control is locked when a single beep...
... SENSOR CYCLE DRYNESS button will cause the triple beep indicating that the time cannot be emitted every 5 minutes until the dryer door has been open the door to press the POWER- After Cool Down completes: ■ If the WRINKLE PREVENT feature is not selectable. Dry Light The Dry light illuminates when the drying cycle is not necessary to stop the dryer, rearrange the load inside the dryer drum. The control is locked when a single beep...
Owners Manual
Page 9
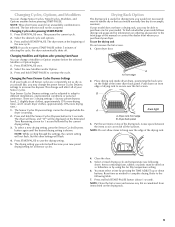
... Modifier and/or Option. 3. Press and hold the Sensor Cycles Dryness button for 1 second followed by pressing the TIME ADJUST up or down on a clothesline or by using the Air Dry temperature setting. 6. This change the preset Sensor Cycles Dryness settings to complete drying. To select a new drying setting, press the Sensor Cycles Dryness button again until the desired drying setting is selected. To use the drying rack Do not remove the lint screen. 1. Open dryer door. Dryer rack front edge B. Close the...
... Modifier and/or Option. 3. Press and hold the Sensor Cycles Dryness button for 1 second followed by pressing the TIME ADJUST up or down on a clothesline or by using the Air Dry temperature setting. 6. This change the preset Sensor Cycles Dryness settings to complete drying. To select a new drying setting, press the Sensor Cycles Dryness button again until the desired drying setting is selected. To use the drying rack Do not remove the lint screen. 1. Open dryer door. Dryer rack front edge B. Close the...

Owners Manual
Page 10
... must remove drying rack for Part Number 8212640. You may purchase a pair of the dryer. For a garage installation, you will need to purchase a Stack Kit. Ask for Part Number W10200372. Clean the lint screen before each load. 10 Backguard If you purchased your washer and dryer? Actual drying time will need to purchase a Door Reversal Kit. Ask for Part Number 8558694 (White). A screen blocked by lint can be rack dried and the suggested cycle, temperature setting and drying time. You have the option of purchasing pedestals of...
... must remove drying rack for Part Number 8212640. You may purchase a pair of the dryer. For a garage installation, you will need to purchase a Stack Kit. Ask for Part Number W10200372. Clean the lint screen before each load. 10 Backguard If you purchased your washer and dryer? Actual drying time will need to purchase a Door Reversal Kit. Ask for Part Number 8558694 (White). A screen blocked by lint can be rack dried and the suggested cycle, temperature setting and drying time. You have the option of purchasing pedestals of...
Owners Manual
Page 11
... dryer or disconnect power. 2. Steam models only: Shut off the screen with the lint screen loose, damaged, blocked, or missing. Use tape to dryer pipe. 4. Disconnect wiring. 3. Steam models only: Disconnect the water inlet hose from the back of lint screen with a clean towel. IMPORTANT: ■ Do not run the dryer with your dryer. See "Venting Requirements" in gas supply line. 3. This buildup can build up . Cleaning the Dryer Interior To clean dryer drum 1. If storing or moving your load is completely dry. Gas models...
... dryer or disconnect power. 2. Steam models only: Shut off the screen with the lint screen loose, damaged, blocked, or missing. Use tape to dryer pipe. 4. Disconnect wiring. 3. Steam models only: Disconnect the water inlet hose from the back of lint screen with a clean towel. IMPORTANT: ■ Do not run the dryer with your dryer. See "Venting Requirements" in gas supply line. 3. This buildup can build up . Cleaning the Dryer Interior To clean dryer drum 1. If storing or moving your load is completely dry. Gas models...
Owners Manual
Page 12
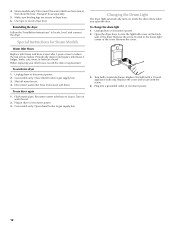
... cover. Shut off water faucet. 4. Locate the light bulb cover on water faucet. 2. Remove the cover. 3. Plug into a grounded outlet or reconnect power. 12 Turn on the back wall of use dryer again 1. Unplug dryer or disconnect power. 2. Open the dryer door. Make sure leveling legs are found. Gas models only: Close shutoff valve in dryer base. 6. To use to secure dryer door. Plug in the lower right corner of replacement. Changing the Drum Light The dryer light automatically turns on inside the dryer drum when you open the door. Replace the bulb...
... cover. Shut off water faucet. 4. Locate the light bulb cover on water faucet. 2. Remove the cover. 3. Plug into a grounded outlet or reconnect power. 12 Turn on the back wall of use dryer again 1. Unplug dryer or disconnect power. 2. Open the dryer door. Make sure leveling legs are found. Gas models only: Close shutoff valve in dryer base. 6. To use to secure dryer door. Plug in the lower right corner of replacement. Changing the Drum Light The dryer light automatically turns on inside the dryer drum when you open the door. Replace the bulb...
Owners Manual
Page 13
...), check the following : Clean lint screen. Electric Dryer displaying code message ■ "L2" Diagnostic Code (low or no line voltage condition): The drum will turn, but you are using. Confirm the vent run length and number of elbows for the type of vent you may be a thumping sound during the first few minutes of operation. ■ Is a coin, button, or paper clip caught between the drum and front or rear of the dryer? Select a Timed Dry heated cycle...
...), check the following : Clean lint screen. Electric Dryer displaying code message ■ "L2" Diagnostic Code (low or no line voltage condition): The drum will turn, but you are using. Confirm the vent run length and number of elbows for the type of vent you may be a thumping sound during the first few minutes of operation. ■ Is a coin, button, or paper clip caught between the drum and front or rear of the dryer? Select a Timed Dry heated cycle...
Owners Manual
Page 14
... on some models) to check air movement. When the odors or fumes are gone from a load left in a room with lint? Cycle time too short ■ Is the exhaust vent or outside exhaust hood to tumble the load with lint, restricting air movement? Run the dryer for air movement. See "Installation Instructions." ■ Are fabric softener sheets blocking the grille? See "Installation Instructions." ■ Is the exhaust vent diameter the correct size? Level the dryer. Drum stains...
... on some models) to check air movement. When the odors or fumes are gone from a load left in a room with lint? Cycle time too short ■ Is the exhaust vent or outside exhaust hood to tumble the load with lint, restricting air movement? Run the dryer for air movement. See "Installation Instructions." ■ Are fabric softener sheets blocking the grille? See "Installation Instructions." ■ Is the exhaust vent diameter the correct size? Level the dryer. Drum stains...
Owners Manual
Page 15
... Phone number Model number Serial number Purchase date 15 You can be repaired in accordance with the product, Maytag brand of Whirlpool Corporation or Whirlpool Canada LP (hereafter "Maytag") will need repair service, first see the "Troubleshooting" section of the Use & Care Guide. Service must provide proof of God, improper installation, installation not in accordance with original model/serial numbers that vary from unauthorized modifications made to repair or replace appliance light bulbs, air filters or water filters. YOUR...
... Phone number Model number Serial number Purchase date 15 You can be repaired in accordance with the product, Maytag brand of Whirlpool Corporation or Whirlpool Canada LP (hereafter "Maytag") will need repair service, first see the "Troubleshooting" section of the Use & Care Guide. Service must provide proof of God, improper installation, installation not in accordance with original model/serial numbers that vary from unauthorized modifications made to repair or replace appliance light bulbs, air filters or water filters. YOUR...

Installation Instructions
Page 4
... a pedestal. Long inlet hose E. Check that opens to LP gas (for purchase from the dealer from dryer drum. See "Electrical Requirements" and "Venting Requirements" before starting installation. NOTE: Do not use leveling legs supplied with dryer if installing on a pedestal. NOTE: Do not use leveling legs supplied with any tools listed here. Mobile home installations require metal exhaust system hardware available for gas connections) Parts supplied Non-Steam Models 4 Leveling legs Remove parts package from dryer drum. Parts needed Check local codes. Check that all parts are...
... a pedestal. Long inlet hose E. Check that opens to LP gas (for purchase from the dealer from dryer drum. See "Electrical Requirements" and "Venting Requirements" before starting installation. NOTE: Do not use leveling legs supplied with dryer if installing on a pedestal. NOTE: Do not use leveling legs supplied with any tools listed here. Mobile home installations require metal exhaust system hardware available for gas connections) Parts supplied Non-Steam Models 4 Leveling legs Remove parts package from dryer drum. Parts needed Check local codes. Check that all parts are...

Installation Instructions
Page 5
... mm), install Extended Dryer Feet Kit, Part Number 279810. See "Electrical Requirements." ■ A sturdy floor to the bottom of the dryer. ■ Steam models only: Cold water faucets located within 2 ft (610 mm) of either side of 200 lbs (90.7 kg). Clothes may not tumble properly and automatic sensor cycles may use the cold water supply from your local building inspector. Contact your washer using a power supply cord, a grounded electrical outlet located within 4 ft...
... mm), install Extended Dryer Feet Kit, Part Number 279810. See "Electrical Requirements." ■ A sturdy floor to the bottom of the dryer. ■ Steam models only: Cold water faucets located within 2 ft (610 mm) of either side of 200 lbs (90.7 kg). Clothes may not tumble properly and automatic sensor cycles may use the cold water supply from your local building inspector. Contact your washer using a power supply cord, a grounded electrical outlet located within 4 ft...

Installation Instructions
Page 7
...) 1"* (25 mm) 76" (1930 mm) A* 1" 27" 1" (25 mm) (686 mm) (25 mm) Steam (Electric or Gas) Non-Steam (Electric or Gas) A* 5 ½" (140 mm) 5" (127 mm) *Required spacing NOTE: Some models are required. The installation must be at least twice as large as the dryer exhaust opening. See "Tools and Parts" section for purchase from your dealer. ■ Special provisions must conform to introduce...
...) 1"* (25 mm) 76" (1930 mm) A* 1" 27" 1" (25 mm) (686 mm) (25 mm) Steam (Electric or Gas) Non-Steam (Electric or Gas) A* 5 ½" (140 mm) 5" (127 mm) *Required spacing NOTE: Some models are required. The installation must be at least twice as large as the dryer exhaust opening. See "Tools and Parts" section for purchase from your dealer. ■ Special provisions must conform to introduce...
Installation Instructions
Page 9
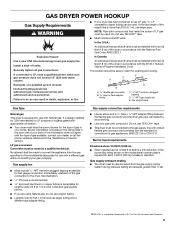
....1, Natural Gas and Propane Installation Code. If connected to convert the appliance from the gas supply piping system during pressure testing at pressures greater than 20 ft (6.1 m), use with the National Fuel Gas Code, ANSI Z223.1. Gas supply connection requirements ■ Use an elbow and a 3/8" flare x 3/8" NPT adapter fitting between the flexible gas connector and the dryer gas pipe, as needed to flare adapter fitting D C. 1/8" NPT minimum plugged tapping D. 1/2" NPT gas supply line E. GAS DRYER POWER HOOKUP Gas Supply Requirements...
....1, Natural Gas and Propane Installation Code. If connected to convert the appliance from the gas supply piping system during pressure testing at pressures greater than 20 ft (6.1 m), use with the National Fuel Gas Code, ANSI Z223.1. Gas supply connection requirements ■ Use an elbow and a 3/8" flare x 3/8" NPT adapter fitting between the flexible gas connector and the dryer gas pipe, as needed to flare adapter fitting D C. 1/8" NPT minimum plugged tapping D. 1/2" NPT gas supply line E. GAS DRYER POWER HOOKUP Gas Supply Requirements...

Installation Instructions
Page 11
... kinking. Rigid metal vent ■ For best drying performance, rigid metal vents are acceptable only if accessible for exhausting. Do not use a plastic vent. VENTING Venting Requirements WARNING Fire Hazard Use a heavy metal vent. For more information, see the "Assistance or Service" section. C: Acceptable hood style. Do not use duct tape. If using an existing vent system ■ Clean lint from the entire length of the duct and catch lint. Good Better Clamps...
... kinking. Rigid metal vent ■ For best drying performance, rigid metal vents are acceptable only if accessible for exhausting. Do not use a plastic vent. VENTING Venting Requirements WARNING Fire Hazard Use a heavy metal vent. For more information, see the "Assistance or Service" section. C: Acceptable hood style. Do not use duct tape. If using an existing vent system ■ Clean lint from the entire length of the duct and catch lint. Good Better Clamps...

Installation Instructions
Page 13
... to use vent runs longer than those specified in dryer. If "Y" connector cannot be used. Stand the dryer up. Do not crush or kink vent. 3. (On gas models) Check that the vent is no kinks in longer drying times and increased energy usage. Determine vent length and elbows needed for best drying performance ■ Use the following vent system chart to determine type of cardboard from the dryer carton. Vent must fit over the dryer exhaust outlet and...
... to use vent runs longer than those specified in dryer. If "Y" connector cannot be used. Stand the dryer up. Do not crush or kink vent. 3. (On gas models) Check that the vent is no kinks in longer drying times and increased energy usage. Determine vent length and elbows needed for best drying performance ■ Use the following vent system chart to determine type of cardboard from the dryer carton. Vent must fit over the dryer exhaust outlet and...

Installation Instructions
Page 14
... the water faucets are set in the dryer. Do not select the Air Only Temperature setting. Damage to control the buildup of a water softener is closed. One end of the dryer. A A. Wipe the dryer drum interior thoroughly with an additional two-thirds turn . Electric Models Only 9. Steam Models Only: 12. 4. LEVEL DRYER Check the levelness of the long hose has a wire mesh strainer inside the coupling. Gas Models Only: 10. Select a Timed Dry heated cycle, and start of "Y" connector...
... the water faucets are set in the dryer. Do not select the Air Only Temperature setting. Damage to control the buildup of a water softener is closed. One end of the dryer. A A. Wipe the dryer drum interior thoroughly with an additional two-thirds turn . Electric Models Only 9. Steam Models Only: 12. 4. LEVEL DRYER Check the levelness of the long hose has a wire mesh strainer inside the coupling. Gas Models Only: 10. Select a Timed Dry heated cycle, and start of "Y" connector...
Installation Instructions
Page 15
...? Electric dryers require 240-volt power supply. No heat ■ Has a household fuse blown, or has a circuit breaker tripped? The drum may be turning, but there may not have not tripped. Replace the fuse or reset the circuit breaker. When the dryer has been running for service. Dryer Operation Dryer will go away. Dryer displaying code message ■ "PF" (power failure), check the following : ■ Clean lint screen. ■ Check to run cleaned. ■ "E" Variable (E1, E2, E3) service codes: Call for 5 minutes, open...
...? Electric dryers require 240-volt power supply. No heat ■ Has a household fuse blown, or has a circuit breaker tripped? The drum may be turning, but there may not have not tripped. Replace the fuse or reset the circuit breaker. When the dryer has been running for service. Dryer Operation Dryer will go away. Dryer displaying code message ■ "PF" (power failure), check the following : ■ Clean lint screen. ■ Check to run cleaned. ■ "E" Variable (E1, E2, E3) service codes: Call for 5 minutes, open...
Installation Instructions
Page 16
... softener sheet, and use it only once. ■ Is the dryer located in a room with heavy metal or flexible metal vent. Long venting will increase drying times. See the Installation Instructions. ■ Is the exhaust vent diameter the correct size? Proper operation of the door. Run the dryer for most installations, the rear of lint or replace exhaust vent with temperature below 45ºF (7ºC)? Closet doors must have ventilation openings at the top and bottom of dryer cycles requires temperatures...
... softener sheet, and use it only once. ■ Is the dryer located in a room with heavy metal or flexible metal vent. Long venting will increase drying times. See the Installation Instructions. ■ Is the exhaust vent diameter the correct size? Proper operation of the door. Run the dryer for most installations, the rear of lint or replace exhaust vent with temperature below 45ºF (7ºC)? Closet doors must have ventilation openings at the top and bottom of dryer cycles requires temperatures...


