
Owners Manual
Page 1
...must provide proof of Contents DRYER SAFETY 1 CONTROL PANEL 4 CYCLE GUIDE 5 DRYER USE 6 DRYER CARE 7 TROUBLESHOOTING 8 WARRANTY 11 ASSISTANCE OR SERVICE Back Cover Keep this book and your complete model number and serial number. Dealer name Serial number Address Phone number Model number Purchase date Table des...assistance or service if you how to potential hazards that can find this manual and on the model and serial number label, located at the top inside dryer door well. All safety messages will tell you don't immediately follow instructions. WARNING You can ...
...must provide proof of Contents DRYER SAFETY 1 CONTROL PANEL 4 CYCLE GUIDE 5 DRYER USE 6 DRYER CARE 7 TROUBLESHOOTING 8 WARRANTY 11 ASSISTANCE OR SERVICE Back Cover Keep this book and your complete model number and serial number. Dealer name Serial number Address Phone number Model number Purchase date Table des...assistance or service if you how to potential hazards that can find this manual and on the model and serial number label, located at the top inside dryer door well. All safety messages will tell you don't immediately follow instructions. WARNING You can ...

Owners Manual
Page 4
... cycle varies according to ENERGY PREFERRED, which is included in the cycle selections. Temperature Control (on some models) You may select a drying temperature based on the fabrics in your dryer has multiple heat settings: ■■ A High heat setting may be used for drying heavyweight items ...9632;■ If the load is drier than the higher setting. NOTE: A signal will run after your dryer model. At the end of the cycle, you may choose a setting based on some models, the End of the temperature to select for rubber, plastic, or heat-sensitive fabrics. ■■ ...
... cycle varies according to ENERGY PREFERRED, which is included in the cycle selections. Temperature Control (on some models) You may select a drying temperature based on the fabrics in your dryer has multiple heat settings: ■■ A High heat setting may be used for drying heavyweight items ...9632;■ If the load is drier than the higher setting. NOTE: A signal will run after your dryer model. At the end of the cycle, you may choose a setting based on some models, the End of the temperature to select for rubber, plastic, or heat-sensitive fabrics. ■■ ...
Owners Manual
Page 5
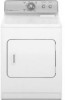
... than the Energy Preferred cycle. Drying time varies based on fabric type, load size, and dryness setting. High or Low Will run the dryer for automatic Any drying. such as thick towels or robes Any load Dries items to smooth out wrinkles from items, such as your starting ... it . Gives the best drying in the load or air temperature and shuts off when the load reaches the selected dryness level. Depending on model, temperature may feel slightly damp. High Any High No heat No heat No heat 5 CYCLES SENSOR DRY or AUTOMATIC DRY AUTOMATIC DRY High Heat...
... than the Energy Preferred cycle. Drying time varies based on fabric type, load size, and dryness setting. High or Low Will run the dryer for automatic Any drying. such as thick towels or robes Any load Dries items to smooth out wrinkles from items, such as your starting ... it . Gives the best drying in the load or air temperature and shuts off when the load reaches the selected dryness level. Depending on model, temperature may feel slightly damp. High Any High No heat No heat No heat 5 CYCLES SENSOR DRY or AUTOMATIC DRY AUTOMATIC DRY High Heat...

Owners Manual
Page 6
...of oil on top of drying rack, leaving space between items. Do not allow space for clothes to tumble freely. 3. Your dryer may be able to purchase one for your model does not have a Wrinkle Prevent feature selector. Push the Start button or knob. Put wet items on it stops. 6. (... for information on a clothesline or by using an air cycle. See "Cleaning the Lint Screen." 2. If your dryer. If your model. Failure to follow these instructions can stop your dryer, wipe the dryer drum with a damp cloth to remove dust from whom you may not have an End of Cycle Signal. If...
...of oil on top of drying rack, leaving space between items. Do not allow space for clothes to tumble freely. 3. Your dryer may be able to purchase one for your model does not have a Wrinkle Prevent feature selector. Push the Start button or knob. Put wet items on it stops. 6. (... for information on a clothesline or by using an air cycle. See "Cleaning the Lint Screen." 2. If your dryer. If your model. Failure to follow these instructions can stop your dryer, wipe the dryer drum with a damp cloth to remove dust from whom you may not have an End of Cycle Signal. If...

Owners Manual
Page 8
... and restart the dryer. The timer moves slowly and continuously for awhile, there may not have heat. Locate the light bulb cover on some models) 1. Replace the bulb with the screw. 4. In Canada www.maytag.ca Dryer will not run ■■ For gas dryers, is the dryer level front to ...back and side to secure dryer door. The drum may be turning, but you may be...
... and restart the dryer. The timer moves slowly and continuously for awhile, there may not have heat. Locate the light bulb cover on some models) 1. Replace the bulb with the screw. 4. In Canada www.maytag.ca Dryer will not run ■■ For gas dryers, is the dryer level front to ...back and side to secure dryer door. The drum may be turning, but you may be...

Owners Manual
Page 11
... your major appliance to better help can find this information on the model and serial number label located on major appliances with the product, Maytag brand of Whirlpool Corporation or Whirlpool Canada LP (hereafter "Maytag") will need it is installed in an inaccessible location or is not...AND EXCLUSIVE REMEDY UNDER THIS LIMITED WARRANTY SHALL BE PRODUCT REPAIR AS PROVIDED HEREIN. Dealer name Address Phone number Model number Serial number Purchase date 11 MAYTAG® LAUNDRY WARRANTY LIMITED WARRANTY For one year from the date of purchase, when this major appliance is ...
... your major appliance to better help can find this information on the model and serial number label located on major appliances with the product, Maytag brand of Whirlpool Corporation or Whirlpool Canada LP (hereafter "Maytag") will need it is installed in an inaccessible location or is not...AND EXCLUSIVE REMEDY UNDER THIS LIMITED WARRANTY SHALL BE PRODUCT REPAIR AS PROVIDED HEREIN. Dealer name Address Phone number Model number Serial number Purchase date 11 MAYTAG® LAUNDRY WARRANTY LIMITED WARRANTY For one year from the date of purchase, when this major appliance is ...
Installation Instructions
Page 1
...CANADA ONLY......... 6 Electrical Requirements 6 Install Leveling Legs 6 Gas DRYER POWER HOOKUP 7 Gas Supply Requirements 7 Venting 8 Venting Requirements 8 Plan Vent System 9 Install Vent System 11 Level Dryer 11 Make Gas Connection 11 Connect Vent 11 Complete Installation 11 Reverse Door Swing... - W10296135A W10296136A-SP 1 WARNING You can kill or hurt you and others are not followed. Dryer Installation Instructions 29" and 27" Wide Models Gas (U.S.A. CANADA SEULEMENT 19 Spécifications Électriques 19 INSTALLATION DES PIEDS DE NIVELLEMENT 20 RACCORDEMENT ...
...CANADA ONLY......... 6 Electrical Requirements 6 Install Leveling Legs 6 Gas DRYER POWER HOOKUP 7 Gas Supply Requirements 7 Venting 8 Venting Requirements 8 Plan Vent System 9 Install Vent System 11 Level Dryer 11 Make Gas Connection 11 Connect Vent 11 Complete Installation 11 Reverse Door Swing... - W10296135A W10296136A-SP 1 WARNING You can kill or hurt you and others are not followed. Dryer Installation Instructions 29" and 27" Wide Models Gas (U.S.A. CANADA SEULEMENT 19 Spécifications Électriques 19 INSTALLATION DES PIEDS DE NIVELLEMENT 20 RACCORDEMENT ...
Installation Instructions
Page 5
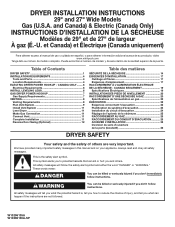
...mm) A B C A. The opening (such as a nearby window) should also be at least twice as large as the dryer exhaust opening. 5 See "Venting Requirements." 29" Wide Models Dryer Dimensions 27" Wide Models Dryer Dimensions 43 3/8" (1102 mm) 15¼" (387 mm) 433/8" (1102 mm) 22 ¾" (578 mm) *...26" (660 mm) 29" (737 mm) A *27 ¾" (705 mm) 29" (737 mm) B 43 3/8" (1102 mm) 22 ¾" (578 mm) ...
...mm) A B C A. The opening (such as a nearby window) should also be at least twice as large as the dryer exhaust opening. 5 See "Venting Requirements." 29" Wide Models Dryer Dimensions 27" Wide Models Dryer Dimensions 43 3/8" (1102 mm) 15¼" (387 mm) 433/8" (1102 mm) 22 ¾" (578 mm) *...26" (660 mm) 29" (737 mm) A *27 ¾" (705 mm) 29" (737 mm) B 43 3/8" (1102 mm) 22 ¾" (578 mm) ...
Installation Instructions
Page 7
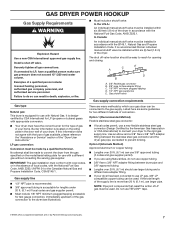
...different methods of a qualified person include: licensed heating personnel, authorized gas company personnel, and authorized service personnel. No attempt shall be connected to connect your gas dryer can use with the B149.1, Natural Gas and Propane Installation Code. NOTE: Pipe joint compounds that an ... on the model/serial rating plate for use LP gas, 3/8" LP compatible copper tubing can result in the absence of local codes, with the type of gas available, please reference the "Assistance or Service" section of your dryer has been converted to the rigid gas supply line...
...different methods of a qualified person include: licensed heating personnel, authorized gas company personnel, and authorized service personnel. No attempt shall be connected to connect your gas dryer can use with the B149.1, Natural Gas and Propane Installation Code. NOTE: Pipe joint compounds that an ... on the model/serial rating plate for use LP gas, 3/8" LP compatible copper tubing can result in the absence of local codes, with the type of gas available, please reference the "Assistance or Service" section of your dryer has been converted to the rigid gas supply line...
Installation Instructions
Page 8
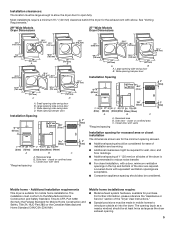
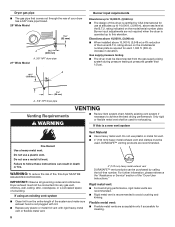
... number plate is required for use a heavy metal vent. Dryer gas pipe ■■ The gas pipe that comes out through the rear of your dryer has a 3/8" male pipe thread. 29" Wide Model 1¼" (32 mm) A 9¼" (235 mm) A. 3/8" NPT dryer pipe 27" Wide Model A *6¼" (159 mm) Burner input requirements Elevations up to 10,000 ft. (3,048...
... number plate is required for use a heavy metal vent. Dryer gas pipe ■■ The gas pipe that comes out through the rear of your dryer has a 3/8" male pipe thread. 29" Wide Model 1¼" (32 mm) A 9¼" (235 mm) A. 3/8" NPT dryer pipe 27" Wide Model A *6¼" (159 mm) Burner input requirements Elevations up to 10,000 ft. (3,048...
Installation Instructions
Page 9
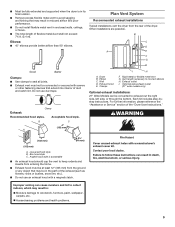
... Models can cause moisture and lint to exhaust out the right side, left side, or through the bottom. Acceptable hood style. Rigid metal or flexible metal vent G. For further information, please reference the "Assistance or Service" section of duct and catch lint. Box hood style C. Dryer...health problems. 9 Each kit includes step-bystep instructions. Vent length necessary to avoid sagging and kinking that extend into interior of the "Dryer User Instructions." 4" (102 mm) 4" (102 mm) 2½" (64 mm) A. Other installations are possible. Clamps F. Louvered...
... Models can cause moisture and lint to exhaust out the right side, left side, or through the bottom. Acceptable hood style. Rigid metal or flexible metal vent G. For further information, please reference the "Assistance or Service" section of duct and catch lint. Box hood style C. Dryer...health problems. 9 Each kit includes step-bystep instructions. Vent length necessary to avoid sagging and kinking that extend into interior of the "Dryer User Instructions." 4" (102 mm) 4" (102 mm) 2½" (64 mm) A. Other installations are possible. Clamps F. Louvered...
Installation Instructions
Page 10
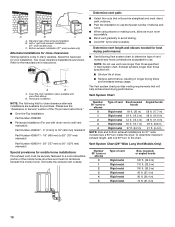
... making turns, allow as much room as possible. ■■ Bend vDent gradually to use with one 90º turn inside the dryer. Vent System Chart (29" Wide Long Vent Models Only) Number 90° turns or elbows 0 1 2 3 4 5 Type of vent Box/louvered Angled hoods 90° turns or hoods elbows 0 Rigid metal...
... making turns, allow as much room as possible. ■■ Bend vDent gradually to use with one 90º turn inside the dryer. Vent System Chart (29" Wide Long Vent Models Only) Number 90° turns or elbows 0 1 2 3 4 5 Type of vent Box/louvered Angled hoods 90° turns or hoods elbows 0 Rigid metal...
Installation Instructions
Page 11
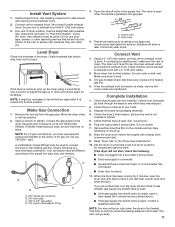
...leak. Use the straightest path possible. Check levelness first side to side, then front to the dryer. A combination of LP gas. A B A. Connect Vent 1. Check the dryer's final location. See "Level Dryer." 6. Read "Dryer Use" in the supply line. Install Vent System 1. Install exhaust hood. Avoid 90º... made, remove the corner posts and cardboard. This odor is common when the heating element is level. 3. (On gas models) Check that all of the dryer. Connect vent to exhaust outlet in "Plan Vent System." Vent must be sure there are no kinks. Use a...
...leak. Use the straightest path possible. Check levelness first side to side, then front to the dryer. A combination of LP gas. A B A. Connect Vent 1. Check the dryer's final location. See "Level Dryer." 6. Read "Dryer Use" in the supply line. Install Vent System 1. Install exhaust hood. Avoid 90º... made, remove the corner posts and cardboard. This odor is common when the heating element is level. 3. (On gas models) Check that all of the dryer. Connect vent to exhaust outlet in "Plan Vent System." Vent must be sure there are no kinks. Use a...
Installation Instructions
Page 12
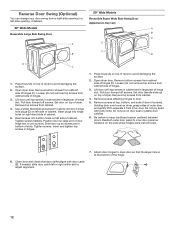
... into hinge holes on left -side opening, if desired. 29" Wide Models Reversible Super Wide Side-Swing Door Appearance may vary 29" Wide Models A Reversible Large Side Swing Door B C E A F B D D C 1. Insert and tighten top screws in bottom of dryer. Holding door over screws. Do not pull on dryer, grasp sides of cabinet. Be certain to a left side...
... into hinge holes on left -side opening, if desired. 29" Wide Models Reversible Super Wide Side-Swing Door Appearance may vary 29" Wide Models A Reversible Large Side Swing Door B C E A F B D D C 1. Insert and tighten top screws in bottom of dryer. Holding door over screws. Do not pull on dryer, grasp sides of cabinet. Be certain to a left side...
Installation Instructions
Page 13
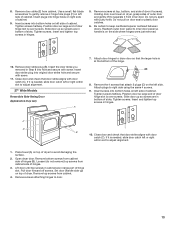
... screws in cabinet are in bottom of outer door and gently lift to adjust alignment. 27" Wide Models Reversible Side-Swing Door Appearance may vary A 7. Use a small, flat-blade screwdriver to dryer door so that door strike aligns with door catch (C). Insert plugs into bottom holes on right side... C D B 10. Remove door strike (E) from cabinet. 4. Holding door over screws. Slide door up so screws are in Step 8 into bottom holes on dryer, grasp sides of slots. Pull door forward off screws. Insert and tighten top screws in hinges. If it is on door seal or plastic door...
... screws in cabinet are in bottom of outer door and gently lift to adjust alignment. 27" Wide Models Reversible Side-Swing Door Appearance may vary A 7. Use a small, flat-blade screwdriver to dryer door so that door strike aligns with door catch (C). Insert plugs into bottom holes on right side... C D B 10. Remove door strike (E) from cabinet. 4. Holding door over screws. Slide door up so screws are in Step 8 into bottom holes on dryer, grasp sides of slots. Pull door forward off screws. Insert and tighten top screws in hinges. If it is on door seal or plastic door...


