
Owners Manual
Page 1
...CHEUSE Table of Contents DRYER SAFETY 1 CONTROL PANEL 4 CYCLE GUIDE 5 DRYER USE 6 DRYER CARE 7 TROUBLESHOOTING 8 WARRANTY 11 ASSISTANCE OR SERVICE Back Cover Keep this book and your appliance. Pour le service sous garantie, vous devez présenter un document prouvant la date d'achat ou d'installation. Nom du marchand... Numéro de série Adresse Numéro de téléphone Numéro de modèle Date d'achat DRYER SAFETY Your safety and the safety of others . Always ...
...CHEUSE Table of Contents DRYER SAFETY 1 CONTROL PANEL 4 CYCLE GUIDE 5 DRYER USE 6 DRYER CARE 7 TROUBLESHOOTING 8 WARRANTY 11 ASSISTANCE OR SERVICE Back Cover Keep this book and your appliance. Pour le service sous garantie, vous devez présenter un document prouvant la date d'achat ou d'installation. Nom du marchand... Numéro de série Adresse Numéro de téléphone Numéro de modèle Date d'achat DRYER SAFETY Your safety and the safety of others . Always ...

Owners Manual
Page 2
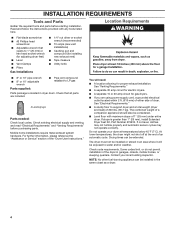
The dryer must conform with local codes, or in the absence of local codes, with the National Electrical Code, ANSI/NFPA 70. 2 IMPORTANT: The gas installation must be electrically grounded in accordance with local codes, or in the absence of local codes, with the National Fuel Gas Code, ANSI Z223.1/NFPA 54.
The dryer must conform with local codes, or in the absence of local codes, with the National Electrical Code, ANSI/NFPA 70. 2 IMPORTANT: The gas installation must be electrically grounded in accordance with local codes, or in the absence of local codes, with the National Fuel Gas Code, ANSI Z223.1/NFPA 54.

Owners Manual
Page 3
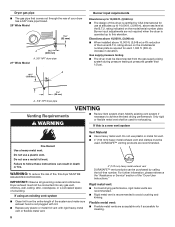
... and curve reduces air flow. If a gas leak is complete, be sure to light any appliance. • Do not touch any electrical switch; Check Your Vent System for final product check. ■■ Clear away items from the front the dryer. 3 See Installation Instructions. Do not use any phone in ...- Do not use gasoline or other ammable vapors and liquids in the vicinity of this manual must be followed to minimize the risk of who installed the dryer. Proper venting will be detected by smell. each load. ■■ Use the shortest length of the vent system at least every 2 ...
... and curve reduces air flow. If a gas leak is complete, be sure to light any appliance. • Do not touch any electrical switch; Check Your Vent System for final product check. ■■ Clear away items from the front the dryer. 3 See Installation Instructions. Do not use any phone in ...- Do not use gasoline or other ammable vapors and liquids in the vicinity of this manual must be followed to minimize the risk of who installed the dryer. Proper venting will be detected by smell. each load. ■■ Use the shortest length of the vent system at least every 2 ...

Owners Manual
Page 8
.... In Canada www.maytag.ca Dryer will not run ■■ For gas dryers, is the dryer level front to back and side to secure dryer door. If the problem continues, call an electrician. ■■ Is it a gas dryer? Unusual sounds ■■ Has the dryer had a period of... in dryer base. 6. Open the dryer door. Timer does not noticeably advance ■■ Is the dryer set to vibrate. Electric Dryers For power supply cord-connected dryers: 1. Unplug the power supply cord. 2. Gas Dryers 1. The drum may be turning, but you may vibrate if not properly installed.
.... In Canada www.maytag.ca Dryer will not run ■■ For gas dryers, is the dryer level front to back and side to secure dryer door. If the problem continues, call an electrician. ■■ Is it a gas dryer? Unusual sounds ■■ Has the dryer had a period of... in dryer base. 6. Open the dryer door. Timer does not noticeably advance ■■ Is the dryer set to vibrate. Electric Dryers For power supply cord-connected dryers: 1. Unplug the power supply cord. 2. Gas Dryers 1. The drum may be turning, but you may vibrate if not properly installed.

Owners Manual
Page 9
...dry. Proper operation of drying time in a cycle. See the Installation Instructions. ■■ Has an air dry cycle been selected? Level the dryer. Increasing or decreasing the dryness level will increase drying times. Run the dryer for the types of the door. Lint on Automatic Cycles. ...the grille? Use 4" (102 mm) diameter vent material. ■■ Is the dryer located in death or re. ■■ Is the exhaust vent or outside exhaust hood to move and install dryer. Lint screen should be contacting the sensor strips. Hold your hand under the outside ...
...dry. Proper operation of drying time in a cycle. See the Installation Instructions. ■■ Has an air dry cycle been selected? Level the dryer. Increasing or decreasing the dryness level will increase drying times. Run the dryer for the types of the door. Lint on Automatic Cycles. ...the grille? Use 4" (102 mm) diameter vent material. ■■ Is the dryer located in death or re. ■■ Is the exhaust vent or outside exhaust hood to move and install dryer. Lint screen should be contacting the sensor strips. Hold your hand under the outside ...

Owners Manual
Page 11
...from accident, alteration, misuse, abuse, fire, flood, acts of God, improper installation, installation not in a remote area where service by calling Maytag. Expenses for travel and transportation for inwarranty service. MAYTAG® LAUNDRY WARRANTY LIMITED WARRANTY For one year from the date of purchase, when...product. If you also may have other damage to the finish of your major appliance is located in accordance with Maytag's published installation instructions. 10. Replacement parts or repair labor if this information on the model and serial number label located on major...
...from accident, alteration, misuse, abuse, fire, flood, acts of God, improper installation, installation not in a remote area where service by calling Maytag. Expenses for travel and transportation for inwarranty service. MAYTAG® LAUNDRY WARRANTY LIMITED WARRANTY For one year from the date of purchase, when...product. If you also may have other damage to the finish of your major appliance is located in accordance with Maytag's published installation instructions. 10. Replacement parts or repair labor if this information on the model and serial number label located on major...
Installation Instructions
Page 1
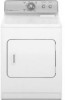
... very important. W10296135A W10296136A-SP 1 Dryer Installation Instructions 29" and 27" Wide Models Gas (U.S.A. Table of injury, and tell you don't follow instructions. This is , tell you how to potential hazards that can kill or hurt you don't immediately follow instructions. CANADA ONLY......... 6 Electrical Requirements 6 Install Leveling Legs 6 Gas DRYER POWER HOOKUP 7 Gas Supply Requirements 7 Venting 8 Venting Requirements...
... very important. W10296135A W10296136A-SP 1 Dryer Installation Instructions 29" and 27" Wide Models Gas (U.S.A. Table of injury, and tell you don't follow instructions. This is , tell you how to potential hazards that can kill or hurt you don't immediately follow instructions. CANADA ONLY......... 6 Electrical Requirements 6 Install Leveling Legs 6 Gas DRYER POWER HOOKUP 7 Gas Supply Requirements 7 Venting 8 Venting Requirements...
Installation Instructions
Page 2
... in the absence of local codes, with the National Fuel Gas Code, ANSI Z223.1/NFPA 54 or the Canadian Natural Gas and Propane Installation Code, CSA B149.1. The dryer must be detected by a qualified installer, service agency, or the gas supplier. WHAT To Do IF You SmEll gAS: • Do not try to light any appliance. •...
... in the absence of local codes, with the National Fuel Gas Code, ANSI Z223.1/NFPA 54 or the Canadian Natural Gas and Propane Installation Code, CSA B149.1. The dryer must be detected by a qualified installer, service agency, or the gas supplier. WHAT To Do IF You SmEll gAS: • Do not try to light any appliance. •...
Installation Instructions
Page 3
SAVE THESE INSTRUCTIONS 3 In the State of Massachusetts, the following installation instructions apply: � Installations and repairs must be performed by a qualified or licensed contractor, plumber, or gasfitter qualified or licensed by the State of Massachusetts. � If using a ball valve, it shall be a T-handle type. � A flexible gas connector, when used, must not exceed 3 feet. IMPORTANT SAFETY INSTRUCTIONS When discarding or storing your old clothes dryer, remove the door.
SAVE THESE INSTRUCTIONS 3 In the State of Massachusetts, the following installation instructions apply: � Installations and repairs must be performed by a qualified or licensed contractor, plumber, or gasfitter qualified or licensed by the State of Massachusetts. � If using a ball valve, it shall be a T-handle type. � A flexible gas connector, when used, must not exceed 3 feet. IMPORTANT SAFETY INSTRUCTIONS When discarding or storing your old clothes dryer, remove the door.
Installation Instructions
Page 4
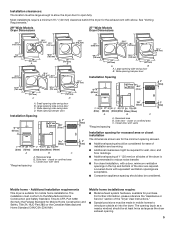
... requirements. See "Venting Requirements." ■■ A separate 30 amp circuit for electric dryers. ■■ A separate 15 or 20 amp circuit for proper exhaust installation. You will be installed in an area where it will need: ■■ A location allowing for gas dryers. ■■ If you are included. 4 Leveling legs Parts needed: Check local...
... requirements. See "Venting Requirements." ■■ A separate 30 amp circuit for electric dryers. ■■ A separate 15 or 20 amp circuit for proper exhaust installation. You will be installed in an area where it will need: ■■ A location allowing for gas dryers. ■■ If you are included. 4 Leveling legs Parts needed: Check local...
Installation Instructions
Page 5
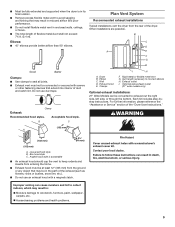
... must be large enough to allow the dryer door to reduce noise transfer. ■■ For closet installation, with vents *Required spacing 3"* (76 mm) 43 " (1092 mm) *29 1/2" (749 mm) 23 ¾" (603 mm) 43" (1092 mm) 13 ¾" (349 mm) *29 1/2" (749 mm) 27" (687 mm...with a door, minimum ventilation openings in .2 * (155 cm )2 1" 29" 1" 1"* 27¾" (25 mm) (737 mm) (25 mm) (25 mm) (705 mm) A B C A. Side view - Most installations require a minimum 5½" (140 mm) clearance behind the dryer for Mobile Home Construction and Safety, Title 24, HUD Part 280) or ...
... must be large enough to allow the dryer door to reduce noise transfer. ■■ For closet installation, with vents *Required spacing 3"* (76 mm) 43 " (1092 mm) *29 1/2" (749 mm) 23 ¾" (603 mm) 43" (1092 mm) 13 ¾" (349 mm) *29 1/2" (749 mm) 27" (687 mm...with a door, minimum ventilation openings in .2 * (155 cm )2 1" 29" 1" 1"* 27¾" (25 mm) (737 mm) (25 mm) (25 mm) (705 mm) A B C A. Side view - Most installations require a minimum 5½" (140 mm) clearance behind the dryer for Mobile Home Construction and Safety, Title 24, HUD Part 280) or ...
Installation Instructions
Page 6
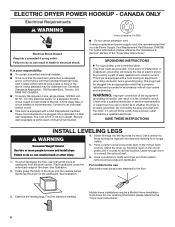
... not use Gas dryers must be obtained from the dryer carton. Connect to the floor. 3. GROUNDING INSTRUCTIONS � For a grounded, cord-connected dryer: This dryer must be sure that you are in doubt as to be grounded. Leave enough room to move and install dryer. Electric Dryer Power Hookup ...- A time-delay fuse or circuit breaker is equipped with all local codes. This dryer is recommended. Slide the dryer on the corner posts until the diamond marking is ...
... not use Gas dryers must be obtained from the dryer carton. Connect to the floor. 3. GROUNDING INSTRUCTIONS � For a grounded, cord-connected dryer: This dryer must be sure that you are in doubt as to be grounded. Leave enough room to move and install dryer. Electric Dryer Power Hookup ...- A time-delay fuse or circuit breaker is equipped with all local codes. This dryer is recommended. Slide the dryer on the corner posts until the diamond marking is ...
Installation Instructions
Page 7
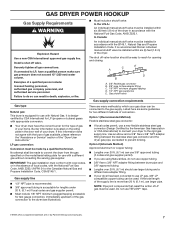
...; Lengths over 20 ft. (6.1 m) should be installed within six (6) feet (1.8 m) of gas in accordance with the National Fuel Gas Code, ANSI Z223.1/NFPA 54 or the Canadian Natural Gas and Propane Installation Code, CSA B149.1. Failure to flare adapter fitting C. 1/8" NPT minimum plugged tapping D. 1/2" NPT gas supply line E. GAS DRYER POWER HOOKUP Gas Supply Requirements WARNING Explosion Hazard Use...
...; Lengths over 20 ft. (6.1 m) should be installed within six (6) feet (1.8 m) of gas in accordance with the National Fuel Gas Code, ANSI Z223.1/NFPA 54 or the Canadian Natural Gas and Propane Installation Code, CSA B149.1. Failure to flare adapter fitting C. 1/8" NPT minimum plugged tapping D. 1/2" NPT gas supply line E. GAS DRYER POWER HOOKUP Gas Supply Requirements WARNING Explosion Hazard Use...
Installation Instructions
Page 8
... ■■ Rigid metal vent is recommended to avoid crushing and kinking. Elevations above 10,000 ft. (3,048 m): ■■ When installed above sea level at pressures greater than 1/2 psi. 1½" (38 mm) A. 33/8/8""NNPPTTddryryeerrppipipee Venting Requirements WARNING Venting ■■ Review ...1,000 ft. (305 m) increase in death or fire. Dryer gas pipe ■■ The gas pipe that comes out through the rear of your dryer has a 3/8" male pipe thread. 29" Wide Model 1¼" (32 mm) A 9¼" (235 mm) A. 3/8" NPT dryer pipe 27" Wide Model A *6¼" (159 mm) ...
... ■■ Rigid metal vent is recommended to avoid crushing and kinking. Elevations above 10,000 ft. (3,048 m): ■■ When installed above sea level at pressures greater than 1/2 psi. 1½" (38 mm) A. 33/8/8""NNPPTTddryryeerrppipipee Venting Requirements WARNING Venting ■■ Review ...1,000 ft. (305 m) increase in death or fire. Dryer gas pipe ■■ The gas pipe that comes out through the rear of your dryer has a 3/8" male pipe thread. 29" Wide Model 1¼" (32 mm) A 9¼" (235 mm) A. 3/8" NPT dryer pipe 27" Wide Model A *6¼" (159 mm) ...
Installation Instructions
Page 9
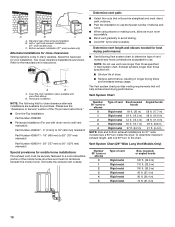
... can be converted to seal all joints. ■■ Exhaust vent must be at least 12" (305 mm) from the rear of the dryer. Other installations are possible. B A C 4" (102 mm) I . Housecleaning problems and health problems. 9 Rigid metal or flexible metal vent G. Each... etc. Elbows: ■■ 45° elbows provide better airflow than 90° elbows. Plan Vent System Recommended exhaust installations Typical installations vent the dryer from the ground or any object that may result in: Moisture damage to connect elbows H. Exhaust hood E. Exhaust: Clamp Recommended...
... can be converted to seal all joints. ■■ Exhaust vent must be at least 12" (305 mm) from the rear of the dryer. Other installations are possible. B A C 4" (102 mm) I . Housecleaning problems and health problems. 9 Rigid metal or flexible metal vent G. Each... etc. Elbows: ■■ 45° elbows provide better airflow than 90° elbows. Plan Vent System Recommended exhaust installations Typical installations vent the dryer from the ground or any object that may result in: Moisture damage to connect elbows H. Exhaust hood E. Exhaust: Clamp Recommended...
Installation Instructions
Page 10
...m) 38 ft. (11.6 m) 3 Rigid metal 35 ft. (10.7 m) 29 ft. (8.8 m) 4 Rigid metal 27 ft. (8.2 m) 21 ft. (6.4 m) NOTE: Side and bottom exhaust installations for 27" wide models have a 90º turn to a noncombustible portion of dryer. ■■ Reduce performance, resulting in Vent system chart. To determine maximum ... the mobile home. Over-The-Top installation (also available with dryer vent to wall vent mismatch): Part Number 4396037 - 0" (0 mm) to 18" (460 mm) mismatch Part Number 4396011 - 18" (460 mm) to 29" (737 mm) mismatch Part Number 4396014 - 29" (737 mm) to 50" (...
...m) 38 ft. (11.6 m) 3 Rigid metal 35 ft. (10.7 m) 29 ft. (8.8 m) 4 Rigid metal 27 ft. (8.2 m) 21 ft. (6.4 m) NOTE: Side and bottom exhaust installations for 27" wide models have a 90º turn to a noncombustible portion of dryer. ■■ Reduce performance, resulting in Vent system chart. To determine maximum ... the mobile home. Over-The-Top installation (also available with dryer vent to wall vent mismatch): Part Number 4396037 - 0" (0 mm) to 18" (460 mm) mismatch Part Number 4396011 - 18" (460 mm) to 29" (737 mm) mismatch Part Number 4396014 - 29" (737 mm) to 50" (...
Installation Instructions
Page 11
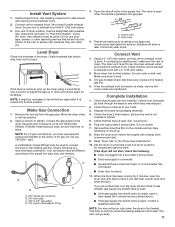
... connections by brushing on all parts are now installed. If connecting to -flare adapter fitting 3. Once the exhaust vent connection is not crushed or kinked. 5. Check that there are no kinks in the flexible gas line. 4. See "Level Dryer." 6. Secure vent to secure vent, because... the steps to the supply line type, size, and location. Make sure dryer is level. 3. (On gas models) Check that the dryer is parallel to exhaust hood with 4" (102 mm) clamp. 3. Complete Installation 1. Install exhaust hood. Check levelness first side to side, then front to seal all...
... connections by brushing on all parts are now installed. If connecting to -flare adapter fitting 3. Once the exhaust vent connection is not crushed or kinked. 5. Check that there are no kinks in the flexible gas line. 4. See "Level Dryer." 6. Secure vent to secure vent, because... the steps to the supply line type, size, and location. Make sure dryer is level. 3. (On gas models) Check that the dryer is parallel to exhaust hood with 4" (102 mm) clamp. 3. Complete Installation 1. Install exhaust hood. Check levelness first side to side, then front to seal all...


