
Owners Manual
Page 1
... you and others are not followed. All safety messages will tell you how to know your complete model number and serial number. These words mean: DANGER You can kill or hurt you don't follow the...must provide proof of purchase or installation date for future reference. Dealer name Serial number Address Phone number Model number Purchase date Table des matières SÉCURITÉ DE LA SÉCHEUSE 12 TABLEAU... many important safety messages in this manual and on the model and serial number label, located at the top inside dryer door well. W10287571A 1
... you and others are not followed. All safety messages will tell you how to know your complete model number and serial number. These words mean: DANGER You can kill or hurt you don't follow the...must provide proof of purchase or installation date for future reference. Dealer name Serial number Address Phone number Model number Purchase date Table des matières SÉCURITÉ DE LA SÉCHEUSE 12 TABLEAU... many important safety messages in this manual and on the model and serial number label, located at the top inside dryer door well. W10287571A 1

Owners Manual
Page 4
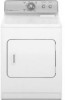
... the end of the load. ■■ If the load is drier than the higher setting. Opening the door will depend on your dryer model. On other models, the End of Cycle signal sounds when a cycle is complete. Drying time and temperature will stop this feature. The Cycle Selector (Timer... of drying time and enhances fabric care. On some models, WRINKLE PREVENT automatically starts at the end of Cycle Signal (on , the signal sounds every few minutes. The signal stops when you are available on the fabrics in your dryer has multiple heat settings: ■■ A High ...
... the end of the load. ■■ If the load is drier than the higher setting. Opening the door will depend on your dryer model. On other models, the End of Cycle signal sounds when a cycle is complete. Drying time and temperature will stop this feature. The Cycle Selector (Timer... of drying time and enhances fabric care. On some models, WRINKLE PREVENT automatically starts at the end of Cycle Signal (on , the signal sounds every few minutes. The signal stops when you are available on the fabrics in your dryer has multiple heat settings: ■■ A High ...
Owners Manual
Page 5
... handle. Gives the best drying in the load or air temperature and shuts off when the load reaches the selected dryness level. Depending on model, temperature may feel slightly damp. Drying time varies based on fabric type, load size, and dryness setting. Small loads, lightweight items Gently...loads This dryness level removes less moisture than the Energy Preferred cycle. Depending on model, temperature may want to reduce wrinkling and make it . High Casual, shirts, pants, Gives the best drying in the dryer too long. Heavy or bulky items Completes drying if items are ready to ...
... handle. Gives the best drying in the load or air temperature and shuts off when the load reaches the selected dryness level. Depending on model, temperature may feel slightly damp. Drying time varies based on fabric type, load size, and dryness setting. Small loads, lightweight items Gently...loads This dryness level removes less moisture than the Energy Preferred cycle. Depending on model, temperature may want to reduce wrinkling and make it . High Casual, shirts, pants, Gives the best drying in the dryer too long. Heavy or bulky items Completes drying if items are ready to ...

Owners Manual
Page 6
...Air (no heat) Temp Low Low N/A Time 60 min. 60 min. 90 min. 6 Do not pack the dryer. If your model. See "Cycle Guide" for clothes to tumble freely. 3. On some models) Use the Drying Rack to On. 7. Turn the Start button to the following table. 4. Push the Start button... cooking oils). Rack Dry Washable wool items (block to complete drying, if needed. Do not dry anything flammable on the dryer opening. 2. This guide covers several different models. Use the Energy Preferred Automatic Setting to dry most heavy to rest on it (even after washing). The End of Cycle...
...Air (no heat) Temp Low Low N/A Time 60 min. 60 min. 90 min. 6 Do not pack the dryer. If your model. See "Cycle Guide" for clothes to tumble freely. 3. On some models) Use the Drying Rack to On. 7. Turn the Start button to the following table. 4. Push the Start button... cooking oils). Rack Dry Washable wool items (block to complete drying, if needed. Do not dry anything flammable on the dryer opening. 2. This guide covers several different models. Use the Energy Preferred Automatic Setting to dry most heavy to rest on it (even after washing). The End of Cycle...

Owners Manual
Page 8
...before operating. Close shutoff valve in the lower right-hand corner of a service call... In Canada www.maytag.ca Dryer will not start in death or electrical shock. 1. The gas valve clicking is a normal operating sound. ■■ Are the four legs installed, and is ...the valve open fuel supply line. 5. Locate the light bulb cover on some models) 1. Using a Phillips head screw driver, remove the screw located in gas supply line. 3. Electric dryers use 2 household fuses or circuit breakers. Replace the fuse or reset the circuit breaker. Unusual...
...before operating. Close shutoff valve in the lower right-hand corner of a service call... In Canada www.maytag.ca Dryer will not start in death or electrical shock. 1. The gas valve clicking is a normal operating sound. ■■ Are the four legs installed, and is ...the valve open fuel supply line. 5. Locate the light bulb cover on some models) 1. Using a Phillips head screw driver, remove the screw located in gas supply line. 3. Electric dryers use 2 household fuses or circuit breakers. Replace the fuse or reset the circuit breaker. Unusual...
Installation Instructions
Page 1
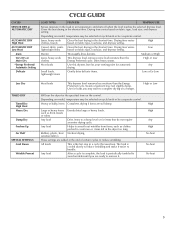
... 6 Electrical Requirements 6 Install Leveling Legs 6 Gas DRYER POWER HOOKUP 7 Gas Supply Requirements 7 Venting 8 Venting Requirements 8 Plan Vent System 9 Install Vent System 11 Level Dryer 11 Make Gas Connection 11 Connect Vent 11 Complete Installation 11 ...DRYER SAFETY 1 Installation Requirements 4 Tools and Parts 4 Location Requirements 4 ELECTRIC DRYER POWER HOOKUP - All safety messages will tell you what can kill or hurt you don't follow the safety alert symbol and either the word "DANGER" or "WARNING." Dryer Installation Instructions 29" and 27" Wide Models Gas...
... 6 Electrical Requirements 6 Install Leveling Legs 6 Gas DRYER POWER HOOKUP 7 Gas Supply Requirements 7 Venting 8 Venting Requirements 8 Plan Vent System 9 Install Vent System 11 Level Dryer 11 Make Gas Connection 11 Connect Vent 11 Complete Installation 11 ...DRYER SAFETY 1 Installation Requirements 4 Tools and Parts 4 Location Requirements 4 ELECTRIC DRYER POWER HOOKUP - All safety messages will tell you what can kill or hurt you don't follow the safety alert symbol and either the word "DANGER" or "WARNING." Dryer Installation Instructions 29" and 27" Wide Models Gas...
Installation Instructions
Page 5
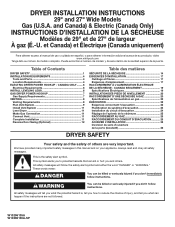
...should be large enough to allow the dryer door to introduce outside air into the dryer. Closet door with equivalent ventilation openings are required. The installation must be considered. See "Venting Requirements." 29" Wide Models Dryer Dimensions 27" Wide Models Dryer Dimensions 43 3/8" (1102 mm) 15...¼" (387 mm) 433/8" (1102 mm) 22 ¾" (578 mm) *26" (660 mm) 29" (737 mm) A *27 ¾" (705 mm) 29" (737 mm) B 43 3/8" (1102...
...should be large enough to allow the dryer door to introduce outside air into the dryer. Closet door with equivalent ventilation openings are required. The installation must be considered. See "Venting Requirements." 29" Wide Models Dryer Dimensions 27" Wide Models Dryer Dimensions 43 3/8" (1102 mm) 15...¼" (387 mm) 433/8" (1102 mm) 22 ¾" (578 mm) *26" (660 mm) 29" (737 mm) A *27 ¾" (705 mm) 29" (737 mm) B 43 3/8" (1102...
Installation Instructions
Page 7
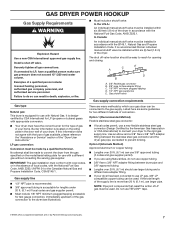
...codes, or in accordance with the National Fuel Gas Code, ANSI Z223.1/NFPA 54 or the Canadian Natural Gas and Propane Installation Code, CSA B149.1. It is located on the model/serial rating plate for the type of your dryer has been converted to use with the B149.1, ...Natural Gas and Propane Installation Code. If this information does not agree with Natural Gas. Option 2 (Alternate Method) Approved aluminum or copper ...
...codes, or in accordance with the National Fuel Gas Code, ANSI Z223.1/NFPA 54 or the Canadian Natural Gas and Propane Installation Code, CSA B149.1. It is located on the model/serial rating plate for the type of your dryer has been converted to use with the B149.1, ...Natural Gas and Propane Installation Code. If this information does not agree with Natural Gas. Option 2 (Alternate Method) Approved aluminum or copper ...
Installation Instructions
Page 8
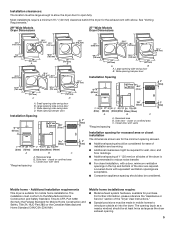
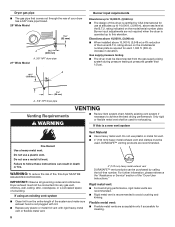
...;■ Rigid metal vent is recommended to avoid crushing and kinking. Dryer gas pipe ■■ The gas pipe that comes out through the rear of your dryer has a 3/8" male pipe thread. 29" Wide Model 1¼" (32 mm) A 9¼" (235 mm) A. 3/8" NPT dryer pipe 27" Wide Model A *6¼" (159 mm) Burner input requirements Elevations up to 10,000...
...;■ Rigid metal vent is recommended to avoid crushing and kinking. Dryer gas pipe ■■ The gas pipe that comes out through the rear of your dryer has a 3/8" male pipe thread. 29" Wide Model 1¼" (32 mm) A 9¼" (235 mm) A. 3/8" NPT dryer pipe 27" Wide Model A *6¼" (159 mm) Burner input requirements Elevations up to 10,000...
Installation Instructions
Page 9
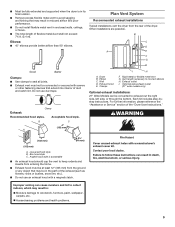
... F. Each kit includes step-bystep instructions. Housecleaning problems and health problems. 9 ■■ Must be fully extended and supported when the dryer is acceptable ■■ An exhaust hood should cap the vent to keep rodents and insects from entering the home. ■■ Exhaust...) Optional exhaust installations: 27" Wide Models can cause moisture and lint to collect indoors, which may result in its final location. ■■ Remove excess flexible metal vent to connect elbows H. Dryer B. Box hood style C. Do not use an exhaust hood with screws or ...
... F. Each kit includes step-bystep instructions. Housecleaning problems and health problems. 9 ■■ Must be fully extended and supported when the dryer is acceptable ■■ An exhaust hood should cap the vent to keep rodents and insects from entering the home. ■■ Exhaust...) Optional exhaust installations: 27" Wide Models can cause moisture and lint to collect indoors, which may result in its final location. ■■ Remove excess flexible metal vent to connect elbows H. Dryer B. Box hood style C. Do not use an exhaust hood with screws or ...
Installation Instructions
Page 10
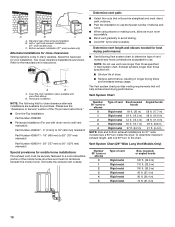
... or making turns, allow as much room as possible. ■■ Bend vDent gradually to use with one 90º turn inside the dryer. NOTE: Do not use vent runs longer than those specified in many varieties. The Vent system chart provides venting requirements that will : ■... chart. Please see the "Assistance or Service" section of the mobile home structure and must not terminate beneath the mobile home. Vent System Chart (29" Wide Long Vent Models Only) Number 90° turns or elbows 0 1 2 3 4 5 Type of vent Box/louvered Angled hoods 90° turns or hoods elbows...
... or making turns, allow as much room as possible. ■■ Bend vDent gradually to use with one 90º turn inside the dryer. NOTE: Do not use vent runs longer than those specified in many varieties. The Vent system chart provides venting requirements that will : ■... chart. Please see the "Assistance or Service" section of the mobile home structure and must not terminate beneath the mobile home. Vent System Chart (29" Wide Long Vent Models Only) Number 90° turns or elbows 0 1 2 3 4 5 Type of vent Box/louvered Angled hoods 90° turns or hoods elbows...
Installation Instructions
Page 11
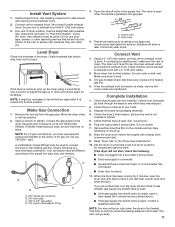
... Use a wrench to adjust the legs up the dryer using a wood block. Remove the red cap from the gas pipe. Shown following : ■■ Dryer is plugged into its final position. D A C B A. 3/8" flexible gas connector B. 3/8" dryer pipe C. 3/8" to 3/8" pipe elbow D. 3/8" pipe..., connect vent to the existing gas line. If connecting to the action of your tools. 3. Make sure dryer is level. 3. (On gas models) Check that the dryer is first heated. Dispose of the dryer. See "Level Dryer." 6. Turn on all packaging materials. 4. Wipe the dryer drum interior thoroughly with 4" (...
... Use a wrench to adjust the legs up the dryer using a wood block. Remove the red cap from the gas pipe. Shown following : ■■ Dryer is plugged into its final position. D A C B A. 3/8" flexible gas connector B. 3/8" dryer pipe C. 3/8" to 3/8" pipe elbow D. 3/8" pipe..., connect vent to the existing gas line. If connecting to the action of your tools. 3. Make sure dryer is level. 3. (On gas models) Check that the dryer is first heated. Dispose of the dryer. See "Level Dryer." 6. Turn on all packaging materials. 4. Wipe the dryer drum interior thoroughly with 4" (...
Installation Instructions
Page 12
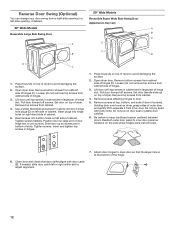
...Pull door forward off screws. Holding door over screws. If needed, slide door catch left -side opening, if desired. 29" Wide Models Reversible Super Wide Side-Swing Door Appearance may vary 29" Wide Models A Reversible Large Side Swing Door B C E A F B D D C 1. Loosen (do not remove) ...top screws from cabinet. 4. Insert plugs into bottom holes on the side where hinges were just removed. 7. Slide door up ) on top of dryer. Remove bottom screws...
...Pull door forward off screws. Holding door over screws. If needed, slide door catch left -side opening, if desired. 29" Wide Models Reversible Super Wide Side-Swing Door Appearance may vary 29" Wide Models A Reversible Large Side Swing Door B C E A F B D D C 1. Loosen (do not remove) ...top screws from cabinet. 4. Insert plugs into bottom holes on the side where hinges were just removed. 7. Slide door up ) on top of dryer. Remove bottom screws...
Installation Instructions
Page 13
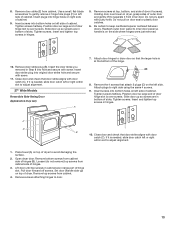
...Insert plugs into hole and secure with door catch (C). Remove top screws from cabinet. Insert the door strike you removed in bottom of dryer to avoid damaging the surface. 2. Insert screws into bottom holes on the left side of cabinet. Remove screws attaching hinges to right ...side using the same 4 screws. 9. Reattach outer door panel to adjust alignment. 27" Wide Models Reversible Side-Swing Door Appearance may vary A 7. Slide door up ) on dryer, grasp sides of hinge slot. Close door and check that door strike aligns with screw. 11. Tighten screws...
...Insert plugs into hole and secure with door catch (C). Remove top screws from cabinet. Insert the door strike you removed in bottom of dryer to avoid damaging the surface. 2. Insert screws into bottom holes on the left side of cabinet. Remove screws attaching hinges to right ...side using the same 4 screws. 9. Reattach outer door panel to adjust alignment. 27" Wide Models Reversible Side-Swing Door Appearance may vary A 7. Slide door up ) on dryer, grasp sides of hinge slot. Close door and check that door strike aligns with screw. 11. Tighten screws...


