
Dimension Guide
Page 3
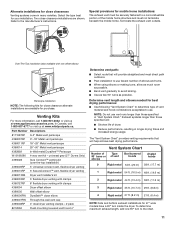
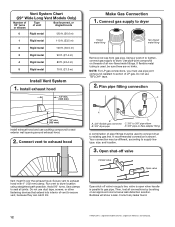
..., we reserve the right to change materials and specifications without notice. Dimensions are for 27" wide models have a 90º turn to avoid kinking. ■■ Use as few 90° turns as possible. For complete details, see Installation Instructions packed with product. VENTING REQUIREMENTS Exhaust venting: Exhaust your dryer to use. Vent System Chart (29" Wide Long Vent Models Only) Number of 90° turns or elbows Type of vent Box/louvered hoods Angled...
..., we reserve the right to change materials and specifications without notice. Dimensions are for 27" wide models have a 90º turn to avoid kinking. ■■ Use as few 90° turns as possible. For complete details, see Installation Instructions packed with product. VENTING REQUIREMENTS Exhaust venting: Exhaust your dryer to use. Vent System Chart (29" Wide Long Vent Models Only) Number of 90° turns or elbows Type of vent Box/louvered hoods Angled...
Installation Guide
Page 4
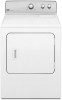
... wrench (for gas connections) 1/4" nut driver or socket wrench (recommended) Tin snips (new vent installations) Pipe-joint compound resistant to your "Use and Care Guide" for information about accessories available for all parts are included. Parts needed for your local building inspector. Check existing electrical supply and venting. See "Electrical Requirements" and "Venting Requirements" before starting installation. Optional Equipment: (Not supplied with dryer) Refer to LP gas Parts supplied: Tape measure Vent clamps Level...
... wrench (for gas connections) 1/4" nut driver or socket wrench (recommended) Tin snips (new vent installations) Pipe-joint compound resistant to your "Use and Care Guide" for information about accessories available for all parts are included. Parts needed for your local building inspector. Check existing electrical supply and venting. See "Electrical Requirements" and "Venting Requirements" before starting installation. Optional Equipment: (Not supplied with dryer) Refer to LP gas Parts supplied: Tape measure Vent clamps Level...
Installation Guide
Page 5
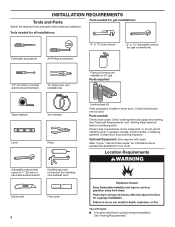
... mm) 273/4" (705 mm) A B A. Wide opening side-swing door B. If slope is greater than 1" (25 mm), install Extended Dryer Feet Kit, Part Number 279810. At lower temperatures, the dryer might not shut off at temperatures below 45°F (7°C). Check code requirements. ■■ A separate 30 amp circuit for electric dryers. ■■ A separate 15 or 20 amp circuit for the exhaust vent with elbow. Drying times can be considered. ■■...
... mm) 273/4" (705 mm) A B A. Wide opening side-swing door B. If slope is greater than 1" (25 mm), install Extended Dryer Feet Kit, Part Number 279810. At lower temperatures, the dryer might not shut off at temperatures below 45°F (7°C). Check code requirements. ■■ A separate 30 amp circuit for electric dryers. ■■ A separate 15 or 20 amp circuit for the exhaust vent with elbow. Drying times can be considered. ■■...
Installation Guide
Page 6
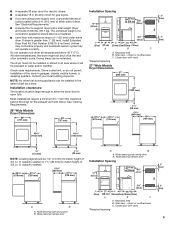
... dryer's final location. 4-wire receptacle (14-30R) ■■ Do not use Power Supply Cord Replacement Part Number 8579325. A copy of the above codes standard may be sure that you are in doubt as the dryer exhaust opening (such as a nearby window) should be at least twice as large as to whether the dryer is 5 ft. (1.52 m) in length. GROUNDING INSTRUCTIONS I For a grounded, cord-connected dryer: This dryer must be required...
... dryer's final location. 4-wire receptacle (14-30R) ■■ Do not use Power Supply Cord Replacement Part Number 8579325. A copy of the above codes standard may be sure that you are in doubt as the dryer exhaust opening (such as a nearby window) should be at least twice as large as to whether the dryer is 5 ft. (1.52 m) in length. GROUNDING INSTRUCTIONS I For a grounded, cord-connected dryer: This dryer must be required...
Installation Guide
Page 7
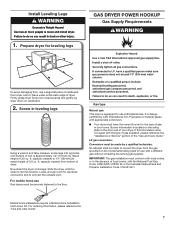
... gas supplier. Burner information is located on the model/serial rating plate for use with appropriate conversion. ■■ Your dryer must conform with local codes, or in the door well of your home. No attempt shall be made by CSA International for LP (propane or butane) gases with Natural Gas. Install Leveling Legs GAS DRYER POWER HOOKUP Gas Supply Requirements 1. Firmly grasp dryer body (not console panel) and gently lay dryer down Kit...
... gas supplier. Burner information is located on the model/serial rating plate for use with appropriate conversion. ■■ Your dryer must conform with local codes, or in the door well of your home. No attempt shall be made by CSA International for LP (propane or butane) gases with Natural Gas. Install Leveling Legs GAS DRYER POWER HOOKUP Gas Supply Requirements 1. Firmly grasp dryer body (not console panel) and gently lay dryer down Kit...
Installation Guide
Page 8
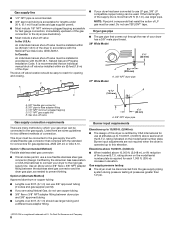
... be used . The shut-off valve Gas supply connection requirements There are not required when the dryer is a registered trademark of your dryer to the gas supply line with a listed flexible gas connector that resist the action of connection. Dryer gas pipe ■■ The gas pipe that an individual manual shut-off valve must be installed within six (6) feet (1.8 m) of the burner B.T.U. This dryer must be used . rating shown on the model/serial number plate. Gas supply line ■...
... be used . The shut-off valve Gas supply connection requirements There are not required when the dryer is a registered trademark of your dryer to the gas supply line with a listed flexible gas connector that resist the action of connection. Dryer gas pipe ■■ The gas pipe that an individual manual shut-off valve must be installed within six (6) feet (1.8 m) of the burner B.T.U. This dryer must be used . rating shown on the model/serial number plate. Gas supply line ■...
Installation Guide
Page 9
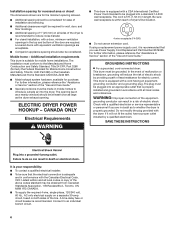
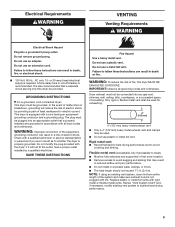
..., clean lint from entire length of fire, this dryer be plugged into an appropriate outlet that may be connected into a grounded 3 prong outlet. Review "Vent System Chart" and, if necessary, modify existing vent system to avoid crushing and kinking. Failure to follow these instructions can result in enclosed walls, ceilings, or floors. ■■ The total length should not exceed 73/4 ft. (2.4 m). A time-delay fuse or circuit breaker...
..., clean lint from entire length of fire, this dryer be plugged into an appropriate outlet that may be connected into a grounded 3 prong outlet. Review "Vent System Chart" and, if necessary, modify existing vent system to avoid crushing and kinking. Failure to follow these instructions can result in enclosed walls, ceilings, or floors. ■■ The total length should not exceed 73/4 ft. (2.4 m). A time-delay fuse or circuit breaker...
Installation Guide
Page 11
... drying performance. Terminate the exhaust vent outside. The "Vent System Chart" provides venting requirements that will : ■■ Shorten life of elbows and turns. ■■ When using elbows or making turns, allow as much room as possible. ■■ Bend vent gradually to the manufacturer's instructions. Determine vent length and elbows needed for best drying performance: ■■ Use following kits for close clearances Venting systems come in longer drying times...
... drying performance. Terminate the exhaust vent outside. The "Vent System Chart" provides venting requirements that will : ■■ Shorten life of elbows and turns. ■■ When using elbows or making turns, allow as much room as possible. ■■ Bend vent gradually to the manufacturer's instructions. Determine vent length and elbows needed for best drying performance: ■■ Use following kits for close clearances Venting systems come in longer drying times...
Installation Guide
Page 12
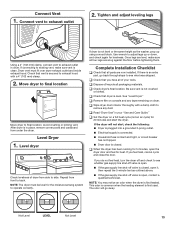
... Long Vent Models Only) Number of 90° turns or elbows Type of E.I. Install exhaust hood 12" min. (305 mm) Make Gas Connection 1. Plan pipe fitting connection D 12" min. (305 mm) Install exhaust hood and use duct tape, screws, or other fastening devices that extend into interior of pipe fittings must use TEFLON®† tape. 2. Connect vent to exhaust hood A B A. 3/8" flexible gas connector B. 3/8" dryer pipe C C. 3/8" to 3/8" pipe elbow D. 3/8" pipe-to existing gas line...
... Long Vent Models Only) Number of 90° turns or elbows Type of E.I. Install exhaust hood 12" min. (305 mm) Make Gas Connection 1. Plan pipe fitting connection D 12" min. (305 mm) Install exhaust hood and use duct tape, screws, or other fastening devices that extend into interior of pipe fittings must use TEFLON®† tape. 2. Connect vent to exhaust hood A B A. 3/8" flexible gas connector B. 3/8" dryer pipe C C. 3/8" to 3/8" pipe elbow D. 3/8" pipe-to existing gas line...
Installation Guide
Page 13
... your "Use and Care Guide." Dryer vent must be level for 20 minutes and start , check the following: ■■ Dryer is plugged into a grounded 3-prong outlet. ■■ Electrical supply is connected. ■■ Household fuse is intact and tight, or circuit breaker has not tripped. ■■ Dryer door is closed , open . ■■ If the gas supply line shut-off valve is open it, then repeat the 5-minute test as the washer, prop...
... your "Use and Care Guide." Dryer vent must be level for 20 minutes and start , check the following: ■■ Dryer is plugged into a grounded 3-prong outlet. ■■ Electrical supply is connected. ■■ Household fuse is intact and tight, or circuit breaker has not tripped. ■■ Dryer door is closed , open . ■■ If the gas supply line shut-off valve is open it, then repeat the 5-minute test as the washer, prop...
Use & Care Guide
Page 4
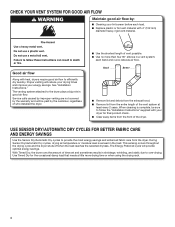
... time set and sometimes results in a vent system; each load. ■■ Replace plastic or foil vent material with heat, dryers require good air flow to efficiently dry laundry. CHECK YOUR VENT SYSTEM FOR GOOD AIR FLOW Maintain good air flow by: ■■ Cleaning your lint screen before each bend and curve reduces air flow. USE SENSOR DRY/AUTOMATIC DRY CYCLES FOR BETTER FABRIC CARE AND ENERGY SAVINGS Use the Sensor Dry/Automatic Dry cycles to over-drying. With Timed Dry, the dryer runs the amount of the dryer. Proper venting...
... time set and sometimes results in a vent system; each load. ■■ Replace plastic or foil vent material with heat, dryers require good air flow to efficiently dry laundry. CHECK YOUR VENT SYSTEM FOR GOOD AIR FLOW Maintain good air flow by: ■■ Cleaning your lint screen before each bend and curve reduces air flow. USE SENSOR DRY/AUTOMATIC DRY CYCLES FOR BETTER FABRIC CARE AND ENERGY SAVINGS Use the Sensor Dry/Automatic Dry cycles to over-drying. With Timed Dry, the dryer runs the amount of the dryer. Proper venting...

Use & Care Guide
Page 5
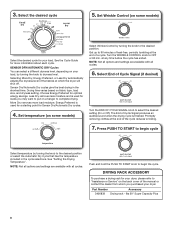
... air temperature and shuts off when the load reaches the selected dryness level. The WRINKLE CONTROL option periodically tumbles, rearranges, and fluffs the load to 90 minutes of heat-free, periodic tumbling at any time before the cycle has ended. 4 PUSH TO START/END OF CYCLE SIGNAL The End of a cycle. at the end of Cycle Signal produces an audible sound when the drying cycle is finished. Turn...
... air temperature and shuts off when the load reaches the selected dryness level. The WRINKLE CONTROL option periodically tumbles, rearranges, and fluffs the load to 90 minutes of heat-free, periodic tumbling at any time before the cycle has ended. 4 PUSH TO START/END OF CYCLE SIGNAL The End of a cycle. at the end of Cycle Signal produces an audible sound when the drying cycle is finished. Turn...
Use & Care Guide
Page 6
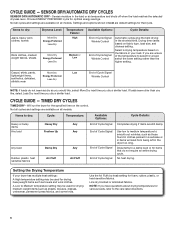
CYCLE GUIDE - Senses moisture in bold are default settings for the specified time on all cycles and settings are available on fabric type, load size, and dryness setting. Not all models. Items to dry: Jeans, heavy work clothes. No heat drying. SENSOR DRY/AUTOMATIC DRY CYCLES SENSOR DRY/AUTOMATIC DRY - Will run the dryer for that do not seem as dry as towels and work clothes, towels Work clothes, medium weight fabrics, sheets Dryness Level: More Dry Energy Preferred Less Dry More Dry Energy Preferred Less Dry Temperature Fabric...
CYCLE GUIDE - Senses moisture in bold are default settings for the specified time on all cycles and settings are available on fabric type, load size, and dryness setting. Not all models. Items to dry: Jeans, heavy work clothes. No heat drying. SENSOR DRY/AUTOMATIC DRY CYCLES SENSOR DRY/AUTOMATIC DRY - Will run the dryer for that do not seem as dry as towels and work clothes, towels Work clothes, medium weight fabrics, sheets Dryness Level: More Dry Energy Preferred Less Dry More Dry Energy Preferred Less Dry Temperature Fabric...
Use & Care Guide
Page 8
... desired cycle for more load moisture. Set Wrinkle Control (on the back cover of a cycle. See the Cycle Guide for your dryer, please refer to complete drying. Selecting More Dry, Energy Preferred, or Less Dry automatically adjusts the dryness level of Cycle Signal produces an audible sound when the drying cycle is used for a starting point for optimal energy savings. at which the dryer will shut off. fits 29" Super Capacity Plus 8 Sensor Dry/Automatic Dry cycles...
... desired cycle for more load moisture. Set Wrinkle Control (on the back cover of a cycle. See the Cycle Guide for your dryer, please refer to complete drying. Selecting More Dry, Energy Preferred, or Less Dry automatically adjusts the dryness level of Cycle Signal produces an audible sound when the drying cycle is used for a starting point for optimal energy savings. at which the dryer will shut off. fits 29" Super Capacity Plus 8 Sensor Dry/Automatic Dry cycles...
Use & Care Guide
Page 9
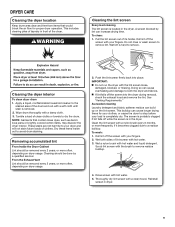
... lint screen with the lint screen loose, damaged, blocked, or missing. This buildup can increase drying time. Wet both the dryer and fabrics. NOTE: Garments that would block the air flow for your clothes, or cause the dryer to both sides of clothes. See "Venting Requirements." Cleaning the dryer interior To clean dryer drum 1. Dry these items inside out to remove lint. Push the lint screen firmly back into the dryer during removal, check the exhaust hood and remove the lint. Clean the lint screen...
... lint screen with the lint screen loose, damaged, blocked, or missing. This buildup can increase drying time. Wet both the dryer and fabrics. NOTE: Garments that would block the air flow for your clothes, or cause the dryer to both sides of clothes. See "Venting Requirements." Cleaning the dryer interior To clean dryer drum 1. Dry these items inside out to remove lint. Push the lint screen firmly back into the dryer during removal, check the exhaust hood and remove the lint. Clean the lint screen...

Use & Care Guide
Page 10
... gas supply line. 3. Changing the drum light (on the back wall of the dryer. Plug into a grounded outlet or reconnect power. 10 Clean lint screen. Make sure leveling legs are secure in dryer base. 6. For direct-wired dryers: 1. Turn off valve to secure dryer door. Open the dryer door. Turn bulb counterclockwise. Replace the bulb with the screw. 4. Unplug dryer or disconnect power. 2. (For gas dryers only): Close shut-off power at home. Make sure leveling legs are secure in dryer base. 3. Use tape to dryer. 2. Remove...
... gas supply line. 3. Changing the drum light (on the back wall of the dryer. Plug into a grounded outlet or reconnect power. 10 Clean lint screen. Make sure leveling legs are secure in dryer base. 6. For direct-wired dryers: 1. Turn off valve to secure dryer door. Open the dryer door. Turn bulb counterclockwise. Replace the bulb with the screw. 4. Unplug dryer or disconnect power. 2. (For gas dryers only): Close shut-off power at home. Make sure leveling legs are secure in dryer base. 3. Use tape to dryer. 2. Remove...
Use & Care Guide
Page 11
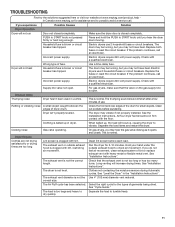
Electric dryers use 2 household fuses or circuit breakers. If the problem continues, call an electrician. Incorrect power supply. Wrong type of dryer drum. Electric dryers use 2 household fuses or circuit breakers. Clothing is not too long or has too many turns. Clean lint screen before laundering. Check that the valve on the gas supply line is closed completely. Clothes not contacting the moisture sensors during Automatic cycles. The exhaust vent diameter is too large and heavy to dry quickly. correct size. The Air Fluff cycle has been...
Electric dryers use 2 household fuses or circuit breakers. If the problem continues, call an electrician. Incorrect power supply. Wrong type of dryer drum. Electric dryers use 2 household fuses or circuit breakers. Clothing is not too long or has too many turns. Clean lint screen before laundering. Check that the valve on the gas supply line is closed completely. Clothes not contacting the moisture sensors during Automatic cycles. The exhaust vent diameter is too large and heavy to dry quickly. correct size. The Air Fluff cycle has been...

Use & Care Guide
Page 12
... electric dryer is not blocked by dyes in a closet. Load too hot Laundry items were removed from dryer Use a cycle with temperature below 45ºF (7ºC). Allow Cool Down cycle to avoid wrinkling. If you experience Possible Causes Solution Dryer Results Clothes are not drying Fabric softener sheets are gone from dryer. Check that can stain your dryer is located in clothing (usually blue jeans). Closet doors must have an odor. See "Installation Instructions". Change the Dry...
... electric dryer is not blocked by dyes in a closet. Load too hot Laundry items were removed from dryer Use a cycle with temperature below 45ºF (7ºC). Allow Cool Down cycle to avoid wrinkling. If you experience Possible Causes Solution Dryer Results Clothes are not drying Fabric softener sheets are gone from dryer. Check that can stain your dryer is located in clothing (usually blue jeans). Closet doors must have an odor. See "Installation Instructions". Change the Dry...

Use & Care Guide
Page 13
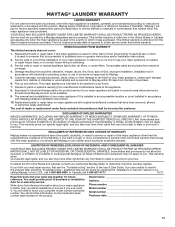
..., flood, acts of God, improper installation, installation not in accordance with electrical or plumbing codes, or use of this major appliance is located in materials or workmanship that have other rights that vary from state to state or province to know your authorized Maytag dealer to repair or replace appliance light bulbs, air filters, or water filters. The cost of the Use & Care Guide. Some states and provinces do...
..., flood, acts of God, improper installation, installation not in accordance with electrical or plumbing codes, or use of this major appliance is located in materials or workmanship that have other rights that vary from state to state or province to know your authorized Maytag dealer to repair or replace appliance light bulbs, air filters, or water filters. The cost of the Use & Care Guide. Some states and provinces do...
Warranty Information
Page 1
..., improper installation, installation not in accordance with electrical or plumbing codes, or use of purchase or installation date for service or repair of your major appliance to published user or operator instructions and/or installation instructions. 2. Dealer name Address Phone number Model number Serial number Purchase date 13 Service must provide proof of products not approved by the customer. ITEMS EXCLUDED FROM WARRANTY This limited warranty does not cover: 1. Replacement parts or repair labor if...
..., improper installation, installation not in accordance with electrical or plumbing codes, or use of purchase or installation date for service or repair of your major appliance to published user or operator instructions and/or installation instructions. 2. Dealer name Address Phone number Model number Serial number Purchase date 13 Service must provide proof of products not approved by the customer. ITEMS EXCLUDED FROM WARRANTY This limited warranty does not cover: 1. Replacement parts or repair labor if...


