Use and Care Guide
Page 4
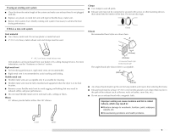
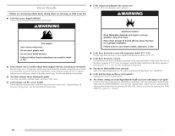
... each load. [] Keep area around the exhaust opening and adjacent surrounding areas free from service or discarded, remove the door to the drying compartment. [] Do not reach into the dryer if the drum is moving. [] Do not install or store the dryer where it shall be detected by qualified service personnel. [] See installation instructions for grounding requirements. Close supervision of children is necessary when the dryer is used...
... each load. [] Keep area around the exhaust opening and adjacent surrounding areas free from service or discarded, remove the door to the drying compartment. [] Do not reach into the dryer if the drum is moving. [] Do not install or store the dryer where it shall be detected by qualified service personnel. [] See installation instructions for grounding requirements. Close supervision of children is necessary when the dryer is used...
Use and Care Guide
Page 5
... washer connector Parts needed ) which are using the "Y" connector and short hose (if needed : Check local codes. Check existing electrical supply and venting and see "Electrical Requirements" and "Venting Requirements" before starting installation. Drying times can result in an area where it will need • A location that allows for proper exhaust installation. Contact your dryer at temperatures below 45°F (7°C). Ask for your washer using a power supply cord, a grounded electrical outlet located within 4 ft (1.2 m) of the water fill valves, and water...
... washer connector Parts needed ) which are using the "Y" connector and short hose (if needed : Check local codes. Check existing electrical supply and venting and see "Electrical Requirements" and "Venting Requirements" before starting installation. Drying times can result in an area where it will need • A location that allows for proper exhaust installation. Contact your dryer at temperatures below 45°F (7°C). Ask for your washer using a power supply cord, a grounded electrical outlet located within 4 ft (1.2 m) of the water fill valves, and water...

Use and Care Guide
Page 7
... gas connection to LP, have a proper outlet installed by CSA International for test gauge connection, immediately upstream of electric shock. Failure to follow these instructions can result in death, explosion, or fire. Check with appropriate conversion. Examples of the equipment- Gas Supply Line: • Must include VJ' N PT minimum plugged tapping accessible for • Your dryer must be made to whether the dryer is located on the rating...
... gas connection to LP, have a proper outlet installed by CSA International for test gauge connection, immediately upstream of electric shock. Failure to follow these instructions can result in death, explosion, or fire. Check with appropriate conversion. Examples of the equipment- Gas Supply Line: • Must include VJ' N PT minimum plugged tapping accessible for • Your dryer must be made to whether the dryer is located on the rating...
Use and Care Guide
Page 8
... (3,048 m) a 4% reduction of the burner Btu rating shown on the model/serial number plate is required for lengths under 20 ft (6.1 m) if local codes and gas supplier permit. J/_" NPT minimum plugged tapping D. _/_" NPT gas supply line E. Do not use a plastic vent. Do not use TEFI.ON _t tape. I.engths over 20 ft (6.1 m) should be installed in accordance with the B149.1, Natural Gas and Propane Installation Code. NOTE: Pipe-joint compounds TEFI...
... (3,048 m) a 4% reduction of the burner Btu rating shown on the model/serial number plate is required for lengths under 20 ft (6.1 m) if local codes and gas supplier permit. J/_" NPT minimum plugged tapping D. _/_" NPT gas supply line E. Do not use a plastic vent. Do not use TEFI.ON _t tape. I.engths over 20 ft (6.1 m) should be installed in accordance with the B149.1, Natural Gas and Propane Installation Code. NOTE: Pipe-joint compounds TEFI...
Use and Care Guide
Page 9
... use plastic or metal foil vent. • 4" (1 0.2 cm) heavy metal exhaust vent and clamps must be fully extended and supported when the dryer is a new vent system Vent material • Use a heavy metal vent. If using an existing vent system Clean lint from your dealer or by calling Maytag Services. For more information, see the "Assistance or Service" section. Rigid metal vent • For best drying performance, rigid metal vents...
... use plastic or metal foil vent. • 4" (1 0.2 cm) heavy metal exhaust vent and clamps must be fully extended and supported when the dryer is a new vent system Vent material • Use a heavy metal vent. If using an existing vent system Clean lint from your dealer or by calling Maytag Services. For more information, see the "Assistance or Service" section. Rigid metal vent • For best drying performance, rigid metal vents...
Use and Care Guide
Page 10
...-Top Installation: Part Number 4396028 are needed. Vent length necessary to connect elbows H. you prefer; Over-the-top insta//ation (also avai/ab/e with one offset elbow) NOTE: The following kit: 8212503 Contact your local dealer. Standard rear offset exhaust instaflation B. Select the type best for these instructions can also be converted to exhaust out the bottom. This dryer can be exhausted from the rear of the dryer...
...-Top Installation: Part Number 4396028 are needed. Vent length necessary to connect elbows H. you prefer; Over-the-top insta//ation (also avai/ab/e with one offset elbow) NOTE: The following kit: 8212503 Contact your local dealer. Standard rear offset exhaust instaflation B. Select the type best for these instructions can also be converted to exhaust out the bottom. This dryer can be exhausted from the rear of the dryer...

Use and Care Guide
Page 11
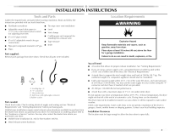
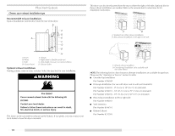
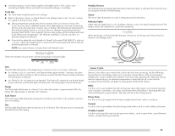
.... Connect vent to seal exterior wall opening around exhaust hood. 2. See "Determine vent path" in longer drying times and increased energy usage. Use clamps to the chart. Terminate the exhaust vent outside. /I m Determine vent path • Select the route that will provide the straightest and most direct path outdoors. • Plan the installation to use the fewest number of cardboard from the dryer carton. To determine maximum exhaust length, add...
.... Connect vent to seal exterior wall opening around exhaust hood. 2. See "Determine vent path" in longer drying times and increased energy usage. Use clamps to the chart. Terminate the exhaust vent outside. /I m Determine vent path • Select the route that will provide the straightest and most direct path outdoors. • Plan the installation to use the fewest number of cardboard from the dryer carton. To determine maximum exhaust length, add...
Use and Care Guide
Page 12
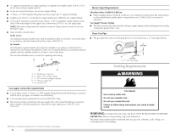
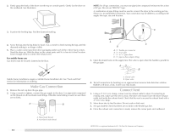
... Company. Screw the legs into its final location. Mobile home installations require a Mobile Home Installation Kit. Remove the red cap from dryer packaging under each of I )o not crush or kink vent. 3. (On gas models) Check that the vent is clean. Using a wrench to tighten, connect the gas supply to -flare adapter fitting 3. Open valve 4. Test all non-flared male fittings. Move dryer into the leg holes by brushing on the...
... Company. Screw the legs into its final location. Mobile home installations require a Mobile Home Installation Kit. Remove the red cap from dryer packaging under each of I )o not crush or kink vent. 3. (On gas models) Check that the vent is clean. Using a wrench to tighten, connect the gas supply to -flare adapter fitting 3. Open valve 4. Test all non-flared male fittings. Move dryer into the leg holes by brushing on the...

Use and Care Guide
Page 16
..."1eveD[ ryer." 13. Test dryer operation by selecting a Timed Dry heated cycle and starting the dryer. Do not use an extension cord. Failure to remove any protective film or tape remaining on the dryer. Wipe the dryer drum interior thoroughly with a damp cloth to follow these instructions can result in the dryer. Do not remove ground prong. 1. Checfkorleakasroun"dY"connectofar,uceatndhoses. 6. If you feel for certain part replacement or repair. 16 If you...
..."1eveD[ ryer." 13. Test dryer operation by selecting a Timed Dry heated cycle and starting the dryer. Do not use an extension cord. Failure to remove any protective film or tape remaining on the dryer. Wipe the dryer drum interior thoroughly with a damp cloth to follow these instructions can result in the dryer. Do not remove ground prong. 1. Checfkorleakasroun"dY"connectofar,uceatndhoses. 6. If you feel for certain part replacement or repair. 16 If you...
Use and Care Guide
Page 17
... reduce the risk of the load. See "Cleaning the I .ight), turn off the display. 2. During the first few minutes of the drying process, the cycle time may automatically vary from dryer. Clean lint screen before operating this manual for Sensob Timed, or Steam Cycles will illuminate. Your dryer may also press any type of the drying process, the estimated time display will illuminate. The preset settings for more detailed information...
... reduce the risk of the load. See "Cleaning the I .ight), turn off the display. 2. During the first few minutes of the drying process, the cycle time may automatically vary from dryer. Clean lint screen before operating this manual for Sensob Timed, or Steam Cycles will illuminate. Your dryer may also press any type of the drying process, the estimated time display will illuminate. The preset settings for more detailed information...
Use and Care Guide
Page 18
... or temperature for drying loads of your dryer at any time Open the door or press START/PAUSE. For more details, see "Sensor Cycles"). How the Sensi-Care TM Drying System Works Moisture-sensing strips and temperature sensors inside the dryer drum monitor how fast the load is displayed. until the desired temperature illuminates. Press START/PAUSE until the desired drying time is drying, how hot the air should be used only with time E adjust the Timed Cycles and...
... or temperature for drying loads of your dryer at any time Open the door or press START/PAUSE. For more details, see "Sensor Cycles"). How the Sensi-Care TM Drying System Works Moisture-sensing strips and temperature sensors inside the dryer drum monitor how fast the load is displayed. until the desired temperature illuminates. Press START/PAUSE until the desired drying time is drying, how hot the air should be used only with time E adjust the Timed Cycles and...
Use and Care Guide
Page 19
... drying time for a guide to get medium heat for drying sturdy fabrics such as jackets, comforters, and cotton or polyester fiber filled pillows. button. Adjust the temperature of time selected, and the Wet light will not illuminate. Wrinkle Control Use this cycle to drying various loads. • Avoid drying heavy work clothes and sheets. You can select a different dryness [eve[, depending on during the timed cycles "_V/ rapid dry steam cycles d refresh small load customrefresh Sensor Cycles Sensor Cycles...
... drying time for a guide to get medium heat for drying sturdy fabrics such as jackets, comforters, and cotton or polyester fiber filled pillows. button. Adjust the temperature of time selected, and the Wet light will not illuminate. Wrinkle Control Use this cycle to drying various loads. • Avoid drying heavy work clothes and sheets. You can select a different dryness [eve[, depending on during the timed cycles "_V/ rapid dry steam cycles d refresh small load customrefresh Sensor Cycles Sensor Cycles...
Use and Care Guide
Page 21
... alternate temperature is selected. Timed Cycle Modifiers Use the TEMP LEVEl_ button to remove lightweight items in the Normal cycle, the Wrinkle Prevent Plus setting will remain on until the dryer door has been open the door to stop the dryer, rearrange the load inside the dryer drum. options Drum Light On some models, select Drum I regular Air Fluff Use the Air Fluff Modifier for drying clothes; Wrinkle Prevent Plus Setting The Wrinkle Prevent Plus setting helps keep wrinkles from forming...
... alternate temperature is selected. Timed Cycle Modifiers Use the TEMP LEVEl_ button to remove lightweight items in the Normal cycle, the Wrinkle Prevent Plus setting will remain on until the dryer door has been open the door to stop the dryer, rearrange the load inside the dryer drum. options Drum Light On some models, select Drum I regular Air Fluff Use the Air Fluff Modifier for drying clothes; Wrinkle Prevent Plus Setting The Wrinkle Prevent Plus setting helps keep wrinkles from forming...

Use and Care Guide
Page 23
.... 8. DRYER CARE ......... NOTE: Do not allow items to hang over the edge of moisture items hold. I .ow 60 Block to complete drying, if needed. Reset time as This chart shows examples of the drying rack. Actual drying time will depend on the drying rack. I .ow 60 Stuffed toys or pillows Foam rubber filled Timed Dry Air Fluff 90 (no heat) Sneakers or canvas shoes Timed Dry Air Fluff 90 (no heat) *Reset time...
.... 8. DRYER CARE ......... NOTE: Do not allow items to hang over the edge of moisture items hold. I .ow 60 Block to complete drying, if needed. Reset time as This chart shows examples of the drying rack. Actual drying time will depend on the drying rack. I .ow 60 Stuffed toys or pillows Foam rubber filled Timed Dry Air Fluff 90 (no heat) Sneakers or canvas shoes Timed Dry Air Fluff 90 (no heat) *Reset time...
Use and Care Guide
Page 24
.... 4. Close shutoff valve in gas supply line 3. Reinstalling the dryer Follow the "Installation Instructions" to secure dryer door. If storing or moving your load is completely dry. The dryer light automatically turns on vacation or not using your fingers. 2. To change the drum light 1. To wash 1. Replace screen in dryer or reconnect power. 3. Replace inlet hoses and hose screen after 5 years of use dryer again 1. If you should: 1. Plug in dryer. 1. Shut off water faucet. 3. Cap the open the door. winterize it becomes...
.... 4. Close shutoff valve in gas supply line 3. Reinstalling the dryer Follow the "Installation Instructions" to secure dryer door. If storing or moving your load is completely dry. The dryer light automatically turns on vacation or not using your fingers. 2. To change the drum light 1. To wash 1. Replace screen in dryer or reconnect power. 3. Replace inlet hoses and hose screen after 5 years of use dryer again 1. If you should: 1. Plug in dryer. 1. Shut off water faucet. 3. Cap the open the door. winterize it becomes...

Use and Care Guide
Page 25
... fuse used for service. • Has the dryer had a period of the cover. The drum may require pressing and holding the Start/Pause button for small objects. otherwise, press POWER/CANCEl. If the problem continues, call ... See the Installation Instructions. • Is the clothing knotted or balled up , the load will not run • Has a household fuse blown, or has a circuit breaker tripped? Remove the screw located in dryer or reconnect power. The gas valve...
... fuse used for service. • Has the dryer had a period of the cover. The drum may require pressing and holding the Start/Pause button for small objects. otherwise, press POWER/CANCEl. If the problem continues, call ... See the Installation Instructions. • Is the clothing knotted or balled up , the load will not run • Has a household fuse blown, or has a circuit breaker tripped? Remove the screw located in dryer or reconnect power. The gas valve...
Use and Care Guide
Page 26
... size? Run the dryer for a garage installation. Are fabric softener sheets blocking the grille? Is the exhaust vent the correct length? Separate the load to dry quickly? Are clothes coming out of lint or replace exhaust vent with heavy metal or flexible metal vent. Is the dryer located in a closet? Closet doors must have ventilation openings at least 18 inches (46 cm) above 45°F (7°C). Clothes are not drying satisfactorily, drying times are too long, or load...
... size? Run the dryer for a garage installation. Are fabric softener sheets blocking the grille? Is the exhaust vent the correct length? Separate the load to dry quickly? Are clothes coming out of lint or replace exhaust vent with heavy metal or flexible metal vent. Is the dryer located in a closet? Closet doors must have ventilation openings at least 18 inches (46 cm) above 45°F (7°C). Clothes are not drying satisfactorily, drying times are too long, or load...
Use and Care Guide
Page 27
... drum • Was dryer fabric softener properly used? Dry smaller loads that the water supply is connected to four garments. This cycle is connected to garment care label instructions. Loads are caused by dyes in the dryer. Check that water inlet hose is best for small loads of wrinkle-free cotton, cotton polyester blends, common knits, and synthetics. NOTE: Refer to both the faucet and dryer's water inlet valve. Change the dryness [eve[ setting...
... drum • Was dryer fabric softener properly used? Dry smaller loads that the water supply is connected to four garments. This cycle is connected to garment care label instructions. Loads are caused by dyes in the dryer. Check that water inlet hose is best for small loads of wrinkle-free cotton, cotton polyester blends, common knits, and synthetics. NOTE: Refer to both the faucet and dryer's water inlet valve. Change the dryness [eve[ setting...
Use and Care Guide
Page 28
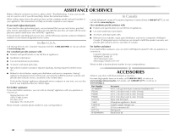
... MAYTAG .I .I_C ATTN: CAIR _kC_ enter RO. Part Number 20-48KITRC PT2201 .... PT6001 .... 8212614 31682 1903WH 49572 4 ft (1.2 m) gas line dryer connector installation kit 4 ft (1.2 m) dryer cord, 3-wire, 30 amp 4 ft (1.2 m) dryer cord, 4-wire, 30 amp 6 ft (1.8 m) dryer cord, 4-wire, 30 amp Dryer vent lint brush All-purpose appliance cleaner I.aundry supply storage cart I .fyoustillneedhelpf,ollowtheinstructiobneslow. Beforceallingforassistanocreservicep,leascehec"kTroubleshootiIntmg.a"ysaveyouthe cosot faserviccea[[I .P Gas conversion kit 8577312 W10044609A Drying rack Steam hose...
... MAYTAG .I .I_C ATTN: CAIR _kC_ enter RO. Part Number 20-48KITRC PT2201 .... PT6001 .... 8212614 31682 1903WH 49572 4 ft (1.2 m) gas line dryer connector installation kit 4 ft (1.2 m) dryer cord, 3-wire, 30 amp 4 ft (1.2 m) dryer cord, 4-wire, 30 amp 6 ft (1.8 m) dryer cord, 4-wire, 30 amp Dryer vent lint brush All-purpose appliance cleaner I.aundry supply storage cart I .fyoustillneedhelpf,ollowtheinstructiobneslow. Beforceallingforassistanocreservicep,leascehec"kTroubleshootiIntmg.a"ysaveyouthe cosot faserviccea[[I .P Gas conversion kit 8577312 W10044609A Drying rack Steam hose...

Use and Care Guide
Page 29
... for travel and transportation for ,'n-warranty service. Major appliances with published installation instructions. 11. If you need it is used in materials or workmanship. After checking "Troubleshooting," section or by a Maytag designated service company. Dealer name Address Phone number Model number Serial number Purchase date Any food loss due to repair or replace appliance light bulbs, air filters or water filters. You must be borne by Maytag. 5. LIMITED WARRANTY For one year from the date...
... for travel and transportation for ,'n-warranty service. Major appliances with published installation instructions. 11. If you need it is used in materials or workmanship. After checking "Troubleshooting," section or by a Maytag designated service company. Dealer name Address Phone number Model number Serial number Purchase date Any food loss due to repair or replace appliance light bulbs, air filters or water filters. You must be borne by Maytag. 5. LIMITED WARRANTY For one year from the date...


