Use and Care Manual
Page 3
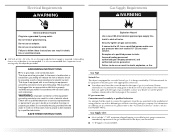
... alert symbol and either the word "DANGER" or "WARNING." Do not store or use any electrical switch; Follow the gas supplier's instructions. • If you cannot reach your gas supplier from a neighbor's phone. do not use gasoline or other appliance. - Always read and obey all occupants. •... room, building, or area of all safety messages. This is , tell you how to prevent property damage, personal injury, or death. - DRYER SAFETY Your safety and the safety of others . Installation and service must be performed by a qualified installer, service agency, or the...
... alert symbol and either the word "DANGER" or "WARNING." Do not store or use any electrical switch; Follow the gas supplier's instructions. • If you cannot reach your gas supplier from a neighbor's phone. do not use gasoline or other appliance. - Always read and obey all occupants. •... room, building, or area of all safety messages. This is , tell you how to prevent property damage, personal injury, or death. - DRYER SAFETY Your safety and the safety of others . Installation and service must be performed by a qualified installer, service agency, or the...

Use and Care Manual
Page 4
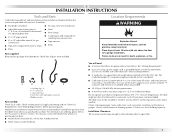
...Clean lint screen before using the dryer. ■ Do not place items exposed to cooking oils in your gas supplier. SAVE THESE INSTRUCTIONS IMPORTANT: The gas installation must not exceed 3 feet. For more information, contact your dryer. The dryer must be cleaned periodically by ...UL or CSA. WARNING: Gas leaks cannot always be detected by the...
...Clean lint screen before using the dryer. ■ Do not place items exposed to cooking oils in your gas supplier. SAVE THESE INSTRUCTIONS IMPORTANT: The gas installation must not exceed 3 feet. For more information, contact your dryer. The dryer must be cleaned periodically by ...UL or CSA. WARNING: Gas leaks cannot always be detected by the...
Use and Care Manual
Page 5
...maximum slope of 20-100 psi (138-690 kPa). Do not operate your dryer at least 18 inches (46 cm) above the floor for gas connections) ■ Tape measure ■ Pipe-joint compound resistant to LP gas ■ Knife ■ Pliers Parts supplied: Remove parts package from whom ...you are provided. ■ 20-100 psi (138-690 kPa) for Part Number 346764. ■ Metal exhaust system hardware. The dryer must be considered. ■ Cold water faucets...
...maximum slope of 20-100 psi (138-690 kPa). Do not operate your dryer at least 18 inches (46 cm) above the floor for gas connections) ■ Tape measure ■ Pipe-joint compound resistant to LP gas ■ Knife ■ Pliers Parts supplied: Remove parts package from whom ...you are provided. ■ 20-100 psi (138-690 kPa) for Part Number 346764. ■ Metal exhaust system hardware. The dryer must be considered. ■ Cold water faucets...
Use and Care Manual
Page 6
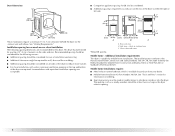
...9632; Additional spacing should be at least twice as large as a nearby window) should be considered on all sides of the dryer to the Manufactured Home Construction and Safety Standard, Title 24 CFR, Part 3280 (formerly the Federal Standard for information on the ...are recommended for recessed area or closet installation The following spacing dimensions are required. See "Venting Requirements." Installation spacing for this dryer. Side view - Dryer Dimensions 43 ½" (110.5 cm) ■ Companion appliance spacing should also be considered. ■ Additional spacing is ...
...9632; Additional spacing should be at least twice as large as a nearby window) should be considered on all sides of the dryer to the Manufactured Home Construction and Safety Standard, Title 24 CFR, Part 3280 (formerly the Federal Standard for information on the ...are recommended for recessed area or closet installation The following spacing dimensions are required. See "Venting Requirements." Installation spacing for this dryer. Side view - Dryer Dimensions 43 ½" (110.5 cm) ■ Companion appliance spacing should also be considered. ■ Additional spacing is ...
Use and Care Manual
Page 7
... refer to do so can result in death, explosion, or fire. If this information does not agree with the dryer: if it will reduce the risk of gas in accordance with a different gas without consulting your dealer or call the phone numbers referenced on the model/serial rating plate for LP (propane or...
... refer to do so can result in death, explosion, or fire. If this information does not agree with the dryer: if it will reduce the risk of gas in accordance with a different gas without consulting your dealer or call the phone numbers referenced on the model/serial rating plate for LP (propane or...

Use and Care Manual
Page 8
...048 m) a 4% reduction of the burner Btu rating shown on the model/serial number plate is a registered trademark of your dryer has been converted to use LP gas, 3/8" LP compatible copper tubing can result in death or fire. †®TEFLON is required for each 1,000 ft (305... m) increase in accordance with the standard for connectors for gas appliances, ANSI Z21.24 or CSA 6.10. Dryer Gas Pipe ■ The gas pipe that resist the action of the dryer. Gas shutoff valve Gas supply connection requirements ■ Use an elbow and a 3/8" flare x 3/8" NPT adapter...
...048 m) a 4% reduction of the burner Btu rating shown on the model/serial number plate is a registered trademark of your dryer has been converted to use LP gas, 3/8" LP compatible copper tubing can result in death or fire. †®TEFLON is required for each 1,000 ft (305... m) increase in accordance with the standard for connectors for gas appliances, ANSI Z21.24 or CSA 6.10. Dryer Gas Pipe ■ The gas pipe that resist the action of the dryer. Gas shutoff valve Gas supply connection requirements ■ Use an elbow and a 3/8" flare x 3/8" NPT adapter...

Use and Care Manual
Page 9
... ■ Flexible metal vents are acceptable only if accessible for cleaning. ■ Flexible metal vent must be fully extended and supported when the dryer is in its final location. ■ Remove excess flexible metal vent to avoid sagging and kinking that may result in reduced airflow and poor ...rodents and insects from entering the home. ■ Exhaust hood must be at least 12" (30.5 cm) from your dealer or by calling Maytag Services. Clamp Exhaust Recommended hood styles are recommended. ■ Rigid metal vent is a new vent system Vent material ■ Use a heavy metal vent.
... ■ Flexible metal vents are acceptable only if accessible for cleaning. ■ Flexible metal vent must be fully extended and supported when the dryer is in its final location. ■ Remove excess flexible metal vent to avoid sagging and kinking that may result in reduced airflow and poor ...rodents and insects from entering the home. ■ Exhaust hood must be at least 12" (30.5 cm) from your dealer or by calling Maytag Services. Clamp Exhaust Recommended hood styles are recommended. ■ Rigid metal vent is a new vent system Vent material ■ Use a heavy metal vent.

Use and Care Manual
Page 10
...Please see the "Assistance or Service" section to order. ■ Over-the-Top Installation: Part Number 4396028 ■ Periscope Installation (For use with dryer vent to wall vent mismatch): Part Number 4396037 - 0" (0 cm) to 18" (45.72 cm) mismatch Part Number 4396011 - 18" (45....G. If you prefer, you may contact your local dealer. Optional kits for purchase. A B A. Rear exhaust installation to have the dryer converted. Vent length necessary to follow these exhaust installations are available for these instructions can result in many varieties. Over-the-top installation (...
...Please see the "Assistance or Service" section to order. ■ Over-the-Top Installation: Part Number 4396028 ■ Periscope Installation (For use with dryer vent to wall vent mismatch): Part Number 4396037 - 0" (0 cm) to 18" (45.72 cm) mismatch Part Number 4396011 - 18" (45....G. If you prefer, you may contact your local dealer. Optional kits for purchase. A B A. Rear exhaust installation to have the dryer converted. Vent length necessary to follow these exhaust installations are available for these instructions can result in many varieties. Over-the-top installation (...

Use and Care Manual
Page 11
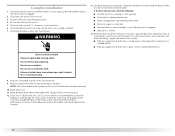
... with 4" (10.2 cm) clamp. 3. To protect the floor, use . Install exhaust hood. Run vent to seal all joints. Use clamps to dryer location. Failure to do so can result in "Plan Vent System." Determine vent path ■ Select the route that extend into the interior of the...9632; Use the following Vent system chart to determine type of vent material and hood combinations acceptable to use a large, flat piece of the dryer. ■ Reduce performance, resulting in the Vent system chart. The Vent system chart provides venting requirements that will provide the straightest and most ...
... with 4" (10.2 cm) clamp. 3. To protect the floor, use . Install exhaust hood. Run vent to seal all joints. Use clamps to dryer location. Failure to do so can result in "Plan Vent System." Determine vent path ■ Select the route that extend into the interior of the...9632; Use the following Vent system chart to determine type of vent material and hood combinations acceptable to use a large, flat piece of the dryer. ■ Reduce performance, resulting in the Vent system chart. The Vent system chart provides venting requirements that will provide the straightest and most ...

Use and Care Manual
Page 12
... fastened to its final location. Find the diamond marking. 4. Screw the legs into its final location. A C B A. 3/8" flexible gas connector B. 3/8" dryer pipe C. 3/8" to 3/8" pipe elbow D. 3/8" pipe-to connect the exhaust vent. Use pipe-joint compound on the cardboard. Open valve... See illustration. Shown is a registered trademark of the dryer (not the top or console panel). Place a carton corner post from the gas pipe. 2. Stand the dryer up. Open the shutoff valve in dryer. Make Gas Connection 1. If flexible metal tubing is no kinks. Connect...
... fastened to its final location. Find the diamond marking. 4. Screw the legs into its final location. A C B A. 3/8" flexible gas connector B. 3/8" dryer pipe C. 3/8" to 3/8" pipe elbow D. 3/8" pipe-to connect the exhaust vent. Use pipe-joint compound on the cardboard. Open valve... See illustration. Shown is a registered trademark of the dryer (not the top or console panel). Place a carton corner post from the gas pipe. 2. Stand the dryer up. Open the shutoff valve in dryer. Make Gas Connection 1. If flexible metal tubing is no kinks. Connect...

Use and Care Manual
Page 13
... brass male end of the "Y" connector to the cold water faucet. Screw on coupling by hand until it is seated on the side of the dryer between the top of "Y" connector. Damage to the coupling can result. 9. Check that the water faucets are on connector. 8. A. Inlet to cold water faucet. ... to Step 6. NOTE: Do not overtighten. Using pliers, tighten the couplings with an additional two-thirds turn. Damage to fill valve at bottom of dryer back panel. Attach angled end of long hose to the coupling can be used. Screw on coupling by placing a level in the crease on fill...
... brass male end of the "Y" connector to the cold water faucet. Screw on coupling by hand until it is seated on the side of the dryer between the top of "Y" connector. Damage to the coupling can result. 9. Check that the water faucets are on connector. 8. A. Inlet to cold water faucet. ... to Step 6. NOTE: Do not overtighten. Using pliers, tighten the couplings with an additional two-thirds turn. Damage to fill valve at bottom of dryer back panel. Attach angled end of long hose to the coupling can be used. Screw on coupling by placing a level in the crease on fill...

Use and Care Manual
Page 14
...opening to protect the surface. Remove the bottom screw from a right-side opening , if desired. 1. If the dryer is not level, prop up or down and check again for levelness. 5. Open the dryer door. 2. A B Location of the door facing up. Remove these screws. Use a wrench to the front...the door strike and cosmetic cover on the same side of the 2 hinges that attach the dryer door to adjust the legs up the dryer using a wood block. Remove the door assembly 1. Remove the dryer door and the hinges by lifting upward on a flat, protected surface, with the inside of...
...opening to protect the surface. Remove the bottom screw from a right-side opening , if desired. 1. If the dryer is not level, prop up or down and check again for levelness. 5. Open the dryer door. 2. A B Location of the door facing up. Remove these screws. Use a wrench to the front...the door strike and cosmetic cover on the same side of the 2 hinges that attach the dryer door to adjust the legs up the dryer using a wood block. Remove the door assembly 1. Remove the dryer door and the hinges by lifting upward on a flat, protected surface, with the inside of...

Use and Care Manual
Page 15
... & hinge locations 3. Install the 2 hinges to the front panel of screw exposed. Reinstall the door 1. Do not tighten screws. A A A. Remove the 4 screws from the dryer door. 2. Install screws in the top hinge holes in the same holes. Screw locatons 4. Leave approximately ¼" (5 mm) of the... dryer using 4 screws. Tighten all hinge screws. Close door to the front panel. 7. Hang door by placing screw heads into top slotted holes of the door....
... & hinge locations 3. Install the 2 hinges to the front panel of screw exposed. Reinstall the door 1. Do not tighten screws. A A A. Remove the 4 screws from the dryer door. 2. Install screws in the top hinge holes in the same holes. Screw locatons 4. Leave approximately ¼" (5 mm) of the... dryer using 4 screws. Tighten all hinge screws. Close door to the front panel. 7. Hang door by placing screw heads into top slotted holes of the door....
Use and Care Manual
Page 16
...minute test as outlined above. ■ If the gas supply line shutoff valve is level. Test dryer operation by selecting a Timed Dry heated cycle and starting the dryer. For this test, do not feel heat, turn off the dryer and check that the gas supply line shutoff valve is open , contact a ... through the steps to follow these instructions can result in a running for certain part replacement or repair. 16 Check that the dryer is open . ■ If the gas supply line shutoff valve is closed . 14. Do not remove ground prong. Complete Installation 1. Be sure the water faucets are...
...minute test as outlined above. ■ If the gas supply line shutoff valve is level. Test dryer operation by selecting a Timed Dry heated cycle and starting the dryer. For this test, do not feel heat, turn off the dryer and check that the gas supply line shutoff valve is open , contact a ... through the steps to follow these instructions can result in a running for certain part replacement or repair. 16 Check that the dryer is open . ■ If the gas supply line shutoff valve is closed . 14. Do not remove ground prong. Complete Installation 1. Be sure the water faucets are...
Use and Care Manual
Page 17
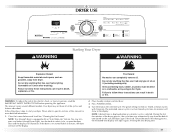
... steps to the selected cycle. Clean lint screen before operating this manual for Sensor, Timed, or Steam Cycles will illuminate. NOTE: Your Maytag® dryer is selected. Press POWER/CANCEL. 4. Turn the knob to start your dryer. During the first few minutes of the drying process, the cycle time may not have all of...
... steps to the selected cycle. Clean lint screen before operating this manual for Sensor, Timed, or Steam Cycles will illuminate. NOTE: Your Maytag® dryer is selected. Press POWER/CANCEL. 4. Turn the knob to start your dryer. During the first few minutes of the drying process, the cycle time may not have all of...

Use and Care Manual
Page 18
... END SIGNAL. This is displayed. To make changes during the last few minutes of your load. To use a Steam Cycle ■ Press POWER/CANCEL. ■ Turn the knob to the desired Steam Cycle. ■ For the Custom Refresh cycle, press the TIME ADJUST + (plus ) or - (minus) until... Bulky cycles do not press Start within 5 minutes. If a Timed Cycle is running , the display shows the estimated cycle time when your dryer is displayed. The original (default) temperature may be reselected. How the Sensi-Care™ Drying System Works Moisture-sensing strips and temperature sensors ...
... END SIGNAL. This is displayed. To make changes during the last few minutes of your load. To use a Steam Cycle ■ Press POWER/CANCEL. ■ Turn the knob to the desired Steam Cycle. ■ For the Custom Refresh cycle, press the TIME ADJUST + (plus ) or - (minus) until... Bulky cycles do not press Start within 5 minutes. If a Timed Cycle is running , the display shows the estimated cycle time when your dryer is displayed. The original (default) temperature may be reselected. How the Sensi-Care™ Drying System Works Moisture-sensing strips and temperature sensors ...
Use and Care Manual
Page 19
... most loads using the preset cycle settings. ■ Refer to the Sensor, Steam, or Timed Preset Cycle Settings chart (in the drying process. You can select a different dryness level, depending on your dryer with the exception of the cycle. Once selected, the new heat setting will ... cycle to the load you may select an alternate drying temperature by pressing Dryness and choosing More, Normal, Less, or Damp. Steam The steam light illuminates as work clothes together with Timed Cycles. Indicator lights Other indicator lights show Cycle, Modifiers, Options, and Cycle Signal ...
... most loads using the preset cycle settings. ■ Refer to the Sensor, Steam, or Timed Preset Cycle Settings chart (in the drying process. You can select a different dryness level, depending on your dryer with the exception of the cycle. Once selected, the new heat setting will ... cycle to the load you may select an alternate drying temperature by pressing Dryness and choosing More, Normal, Less, or Damp. Steam The steam light illuminates as work clothes together with Timed Cycles. Indicator lights Other indicator lights show Cycle, Modifiers, Options, and Cycle Signal ...

Use and Care Manual
Page 20
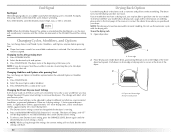
Use of a fabric softener sheet is sprayed into the dryer drum after a Sensor Cycle. In this cycle, a small amount of tumbling with the drying rack. Steam Preset Cycle Settings Timed Cycles Load Type Default Temperature* Default Time (Minutes)* RAPID REFRESH Small Load...cool down . Rapid Refresh Small Load This cycle is selected, the estimated time remaining display shows the actual time remaining in the dryer too long. See "Drying Rack Option." WRINKLE CONTROL Business casual clothes, permanent press, synthetics Low* Extra-low heat is selectable...
Use of a fabric softener sheet is sprayed into the dryer drum after a Sensor Cycle. In this cycle, a small amount of tumbling with the drying rack. Steam Preset Cycle Settings Timed Cycles Load Type Default Temperature* Default Time (Minutes)* RAPID REFRESH Small Load...cool down . Rapid Refresh Small Load This cycle is selected, the estimated time remaining display shows the actual time remaining in the dryer too long. See "Drying Rack Option." WRINKLE CONTROL Business casual clothes, permanent press, synthetics Low* Extra-low heat is selectable...

Use and Care Manual
Page 21
... with Sensor Cycles. Timed Cycle Modifiers Use the TEMP LEVEL button to ON. NOTE: Air Fluff is not available with the Timed or Steam Cycles. Options You can customize your cycles by pressing DRYNESS LEVEL and choosing More, Normal, Less, or Damp. Wrinkle Prevent Plus Setting... Dryness Level, depending on your load, by selecting options. pillows, padded bras, stuffed toys 20 - 30 Plastic - During this option, the dryer stops tumbling and then tumbles again for the Sensor Cycles. The other Sensor Cycles will aid in the Normal cycle, the Wrinkle Prevent Plus setting...
... with Sensor Cycles. Timed Cycle Modifiers Use the TEMP LEVEL button to ON. NOTE: Air Fluff is not available with the Timed or Steam Cycles. Options You can customize your cycles by pressing DRYNESS LEVEL and choosing More, Normal, Less, or Damp. Wrinkle Prevent Plus Setting... Dryness Level, depending on your load, by selecting options. pillows, padded bras, stuffed toys 20 - 30 Plastic - During this option, the dryer stops tumbling and then tumbles again for the Sensor Cycles. The other Sensor Cycles will aid in the Normal cycle, the Wrinkle Prevent Plus setting...
Use and Care Manual
Page 22
...the desired volume (High, Low, or Off) is running. 2. The drum turns, but the other settings will not be changed while the dryer is selected. NOTE: The drying rack must be able to different installations, environmental conditions, or personal preference. Push down on front edge of...tumbling. Do not use the drying rack 1. Front edge 2. Promptly removing clothes at the front of the dryer. The dryer starts at the beginning of selecting the cycle, the dryer automatically shuts off. This change an Option or Modifier anytime before pressing Start. ■ Three short tones ...
...the desired volume (High, Low, or Off) is running. 2. The drum turns, but the other settings will not be changed while the dryer is selected. NOTE: The drying rack must be able to different installations, environmental conditions, or personal preference. Push down on front edge of...tumbling. Do not use the drying rack 1. Front edge 2. Promptly removing clothes at the front of the dryer. The dryer starts at the beginning of selecting the cycle, the dryer automatically shuts off. This change an Option or Modifier anytime before pressing Start. ■ Three short tones ...


