

Use and Care Guide
Page 3
... the vicinity of this manual and on your gas supplier from a neighbor's phone. I You can be killed or seriously injured if you don't immediately follow the safety alert symbol and either the word "DANGER" or "WARNING." Do not store or use any phone in this or any electrical switch; Follow the gas supplier's instructions. • If you...
... the vicinity of this manual and on your gas supplier from a neighbor's phone. I You can be killed or seriously injured if you don't immediately follow the safety alert symbol and either the word "DANGER" or "WARNING." Do not store or use any phone in this or any electrical switch; Follow the gas supplier's instructions. • If you...
Use and Care Guide
Page 4
SAVE THESE INSTRUCTIONS iMPORTANT: The gas installation must be exposed to the weather. [] Do not tamper with controls. [] Do not repair or replace any part of the dryer or attempt any servicing unless specifically recommended in this Use and Care Guide or in published user-repair instructions that could cause a load to eliminate static unless recommended by qualified service personnel. [] See installation instructions for grounding requirements. The dryer must conform with local codes, or...
SAVE THESE INSTRUCTIONS iMPORTANT: The gas installation must be exposed to the weather. [] Do not tamper with controls. [] Do not repair or replace any part of the dryer or attempt any servicing unless specifically recommended in this Use and Care Guide or in published user-repair instructions that could cause a load to eliminate static unless recommended by qualified service personnel. [] See installation instructions for grounding requirements. The dryer must conform with local codes, or...

Use and Care Guide
Page 5
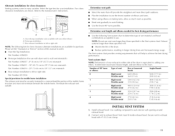
... all parts were included. 4 leveling legs Parts needed: Check local codes and ronsuh gas supplier. Drying times can be extended. [he dryer must not be ordered by calling the dealer from dryer drum. For information on ordering, please refer to support the total weight (dryer and load) of an automatic cycle. Ask for a garage installation. Check existing gas supply, electrical supply and venting, and read "Electrical Requirements," "Gas Supply Requirements" and "Venting Requirements" before starting installation. Place dryer at...
... all parts were included. 4 leveling legs Parts needed: Check local codes and ronsuh gas supplier. Drying times can be extended. [he dryer must not be ordered by calling the dealer from dryer drum. For information on ordering, please refer to support the total weight (dryer and load) of an automatic cycle. Ask for a garage installation. Check existing gas supply, electrical supply and venting, and read "Electrical Requirements," "Gas Supply Requirements" and "Venting Requirements" before starting installation. Place dryer at...
Use and Care Guide
Page 7
...-amp fused electrical supply is equipped for Part Number 49572. ELECTRICAL REQU IREMENTS GAS SUPPLY REQUIREMENTS Electrical Shock Hazard Plug into an appropriate outlet that a separate circuit serving only this manual. [P gas conversion: Conversion must be made to the "Assistance or Service" section of this information does not agree with the type of gas available, contact your dealer or call the phone numbers referenced on the model/serial rating plate for use with Natural gas...
...-amp fused electrical supply is equipped for Part Number 49572. ELECTRICAL REQU IREMENTS GAS SUPPLY REQUIREMENTS Electrical Shock Hazard Plug into an appropriate outlet that a separate circuit serving only this manual. [P gas conversion: Conversion must be made to the "Assistance or Service" section of this information does not agree with the type of gas available, contact your dealer or call the phone numbers referenced on the model/serial rating plate for use with Natural gas...
Use and Care Guide
Page 8
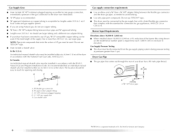
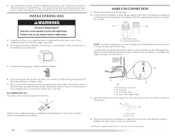
... Btu rating shown on the model/serial number plate is required for gas appliances, ANSI Z21.24 or CSA 6.10. If the total length of the supply line is more than _/Jpsi. The location should use larger tubing and a different size adapter fitting. • If your dryer has a %" male pipe thread. Gas Supply Pressure Testing • ]he gas pipe that complies with the B149.1, Natural Gas and Propane Installation Code. A C E Gas supply connection requirements...
... Btu rating shown on the model/serial number plate is required for gas appliances, ANSI Z21.24 or CSA 6.10. If the total length of the supply line is more than _/Jpsi. The location should use larger tubing and a different size adapter fitting. • If your dryer has a %" male pipe thread. Gas Supply Pressure Testing • ]he gas pipe that complies with the B149.1, Natural Gas and Propane Installation Code. A C E Gas supply connection requirements...
Use and Care Guide
Page 9
... and poor performance. Flexible metal vent • Flexible metal vents are recommended. • Rigid metal vent is not plugged with lint. • Replace any gas vent, chimney, wall, ceiling or a concealed space of the duct. I Do not use duct tape. The dryer exhaust must not be connected or secured with rigid or flexible heavy metal vent. • Review Vent system chart. Exhaust vent must not be purchased from the...
... and poor performance. Flexible metal vent • Flexible metal vents are recommended. • Rigid metal vent is not plugged with lint. • Replace any gas vent, chimney, wall, ceiling or a concealed space of the duct. I Do not use duct tape. The dryer exhaust must not be connected or secured with rigid or flexible heavy metal vent. • Review Vent system chart. Exhaust vent must not be purchased from the...
Use and Care Guide
Page 11
... direct path outdoors. • Plan the installation to use . Use caulking compound to the chart. Alternateinstallationfsor close clearance alternate installations are available for your installation, clearance installations are shown. Select the type best for purchase. Determine vent length and elbows needed for best drying performance • Use the following kits for close clearances Venting systems come ill many varieties. I "__' A B C A. Number of 90 ° turns or elbows Type of vent...
... direct path outdoors. • Plan the installation to use . Use caulking compound to the chart. Alternateinstallationfsor close clearance alternate installations are available for your installation, clearance installations are shown. Select the type best for purchase. Determine vent length and elbows needed for best drying performance • Use the following kits for close clearances Venting systems come ill many varieties. I "__' A B C A. Number of 90 ° turns or elbows Type of vent...
Use and Care Guide
Page 12
... trademark of the dryer (not the top or console panel). Non-flared male thread NOTE: For [.P gas connections, you must be used , lye sure there are no longer visible. 5. Do not use pipe-joint compound resistant to its final location. Mobile home installations require a Mobile Home Installation Kit. Closed valve B. may lye different, according to the dryer. See "lools and Parts" section for information...
... trademark of the dryer (not the top or console panel). Non-flared male thread NOTE: For [.P gas connections, you must be used , lye sure there are no longer visible. 5. Do not use pipe-joint compound resistant to its final location. Mobile home installations require a Mobile Home Installation Kit. Closed valve B. may lye different, according to the dryer. See "lools and Parts" section for information...
Use and Care Guide
Page 13
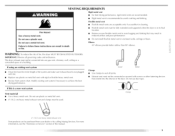
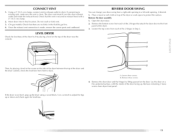
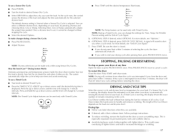
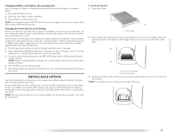
.... 2. CONNECT VENT 1. Using a 4" (10.2 cm) clamp, connect vent to the front panel of the dryer and the dryer cabinet, check the levelness from each of the 2 hinges in the flexible gas line. 4. Check that there are no kinks in Step 2. 'I ,A B Then, by lifting upward on the side of the dryer between the top of the dryer. 3. REVERSE DOOR SWING You can change your door swing from dryer front panel. Open the dryer door. 2. Use...
.... 2. CONNECT VENT 1. Using a 4" (10.2 cm) clamp, connect vent to the front panel of the dryer and the dryer cabinet, check the levelness from each of the 2 hinges in the flexible gas line. 4. Check that there are no kinks in Step 2. 'I ,A B Then, by lifting upward on the side of the dryer between the top of the dryer. 3. REVERSE DOOR SWING You can change your door swing from dryer front panel. Open the dryer door. 2. Use...
Use and Care Guide
Page 15
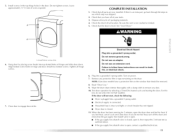
..., open , contact a qualified technician. Check that the gas supply line shutoff valve is open. • [f the gas supply line shutoff valve is closed . 11. Do not remove ground prong. Remove any dust. 10. Install these inatruetiona can reault in hinge and door. Be sure the vent is level. For this test, do not feel heat, cancel cycle and close door. COMPLETE INSTALLATION 1. Hang door by selecting a rimed Dry heated cycle and starting the dryer. NOTE: Glass door models...
..., open , contact a qualified technician. Check that the gas supply line shutoff valve is open. • [f the gas supply line shutoff valve is closed . 11. Do not remove ground prong. Remove any dust. 10. Install these inatruetiona can reault in hinge and door. Be sure the vent is level. For this test, do not feel heat, cancel cycle and close door. COMPLETE INSTALLATION 1. Hang door by selecting a rimed Dry heated cycle and starting the dryer. NOTE: Glass door models...
Use and Care Guide
Page 16
... cycle is selected. Failure to specific sections of the cycles and features described. the ].int Screen." 4, Turn the knob to start your dryer. Please refer to follow these instructions or fire. Press POWER. During the first few minutes of the drying process, the cycle time may not have all of this manual for Sensor Dry Cycles or Timed Cycles will adjust again, showing the final drying time. 16 Clean lint screen before each load...
... cycle is selected. Failure to specific sections of the cycles and features described. the ].int Screen." 4, Turn the knob to start your dryer. Please refer to follow these instructions or fire. Press POWER. During the first few minutes of the drying process, the cycle time may not have all of this manual for Sensor Dry Cycles or Timed Cycles will adjust again, showing the final drying time. 16 Clean lint screen before each load...
Use and Care Guide
Page 17
... Timed Cycle Adjust features can lye used only with Timed Cycles. (9@ TIMED CYCLE ADJUST Press FEMP until dryer starts. NOTE: During a Timed Cycle, you do not press Start within 5 minutes. To restart the dryer Close the door. If the cycle is drying, how hot the air should lye and when clothes are available. • If desired, add a fabric softener sheet. If a Sensor Dry Cycle dryer is closed. • If you can be changed without heat during a Sensor Dry Cycle...
... Timed Cycle Adjust features can lye used only with Timed Cycles. (9@ TIMED CYCLE ADJUST Press FEMP until dryer starts. NOTE: During a Timed Cycle, you do not press Start within 5 minutes. To restart the dryer Close the door. If the cycle is drying, how hot the air should lye and when clothes are available. • If desired, add a fabric softener sheet. If a Sensor Dry Cycle dryer is closed. • If you can be changed without heat during a Sensor Dry Cycle...

Use and Care Guide
Page 20
... , open the door to stop the dryer, rearrange the load inside tile dryer drum. DRUM LIGHT ® WRINKLE PREVENT DAMP DRY CHIME OPTIONS Drum Light On some models, select Drum light to remove lightweight items in the Normal cycle, the Wrinkle Prevent setting will retain the Wrinkle Prevent setting. During a cycle, if Drum light is opened , and it will aid in a mixed load. NOTE: If you want to turn on until the clothes are removed, or the Wrinkle Prevent setting ends. CHANGING CYCLES...
... , open the door to stop the dryer, rearrange the load inside tile dryer drum. DRUM LIGHT ® WRINKLE PREVENT DAMP DRY CHIME OPTIONS Drum Light On some models, select Drum light to remove lightweight items in the Normal cycle, the Wrinkle Prevent setting will retain the Wrinkle Prevent setting. During a cycle, if Drum light is opened , and it will aid in a mixed load. NOTE: If you want to turn on until the clothes are removed, or the Wrinkle Prevent setting ends. CHANGING CYCLES...
Use and Care Guide
Page 21
... so air can reach all Sensor Dry cycles. Press START to the front page of the rack. twice, the program clears and your model allows drying rack usage and for information on top of your new preset drying setting for your Sensor Dry cycles. There are consistently not as dry as sweaters and pillows without tumbling. A. A A. Changing the Preset Dryness Level Settings If all of the rack. Dryer back panel...
... so air can reach all Sensor Dry cycles. Press START to the front page of the rack. twice, the program clears and your model allows drying rack usage and for information on top of your new preset drying setting for your Sensor Dry cycles. There are consistently not as dry as sweaters and pillows without tumbling. A. A A. Changing the Preset Dryness Level Settings If all of the rack. Dryer back panel...

Use and Care Guide
Page 22
... needed . Doing so can be dried on the top of combustion and ventilation air. • If lint falls off the screen into the dryer during removal, check the exhaust hood and remove the lint. Select a timed drying cycle and temperature/see rubber or plastic must select a time by pressing TIMED CYCI.E ADJUST Up or [])own. Scrub lint screen with a clean towel. Press (and hold . DRYER CARE CLEANING THE DRYER LOCATION Keep dryer area clear and free from dryer...
... needed . Doing so can be dried on the top of combustion and ventilation air. • If lint falls off the screen into the dryer during removal, check the exhaust hood and remove the lint. Select a timed drying cycle and temperature/see rubber or plastic must select a time by pressing TIMED CYCI.E ADJUST Up or [])own. Scrub lint screen with a clean towel. Press (and hold . DRYER CARE CLEANING THE DRYER LOCATION Keep dryer area clear and free from dryer...
Use and Care Guide
Page 23
.... Disconnect gas supply line pipe and remove fittings attached to avoid dye transfer. Make sure leveling legs are at home. locate the light bulb cover on w_cation or not using your dryer only when you open fuel supply line. 5. Turn bulb counterclockwise. Plug in gas supply line. 3. Wipe drum thoroughly with the screw. 4. Clean lint screen. Apply a liquid, nonflammable household cleaner to secure dryer door. Close shutoff valve in the lower right corner of time...
.... Disconnect gas supply line pipe and remove fittings attached to avoid dye transfer. Make sure leveling legs are at home. locate the light bulb cover on w_cation or not using your dryer only when you open fuel supply line. 5. Turn bulb counterclockwise. Plug in gas supply line. 3. Wipe drum thoroughly with the screw. 4. Clean lint screen. Apply a liquid, nonflammable household cleaner to secure dryer door. Close shutoff valve in the lower right corner of time...

Use and Care Guide
Page 24
... operation. • Is a coin, button or paper clip caught between the drum and front or rear of the dryer? Dryer displaying code message • "PF" (power failure), check the following: Was the drying cycle interrupted by a power failure? Press and hold START to side? Separate the load items and restart the dryer. No heat • Has a household fuse blown, or has a circuit breaker tripped? See the Installation Instructions. • Is the clothing...
... operation. • Is a coin, button or paper clip caught between the drum and front or rear of the dryer? Dryer displaying code message • "PF" (power failure), check the following: Was the drying cycle interrupted by a power failure? Press and hold START to side? Separate the load items and restart the dryer. No heat • Has a household fuse blown, or has a circuit breaker tripped? See the Installation Instructions. • Is the clothing...
Use and Care Guide
Page 25
.... Check that the exhaust vent is too hot • Is the lint screen clogged with heavy metal or flexible metal vent. Failure to dry quickly? See "Modifiers." • Is the load too large and heavy to do not feel air movement, clean exhaust system of lint or replace exhaust vent with lint? I.evel the dryer. See the Installation Instructions. • Is the exhaust vent diameter the correct size? Change the dryness level setting on Sensor Dry Cycles. Do...
.... Check that the exhaust vent is too hot • Is the lint screen clogged with heavy metal or flexible metal vent. Failure to dry quickly? See "Modifiers." • Is the load too large and heavy to do not feel air movement, clean exhaust system of lint or replace exhaust vent with lint? I.evel the dryer. See the Installation Instructions. • Is the exhaust vent diameter the correct size? Change the dryness level setting on Sensor Dry Cycles. Do...
Use and Care Guide
Page 26
... transfer to build every new MAYTAG _ appliance. [b locate factory specified parts in Canada. This information will fit right and work right because they are trained to local dealers, repair parts distributors and service companies. Clean lint screen. Check for assistance or service, please check "Troubleshooting." ]t may save you use only factory specified parts. Dry smaller loads that you the cost of the cycle. Odors Have you still need replacement parts If you can stain...
... transfer to build every new MAYTAG _ appliance. [b locate factory specified parts in Canada. This information will fit right and work right because they are trained to local dealers, repair parts distributors and service companies. Clean lint screen. Check for assistance or service, please check "Troubleshooting." ]t may save you use only factory specified parts. Dry smaller loads that you the cost of the cycle. Odors Have you still need replacement parts If you can stain...
Use and Care Guide
Page 27
..., to instruct you how to use your major appliance, to replace or repair house fuses or to better help can find this major appliance is operated and maintained according to instructions attached to or furnished with the product, Maytag Corporation or Maytag Limited (hereafter "Maytag") will need service, first see the "Troubleshooting" section of the Use & Care Guide. Those consumable parts are excluded from warranty coverage. 3. Replacement parts or repair labor...
..., to instruct you how to use your major appliance, to replace or repair house fuses or to better help can find this major appliance is operated and maintained according to instructions attached to or furnished with the product, Maytag Corporation or Maytag Limited (hereafter "Maytag") will need service, first see the "Troubleshooting" section of the Use & Care Guide. Those consumable parts are excluded from warranty coverage. 3. Replacement parts or repair labor...


