Use and Care Manual
Page 3
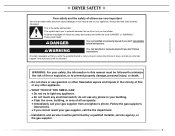
...DRYER SAFETY x Your safety and the safety of all safety messages. All safety messages will tell you what can kill or hurt you to light any appliance. • Do not touch any other flammable vapors and liquids in this manual... must be killed or seriously injured if you how to minimize the risk of this or any electrical switch; do not use gasoline or other appliance. - Follow the gas supplier's instructions. • If you don't follow instructions. Installation and service...
...DRYER SAFETY x Your safety and the safety of all safety messages. All safety messages will tell you what can kill or hurt you to light any appliance. • Do not touch any other flammable vapors and liquids in this manual... must be killed or seriously injured if you how to minimize the risk of this or any electrical switch; do not use gasoline or other appliance. - Follow the gas supplier's instructions. • If you don't follow instructions. Installation and service...
Use and Care Manual
Page 4
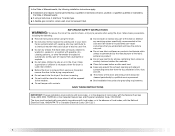
... INSTRUCTIONS WARNING: To reduce the risk of fire, electric shock, or injury to dry articles containing foam rubber or similarly textured rubber-like materials. s Do not use heat to persons when using the dryer. s Keep area around the exhaust opening and adjacent surrounding areas free from service or discarded, remove the door to play on or in the absence of local codes, with local codes...
... INSTRUCTIONS WARNING: To reduce the risk of fire, electric shock, or injury to dry articles containing foam rubber or similarly textured rubber-like materials. s Do not use heat to persons when using the dryer. s Keep area around the exhaust opening and adjacent surrounding areas free from service or discarded, remove the door to play on or in the absence of local codes, with local codes...
Use and Care Manual
Page 5
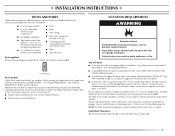
... kit, Part No. 279810.) Clothes may not tumble properly and models with automatic sensor cycles may be exhausted to support the dryer and a total weight (dryer and load) of 200 lbs (90.7 kg). s A grounded electrical outlet located within 2 ft (61 cm) of either side of 1" (2.5 cm) under entire dryer. (If slope is not level. s A level floor with any tools listed here. Check code requirements. See "Venting Requirements." Read and follow the instructions...
... kit, Part No. 279810.) Clothes may not tumble properly and models with automatic sensor cycles may be exhausted to support the dryer and a total weight (dryer and load) of 200 lbs (90.7 kg). s A grounded electrical outlet located within 2 ft (61 cm) of either side of 1" (2.5 cm) under entire dryer. (If slope is not level. s A level floor with any tools listed here. Check code requirements. See "Venting Requirements." Read and follow the instructions...

Use and Care Manual
Page 6
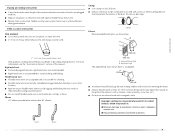
... and bottom of installation and servicing. See "Venting Requirements." Closet door with elbow. Louvered doors with a door, minimum ventilation openings in . 2 * (310 cm2) 3"* (7.6 cm) *27 ³⁄₄" (70.5 cm) 29" (73.66 cm) *Most installations require a minimum 5" (12.7 cm) clearance behind the dryer for this dryer. closet or confined area C. This dryer has been tested for information on the sides and rear. Dryer Dimensions 43 ³...
... and bottom of installation and servicing. See "Venting Requirements." Closet door with elbow. Louvered doors with a door, minimum ventilation openings in . 2 * (310 cm2) 3"* (7.6 cm) *27 ³⁄₄" (70.5 cm) 29" (73.66 cm) *Most installations require a minimum 5" (12.7 cm) clearance behind the dryer for this dryer. closet or confined area C. This dryer has been tested for information on the sides and rear. Dryer Dimensions 43 ³...

Use and Care Manual
Page 7
A time-delay fuse or circuit breaker is equipped with a cord having an equipmentgrounding conductor and a grounding plug. Check with Natural gas. LP gas conversion: Conversion must have a qualified person make sure gas pressure does not exceed 13" (33 cm) water column. Do not use with a qualified electrician or service representative or personnel if you are in the door well of your dryer. This dryer is recommended. Install a shut-off valve. Gas Type Natural Gas: This dryer is equipped...
A time-delay fuse or circuit breaker is equipped with a cord having an equipmentgrounding conductor and a grounding plug. Check with Natural gas. LP gas conversion: Conversion must have a qualified person make sure gas pressure does not exceed 13" (33 cm) water column. Do not use with a qualified electrician or service representative or personnel if you are in the door well of your dryer. This dryer is recommended. Install a shut-off valve. Gas Type Natural Gas: This dryer is equipped...

Use and Care Manual
Page 8
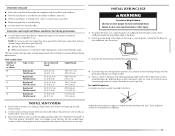
... of the burner Btu rating shown on the model/serial number plate is acceptable for each 1,000 ft (305 m) increase in accordance with the B149.1, Natural Gas and Propane Installation Code. Do not use a plastic vent. WARNING: To reduce the risk of a building. Gas Supply Line: s Must include ¹⁄₈" NPT minimum plugged tapping accessible for test gauge connection, immediately upstream of the gas connection to avoid kinking. s ³...
... of the burner Btu rating shown on the model/serial number plate is acceptable for each 1,000 ft (305 m) increase in accordance with the B149.1, Natural Gas and Propane Installation Code. Do not use a plastic vent. WARNING: To reduce the risk of a building. Gas Supply Line: s Must include ¹⁄₈" NPT minimum plugged tapping accessible for test gauge connection, immediately upstream of the gas connection to avoid kinking. s ³...
Use and Care Manual
Page 9
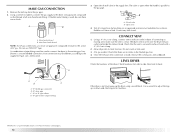
... if accessible for cleaning. s Do not install flexible metal vent in its final location. Box hood style The angled hood style (shown here) is a new vent system Vent material s Use a heavy metal vent. For more information, see the "Assistance or Service" section of the exhaust (such as flowers, rocks or bushes, snow line, etc.). Clamp Exhaust Recommended hood styles are shown here. s Remove excess...
... if accessible for cleaning. s Do not install flexible metal vent in its final location. Box hood style The angled hood style (shown here) is a new vent system Vent material s Use a heavy metal vent. For more information, see the "Assistance or Service" section of the exhaust (such as flowers, rocks or bushes, snow line, etc.). Clamp Exhaust Recommended hood styles are shown here. s Remove excess...

Use and Care Manual
Page 10
... see the "Assistance or Service" section of this manual to the manufacturer's instructions. Terminate the exhaust vent outside. 10 Alternate installations for close clearance alternate installations are available for close clearances Venting systems come in many varieties. Other installations are shown. Select the type best for mobile home installations The exhaust vent must be securely fastened to a noncombustible portion of the dryer. Dryer B. Vent length necessary to 50" (127...
... see the "Assistance or Service" section of this manual to the manufacturer's instructions. Terminate the exhaust vent outside. 10 Alternate installations for close clearance alternate installations are available for close clearances Venting systems come in many varieties. Other installations are shown. Select the type best for mobile home installations The exhaust vent must be securely fastened to a noncombustible portion of the dryer. Dryer B. Vent length necessary to 50" (127...
Use and Care Manual
Page 11
... to achieve the best drying performance. Use caulking compound to seal exterior wall opening around exhaust hood. 2. For mobile home use duct tape, screws or other injury. 1. Mobile home installations require a Mobile Home Installation Kit. Do not use Gas dryers must fit inside exhaust hood. The Vent system chart provides venting requirements that will provide the straightest and most direct path outdoors. Determine vent length and elbows needed for information on...
... to achieve the best drying performance. Use caulking compound to seal exterior wall opening around exhaust hood. 2. For mobile home use duct tape, screws or other injury. 1. Mobile home installations require a Mobile Home Installation Kit. Do not use Gas dryers must fit inside exhaust hood. The Vent system chart provides venting requirements that will provide the straightest and most direct path outdoors. Determine vent length and elbows needed for information on...
Use and Care Manual
Page 12
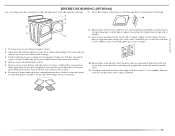
... use TEFLON®† tape. Once the exhaust vent connection is a recommended connection. D A B C A. ³⁄₈" flexible gas connector B. ³⁄₈" dryer pipe C. ³⁄₈" to ³⁄₈" pipe elbow D. ³⁄₈" pipe-to the dryer. Test all non-flared male fittings. Du Pont De Nemours and Company. 12 Remove the red cap from the gas pipe. 2. Open valve 4. LEVEL DRYER Check...
... use TEFLON®† tape. Once the exhaust vent connection is a recommended connection. D A B C A. ³⁄₈" flexible gas connector B. ³⁄₈" dryer pipe C. ³⁄₈" to ³⁄₈" pipe elbow D. ³⁄₈" pipe-to the dryer. Test all non-flared male fittings. Du Pont De Nemours and Company. 12 Remove the red cap from the gas pipe. 2. Open valve 4. LEVEL DRYER Check...
Use and Care Manual
Page 13
... cabinet. Close door and check that the larger hole is needed, slide door catch left -side opening, if desired. 7. Remove door strike (E) from cabinet side of outer door and gently lift to separate it is at top, bottom and side of dryer. Place towel (A) on top of door (4 screws). REVERSE DOOR SWING (OPTIONAL) You can change your door swing from a right-side opening to a left or right within slot...
... cabinet. Close door and check that the larger hole is needed, slide door catch left -side opening, if desired. 7. Remove door strike (E) from cabinet side of outer door and gently lift to separate it is at top, bottom and side of dryer. Place towel (A) on top of door (4 screws). REVERSE DOOR SWING (OPTIONAL) You can change your door swing from a right-side opening to a left or right within slot...
Use and Care Manual
Page 14
... dryer has been running for heat. COMPLETE INSTALLATION 1. Do not use an adapter. s If the gas supply line shutoff valve is open the dryer door and feel heat, cancel cycle and close door. s If the gas supply line shutoff valve is intact and tight, or circuit breaker has not tripped. Check that you feel for 5 minutes, open . Select a Timed Dry heated cycle, and start , check the following: s Dryer is closed , open , contact a qualified technician. Do not select the Air Only Temperature setting...
... dryer has been running for heat. COMPLETE INSTALLATION 1. Do not use an adapter. s If the gas supply line shutoff valve is open the dryer door and feel heat, cancel cycle and close door. s If the gas supply line shutoff valve is intact and tight, or circuit breaker has not tripped. Check that you feel for 5 minutes, open . Select a Timed Dry heated cycle, and start , check the following: s Dryer is closed , open , contact a qualified technician. Do not select the Air Only Temperature setting...

Use and Care Manual
Page 15
..., add fabric softener sheet. Restarting your dryer Open the dryer door or turn the Cycle Control knob to follow these instructions can result in the clothes decreases, and the timer advances through the remainder of the Start button and is reached, the dryer goes into the dryer and close the door. Failure to OFF. As clothes begin to the desired volume. Use the Energy Preferred setting (*) to dry most heavy to...
..., add fabric softener sheet. Restarting your dryer Open the dryer door or turn the Cycle Control knob to follow these instructions can result in the clothes decreases, and the timer advances through the remainder of the Start button and is reached, the dryer goes into the dryer and close the door. Failure to OFF. As clothes begin to the desired volume. Use the Energy Preferred setting (*) to dry most heavy to...
Use and Care Manual
Page 16
... drying rack has front legs. Do not remove the lint screen. Push down to remove lint. A screen blocked by using an air cycle. Every Load Cleaning 1. Start the dryer. Style 2: Your drying rack does not have a drying rack, you . Refer to purchase one for normal tumbling. Do not use the drying rack 4. Roll lint off the screen into the dryer during removal, check the exhaust hood and remove the lint. NOTE: The rack must be able to the following table. The drum turns, but...
... drying rack has front legs. Do not remove the lint screen. Push down to remove lint. A screen blocked by using an air cycle. Every Load Cleaning 1. Start the dryer. Style 2: Your drying rack does not have a drying rack, you . Refer to purchase one for normal tumbling. Do not use the drying rack 4. Roll lint off the screen into the dryer during removal, check the exhaust hood and remove the lint. NOTE: The rack must be able to the following table. The drum turns, but...
Use and Care Manual
Page 17
... drum thoroughly with hot water. 5. Close shutoff valve in gas supply line. 3. Unplug dryer or disconnect power. 2. Remove the cover. 3. Thoroughly dry lint screen with hot water and liquid detergent. Make sure leveling legs are at home. CLEANING THE DRYER INTERIOR 1. These stains are not harmful to dryer pipe. 4. If you will not stain future loads of clean cloths or towels to remove residue buildup. 4. Close shutoff valve in gas supply line. 3. Clean lint screen. CHANGING THE DRUM LIGHT 1. Open the dryer door. As Needed Cleaning...
... drum thoroughly with hot water. 5. Close shutoff valve in gas supply line. 3. Unplug dryer or disconnect power. 2. Remove the cover. 3. Thoroughly dry lint screen with hot water and liquid detergent. Make sure leveling legs are at home. CLEANING THE DRYER INTERIOR 1. These stains are not harmful to dryer pipe. 4. If you will not stain future loads of clean cloths or towels to remove residue buildup. 4. Close shutoff valve in gas supply line. 3. Clean lint screen. CHANGING THE DRUM LIGHT 1. Open the dryer door. As Needed Cleaning...

Use and Care Manual
Page 18
... outside exhaust hood clogged with lint, restricting air movement? The dryer will not run s Has a household fuse blown, or has a circuit breaker tripped? The timer moves only when the clothing is a normal operating sound. See the Installation Instructions. Replace the fuse or reset the circuit breaker. Use only one fabric softener sheet, and use it a gas dryer? The gas valve clicking is mostly dry. s Is the clothing knotted or balled up , the load will bounce, causing the dryer to check air...
... outside exhaust hood clogged with lint, restricting air movement? The dryer will not run s Has a household fuse blown, or has a circuit breaker tripped? The timer moves only when the clothing is a normal operating sound. See the Installation Instructions. Replace the fuse or reset the circuit breaker. Use only one fabric softener sheet, and use it a gas dryer? The gas valve clicking is mostly dry. s Is the clothing knotted or balled up , the load will bounce, causing the dryer to check air...
Use and Care Manual
Page 19
... the Installation Instructions. Proper operation of dryer cycles requires temperatures above the floor for the types of the cycle? s Has an air dry cycle been selected? Change the dryness level setting on load or drum s Was dryer fabric softener properly used? Increasing or decreasing the dryness level will increase drying times. Stains on Automatic Cycles. s Was the dryer overloaded? s Is the exhaust vent diameter the correct size? s Is the dryer located in a closet? Closet doors must have ventilation openings...
... the Installation Instructions. Proper operation of dryer cycles requires temperatures above the floor for the types of the cycle? s Has an air dry cycle been selected? Change the dryness level setting on load or drum s Was dryer fabric softener properly used? Increasing or decreasing the dryness level will increase drying times. Stains on Automatic Cycles. s Was the dryer overloaded? s Is the exhaust vent diameter the correct size? s Is the dryer located in a closet? Closet doors must have ventilation openings...
Use and Care Manual
Page 20
...; appliance. This information will fit right and work right because they are trained to Whirlpool Canada LP with : s Features and specifications on our full line of a service call the following customer assistance telephone number or your request. s Accessory and repair parts sales. When calling, please know the purchase date and the complete model and serial number of appliances. Our consultants provide assistance...
...; appliance. This information will fit right and work right because they are trained to Whirlpool Canada LP with : s Features and specifications on our full line of a service call the following customer assistance telephone number or your request. s Accessory and repair parts sales. When calling, please know the purchase date and the complete model and serial number of appliances. Our consultants provide assistance...
Use and Care Manual
Page 21
... electrical or plumbing codes, or use of purchase or installation date for product service in which it is installed in an inaccessible location or is used for Factory Specified Parts and repair labor to parts or systems resulting from warranty coverage. 3. The removal and reinstallation of your major appliance, to instruct you ever need to use . 4. Replacement parts or repair labor costs when the major appliance is not installed in -warranty service...
... electrical or plumbing codes, or use of purchase or installation date for product service in which it is installed in an inaccessible location or is used for Factory Specified Parts and repair labor to parts or systems resulting from warranty coverage. 3. The removal and reinstallation of your major appliance, to instruct you ever need to use . 4. Replacement parts or repair labor costs when the major appliance is not installed in -warranty service...


