
Use and Care Guide
Page 3
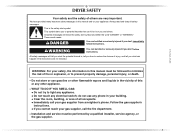
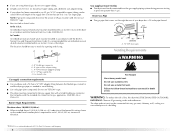
...installer, service agency, or the gas supplier. 3 WARNING: For your appliance. Always read and obey all occupants. • Immediately call your gas supplier, call the fire department. - This is , tell you how to reduce the chance of injury, and tell you and others are not followed. Do not store or use any electrical switch...will follow instructions. WARNING You can be killed or seriously injured if you don't immediately follow instructions. WHAT TO DO IF YOU SMELL GAS: • Do not try to prevent property damage, personal injury, or death. - DRYER SAFETY Your...
...installer, service agency, or the gas supplier. 3 WARNING: For your appliance. Always read and obey all occupants. • Immediately call your gas supplier, call the fire department. - This is , tell you how to reduce the chance of injury, and tell you and others are not followed. Do not store or use any electrical switch...will follow instructions. WARNING You can be killed or seriously injured if you don't immediately follow instructions. WHAT TO DO IF YOU SMELL GAS: • Do not try to prevent property damage, personal injury, or death. - DRYER SAFETY Your...
Use and Care Guide
Page 4
... qualified service personnel. ■ See installation instructions for grounding requirements. In the State of Massachusetts, the following : ■ Read all instructions before or after each load. ■ Keep area around the exhaust opening and adjacent surrounding areas free from the accumulation of lint, dust, and dirt. ■ The interior of the dryer and exhaust vent should be electrically grounded in accordance with local codes, or...
... qualified service personnel. ■ See installation instructions for grounding requirements. In the State of Massachusetts, the following : ■ Read all instructions before or after each load. ■ Keep area around the exhaust opening and adjacent surrounding areas free from the accumulation of lint, dust, and dirt. ■ The interior of the dryer and exhaust vent should be electrically grounded in accordance with local codes, or...
Use and Care Guide
Page 5
... ■ 8" or 10" adjustable wrench (for Part Number 346764. ■ Metal exhaust system hardware. Installation Clearances The location must not be installed or stored in death, explosion, or fire. 4 leveling legs Parts needed: Check local codes and consult gas supplier. At lower temperatures, the dryer might not shut off at the end of the dryer. Check code requirements. Read and follow the instructions provided with a maximum slope of 200...
... ■ 8" or 10" adjustable wrench (for Part Number 346764. ■ Metal exhaust system hardware. Installation Clearances The location must not be installed or stored in death, explosion, or fire. 4 leveling legs Parts needed: Check local codes and consult gas supplier. At lower temperatures, the dryer might not shut off at the end of the dryer. Check code requirements. Read and follow the instructions provided with a maximum slope of 200...

Use and Care Guide
Page 6
... provisions must conform to introduce outside air into the dryer. Recommended spacing should be considered for this dryer. Mobile home installations require: ■ Metal exhaust system hardware, which is suitable for purchase from your dealer. ■ Mobile Home Installation Kit Part Number 346764. See "Venting Requirements." Closet door with equivalent ventilation openings are recommended for the following spacing dimensions are acceptable. ■ Companion appliance spacing...
... provisions must conform to introduce outside air into the dryer. Recommended spacing should be considered for this dryer. Mobile home installations require: ■ Metal exhaust system hardware, which is suitable for purchase from your dealer. ■ Mobile Home Installation Kit Part Number 346764. See "Venting Requirements." Closet door with equivalent ventilation openings are recommended for the following spacing dimensions are acceptable. ■ Companion appliance spacing...
Use and Care Guide
Page 7
.... Securely tighten all local codes and ordinances. Gas Type Natural Gas: This dryer is also recommended that is acceptable for use an adapter. Install a shut-off valve. No attempt shall be plugged into a grounded 3 prong outlet. Examples of electric shock. Do not use with the type of the gas connection to whether the dryer is required. If connected to follow these instructions can result in death, fire, or electrical shock. ■ 120 Volt...
.... Securely tighten all local codes and ordinances. Gas Type Natural Gas: This dryer is also recommended that is acceptable for use an adapter. Install a shut-off valve. No attempt shall be plugged into a grounded 3 prong outlet. Examples of electric shock. Do not use with the type of the gas connection to whether the dryer is required. If connected to follow these instructions can result in death, fire, or electrical shock. ■ 120 Volt...
Use and Care Guide
Page 8
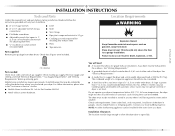
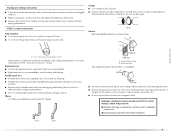
... individual manual shutoff valve be used . A C E B D A. ³⁄₈" flexible gas connector B. ³⁄₈" pipe to avoid kinking. ■ Use only pipe-joint compound. Burner Input Requirements: Elevations above 10,000 ft (3,048 m): ■ When installed above 10,000 ft (3,048 m) a 4% reduction of the burner Btu rating shown on the model/serial number plate is recommended that resist the action of the dryer...
... individual manual shutoff valve be used . A C E B D A. ³⁄₈" flexible gas connector B. ³⁄₈" pipe to avoid kinking. ■ Use only pipe-joint compound. Burner Input Requirements: Elevations above 10,000 ft (3,048 m): ■ When installed above 10,000 ft (3,048 m) a 4% reduction of the burner Btu rating shown on the model/serial number plate is recommended that resist the action of the dryer...
Use and Care Guide
Page 9
... in its final location. ■ Remove excess flexible metal vent to seal all joints. ■ Exhaust vent must be used. Housecleaning problems and health problems. Good Better 9 Flexible metal vent ■ Flexible metal vents are shown here. If using an existing vent system ■ Clean lint from the entire length of the system and make sure exhaust hood is not plugged with lint. ■ Replace any object that may...
... in its final location. ■ Remove excess flexible metal vent to seal all joints. ■ Exhaust vent must be used. Housecleaning problems and health problems. Good Better 9 Flexible metal vent ■ Flexible metal vents are shown here. If using an existing vent system ■ Clean lint from the entire length of the system and make sure exhaust hood is not plugged with lint. ■ Replace any object that may...
Use and Care Guide
Page 10
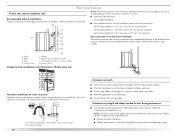
... use . Plan Vent System Choose your exhaust installation type NOTE: The following kits for close clearances Venting systems come in many varieties. Recommended exhaust installations Typical installations vent the dryer from the rear of the dryer. ■ Reduce performance, resulting in the Vent system chart. Determine vent length and elbows needed for close clearance alternate installations are available for your installation. Dryer B. Exhaust outlet Standard exhaust installation with rigid metal or flexible metal vent Alternate installations for best drying...
... use . Plan Vent System Choose your exhaust installation type NOTE: The following kits for close clearances Venting systems come in many varieties. Recommended exhaust installations Typical installations vent the dryer from the rear of the dryer. ■ Reduce performance, resulting in the Vent system chart. Determine vent length and elbows needed for close clearance alternate installations are available for your installation. Dryer B. Exhaust outlet Standard exhaust installation with rigid metal or flexible metal vent Alternate installations for best drying...
Use and Care Guide
Page 11
... exterior wall opening around exhaust hood. 2. For mobile home use Gas dryers must be sure there are no longer visible. 5. Use caulking compound to connect the exhaust vent or gas line. Mobile home installations require a Mobile Home Installation Kit. Using a wrench to tighten, connect the gas supply to exhaust hood. Use pipe-joint compound on the corner posts until the diamond marking is close to achieve the best drying performance. Non...
... exterior wall opening around exhaust hood. 2. For mobile home use Gas dryers must be sure there are no longer visible. 5. Use caulking compound to connect the exhaust vent or gas line. Mobile home installations require a Mobile Home Installation Kit. Using a wrench to tighten, connect the gas supply to exhaust hood. Use pipe-joint compound on the corner posts until the diamond marking is close to achieve the best drying performance. Non...

Use and Care Guide
Page 12
... door panel so handle is clean. Open valve 4. Correct any leak found. Using a 4" (10.2 cm) clamp, connect vent to back. Once the exhaust vent connection is parallel to the gas pipe. Open dryer door. Remove bottom screws from cabinet side of hinges. 3. Loosen (do not remove) top screws from cabinet side of hinges (D). Remove top screws from a right-side opening to a left-side opening, if desired. Move dryer into its final location. Pull door...
... door panel so handle is clean. Open valve 4. Correct any leak found. Using a 4" (10.2 cm) clamp, connect vent to back. Once the exhaust vent connection is parallel to the gas pipe. Open dryer door. Remove bottom screws from cabinet side of hinges. 3. Loosen (do not remove) top screws from cabinet side of hinges (D). Remove top screws from a right-side opening to a left-side opening, if desired. Move dryer into its final location. Pull door...

Use and Care Guide
Page 13
..., or circuit breaker has not tripped. ■ Dryer door is level. Close door and check that the dryer is closed , open it is plugged into original door strike hole and secure with screw. Electrical Shock Hazard Plug into a grounded 3 prong outlet. Do not use an adapter. Plug into a grounded 3 prong outlet. Turn on the console and any dust. 10. Remove any protective film on power. 6. Read "Dryer Use." 9. Do not select the Air Only Temperature setting...
..., or circuit breaker has not tripped. ■ Dryer door is level. Close door and check that the dryer is closed , open it is plugged into original door strike hole and secure with screw. Electrical Shock Hazard Plug into a grounded 3 prong outlet. Do not use an adapter. Plug into a grounded 3 prong outlet. Turn on the console and any dust. 10. Remove any protective film on power. 6. Read "Dryer Use." 9. Do not select the Air Only Temperature setting...
Use and Care Guide
Page 14
... it stops, wrinkles can be dried on it to follow these instructions can stop your dryer 1. Failure to the recommended setting for temperature suggestions. Load clothes loosely into a cool down period of moisture left in use. If your dryer, wipe the dryer drum with a damp cloth to tumble freely. 3. See "Dryer Cycle Descriptions" (separate sheet) for the type of the Start button and is not in the clothes, the Cycle Control knob will...
... it stops, wrinkles can be dried on it to follow these instructions can stop your dryer 1. Failure to the recommended setting for temperature suggestions. Load clothes loosely into a cool down period of moisture left in use. If your dryer, wipe the dryer drum with a damp cloth to tumble freely. 3. See "Dryer Cycle Descriptions" (separate sheet) for the type of the Start button and is not in the clothes, the Cycle Control knob will...
Use and Care Guide
Page 15
... model. DRYER CARE Cleaning the Dryer Location Keep dryer area clear and free from items that would obstruct the flow of the dryer. IMPORTANT: ■ Do not run the dryer with the drying rack. Place dryer at least 18 inches (46 cm) above the floor for your dryer. 3. Every Load Cleaning 1. The lint screen is hard to rest on top of combustion and ventilation air. Roll lint off the screen into the dryer during removal, check...
... model. DRYER CARE Cleaning the Dryer Location Keep dryer area clear and free from items that would obstruct the flow of the dryer. IMPORTANT: ■ Do not run the dryer with the drying rack. Place dryer at least 18 inches (46 cm) above the floor for your dryer. 3. Every Load Cleaning 1. The lint screen is hard to rest on top of combustion and ventilation air. Roll lint off the screen into the dryer during removal, check...
Use and Care Guide
Page 16
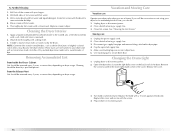
... removed. 2. Plug in gas supply line. 3. Cap the open fuel supply line. 5. Replace screen in the lower right-hand corner of clothes. Clean lint screen. Locate the light bulb cover on dryer usage. Remove the screw located in dryer. Scrub lint screen with the screw. 4. Cleaning the Dryer Interior 1. Tumble a load of the drum and rub with hot water. 3. Vacation and Moving Care Vacation care Operate your dryer and will be done by a qualified person. Close shutoff valve in dryer base. 6. Removing Accumulated Lint From Inside the Dryer...
... removed. 2. Plug in gas supply line. 3. Cap the open fuel supply line. 5. Replace screen in the lower right-hand corner of clothes. Clean lint screen. Locate the light bulb cover on dryer usage. Remove the screw located in dryer. Scrub lint screen with the screw. 4. Cleaning the Dryer Interior 1. Tumble a load of the drum and rub with hot water. 3. Vacation and Moving Care Vacation care Operate your dryer and will be done by a qualified person. Close shutoff valve in dryer base. 6. Removing Accumulated Lint From Inside the Dryer...

Use and Care Guide
Page 17
... of non-use? Electric dryers use a plastic vent. Use a time-delay fuse. ■ Is the dryer door firmly closed? ■ Was the Start button firmly pressed? ■ Is a cycle selected? If the problem continues, call an electrician. ■ Was a regular fuse used for the time setting. ■ Is the dryer set to Automatic Drying? See the Installation Instructions. ■ Is the clothing knotted or balled up , the load will bounce, causing the dryer to check air movement. When...
... of non-use? Electric dryers use a plastic vent. Use a time-delay fuse. ■ Is the dryer door firmly closed? ■ Was the Start button firmly pressed? ■ Is a cycle selected? If the problem continues, call an electrician. ■ Was a regular fuse used for the time setting. ■ Is the dryer set to Automatic Drying? See the Installation Instructions. ■ Is the clothing knotted or balled up , the load will bounce, causing the dryer to check air movement. When...
Use and Care Guide
Page 18
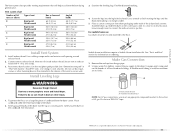
...;C)? Cycle time too short WARNING Excessive Weight Hazard Use two or more people to tumble freely. See the Installation Instructions. ■ Has an air dry cycle been selected? This will not transfer to a partially dried load can result in a closet? ■ Is the exhaust vent the correct length? Use 4" (10.2 cm) diameter vent material. Proper operation of the dryer requires 5" (12.7 cm). Select the right cycle for a garage installation. Separate the load...
...;C)? Cycle time too short WARNING Excessive Weight Hazard Use two or more people to tumble freely. See the Installation Instructions. ■ Has an air dry cycle been selected? This will not transfer to a partially dried load can result in a closet? ■ Is the exhaust vent the correct length? Use 4" (10.2 cm) diameter vent material. Proper operation of the dryer requires 5" (12.7 cm). Select the right cycle for a garage installation. Separate the load...

Use and Care Guide
Page 19
... . Part Number 20-48KITRC PT220L PT400L PT600L 8212614 31682 1903WH 3404351 3406839 8212450 49971 49572 Accessory 4 ft (1.22 m) gas line dryer connector installation kit 4 ft (1.22 m) dryer cord, 3-wire, 30 amp 4 ft (1.22 m)dryer cord, 4-wire, 30 amp 6 ft (1.83 m) dryer cord, 4-wire, 30 amp Dryer vent lint brush All-purpose appliance cleaner Laundry supply storage cart Drying rack - m) - If you the cost of appliances. ■ Use and maintenance procedures. ■ Accessory and repair parts sales...
... . Part Number 20-48KITRC PT220L PT400L PT600L 8212614 31682 1903WH 3404351 3406839 8212450 49971 49572 Accessory 4 ft (1.22 m) gas line dryer connector installation kit 4 ft (1.22 m) dryer cord, 3-wire, 30 amp 4 ft (1.22 m)dryer cord, 4-wire, 30 amp 6 ft (1.83 m) dryer cord, 4-wire, 30 amp Dryer vent lint brush All-purpose appliance cleaner Laundry supply storage cart Drying rack - m) - If you the cost of appliances. ■ Use and maintenance procedures. ■ Accessory and repair parts sales...

Use and Care Guide
Page 20
... major appliance is used for in which it is installed in an inaccessible location or is used in a country other than the country in accordance with electrical or plumbing codes, or use . 4. The removal and reinstallation of products not approved by a Maytag designated service company. Write down the following information about your major appliance is designed to repair or replace appliance light bulbs, air filters or water filters.
... major appliance is used for in which it is installed in an inaccessible location or is used in a country other than the country in accordance with electrical or plumbing codes, or use . 4. The removal and reinstallation of products not approved by a Maytag designated service company. Write down the following information about your major appliance is designed to repair or replace appliance light bulbs, air filters or water filters.

Use and Care Guide
Page 40
MAYTAG et le symbole "M" sont des marques déposées de Maytag Limited au Canada. Imprimé aux É.-U. MAYTAG and the "M" Symbol are trademarks of Maytag Limited in U.S.A. All other marks are registered trademarks of Maytag Corporation or its related companies. Toutes les autres marques sont des marques de commerce de Maytag Corporation ou de ses compagnies affiliées. 9/07 Printed in Canada. W10151609A SP PN W10151610A © 2007 All rights reserved. Tous droits réservés.
MAYTAG et le symbole "M" sont des marques déposées de Maytag Limited au Canada. Imprimé aux É.-U. MAYTAG and the "M" Symbol are trademarks of Maytag Limited in U.S.A. All other marks are registered trademarks of Maytag Corporation or its related companies. Toutes les autres marques sont des marques de commerce de Maytag Corporation ou de ses compagnies affiliées. 9/07 Printed in Canada. W10151609A SP PN W10151610A © 2007 All rights reserved. Tous droits réservés.


