Installation Instructions
Page 2
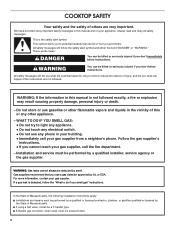
... or "WARNING." Installation and service must be detected by UL or CSA. If a gas leak is , tell you how to potential hazards that you use a gas detector approved by smell. COOKTOP SAFETY Your safety and the safety of others . All safety messages will tell you what... the potential hazard is detected, follow instructions. Gas suppliers recommend that can happen if the instructions are ...
... or "WARNING." Installation and service must be detected by UL or CSA. If a gas leak is , tell you how to potential hazards that you use a gas detector approved by smell. COOKTOP SAFETY Your safety and the safety of others . All safety messages will tell you what... the potential hazard is detected, follow instructions. Gas suppliers recommend that can happen if the instructions are ...
Installation Instructions
Page 3
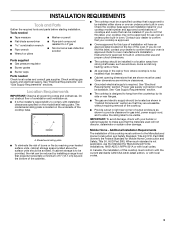
...used will have an approval label located on the top of this label, your cooktop is approved to be installed. A. See "Gas Supply Requirements" section. ■ The cooktop is to be installed must conform with the current standards CAN/CSA-A240-latest edition...obstruct flow of the cooktop base. The model/serial rating plate is approved. A ■ The cooktop must be a specified cooktop that are shown must conform to LP gas ■ Noncorrosive leak-detection solution Parts supplied ■ Gas pressure regulator ■ Burner grates ■ Burner caps Parts needed &#...
...used will have an approval label located on the top of this label, your cooktop is approved to be installed. A. See "Gas Supply Requirements" section. ■ The cooktop is to be installed must conform with the current standards CAN/CSA-A240-latest edition...obstruct flow of the cooktop base. The model/serial rating plate is approved. A ■ The cooktop must be a specified cooktop that are shown must conform to LP gas ■ Noncorrosive leak-detection solution Parts supplied ■ Gas pressure regulator ■ Burner grates ■ Burner caps Parts needed &#...
Installation Instructions
Page 4
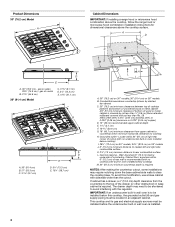
... is required. Wall: Anywhere 6" (15.2 cm) below underside of cutout (with the regulator. Grounded outlet - Gas line opening - IMPORTANT: If an undercounter built-in an adjacent cabinet. A D C B M KEF G D E A. 30" (76.2 cm) - gas on 36" models B. This cooktop and its gas and electrical supply sources must be installed below this modification, use a base cabinet with no...
... is required. Wall: Anywhere 6" (15.2 cm) below underside of cutout (with the regulator. Grounded outlet - Gas line opening - IMPORTANT: If an undercounter built-in an adjacent cabinet. A D C B M KEF G D E A. 30" (76.2 cm) - gas on 36" models B. This cooktop and its gas and electrical supply sources must be installed below this modification, use a base cabinet with no...
Installation Instructions
Page 5
... pipe thread is also recommended. A time-delay fuse or circuit breaker is needed for use with LP gas. ■ This cooktop is design-certified by CSA to connect the cooktop to the rigid gas supply line. LP Gas Conversion: Conversion must be used . No attempt shall be removed from : National Fire Protection Association One Batterymarch...
... pipe thread is also recommended. A time-delay fuse or circuit breaker is needed for use with LP gas. ■ This cooktop is design-certified by CSA to connect the cooktop to the rigid gas supply line. LP Gas Conversion: Conversion must be used . No attempt shall be removed from : National Fire Protection Association One Batterymarch...
Installation Instructions
Page 6
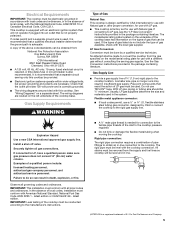
... adjacent cabinet. Excessive Weight Hazard Use two or more people, place the cooktop upside down around bottom of the gas supply piping system at test pressures equal to avoid scratching the countertop. Avoid drilling into the cutout. Foam strip C. Burner Input Requirements Input ratings shown on the final location for elevations up to...
... adjacent cabinet. Excessive Weight Hazard Use two or more people, place the cooktop upside down around bottom of the gas supply piping system at test pressures equal to avoid scratching the countertop. Avoid drilling into the cutout. Foam strip C. Burner Input Requirements Input ratings shown on the final location for elevations up to...
Installation Instructions
Page 7
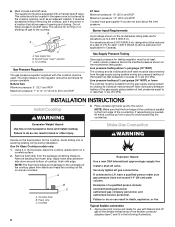
... the pressure regulator with arrow pointing up toward the bottom of cooktop C. Complete Connection 1. Failure to cooktop bottom. Do not make connections to the gas shutoff valve. Use pipe-joint compound. Appliance pressure regulator (supplied) I. ½" or ¾" gas pipe J. B A C A. Correct any leak found. 3. Burner base WARNING B A C D A. Regulator must have ³⁄₈" male pipe...
... the pressure regulator with arrow pointing up toward the bottom of cooktop C. Complete Connection 1. Failure to cooktop bottom. Do not make connections to the gas shutoff valve. Use pipe-joint compound. Appliance pressure regulator (supplied) I. ½" or ¾" gas pipe J. B A C A. Correct any leak found. 3. Burner base WARNING B A C D A. Regulator must have ³⁄₈" male pipe...
Installation Instructions
Page 8
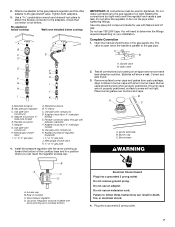
.... Occasional orange flashes are properly positioned on "HIGH" for remaining burners. 8 B A. Knob hole (knob removed) C. Remove rubber grommet. 3. Do not overtighten. 4. Repeat for a blue color. Recheck operation of surface burner flames. A B C A. Initial lighting and gas flame adjustments This cooktop is provided only as a convenience. Use a small flat-blade screwdriver to "OFF." Complete Installation Electronic...
.... Occasional orange flashes are properly positioned on "HIGH" for remaining burners. 8 B A. Knob hole (knob removed) C. Remove rubber grommet. 3. Do not overtighten. 4. Repeat for a blue color. Recheck operation of surface burner flames. A B C A. Initial lighting and gas flame adjustments This cooktop is provided only as a convenience. Use a small flat-blade screwdriver to "OFF." Complete Installation Electronic...
Owners Manual
Page 2
...hazards that can be killed or seriously injured if you and others are not followed. 2 TABLE OF CONTENTS COOKTOP SAFETY 2 COOKTOP USE 4 Cooktop Controls 5 Surface Burners 6 Surface Grates 6 Home Canning 7 Cookware 7 COOKTOP CARE 7 General Cleaning 7 TROUBLESHOOTING 8 ASSISTANCE OR SERVICE 9 In the U.S.A 9 Accessories List 9 In Canada... général 17 DÉPANNAGE 18 ASSISTANCE OU SERVICE 19 Au Canada 19 Liste d'accessoires 19 GARANTIE 20 COOKTOP SAFETY Your safety and the safety of injury, and tell you don't follow instructions. WARNING You can kill or ...
...hazards that can be killed or seriously injured if you and others are not followed. 2 TABLE OF CONTENTS COOKTOP SAFETY 2 COOKTOP USE 4 Cooktop Controls 5 Surface Burners 6 Surface Grates 6 Home Canning 7 Cookware 7 COOKTOP CARE 7 General Cleaning 7 TROUBLESHOOTING 8 ASSISTANCE OR SERVICE 9 In the U.S.A 9 Accessories List 9 In Canada... général 17 DÉPANNAGE 18 ASSISTANCE OU SERVICE 19 Au Canada 19 Liste d'accessoires 19 GARANTIE 20 COOKTOP SAFETY Your safety and the safety of injury, and tell you don't follow instructions. WARNING You can kill or ...
Owners Manual
Page 3
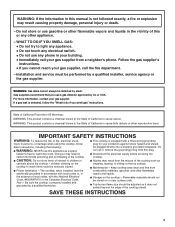
... local codes or, in cabinets above the cooktop - Gas suppliers recommend that you smell gas" instructions. WARNING: This product contains a chemical known to the State of California to cause birth defects or other flammable vapors and liquids. ■ Storage on or near surface units. ■ Top burner flame size should be seriously injured. ■...
... local codes or, in cabinets above the cooktop - Gas suppliers recommend that you smell gas" instructions. WARNING: This product contains a chemical known to the State of California to cause birth defects or other flammable vapors and liquids. ■ Storage on or near surface units. ■ Top burner flame size should be seriously injured. ■...
Owners Manual
Page 4
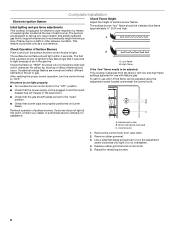
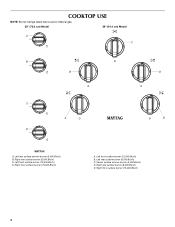
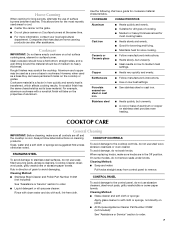
Right front surface burner (15,000 Btu/h) E A. Right front surface burner (15,000 Btu/h) 4 Center surface simmer burner (5,000 Btu/h) D. Right rear surface burner (8,000 Btu/h) E. Left front surface burner (12,500 Btu/h) D. Left rear surface burner (9,200 Btu/h) C. Left rear surface simmer burner (5,000 Btu/h) B. Right rear surface burner (9,200 Btu/h) C. Left front surface burner (12,500 Btu/h) B. COOKTOP USE NOTE: Burner ratings listed below are for Natural gas. 30" (76.2 cm) Model 36" (91.4 cm) Model A C B B D C A D A.
Right front surface burner (15,000 Btu/h) E A. Right front surface burner (15,000 Btu/h) 4 Center surface simmer burner (5,000 Btu/h) D. Right rear surface burner (8,000 Btu/h) E. Left front surface burner (12,500 Btu/h) D. Left rear surface burner (9,200 Btu/h) C. Left rear surface simmer burner (5,000 Btu/h) B. Right rear surface burner (9,200 Btu/h) C. Left front surface burner (12,500 Btu/h) B. COOKTOP USE NOTE: Burner ratings listed below are for Natural gas. 30" (76.2 cm) Model 36" (91.4 cm) Model A C B B D C A D A.
Owners Manual
Page 5
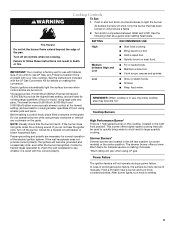
...edge of food or liquid, using LP gas. REMEMBER: When cooktop is included with the LP Gas Conversion Kit for cooking smaller quantities of the electric ignition system. Simmer Burners* Simmer burners are ideal for details on . The large burners (15,000 Btu/h [British Thermal Units.... Check for use LP Gas, an LP Gas Conversion Kit is in death or fire. This burner offers higher speed cooking that the burner has lit. IMPORTANT: Your cooktop is wired with Natural Gas. Electric igniters automatically light the surface burners when control knobs are ideal...
...edge of food or liquid, using LP gas. REMEMBER: When cooktop is included with the LP Gas Conversion Kit for cooking smaller quantities of the electric ignition system. Simmer Burners* Simmer burners are ideal for details on . The large burners (15,000 Btu/h [British Thermal Units.... Check for use LP Gas, an LP Gas Conversion Kit is in death or fire. This burner offers higher speed cooking that the burner has lit. IMPORTANT: Your cooktop is wired with Natural Gas. Electric igniters automatically light the surface burners when control knobs are ideal...
Owners Manual
Page 6
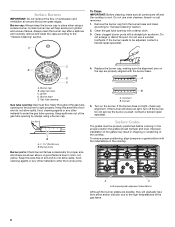
...E A. Burner ports Burner ports: Check burner flames occasionally for the burner to the high temperatures of the gas flame. 6 Replace the burner cap, making sure the alignment pins on the burner. Turn on the cap are properly aligned with a damp cloth. 3. If the burner still does not light, turn off and the cooktop is blue ...in the cooktop. Surface Grates The grates must flow freely throughout the gas tube opening for proper size and shape as shown. In the ...
...E A. Burner ports Burner ports: Check burner flames occasionally for the burner to the high temperatures of the gas flame. 6 Replace the burner cap, making sure the alignment pins on the burner. Turn on the cap are properly aligned with a damp cloth. 3. If the burner still does not light, turn off and the cooktop is blue ...in the cooktop. Surface Grates The grates must flow freely throughout the gas tube opening for proper size and shape as shown. In the ...
Owners Manual
Page 7
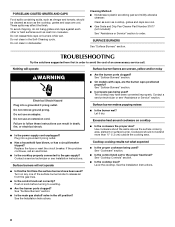
...canner on the grate. ■ Do not place canner on 2 surface burners at the same time. ■ For more information, contact your local agricultural department. Aluminum and copper may scratch the cooktop. COOKTOP CARE General Cleaning IMPORTANT: Before cleaning, make sure knobs are suggested first unless.... ■ Ideal results on a hot surface cooking area, element or surface burner. Soap, water and a soft cloth or sponge are in direction of aluminum or copper on the cooktop or grates. COOKTOP CONTROLS To avoid damage to medium heat settings. To avoid damage, do not ...
...canner on the grate. ■ Do not place canner on 2 surface burners at the same time. ■ For more information, contact your local agricultural department. Aluminum and copper may scratch the cooktop. COOKTOP CARE General Cleaning IMPORTANT: Before cleaning, make sure knobs are suggested first unless.... ■ Ideal results on a hot surface cooking area, element or surface burner. Soap, water and a soft cloth or sponge are in direction of aluminum or copper on the cooktop or grates. COOKTOP CONTROLS To avoid damage to medium heat settings. To avoid damage, do not ...
Owners Manual
Page 8
... electrician. ■ Is the cooktop properly connected to the gas supply? Cooktop cooking results not what expected ■ Is the proper cookware being used? See the Installation Instructions. 8 Surface burners will operate Surface burner flames are the burner caps positioned properly? Let it dry...not use an extension cord. See "Surface Burners" section. ■ Is propane gas being used ? The cooktop may affect the finish. Cookware should be cleaned as soon as cooktop, grates and caps are cool. ■ Gas Grate and Drip Pan Cleaner Part Number ...
... electrician. ■ Is the cooktop properly connected to the gas supply? Cooktop cooking results not what expected ■ Is the proper cookware being used? See the Installation Instructions. 8 Surface burners will operate Surface burner flames are the burner caps positioned properly? Let it dry...not use an extension cord. See "Surface Burners" section. ■ Is propane gas being used ? The cooktop may affect the finish. Cookware should be cleaned as soon as cooktop, grates and caps are cool. ■ Gas Grate and Drip Pan Cleaner Part Number ...


