Installation Instructions
Page 2
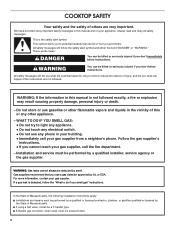
... detected, follow instructions. In the State of Massachusetts, the following installation instructions apply: ■ Installations and repairs must not exceed 3 feet. 2 COOKTOP SAFETY Your safety and the safety of others . All safety messages will tell you what can be a T-handle type. ■ A flexible gas connector, when used, must be performed by a qualified or licensed...
... detected, follow instructions. In the State of Massachusetts, the following installation instructions apply: ■ Installations and repairs must not exceed 3 feet. 2 COOKTOP SAFETY Your safety and the safety of others . All safety messages will tell you what can be a T-handle type. ■ A flexible gas connector, when used, must be performed by a qualified or licensed...
Installation Instructions
Page 3
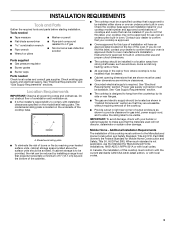
... should be located as shown to LP gas ■ Noncorrosive leak-detection solution Parts supplied ■ Gas pressure regulator ■ Burner grates ■ Burner caps Parts needed Check local codes and consult gas supplier. A. Location Requirements IMPORTANT: Observe all governing codes and ordinances. Additional Installation Requirements The installation of the cooktop base. Model/serial rating plate ■ To...
... should be located as shown to LP gas ■ Noncorrosive leak-detection solution Parts supplied ■ Gas pressure regulator ■ Burner grates ■ Burner caps Parts needed Check local codes and consult gas supplier. A. Location Requirements IMPORTANT: Observe all governing codes and ordinances. Additional Installation Requirements The installation of the cooktop base. Model/serial rating plate ■ To...
Installation Instructions
Page 4
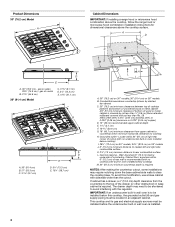
... interfering with sidewalls wider than the cutout. A D C B M KEF G D E A. 30" (76.2 cm) - gas on 36" models B. Locate within 24" (61 cm) of right rear corner of countertop. To avoid this cooktop, the grounded outlet (H) and gas supply piping must be installed before the undercounter built-in oven installed below this modification, use a base cabinet with the regulator...
... interfering with sidewalls wider than the cutout. A D C B M KEF G D E A. 30" (76.2 cm) - gas on 36" models B. Locate within 24" (61 cm) of right rear corner of countertop. To avoid this cooktop, the grounded outlet (H) and gas supply piping must be installed before the undercounter built-in oven installed below this modification, use a base cabinet with the regulator...
Installation Instructions
Page 5
... not kink or damage the flexible metal tubing when moving the cooktop. Do not use with a different gas without consulting the serving gas supplier. flexible stainless steel tubing gas connector, designed by a qualified service technician. Install a shut-off valve. IMPORTANT: This installation must conform with this cooktop be used . Rigid pipe connection: The rigid pipe connection requires...
... not kink or damage the flexible metal tubing when moving the cooktop. Do not use with a different gas without consulting the serving gas supplier. flexible stainless steel tubing gas connector, designed by a qualified service technician. Install a shut-off valve. IMPORTANT: This installation must conform with this cooktop be used . Rigid pipe connection: The rigid pipe connection requires...
Installation Instructions
Page 6
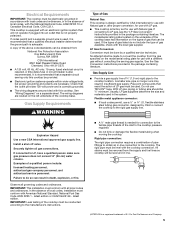
... personnel. NOTE: Make sure that the front edge of the cooktop is parallel to 2,000 ft (609.6 m). Gas On Glass Cooktop models only: 1. Remove backing from cutout to the cooktop. Typical flexible connection 1. Burner Input Requirements Input ratings shown on uneven counters. Excessive Weight Hazard... the package containing literature. Apply foam strip adhesiveside down on or shutting off valve. Install a shut-off gas to avoid scratching the countertop. The valve is needed, lift entire cooktop up from foam strip. The inlet pressure to do so can result in death, ...
... personnel. NOTE: Make sure that the front edge of the cooktop is parallel to 2,000 ft (609.6 m). Gas On Glass Cooktop models only: 1. Remove backing from cutout to the cooktop. Typical flexible connection 1. Burner Input Requirements Input ratings shown on uneven counters. Excessive Weight Hazard... the package containing literature. Apply foam strip adhesiveside down on or shutting off valve. Install a shut-off gas to avoid scratching the countertop. The valve is needed, lift entire cooktop up from foam strip. The inlet pressure to do so can result in death, ...
Installation Instructions
Page 7
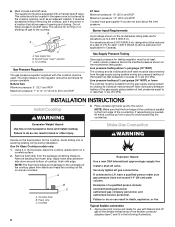
... in burner caps with Natural and LP gas. B A C A. Electrical Shock Hazard Plug into a grounded 3 prong outlet. 7 Failure to cooktop bottom. 2. Attach one adapter to the gas pressure regulator and the other adapter to the gas pipe. Tighten both adapters. 3. Check that connector is parallel to the gas shutoff valve. No appliance below cooktop Wall oven installed below cooktop A A B B C D C E D E F G F H G I H J I . ½...
... in burner caps with Natural and LP gas. B A C A. Electrical Shock Hazard Plug into a grounded 3 prong outlet. 7 Failure to cooktop bottom. 2. Attach one adapter to the gas pressure regulator and the other adapter to the gas pipe. Tighten both adapters. 3. Check that connector is parallel to the gas shutoff valve. No appliance below cooktop Wall oven installed below cooktop A A B B C D C E D E F G F H G I H J I . ½...
Installation Instructions
Page 8
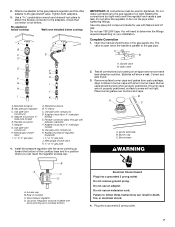
...overtighten. 4. Initial lighting and gas flame adjustments This cooktop is plugged in and the circuit breaker has not tripped or the fuse blown. ■ Check that the gas shutoff valves are designed to light at any valve rotation that burner caps are normal and reflect different... auto-reignition by means of Surface Burners Push in the air or gas. To set to light because of each burner. It should light within 4 seconds. Adjustment screw B. Control knob 1. Repeat for use with Natural gas. Complete Installation Electronic Ignition System Check Flame Height ...
...overtighten. 4. Initial lighting and gas flame adjustments This cooktop is plugged in and the circuit breaker has not tripped or the fuse blown. ■ Check that the gas shutoff valves are designed to light at any valve rotation that burner caps are normal and reflect different... auto-reignition by means of Surface Burners Push in the air or gas. To set to light because of each burner. It should light within 4 seconds. Adjustment screw B. Control knob 1. Repeat for use with Natural gas. Complete Installation Electronic Ignition System Check Flame Height ...
Owners Manual
Page 3
...■ Disconnect the electrical supply before servicing the cooktop. ■ CAUTION: Do not store items of local codes, with a three-prong grounding plug for your gas supplier, call your gas supplier. The cooktop, when installed, must be electrically grounded in accordance with local ... - Be sure the cooktop is properly installed and grounded by a qualified installer, service agency or the gas supplier. Flammable materials should not be stored on or near surface units. ■ Top burner flame size should be seriously injured. ■ Proper Installation - WARNING: If the ...
...■ Disconnect the electrical supply before servicing the cooktop. ■ CAUTION: Do not store items of local codes, with a three-prong grounding plug for your gas supplier, call your gas supplier. The cooktop, when installed, must be electrically grounded in accordance with local ... - Be sure the cooktop is properly installed and grounded by a qualified installer, service agency or the gas supplier. Flammable materials should not be stored on or near surface units. ■ Top burner flame size should be seriously injured. ■ Proper Installation - WARNING: If the ...
Owners Manual
Page 6
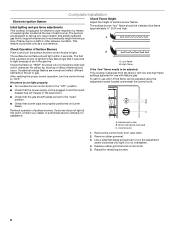
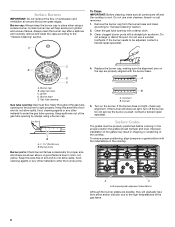
..., food, cleaning agents or any other material to the high temperatures of the gas tube opening . Burner cap: Always keep the burner cap in the cooktop. Always clean the burner cap after a spillover and routinely remove and clean the caps according to "General...gas tube opening with a straight pin as shown above. A B A. To ensure proper positioning, align bumpers on the burner. Do not use a wooden toothpick. Gas tube opening Gas tube opening: Gas must be properly positioned before cooking. A B A. 1-1¹⁄₂" (25-38 mm) B. C B D E A. Improper installation...
..., food, cleaning agents or any other material to the high temperatures of the gas tube opening . Burner cap: Always keep the burner cap in the cooktop. Always clean the burner cap after a spillover and routinely remove and clean the caps according to "General...gas tube opening with a straight pin as shown above. A B A. To ensure proper positioning, align bumpers on the burner. Do not use a wooden toothpick. Gas tube opening Gas tube opening: Gas must be properly positioned before cooking. A B A. 1-1¹⁄₂" (25-38 mm) B. C B D E A. Improper installation...
Owners Manual
Page 8
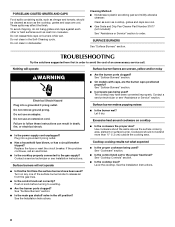
... a household fuse blown, or has a circuit breaker tripped? See "Surface Burners" section. ■ Is propane gas being used ? Cooktop cooking results not what expected ■ Is the proper cookware being used ? See the Installation Instructions. ■ Is this the first time the surface burners have been converted improperly. PORCELAIN-COATED GRATES AND CAPS Food spills...
... a household fuse blown, or has a circuit breaker tripped? See "Surface Burners" section. ■ Is propane gas being used ? Cooktop cooking results not what expected ■ Is the proper cookware being used ? See the Installation Instructions. ■ Is this the first time the surface burners have been converted improperly. PORCELAIN-COATED GRATES AND CAPS Food spills...
Owners Manual
Page 9
...31682 Stainless Steel Cleaner and Polish (stainless steel models) Order Part Number 31462 Gas Grate and Drip Pan Cleaner Order Part Number 31617 In Canada Call the Whirlpool...calling, please know the purchase date and the complete model and serial number of appliances. ■ Installation information. ■ Use and maintenance procedures. ■ Accessory and repair parts sales. ■ ... of your correspondence. For further assistance If you use only factory specified parts. Maytag® appliances designated service technicians are trained to order replacement parts, we recommend ...
...31682 Stainless Steel Cleaner and Polish (stainless steel models) Order Part Number 31462 Gas Grate and Drip Pan Cleaner Order Part Number 31617 In Canada Call the Whirlpool...calling, please know the purchase date and the complete model and serial number of appliances. ■ Installation information. ■ Use and maintenance procedures. ■ Accessory and repair parts sales. ■ ... of your correspondence. For further assistance If you use only factory specified parts. Maytag® appliances designated service technicians are trained to order replacement parts, we recommend ...
Owners Manual
Page 10
...water filters. Service calls to obtain service under these excluded circumstances shall be borne by calling Maytag. The removal and reinstallation of your major appliance if it is installed in an inaccessible location or is used in the country in which it was purchased. LIMITATION...not apply. Service must provide proof of purchase or installation date for factory specified parts and repair labor to Maytag within 30 days from the date of purchase. 6. MAYTAG SHALL NOT BE LIABLE FOR INCIDENTAL OR CONSEQUENTIAL DAMAGES. MAYTAG® MAJOR APPLIANCE WARRANTY LIMITED WARRANTY For one ...
...water filters. Service calls to obtain service under these excluded circumstances shall be borne by calling Maytag. The removal and reinstallation of your major appliance if it is installed in an inaccessible location or is used in the country in which it was purchased. LIMITATION...not apply. Service must provide proof of purchase or installation date for factory specified parts and repair labor to Maytag within 30 days from the date of purchase. 6. MAYTAG SHALL NOT BE LIABLE FOR INCIDENTAL OR CONSEQUENTIAL DAMAGES. MAYTAG® MAJOR APPLIANCE WARRANTY LIMITED WARRANTY For one ...
