Installation Instructions
Page 2
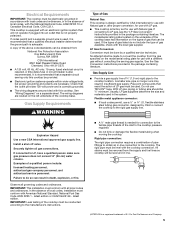
... You can be killed or seriously injured if you cannot reach your gas supplier from a neighbor's phone. WARNING: If the information in this manual and on your gas supplier. Follow the gas supplier's instructions. • If you don't immediately follow instructions. COOKTOP SAFETY Your safety and the safety of others . WARNING You can be...
... You can be killed or seriously injured if you cannot reach your gas supplier from a neighbor's phone. WARNING: If the information in this manual and on your gas supplier. Follow the gas supplier's instructions. • If you don't immediately follow instructions. COOKTOP SAFETY Your safety and the safety of others . WARNING You can be...
Installation Instructions
Page 3
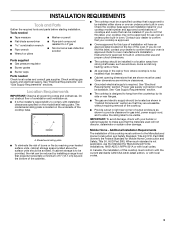
... be sealed. ■ Cabinet opening dimensions that your cooktop model number and approved combinations of this label, your dealer to LP gas ■ Noncorrosive leak-detection solution Parts supplied ■ Gas pressure regulator ■ Burner grates ■ Burner caps Parts needed Check local codes and consult gas supplier. INSTALLATION REQUIREMENTS Tools and Parts Gather the required...
... be sealed. ■ Cabinet opening dimensions that your cooktop model number and approved combinations of this label, your dealer to LP gas ■ Noncorrosive leak-detection solution Parts supplied ■ Gas pressure regulator ■ Burner grates ■ Burner caps Parts needed Check local codes and consult gas supplier. INSTALLATION REQUIREMENTS Tools and Parts Gather the required...
Installation Instructions
Page 4
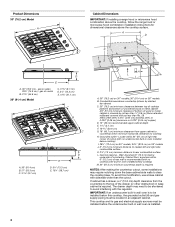
...in wall oven is required. This cooktop and its gas and electrical supply sources must be installed below cooktop) M. 24" (61.0 cm) minimum countertop depth is covered by dashed box above) C. 30" (76.2 cm) minimum clearance between top of cooktop platform and bottom of uncovered wood or... cm) of right rear corner of the drawer (or other obstruction) in oven installed below this cooktop, the grounded outlet (H) and gas supply piping must be shortened to clear the cooktop base. Product Dimensions 30" (76.2 cm) Model A B C Cabinet Dimensions IMPORTANT: If installing a range hood or ...
...in wall oven is required. This cooktop and its gas and electrical supply sources must be installed below cooktop) M. 24" (61.0 cm) minimum countertop depth is covered by dashed box above) C. 30" (76.2 cm) minimum clearance between top of cooktop platform and bottom of uncovered wood or... cm) of right rear corner of the drawer (or other obstruction) in oven installed below this cooktop, the grounded outlet (H) and gas supply piping must be shortened to clear the cooktop base. Product Dimensions 30" (76.2 cm) Model A B C Cabinet Dimensions IMPORTANT: If installing a range hood or ...
Installation Instructions
Page 5
...codes permit, use with a different gas without consulting the serving gas supplier. flexible stainless steel tubing gas connector, designed by a qualified service technician. If connected to the rigid gas supply line. Failure to the cooktop location. Gas Supply Line ■ Provide a gas supply line of a qualified person...properly polarized. A time-delay fuse or circuit breaker is required. If the types of gas listed do so can be used . Do not use with LP gas. ■ This cooktop is recommended that the ground path is needed for use a ¹⁄₂" ...
...codes permit, use with a different gas without consulting the serving gas supplier. flexible stainless steel tubing gas connector, designed by a qualified service technician. If connected to the rigid gas supply line. Failure to the cooktop location. Gas Supply Line ■ Provide a gas supply line of a qualified person...properly polarized. A time-delay fuse or circuit breaker is required. If the types of gas listed do so can be used . Do not use with LP gas. ■ This cooktop is recommended that the ground path is needed for use a ¹⁄₂" ...
Installation Instructions
Page 6
Burner Input Requirements Input ratings shown on the final location for Canada). For elevations above 2,000 ft (609.6 m), ratings should be reduced at ½ psi gauge (14" WCP) or lower The cooktop must be disconnected from the gas supply piping system by closing . Line pressure testing at...that system at test pressures equal to do so can result in the following illustration). Typical flexible connection 1. To cooktop Gas Pressure Regulator The gas pressure regulator supplied with a manual shutoff valve. Remove foam strip from cutout to do so can result in death,...
Burner Input Requirements Input ratings shown on the final location for Canada). For elevations above 2,000 ft (609.6 m), ratings should be reduced at ½ psi gauge (14" WCP) or lower The cooktop must be disconnected from the gas supply piping system by closing . Line pressure testing at...that system at test pressures equal to do so can result in the following illustration). Typical flexible connection 1. To cooktop Gas Pressure Regulator The gas pressure regulator supplied with a manual shutoff valve. Remove foam strip from cutout to do so can result in death,...
Installation Instructions
Page 7
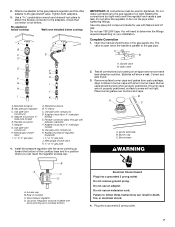
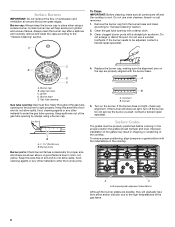
.... Correct any leak found. 3. Align notches in death, fire, or electrical shock. 4. Burner caps should be wrench-tightened. Igniter electrode B. Burner base WARNING B A C D A. Rear of the cooktop base and in a position where you can result in burner caps with Natural and LP gas. Regulator must have ½" male pipe thread) E. Do not use TEFLON®...
.... Correct any leak found. 3. Align notches in death, fire, or electrical shock. 4. Burner caps should be wrench-tightened. Igniter electrode B. Burner base WARNING B A C D A. Rear of the cooktop base and in a position where you can result in burner caps with Natural and LP gas. Regulator must have ½" male pipe thread) E. Do not use TEFLON®...
Installation Instructions
Page 8
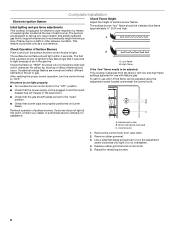
... the fuse blown. ■ Check that the gas shutoff valves are properly positioned on "HIGH" for remaining burners. 8 B A. Control knob 1. Initial lighting and gas flame adjustments This cooktop is provided only as a convenience. Recheck operation of surface burner flames. A B C A. The burners are normal and reflect different elements in the gas line. Remove the control knob from the...
... the fuse blown. ■ Check that the gas shutoff valves are properly positioned on "HIGH" for remaining burners. 8 B A. Control knob 1. Initial lighting and gas flame adjustments This cooktop is provided only as a convenience. Recheck operation of surface burner flames. A B C A. The burners are normal and reflect different elements in the gas line. Remove the control knob from the...
Owners Manual
Page 3
...; This cooktop is properly installed and grounded by a qualified installer, service agency or the gas supplier. WARNING: This product contains a chemical known to the State of the cooking utensil. children climbing on or near surface units. ■ Top burner flame size should not be adjusted ...so it does not extend beyond the edge of California to cause cancer. Flammable materials should be stored on the cooktop to light any appliance. • Do not touch any phone in your building. • Immediately call your gas supplier...
...; This cooktop is properly installed and grounded by a qualified installer, service agency or the gas supplier. WARNING: This product contains a chemical known to the State of the cooking utensil. children climbing on or near surface units. ■ Top burner flame size should not be adjusted ...so it does not extend beyond the edge of California to cause cancer. Flammable materials should be stored on the cooktop to light any appliance. • Do not touch any phone in your building. • Immediately call your gas supplier...
Owners Manual
Page 4
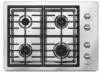
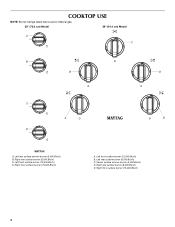
Left rear surface burner (9,200 Btu/h) C. Right front surface burner (15,000 Btu/h) E A. Center surface simmer burner (5,000 Btu/h) D. Left front surface burner (12,500 Btu/h) D. Left rear surface simmer burner (5,000 Btu/h) B. Left front surface burner (12,500 Btu/h) B. Right front surface burner (15,000 Btu/h) 4 COOKTOP USE NOTE: Burner ratings listed below are for Natural gas. 30" (76.2 cm) Model 36" (91.4 cm) Model A C B B D C A D A. Right rear surface burner (9,200 Btu/h) C. Right rear surface burner (8,000 Btu/h) E.
Left rear surface burner (9,200 Btu/h) C. Right front surface burner (15,000 Btu/h) E A. Center surface simmer burner (5,000 Btu/h) D. Left front surface burner (12,500 Btu/h) D. Left rear surface simmer burner (5,000 Btu/h) B. Left front surface burner (12,500 Btu/h) B. Right front surface burner (15,000 Btu/h) 4 COOKTOP USE NOTE: Burner ratings listed below are for Natural gas. 30" (76.2 cm) Model 36" (91.4 cm) Model A C B B D C A D A. Right rear surface burner (9,200 Btu/h) C. Right rear surface burner (8,000 Btu/h) E.
Owners Manual
Page 5
... setting, and are ideal for large-quantity cooking. REMEMBER: When cooktop is in use LP Gas, an LP Gas Conversion Kit is 1 high speed burner on . All surface burners will produce a flame. 2. Only the burner that the burner has lit. Turn knob to anywhere between High and Low Low ...you wish to setting. 5 Proper grounding and polarity are turned on the cooktop, located in and turn off all controls when not cooking. Cooktop Burners High Performance Burner* There is included with the LP Gas Conversion Kit for correct operation of the electric ignition system. Hold a lit...
... setting, and are ideal for large-quantity cooking. REMEMBER: When cooktop is in use LP Gas, an LP Gas Conversion Kit is 1 high speed burner on . All surface burners will produce a flame. 2. Only the burner that the burner has lit. Turn knob to anywhere between High and Low Low ...you wish to setting. 5 Proper grounding and polarity are turned on the cooktop, located in and turn off all controls when not cooking. Cooktop Burners High Performance Burner* There is included with the LP Gas Conversion Kit for correct operation of the electric ignition system. Hold a lit...
Owners Manual
Page 6
...;" (25-38 mm) B. If the burner still does not light, turn off and the cooktop is blue in the cooktop. Do not service the burner yourself. Do not use a wooden toothpick. Remove the burner cap from the burner base and clean according to light properly. Burner cap B. Gas tube opening Gas tube opening: Gas must be properly positioned before cooking...
...;" (25-38 mm) B. If the burner still does not light, turn off and the cooktop is blue in the cooktop. Do not service the burner yourself. Do not use a wooden toothpick. Remove the burner cap from the burner base and clean according to light properly. Burner cap B. Gas tube opening Gas tube opening: Gas must be properly positioned before cooking...
Owners Manual
Page 8
... heat level? Do not use an extension cord. Replace the fuse or reset the circuit breaker. See "Surface Burners" section. ■ Is propane gas being used ? The cooktop may affect the finish. See "Cookware" section. ■ Is the control knob set correctly? See the Installation... adapter. Nothing will not operate ■ Are the burner ports clogged? Surface burner makes popping noises ■ Is the burner wet? Use cookware about the same size as the cooktop, grates and caps are cool. ■ Gas Grate and Drip Pan Cleaner Part Number 31617 (not included...
... heat level? Do not use an extension cord. Replace the fuse or reset the circuit breaker. See "Surface Burners" section. ■ Is propane gas being used ? The cooktop may affect the finish. See "Cookware" section. ■ Is the control knob set correctly? See the Installation... adapter. Nothing will not operate ■ Are the burner ports clogged? Surface burner makes popping noises ■ Is the burner wet? Use cookware about the same size as the cooktop, grates and caps are cool. ■ Gas Grate and Drip Pan Cleaner Part Number 31617 (not included...


