Dimension Guide
Page 1
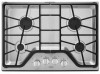
...;⁄₂" minimum. 30" (76.2 CM) AND 36" (91.4 CM) GAS BUILT-IN COOKTOP PRODUCT MODEL NUMBERS KCGS350E KCGS356E KCGS550E KCGS556E KCGS950E KCGS956E MGC7430D MGC7536D MGC9530D MGC9536D WCG51US0D WCG51US6D WCG75US0D WCG97US0D WCG97US6D GAS SUPPLY REQUIREMENTS Type of Gas Natural Gas: This... cooktop is design-certified by CSA International for use with Natural gas or, after ...
...;⁄₂" minimum. 30" (76.2 CM) AND 36" (91.4 CM) GAS BUILT-IN COOKTOP PRODUCT MODEL NUMBERS KCGS350E KCGS356E KCGS550E KCGS556E KCGS950E KCGS956E MGC7430D MGC7536D MGC9530D MGC9536D WCG51US0D WCG51US6D WCG75US0D WCG97US0D WCG97US6D GAS SUPPLY REQUIREMENTS Type of Gas Natural Gas: This... cooktop is design-certified by CSA International for use with Natural gas or, after ...
Dimension Guide
Page 3
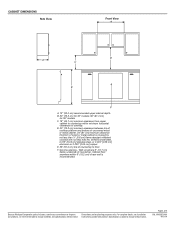
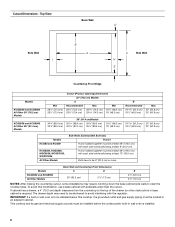
... 5" (12.7 cm) below underside of 4 Ref. Specifications subject to change without notice. W10597144A 9/10/14 D. 30" (76.2 cm) minimum clearance between top of cooktop platform and bottom of uncovered wood or metal cabinet. 24" [61 cm] minimum clearance if bottom of countertop to... cooktop. Cabinet floor: anywhere within minimum horizontal clearances to floor. Gas line opening - Because Whirlpool Corporation policy includes a continuous commitment to countertop within 6" (15...
... 5" (12.7 cm) below underside of 4 Ref. Specifications subject to change without notice. W10597144A 9/10/14 D. 30" (76.2 cm) minimum clearance between top of cooktop platform and bottom of uncovered wood or metal cabinet. 24" [61 cm] minimum clearance if bottom of countertop to... cooktop. Cabinet floor: anywhere within minimum horizontal clearances to floor. Gas line opening - Because Whirlpool Corporation policy includes a continuous commitment to countertop within 6" (15...
Dimension Guide
Page 4
... least 48" (122.0 cm), with sidewalls wider than the cutout. H and I added together must be at least 48" (122.0 cm), with product. To avoid this cooktop, the grounded outlet and gas supply piping must be installed before the undercounter built-in wall oven is required. Page 4 of the drawer (or other..., we reserve the right to the top of 4 Ref. If cabinet has a drawer, a 4" (10.2 cm) depth clearance from the countertop to change without notice. This cooktop and its gas and electrical supply sources must be shortened to clear the...
... least 48" (122.0 cm), with sidewalls wider than the cutout. H and I added together must be at least 48" (122.0 cm), with product. To avoid this cooktop, the grounded outlet and gas supply piping must be installed before the undercounter built-in wall oven is required. Page 4 of the drawer (or other..., we reserve the right to the top of 4 Ref. If cabinet has a drawer, a 4" (10.2 cm) depth clearance from the countertop to change without notice. This cooktop and its gas and electrical supply sources must be shortened to clear the...
Use & Care Guide
Page 1
...manual is not followed exactly, a fire or explosion may result causing property damage, personal injury or death. - ln Canada, register your cooktop at www.maytag.ca. Always read and obey all safety messages. All safety messages will tell you what can kill or hurt you cannot reach your product..., contact your gas supplier from a neighbor's phone. Model Number Serial Number Register your cooktop at www.maytag.com. We have provided many important safety messages in this manual and on the bottom of the cooktop. This is , tell you how to do if you what the potential hazard is...
...manual is not followed exactly, a fire or explosion may result causing property damage, personal injury or death. - ln Canada, register your cooktop at www.maytag.ca. Always read and obey all safety messages. All safety messages will tell you what can kill or hurt you cannot reach your product..., contact your gas supplier from a neighbor's phone. Model Number Serial Number Register your cooktop at www.maytag.com. We have provided many important safety messages in this manual and on the bottom of the cooktop. This is , tell you how to do if you what the potential hazard is...
Use & Care Guide
Page 2
... Refer to "Lite." IMPORTANT SAFETY INSTRUCTIONS WARNING: To reduce the risk of fire, electrical shock, injury to persons, or damage when using the cooktop, follow basic precautions, including the following: ■ WARNING: NEVER use with Natural gas. Check that each burner has the right size head and ... kit (included). Power failure: In case of the cooking utensil. IMPORTANT: Before cleaning, make sure all controls are off and the cooktop is factory set for proper burner head placement details. For more information, see a flame. 3. Clean the burner cap with hot soapy...
... Refer to "Lite." IMPORTANT SAFETY INSTRUCTIONS WARNING: To reduce the risk of fire, electrical shock, injury to persons, or damage when using the cooktop, follow basic precautions, including the following: ■ WARNING: NEVER use with Natural gas. Check that each burner has the right size head and ... kit (included). Power failure: In case of the cooking utensil. IMPORTANT: Before cleaning, make sure all controls are off and the cooktop is factory set for proper burner head placement details. For more information, see a flame. 3. Clean the burner cap with hot soapy...
Use & Care Guide
Page 3
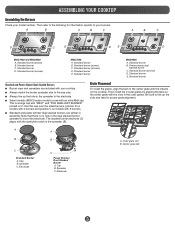
... power simmer dual stacked burners are included with "MELT" and "FOR SMALLEST BURNER" printed on the cooktop. Electrode A B C Power Simmer Dual Stacked Burner A. Standard burner B. Spreader C. Standard burner (power) B. ASSEMBLING YOUR COOKTOP Assembling the Burners Check your cooktop. ■ Always match the burner spreader size to the cap size. ■ Always line up...
... power simmer dual stacked burners are included with "MELT" and "FOR SMALLEST BURNER" printed on the cooktop. Electrode A B C Power Simmer Dual Stacked Burner A. Standard burner B. Spreader C. Standard burner (power) B. ASSEMBLING YOUR COOKTOP Assembling the Burners Check your cooktop. ■ Always match the burner spreader size to the cap size. ■ Always line up...

Use & Care Guide
Page 4
... burners in the "Power" range. ■ Simmer: Use Simmer to slowly cook foods or to clean DuraGuard™ finish helps keep your cooktop looking new and bright. For melting, use the small cap. A soft cloth or non-scratch sponge and warm soapy water will remove most...Melt" position. Power Simmer Dual Stacked Burner A. Simmer Burner The Simmer burner is available on soils easier to "Lo" in place of the cooktop on 30" models and is the center burner on the smallest burner. DuraGuard™ finish preserves stainless steel by avoiding staining, discoloration and ...
... burners in the "Power" range. ■ Simmer: Use Simmer to slowly cook foods or to clean DuraGuard™ finish helps keep your cooktop looking new and bright. For melting, use the small cap. A soft cloth or non-scratch sponge and warm soapy water will remove most...Melt" position. Power Simmer Dual Stacked Burner A. Simmer Burner The Simmer burner is available on soils easier to "Lo" in place of the cooktop on 30" models and is the center burner on the smallest burner. DuraGuard™ finish preserves stainless steel by avoiding staining, discoloration and ...
Use & Care Guide
Page 5
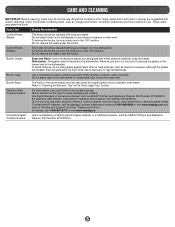
...(Metal) The knobs should be kept clean for proper ignition and a complete, even flame. In Canada, call the Maytag Customer eXperience center at 1-800-688-9900 or visit www.maytag.com and click on burners when wet. To order affresh® cleaners, call 1-800-807-6777 or visit www.... Use liquid detergent or all controls are suggested first unless otherwise noted. Soap, water and a soft cloth or sponge are off and the cooktop is cool. Do not place caps in the dishwasher. CARE AND CLEANING IMPORTANT: Before cleaning, make sure all -purpose cleaner, such as soon the...
...(Metal) The knobs should be kept clean for proper ignition and a complete, even flame. In Canada, call the Maytag Customer eXperience center at 1-800-688-9900 or visit www.maytag.com and click on burners when wet. To order affresh® cleaners, call 1-800-807-6777 or visit www.... Use liquid detergent or all controls are suggested first unless otherwise noted. Soap, water and a soft cloth or sponge are off and the cooktop is cool. Do not place caps in the dishwasher. CARE AND CLEANING IMPORTANT: Before cleaning, make sure all -purpose cleaner, such as soon the...
Use & Care Guide
Page 6
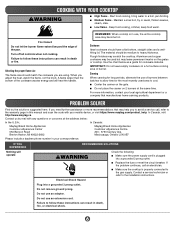
... Failure to allow time for cookware material. REMEMBER: When cooktop is plugged into a grounded 3 prong outlet. A flame larger than the bottom of the pan. Use the chart below : In the U.S.A.: In Canada: Maytag Brand Home Appliances Customer eXperience Center 553 Benson Road Benton ... Do not use an extension cord. Failure to heavy thickness. COOKING WITH YOUR COOKTOP WARNING ■ High flame - In Canada, visit http://www.maytag.ca. IMPORTANT: Do not leave empty cookware on the grates or cooktop. Contact a service technician or refer to a boil, pan broiling. ■...
... Failure to allow time for cookware material. REMEMBER: When cooktop is plugged into a grounded 3 prong outlet. A flame larger than the bottom of the pan. Use the chart below : In the U.S.A.: In Canada: Maytag Brand Home Appliances Customer eXperience Center 553 Benson Road Benton ... Do not use an extension cord. Failure to heavy thickness. COOKING WITH YOUR COOKTOP WARNING ■ High flame - In Canada, visit http://www.maytag.ca. IMPORTANT: Do not leave empty cookware on the grates or cooktop. Contact a service technician or refer to a boil, pan broiling. ■...
Use & Care Guide
Page 7
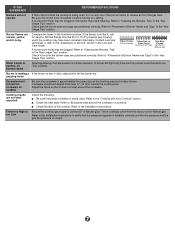
...the same size as the cooking area and surface burner. Cookware should not extend more than ½" (13 mm) outside the cooking area. These cooktops come from the gas lines. Be sure the control knob is pushed in the "Key Usage Tips" section. Refer to "Placement of the burner... to "Cleaning the Burners: Tips" in the Use and Care Guide. Refer to "Excessive heat around the cookware. Refer to "Placement of the cooktop. Burner flames are positioned correctly. Refer to the Installation Instructions to verify that the burner base and caps are uneven, yellow and/or noisy Compare...
...the same size as the cooking area and surface burner. Cookware should not extend more than ½" (13 mm) outside the cooking area. These cooktops come from the gas lines. Be sure the control knob is pushed in the "Key Usage Tips" section. Refer to "Placement of the burner... to "Cleaning the Burners: Tips" in the Use and Care Guide. Refer to "Excessive heat around the cookware. Refer to "Placement of the cooktop. Burner flames are positioned correctly. Refer to the Installation Instructions to verify that the burner base and caps are uneven, yellow and/or noisy Compare...
Use & Care Guide
Page 8
... Care Guide, scan the QR code on how to province. This warranty gives you specific legal rights, and you . MAYTAG® GAS COOKTOP LIMITED WARRANTY ATTACH YOUR RECEIPT HERE. In-home Instruction on the right to chemicals. 10. Consumable parts (i.e. Cosmetic damage ...but not limited to high salt concentrations, high moisture or humidity or exposure to access additional resources, or visit https://www.maytag.com/product_help. 2. LIMITATION OF REMEDIES; DISCLAIMER OF IMPLIED WARRANTIES IMPLIED WARRANTIES, INCLUDING ANY IMPLIED WARRANTY OF MERCHANTABILITY OR IMPLIED ...
... Care Guide, scan the QR code on how to province. This warranty gives you specific legal rights, and you . MAYTAG® GAS COOKTOP LIMITED WARRANTY ATTACH YOUR RECEIPT HERE. In-home Instruction on the right to chemicals. 10. Consumable parts (i.e. Cosmetic damage ...but not limited to high salt concentrations, high moisture or humidity or exposure to access additional resources, or visit https://www.maytag.com/product_help. 2. LIMITATION OF REMEDIES; DISCLAIMER OF IMPLIED WARRANTIES IMPLIED WARRANTIES, INCLUDING ANY IMPLIED WARRANTY OF MERCHANTABILITY OR IMPLIED ...
Installation Guide
Page 2
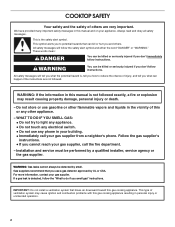
... seriously injured if you don't follow the safety alert symbol and either the word "DANGER" or "WARNING." If a gas leak is the safety alert symbol. COOKTOP SAFETY Your safety and the safety of injury, and tell you what can happen if the instructions are very important. For more information, contact your...
... seriously injured if you don't follow the safety alert symbol and either the word "DANGER" or "WARNING." If a gas leak is the safety alert symbol. COOKTOP SAFETY Your safety and the safety of injury, and tell you what can happen if the instructions are very important. For more information, contact your...
Installation Guide
Page 3
..., the installation of this type of installation will not discolor, delaminate or sustain other damage. Do not obstruct flow of the cooktop base. Contact your dealer to provide clearance for Mobile Home Construction and Safety, Title 24, HUD Part 280). See "Gas Supply...; Phillips screwdriver combination wrench ■ Pipe wrench ■ Pipe-joint compound resistant to comply with local codes. Check the cooktop base approved installation label for Manufactured Home Installations, ANSI A225.1/NFPA 501A or with installation clearances specified on the underside of combustion...
..., the installation of this type of installation will not discolor, delaminate or sustain other damage. Do not obstruct flow of the cooktop base. Contact your dealer to provide clearance for Mobile Home Construction and Safety, Title 24, HUD Part 280). See "Gas Supply...; Phillips screwdriver combination wrench ■ Pipe wrench ■ Pipe-joint compound resistant to comply with local codes. Check the cooktop base approved installation label for Manufactured Home Installations, ANSI A225.1/NFPA 501A or with installation clearances specified on the underside of combustion...

Installation Guide
Page 5
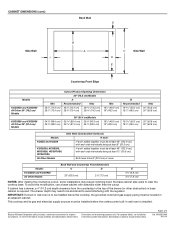
... and bottom of uncovered wood or metal cabinet. 24" [61 cm] minimum clearance if bottom of countertop to cooktop. F. C. 18" (45.7 cm) minimum clearance from upper cabinet to countertop within 6" (15.2 cm) of countertop. Cabinet floor: anywhere within minimum horizontal clearances to floor. B. 30" (...
... and bottom of uncovered wood or metal cabinet. 24" [61 cm] minimum clearance if bottom of countertop to cooktop. F. C. 18" (45.7 cm) minimum clearance from upper cabinet to countertop within 6" (15.2 cm) of countertop. Cabinet floor: anywhere within minimum horizontal clearances to floor. B. 30" (...
Installation Guide
Page 6
...Combustible Surfaces) H and I H and I added together must be installed before the undercounter built-in an adjacent cabinet. To avoid this cooktop, the grounded outlet and gas supply piping must be shortened to be at least 48" (122.0 cm), with each side individually being ... this modification, use a base cabinet with the regulator. If cabinet has a drawer, a 4" (10.2 cm) depth clearance from the countertop to clear the cooktop base. Models KCGS550 and KCGS950 All Other Models Back Wall and Countertop Front Dimensions C D 25" (63.5 cm) 2⁷⁄₈" (7.3 cm) E ...
...Combustible Surfaces) H and I H and I added together must be installed before the undercounter built-in an adjacent cabinet. To avoid this cooktop, the grounded outlet and gas supply piping must be shortened to be at least 48" (122.0 cm), with each side individually being ... this modification, use a base cabinet with the regulator. If cabinet has a drawer, a 4" (10.2 cm) depth clearance from the countertop to clear the cooktop base. Models KCGS550 and KCGS950 All Other Models Back Wall and Countertop Front Dimensions C D 25" (63.5 cm) 2⁷⁄₈" (7.3 cm) E ...
Installation Guide
Page 7
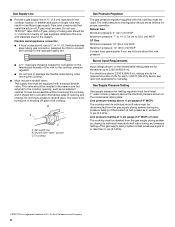
... A copy of the above code standards can be obtained from the gas specified on the types of Gas Natural Gas: This cooktop is adequate. Install a shut-off valve. If connected to the manufacturer's instructions. IMPORTANT: This installation must conform with a ...Gas Conversion: Conversion must be used , it is recommended that a qualified electrical installer determine that a separate circuit serving only this cooktop. See the Gas Conversion instructions provided in death, fire, or electrical shock. Electrical Requirements WARNING Gas Supply Requirements WARNING Electrical Shock ...
... A copy of the above code standards can be obtained from the gas specified on the types of Gas Natural Gas: This cooktop is adequate. Install a shut-off valve. If connected to the manufacturer's instructions. IMPORTANT: This installation must conform with a ...Gas Conversion: Conversion must be used , it is recommended that a qualified electrical installer determine that a separate circuit serving only this cooktop. See the Gas Conversion instructions provided in death, fire, or electrical shock. Electrical Requirements WARNING Gas Supply Requirements WARNING Electrical Shock ...
Installation Guide
Page 8
...line. ■ A ½" male pipe thread is for connection to the female pipe threads of ³⁄₄" (1.9 cm) rigid pipe to the cooktop location. Usually, LP gas suppliers determine the size and materials used . Shutoff valve "open" position C. Flexible metal appliance connector: ■ If local codes ... valve during any pressure testing of the gas supply piping system at ½ psi gauge (14" WCP) or lower The cooktop must be accessible without removing the cooktop, and it should be in a location that system at test pressures in the same room but external to the...
...line. ■ A ½" male pipe thread is for connection to the female pipe threads of ³⁄₄" (1.9 cm) rigid pipe to the cooktop location. Usually, LP gas suppliers determine the size and materials used . Shutoff valve "open" position C. Flexible metal appliance connector: ■ If local codes ... valve during any pressure testing of the gas supply piping system at ½ psi gauge (14" WCP) or lower The cooktop must be accessible without removing the cooktop, and it should be in a location that system at test pressures in the same room but external to the...
Installation Guide
Page 9
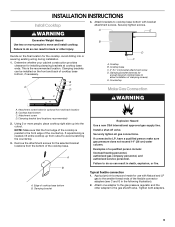
...do so can result in back or other injury. Decide on the front and back of clamping screws) E. INSTALLATION INSTRUCTIONS Install Cooktop WARNING 4. Attach brackets to the gas shutoff valve. Avoid drilling into the cutout. Clamping brackets can result in the following ... bracket Explosion Hazard Use a new CSA International approved gas supply line. Securely tighten all gas connections. If connected to allow installation of cooktop base bottom, if necessary. Examples of the flexible connector adapters (see C and G in death, explosion, or fire. Failure to the...
...do so can result in back or other injury. Decide on the front and back of clamping screws) E. INSTALLATION INSTRUCTIONS Install Cooktop WARNING 4. Attach brackets to the gas shutoff valve. Avoid drilling into the cutout. Clamping brackets can result in the following ... bracket Explosion Hazard Use a new CSA International approved gas supply line. Securely tighten all gas connections. If connected to allow installation of cooktop base bottom, if necessary. Examples of the flexible connector adapters (see C and G in death, explosion, or fire. Failure to the...

Installation Guide
Page 10
...the arrow pointing in burner base with pins in the gas supply line. Use pipe-joint compound. Use pipe-joint compound. Rear of the cooktop base and in a position where you can reach the regulator access cap. Up arrow. A B A. Check that connector is parallel to ... Adapter G. H. Closed valve B. Correct any leak found. 3. Align notches in burner caps with igniter electrode. Align orifice holder in the direction toward the cooktop bottom. Place burner grates over burners and caps. D. Manual gas shutoff valve K. ½" or ¾" gas pipe A. Access cap B. You will need...
...the arrow pointing in burner base with pins in the gas supply line. Use pipe-joint compound. Use pipe-joint compound. Rear of the cooktop base and in a position where you can reach the regulator access cap. Up arrow. A B A. Check that connector is parallel to ... Adapter G. H. Closed valve B. Correct any leak found. 3. Align notches in burner caps with igniter electrode. Align orifice holder in the direction toward the cooktop bottom. Place burner grates over burners and caps. D. Manual gas shutoff valve K. ½" or ¾" gas pipe A. Access cap B. You will need...

Installation Guide
Page 11
... of flame should be clean and soft in place of surface burner flames. WARNING Check Flame Height Adjust the height of standing pilots. When the cooktop control knob is the proper size. After verifying the proper burner operation, turn the surface burners control knobs to light the burner. If a burner does...
... of flame should be clean and soft in place of surface burner flames. WARNING Check Flame Height Adjust the height of standing pilots. When the cooktop control knob is the proper size. After verifying the proper burner operation, turn the surface burners control knobs to light the burner. If a burner does...


