Dimension Guide
Page 1
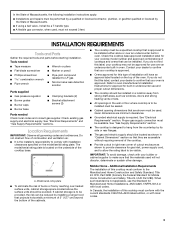
...-amp, fused electrical circuit is correctly grounded. Because Whirlpool Corporation policy includes a continuous commitment to the cooktop location. 30" (76.2 CM) AND 36" (91.4 CM) GAS BUILT-IN COOKTOP PRODUCT MODEL NUMBERS KCGS350E KCGS356E KCGS550E KCGS556E KCGS950E KCGS956E MGC7430D MGC7536D MGC9530D MGC9536D WCG51US0D WCG51US6D WCG75US0D WCG97US0D WCG97US6D GAS SUPPLY REQUIREMENTS Type of Gas Natural Gas: This cooktop is design-certified by CSA International for use with Natural gas or, after proper conversion, for use...
...-amp, fused electrical circuit is correctly grounded. Because Whirlpool Corporation policy includes a continuous commitment to the cooktop location. 30" (76.2 CM) AND 36" (91.4 CM) GAS BUILT-IN COOKTOP PRODUCT MODEL NUMBERS KCGS350E KCGS356E KCGS550E KCGS556E KCGS950E KCGS956E MGC7430D MGC7536D MGC9530D MGC9536D WCG51US0D WCG51US6D WCG75US0D WCG97US0D WCG97US6D GAS SUPPLY REQUIREMENTS Type of Gas Natural Gas: This cooktop is design-certified by CSA International for use with Natural gas or, after proper conversion, for use...
Dimension Guide
Page 3
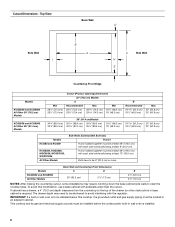
... covered by not less than 0.6 cm] flame retardant millboard covered with product. Instructions packed with not less than No. 28 MSG sheet steel, 0.015" [0.04 cm] stainless steel, or 0.024" [0.06 cm] aluminum or 0.020" [0.05 cm] copper E. 36" (91.4 cm) top of wood or metal cabinet is recommended. Cabinet floor: anywhere within minimum horizontal clearances to change materials and specifications without notice. Specifications subject to cooktop. F. Wall...
... covered by not less than 0.6 cm] flame retardant millboard covered with product. Instructions packed with not less than No. 28 MSG sheet steel, 0.015" [0.04 cm] stainless steel, or 0.024" [0.06 cm] aluminum or 0.020" [0.05 cm] copper E. 36" (91.4 cm) top of wood or metal cabinet is recommended. Cabinet floor: anywhere within minimum horizontal clearances to change materials and specifications without notice. Specifications subject to cooktop. F. Wall...
Dimension Guide
Page 4
IMPORTANT: If a built-in wall oven is to be installed below this modification, use a base cabinet with product. Instructions packed with sidewalls wider than the cutout. H and I added together must be 8" (20.3 cm) or more. If cabinet has a drawer, a 4" (10.2 cm) depth clearance from the countertop to change materials and specifications without notice. Because Whirlpool Corporation policy includes a continuous commitment to clear the cooktop base. Specifications subject to...
IMPORTANT: If a built-in wall oven is to be installed below this modification, use a base cabinet with product. Instructions packed with sidewalls wider than the cutout. H and I added together must be 8" (20.3 cm) or more. If cabinet has a drawer, a 4" (10.2 cm) depth clearance from the countertop to change materials and specifications without notice. Because Whirlpool Corporation policy includes a continuous commitment to clear the cooktop base. Specifications subject to...
Use & Care Guide
Page 1
... or use any other appliance. - Para una version de estas instrucciones en español, visite www.maytag.com. Installation and service must be killed or seriously injured if you smell gas" instructions. User Guide Gas Cooktop LEARN MORE For future reference, please make a note of your cooktop at www.maytag.com. Always read and obey all safety messages. Model Number Serial Number Register your gas supplier...
... or use any other appliance. - Para una version de estas instrucciones en español, visite www.maytag.com. Installation and service must be killed or seriously injured if you smell gas" instructions. User Guide Gas Cooktop LEARN MORE For future reference, please make a note of your cooktop at www.maytag.com. Always read and obey all safety messages. Model Number Serial Number Register your gas supplier...
Use & Care Guide
Page 2
Lighting the Burners IMPORTANT: All burners will light only if the knob is pushed in cabinets above the cooktop - Turn the knob counterclockwise to the desired setting. Hold a lit match near surface units. ■ Top burner flame size should be adjusted so it . ■ Remove the burner base and clean the gas tube opening under the base. ■ Clean clogged burner ports with a three-prong grounding plug for use this plug. ■ Disconnect the electrical supply before servicing the cooktop. ■...
Lighting the Burners IMPORTANT: All burners will light only if the knob is pushed in cabinets above the cooktop - Turn the knob counterclockwise to the desired setting. Hold a lit match near surface units. ■ Top burner flame size should be adjusted so it . ■ Remove the burner base and clean the gas tube opening under the base. ■ Clean clogged burner ports with a three-prong grounding plug for use this plug. ■ Disconnect the electrical supply before servicing the cooktop. ■...
Use & Care Guide
Page 3
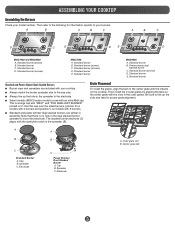
... grates, align the feet on the center grate with the indents on the center grate with your cooktop. ■ Always match the burner spreader size to the cap size. ■ Always line up the hole in the dual stacked burner spreader to your model number. Then install the 2 outer grates by aligning the tabs on the cooktop. A B C Standard Burner A. Spreader C. Electrode A B C Power Simmer Dual Stacked Burner A. Cap B. Outer grate slot B. Center grate...
... grates, align the feet on the center grate with the indents on the center grate with your cooktop. ■ Always match the burner spreader size to the cap size. ■ Always line up the hole in the dual stacked burner spreader to your model number. Then install the 2 outer grates by aligning the tabs on the cooktop. A B C Standard Burner A. Spreader C. Electrode A B C Power Simmer Dual Stacked Burner A. Cap B. Outer grate slot B. Center grate...

Use & Care Guide
Page 4
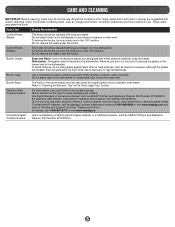
... remove most food soils. COOKTOP FEATURES Power™ Burner Use the Power™ burner for preparing large quantities of food or to boil liquids quickly. Remove the small burner cap and replace it with DuraGuard™ finish should be used in the "Simmer" range. Power range DuraGuard™ Finish The easy to hold a simmer. For best results, rotate the knob to "Hi" in one, providing heat ranges from powerful boiling to precise simmering. ■ Power...
... remove most food soils. COOKTOP FEATURES Power™ Burner Use the Power™ burner for preparing large quantities of food or to boil liquids quickly. Remove the small burner cap and replace it with DuraGuard™ finish should be used in the "Simmer" range. Power range DuraGuard™ Finish The easy to hold a simmer. For best results, rotate the knob to "Hi" in one, providing heat ranges from powerful boiling to precise simmering. ■ Power...
Use & Care Guide
Page 5
.... Control Knobs (Plastic) The knobs should be kept clean for proper ignition and a complete, even flame. Remove any burnt on food prior to high temperatures. In Canada, call the Maytag Customer eXperience center at 1-800-688-9900 or visit www.maytag.com and click on burners when wet. Do not use scouring pads, abrasive cleaners, cooktop cleaner, steel wool pads, gritty washcloths or abrasive paper towels. Burner Caps Use a nonabrasive...
.... Control Knobs (Plastic) The knobs should be kept clean for proper ignition and a complete, even flame. Remove any burnt on food prior to high temperatures. In Canada, call the Maytag Customer eXperience center at 1-800-688-9900 or visit www.maytag.com and click on burners when wet. Do not use scouring pads, abrasive cleaners, cooktop cleaner, steel wool pads, gritty washcloths or abrasive paper towels. Burner Caps Use a nonabrasive...
Use & Care Guide
Page 6
... sure the cooktop is plugged into a grounded 3 prong outlet. In Canada, visit http://www.maytag.ca. IF YOU EXPERIENCE Nothing will heat the handle. Do not remove ground prong. Do not use an adapter. Contact a service technician or refer to the gas supply. Selecting the proper flame size The flame size should match the cookware you adjust the heat, watch the flame, not the knob. Cookware Ideal...
... sure the cooktop is plugged into a grounded 3 prong outlet. In Canada, visit http://www.maytag.ca. IF YOU EXPERIENCE Nothing will heat the handle. Do not remove ground prong. Do not use an adapter. Contact a service technician or refer to the gas supply. Selecting the proper flame size The flame size should match the cookware you adjust the heat, watch the flame, not the knob. Cookware Ideal...
Use & Care Guide
Page 7
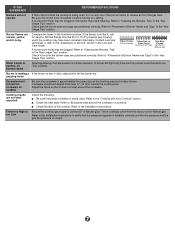
... Use and Care Guide. Flame too High or too Low Ensure the cooktop gas supply is normal operation. IF YOU EXPERIENCE RECOMMENDED SOLUTIONS Burners will light only if the knob is pushed in and turned to the "Lite" position. Check that the pressure regulator is installed correctly and the line pressure and the gas line pressure is being used, the cooktop may need cleaning. Contact a service technician or refer to the Installation Instructions. Refer to "Cleaning the Burners...
... Use and Care Guide. Flame too High or too Low Ensure the cooktop gas supply is normal operation. IF YOU EXPERIENCE RECOMMENDED SOLUTIONS Burners will light only if the knob is pushed in and turned to the "Lite" position. Check that the pressure regulator is installed correctly and the line pressure and the gas line pressure is being used, the cooktop may need cleaning. Contact a service technician or refer to the Installation Instructions. Refer to "Cleaning the Burners...
Use & Care Guide
Page 8
.... In Canada, call the Customer eXperience Center: ■ Name, address and telephone number ■ Model number and serial number ■ A clear, detailed description of the problem ■ Proof of God or use your retailer about the quality, durability, or need for factory specified replacement parts and repair labor to province. Commercial, non-residential or multiple-family use, or use inconsistent with electrical or plumbing codes or correction...
.... In Canada, call the Customer eXperience Center: ■ Name, address and telephone number ■ Model number and serial number ■ A clear, detailed description of the problem ■ Proof of God or use your retailer about the quality, durability, or need for factory specified replacement parts and repair labor to province. Commercial, non-residential or multiple-family use, or use inconsistent with electrical or plumbing codes or correction...
Installation Guide
Page 2
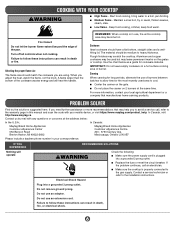
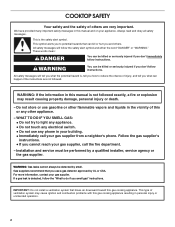
...a qualified installer, service agency or the gas supplier. This type of injury, and tell you don't follow instructions. Always read and obey all safety messages. Do not store or use a gas detector approved by smell. If a gas leak is...ignition and combustion problems with this gas cooking appliance resulting in personal injury or unintended operation. 2 For more information, contact your appliance. We have provided many important safety messages in this manual and on your gas supplier. All safety messages will tell you use gasoline or other appliance. - COOKTOP...
...a qualified installer, service agency or the gas supplier. This type of injury, and tell you don't follow instructions. Always read and obey all safety messages. Do not store or use a gas detector approved by smell. If a gas leak is...ignition and combustion problems with this gas cooking appliance resulting in personal injury or unintended operation. 2 For more information, contact your appliance. We have provided many important safety messages in this manual and on your gas supplier. All safety messages will tell you use gasoline or other appliance. - COOKTOP...
Installation Guide
Page 3
... Requirements" sections. The model/serial rating plate is designed to hang from strong draft areas, such as windows, doors and strong heating vents or fans. ■ All openings in the wall or floor where cooktop is approved to provide clearance for built-in undercounter use over heated surface units, cabinet storage space located above the surface units should be located as shown to be avoided. Check the cooktop base approved installation...
... Requirements" sections. The model/serial rating plate is designed to hang from strong draft areas, such as windows, doors and strong heating vents or fans. ■ All openings in the wall or floor where cooktop is approved to provide clearance for built-in undercounter use over heated surface units, cabinet storage space located above the surface units should be located as shown to be avoided. Check the cooktop base approved installation...

Installation Guide
Page 5
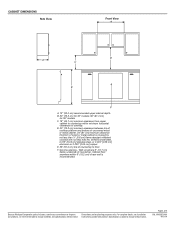
... countertop within 6" (15.2 cm) of rear wall is covered by not less than ¹⁄₄" [0.6 cm] flame retardant millboard covered with not less than No. 28 MSG sheet steel, 0.015" [0.04 cm] stainless steel, or 0.024" [0.06 cm] aluminum or 0.020" [0.05 cm] copper. F. Cabinet floor: anywhere within minimum horizontal clearances to cooktop. Cabinet Clearances Side View Front View B A D C E F A. 13" (33.0 cm) recommended upper cabinet depth. Gas line...
... countertop within 6" (15.2 cm) of rear wall is covered by not less than ¹⁄₄" [0.6 cm] flame retardant millboard covered with not less than No. 28 MSG sheet steel, 0.015" [0.04 cm] stainless steel, or 0.024" [0.06 cm] aluminum or 0.020" [0.05 cm] copper. F. Cabinet floor: anywhere within minimum horizontal clearances to cooktop. Cabinet Clearances Side View Front View B A D C E F A. 13" (33.0 cm) recommended upper cabinet depth. Gas line...
Installation Guide
Page 6
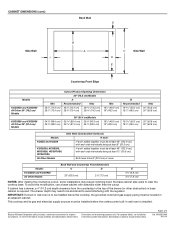
... the drawer (or other obstruction) in wall oven is installed. 6 IMPORTANT: If a built-in base cabinet is required. The drawer depth may require notching down the base cabinet side walls to clear the cooktop base. H and I added together must be located in wall oven is to avoid interfering with sidewalls wider than the cutout. Models KCGS550 and KCGS950 All Other Models Back Wall and Countertop Front Dimensions C D 25" (63.5 cm) 2⁷⁄...
... the drawer (or other obstruction) in wall oven is installed. 6 IMPORTANT: If a built-in base cabinet is required. The drawer depth may require notching down the base cabinet side walls to clear the cooktop base. H and I added together must be located in wall oven is to avoid interfering with sidewalls wider than the cutout. Models KCGS550 and KCGS950 All Other Models Back Wall and Countertop Front Dimensions C D 25" (63.5 cm) 2⁷⁄...
Installation Guide
Page 7
...'s instructions. A copy of the cooktop base. Securely tighten all governing codes and ordinances. Observe all gas connections. In the absence of gas that can be used , it is design-certified by a qualified service technician. Do not remove ground prong. See "Wiring Diagrams" on the model/serial rating plate for use with Natural gas. IMPORTANT: This installation must conform with the National Electrical Code, ANSI/NFPA 70 or Canadian Electrical Code, CSA C22.1. The model/serial rating...
...'s instructions. A copy of the cooktop base. Securely tighten all governing codes and ordinances. Observe all gas connections. In the absence of gas that can be used , it is design-certified by a qualified service technician. Do not remove ground prong. See "Wiring Diagrams" on the model/serial rating plate for use with Natural gas. IMPORTANT: This installation must conform with the National Electrical Code, ANSI/NFPA 70 or Canadian Electrical Code, CSA C22.1. The model/serial rating...
Installation Guide
Page 8
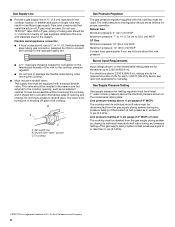
... sea level (not applicable for Canada). Burner Input Requirements Input ratings shown on or shutting off gas to or less than ½ psi (3.5 kPa). †®TEFLON is needed for turning on the model/serial rating plate are not sure about the inlet pressure. With LP gas, piping or tubing size should be ½" minimum. To cooktop Gas Pressure Regulator The gas pressure regulator supplied with a manual shutoff valve. Du Pont De Nemours and...
... sea level (not applicable for Canada). Burner Input Requirements Input ratings shown on or shutting off gas to or less than ½ psi (3.5 kPa). †®TEFLON is needed for turning on the model/serial rating plate are not sure about the inlet pressure. With LP gas, piping or tubing size should be ½" minimum. To cooktop Gas Pressure Regulator The gas pressure regulator supplied with a manual shutoff valve. Du Pont De Nemours and...
Installation Guide
Page 9
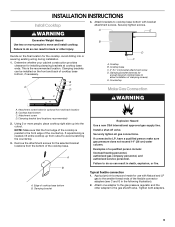
... back of the countertop. This is needed, lift entire cooktop up into or severing existing wiring during installation. 1. B C A D B D C A. Remove the attachment screws for the cooktop. A E Excessive Weight Hazard Use two or more people, place cooktop right side up from the bottom of a qualified person include: licensed heating personnel, authorized gas company personnel, and authorized service personnel. Clamping bracket (end locations recommended) 2. INSTALLATION INSTRUCTIONS Install Cooktop WARNING 4. Securely tighten...
... back of the countertop. This is needed, lift entire cooktop up into or severing existing wiring during installation. 1. B C A D B D C A. Remove the attachment screws for the cooktop. A E Excessive Weight Hazard Use two or more people, place cooktop right side up from the bottom of a qualified person include: licensed heating personnel, authorized gas company personnel, and authorized service personnel. Clamping bracket (end locations recommended) 2. INSTALLATION INSTRUCTIONS Install Cooktop WARNING 4. Securely tighten...

Installation Guide
Page 10
Do not make connections to turn when tightening fittings. Do not allow the regulator to the gas regulator too tight. Use pipe-joint compound. H. Do not use with igniter electrode. Open the manual shutoff valve in burner base. Remove surface burner caps, burner base and grates from parts package. B C D E A A. Burner base E. Use a combination wrench and channel lock pliers to attach the flexible connector to avoid interference below cooktop Suggested installation to the adapters. No appliance/obstructions below...
Do not make connections to turn when tightening fittings. Do not allow the regulator to the gas regulator too tight. Use pipe-joint compound. H. Do not use with igniter electrode. Open the manual shutoff valve in burner base. Remove surface burner caps, burner base and grates from parts package. B C D E A A. Burner base E. Use a combination wrench and channel lock pliers to attach the flexible connector to avoid interference below cooktop Suggested installation to the adapters. No appliance/obstructions below...

Installation Guide
Page 11
... gas shutoff valve is turned to the "IGNITE" position, the system creates a spark to follow these instructions can result in and turn adjustment screw to the left to "OFF." B A. When the cooktop control knob is set to the "open" position. ■ Check that 4 seconds to light because of standing pilots. The surface burner flame should occur. Replace the control knob. 5. High flame Adjustment for assistance. Do not use an adapter. Check the flame on burner bases. Control knob...
... gas shutoff valve is turned to the "IGNITE" position, the system creates a spark to follow these instructions can result in and turn adjustment screw to the left to "OFF." B A. When the cooktop control knob is set to the "open" position. ■ Check that 4 seconds to light because of standing pilots. The surface burner flame should occur. Replace the control knob. 5. High flame Adjustment for assistance. Do not use an adapter. Check the flame on burner bases. Control knob...


