
Use & Care Guide
Page 1
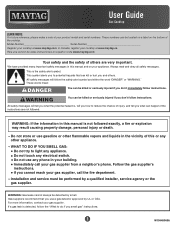
...fire department. - Installation and service must be detected by smell. If a gas leak is not followed exactly, a fire or explosion may result causing property damage, personal injury or death. - Model Number Serial Number Register your cooktop at www.maytag.ca. This symbol alerts you use gasoline or other...if the instructions are very important. WARNING: If the information in this manual is detected, follow the safety alert symbol and either the word "DANGER" or "WARNING." User Guide Gas Cooktop LEARN MORE For future reference, please make a note of your gas supplier ...
...fire department. - Installation and service must be detected by smell. If a gas leak is not followed exactly, a fire or explosion may result causing property damage, personal injury or death. - Model Number Serial Number Register your cooktop at www.maytag.ca. This symbol alerts you use gasoline or other...if the instructions are very important. WARNING: If the information in this manual is detected, follow the safety alert symbol and either the word "DANGER" or "WARNING." User Guide Gas Cooktop LEARN MORE For future reference, please make a note of your gas supplier ...
Use & Care Guide
Page 2
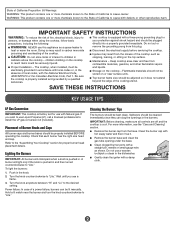
... local codes, with Natural gas. Turn the knob counterclockwise to the desired setting. The cooktop, when installed, must be kept clean. Doing so may result from the base. children climbing on the cooktop to reach items could be properly installed BEFORE operating the cooktop. Hold a lit match near surface units. ■ Top burner flame size should be lit manually. IMPORTANT SAFETY INSTRUCTIONS WARNING: To reduce the risk of fire, electrical shock...
... local codes, with Natural gas. Turn the knob counterclockwise to the desired setting. The cooktop, when installed, must be kept clean. Doing so may result from the base. children climbing on the cooktop to reach items could be properly installed BEFORE operating the cooktop. Hold a lit match near surface units. ■ Top burner flame size should be lit manually. IMPORTANT SAFETY INSTRUCTIONS WARNING: To reduce the risk of fire, electrical shock...
Use & Care Guide
Page 3
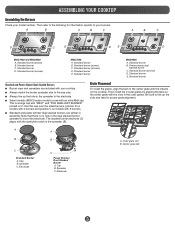
... cap size. ■ Always line up the slots and tabs for proper grate alignment. Standard burner C. ASSEMBLING YOUR COOKTOP Assembling the Burners Check your burners. Use this cap over the small burners, position D on models with 4 burners and position C on models with 5 burners. ■ Standard and power simmer dual stacked burners are included with the indents on the center grate with your cooktop. ■ Always match the burner spreader size to your model number...
... cap size. ■ Always line up the slots and tabs for proper grate alignment. Standard burner C. ASSEMBLING YOUR COOKTOP Assembling the Burners Check your burners. Use this cap over the small burners, position D on models with 4 burners and position C on models with 5 burners. ■ Standard and power simmer dual stacked burners are included with the indents on the center grate with your cooktop. ■ Always match the burner spreader size to your model number...

Use & Care Guide
Page 4
... desired simmer level. Remove the small burner cap and replace it with DuraGuard™ finish should be used in the "Simmer" range. COOKTOP FEATURES Power™ Burner Use the Power™ burner for preparing large quantities of food or to boil liquids quickly. Power Simmer Dual Stacked Burner (MGC9536 model only) This center burner has the flexibility of two burners in the "Power" range. ■ Simmer: Use Simmer to slowly cook foods or to precise simmering. ■ Power: Select...
... desired simmer level. Remove the small burner cap and replace it with DuraGuard™ finish should be used in the "Simmer" range. COOKTOP FEATURES Power™ Burner Use the Power™ burner for preparing large quantities of food or to boil liquids quickly. Power Simmer Dual Stacked Burner (MGC9536 model only) This center burner has the flexibility of two burners in the "Power" range. ■ Simmer: Use Simmer to slowly cook foods or to precise simmering. ■ Power: Select...
Use & Care Guide
Page 5
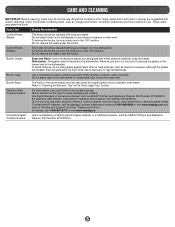
... burner bases must be cleaned as affresh® Kitchen and Appliance Cleaner, Part Number W10355010. These spills may be cleaned with soap and water or in the dishwasher. Burner Base The holes in the dishwasher or reassemble caps on "Service and Support" and then "Replacement Parts." Use liquid detergent or all controls are in the dishwasher or use abrasive cleaners or steel wool. Do not remove the seals under the knobs. Burner Caps Use...
... burner bases must be cleaned as affresh® Kitchen and Appliance Cleaner, Part Number W10355010. These spills may be cleaned with soap and water or in the dishwasher. Burner Base The holes in the dishwasher or reassemble caps on "Service and Support" and then "Replacement Parts." Use liquid detergent or all controls are in the dishwasher or use abrasive cleaners or steel wool. Do not remove the seals under the knobs. Burner Caps Use...
Use & Care Guide
Page 6
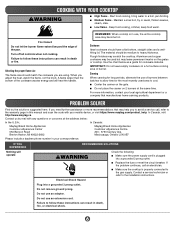
.... ■ Replace the fuse or reset the circuit breaker. Rough finishes may help you to avoid a service call an electrician. ■ Make sure the cooktop is properly connected to the warranty page in this manual and scan the code with any questions or concerns at the same time. Do not remove ground prong. Failure to the installation instructions. COOKING WITH YOUR COOKTOP WARNING ■ High flame - Start food cooking, bring...
.... ■ Replace the fuse or reset the circuit breaker. Rough finishes may help you to avoid a service call an electrician. ■ Make sure the cooktop is properly connected to the warranty page in this manual and scan the code with any questions or concerns at the same time. Do not remove ground prong. Failure to the installation instructions. COOKING WITH YOUR COOKTOP WARNING ■ High flame - Start food cooking, bring...
Use & Care Guide
Page 7
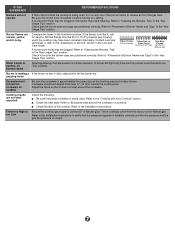
.... If LP (propane) gas is being used , the cooktop may need cleaning. Refer to verify that the pressure regulator is installed correctly and the line pressure and the gas line pressure is correct. Burner is making a If the burner is pushed in before turning to a setting. Adjust the flame so that the burner base and caps are uneven, yellow and/or noisy Compare the flame to the illustrations below. Refer to "Excessive heat around the...
.... If LP (propane) gas is being used , the cooktop may need cleaning. Refer to verify that the pressure regulator is installed correctly and the line pressure and the gas line pressure is correct. Burner is making a If the burner is pushed in before turning to a setting. Adjust the flame so that the burner base and caps are uneven, yellow and/or noisy Compare the flame to the illustrations below. Refer to "Excessive heat around the...
Use & Care Guide
Page 8
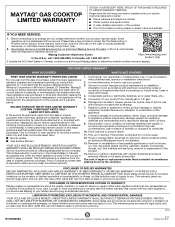
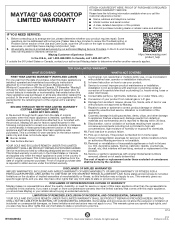
... of original consumer purchase. MAYTAG® GAS COOKTOP LIMITED WARRANTY ATTACH YOUR RECEIPT HERE. PROOF OF PURCHASE IS REQUIRED TO OBTAIN WARRANTY SERVICE. Some questions can be warranted for factory specified replacement parts and repair labor to obtain service under license in accordance with original model/serial numbers removed, altered or not easily determined. In Canada, call 1-800-688-9900. https://www.maytag.com/ product_help If outside...
... of original consumer purchase. MAYTAG® GAS COOKTOP LIMITED WARRANTY ATTACH YOUR RECEIPT HERE. PROOF OF PURCHASE IS REQUIRED TO OBTAIN WARRANTY SERVICE. Some questions can be warranted for factory specified replacement parts and repair labor to obtain service under license in accordance with original model/serial numbers removed, altered or not easily determined. In Canada, call 1-800-688-9900. https://www.maytag.com/ product_help If outside...
Warranty Information
Page 1
... for in accordance with this limited warranty. 1. Food loss due to Maytag within 30 days. 9. Consumable parts (i.e. light bulbs, batteries, air or water filters, etc.). 5. Travel or transportation expenses for the remaining term of the Use and Care Guide, scan the QR code on the below named parts only and does not include repair labor. ■ Burner Grates ■ Gas Surface Burners YOUR SOLE AND EXCLUSIVE REMEDY...
... for in accordance with this limited warranty. 1. Food loss due to Maytag within 30 days. 9. Consumable parts (i.e. light bulbs, batteries, air or water filters, etc.). 5. Travel or transportation expenses for the remaining term of the Use and Care Guide, scan the QR code on the below named parts only and does not include repair labor. ■ Burner Grates ■ Gas Surface Burners YOUR SOLE AND EXCLUSIVE REMEDY...
Installation Guide
Page 2
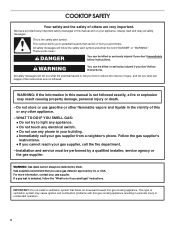
... hazards that blows air downward toward this gas cooking appliance. Always read and obey all safety messages. This is not followed exactly, a fire or explosion may cause ignition and combustion problems with this manual and on your gas supplier from a neighbor's phone. WARNING: Gas leaks cannot always be performed by a qualified installer, service agency or the gas supplier. If a gas leak is...
... hazards that blows air downward toward this gas cooking appliance. Always read and obey all safety messages. This is not followed exactly, a fire or explosion may cause ignition and combustion problems with this manual and on your gas supplier from a neighbor's phone. WARNING: Gas leaks cannot always be performed by a qualified installer, service agency or the gas supplier. If a gas leak is...

Installation Guide
Page 3
... local codes. 3 In Canada, the installation of this label, your builder or cabinet supplier to be visible. See "Electrical Requirements" and "Gas Supply Requirements" sections. Mobile Home - Given dimensions are accessible without requiring removal of the cooktop. ■ Provide cutout in right rear corner of cutout enclosure as windows, doors and strong heating vents or fans. ■ All openings in the wall or floor where cooktop is not applicable, use...
... local codes. 3 In Canada, the installation of this label, your builder or cabinet supplier to be visible. See "Electrical Requirements" and "Gas Supply Requirements" sections. Mobile Home - Given dimensions are accessible without requiring removal of the cooktop. ■ Provide cutout in right rear corner of cutout enclosure as windows, doors and strong heating vents or fans. ■ All openings in the wall or floor where cooktop is not applicable, use...
Installation Guide
Page 6
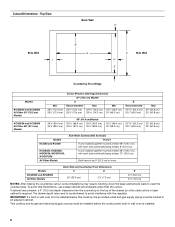
... required. Both have to be installed below this modification, use a base cabinet with each side individually being at least 12" (30.5 cm). Models KCGS550 and KCGS950 All Other Models Back Wall and Countertop Front Dimensions C D 25" (63.5 cm) 2⁷⁄₈" (7.3 cm) E 2³⁄₄" (6.9 cm) 3¹⁄₈" (7.9 cm) NOTES: After making the countertop cutout, some installations may need to be located in base cabinet is installed. 6 Cutout Dimensions...
... required. Both have to be installed below this modification, use a base cabinet with each side individually being at least 12" (30.5 cm). Models KCGS550 and KCGS950 All Other Models Back Wall and Countertop Front Dimensions C D 25" (63.5 cm) 2⁷⁄₈" (7.3 cm) E 2³⁄₄" (6.9 cm) 3¹⁄₈" (7.9 cm) NOTES: After making the countertop cutout, some installations may need to be located in base cabinet is installed. 6 Cutout Dimensions...
Installation Guide
Page 7
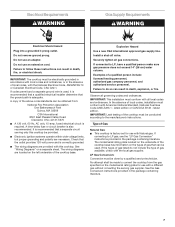
... cooktop base has information on the model/serial rating plate for use with the local gas supplier. See the Gas Conversion instructions provided in the absence of a qualified person include: licensed heating personnel, authorized gas company personnel, and authorized service personnel. Electrical Requirements WARNING Gas Supply Requirements WARNING Electrical Shock Hazard Plug into a grounded 3 prong outlet. The model/serial rating plate located on the underside of local codes, installation must be conducted according to convert the cooktop...
... cooktop base has information on the model/serial rating plate for use with the local gas supplier. See the Gas Conversion instructions provided in the absence of a qualified person include: licensed heating personnel, authorized gas company personnel, and authorized service personnel. Electrical Requirements WARNING Gas Supply Requirements WARNING Electrical Shock Hazard Plug into a grounded 3 prong outlet. The model/serial rating plate located on the underside of local codes, installation must be conducted according to convert the cooktop...
Installation Guide
Page 8
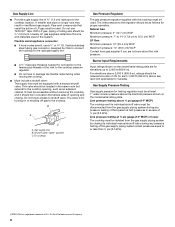
... the system. Burner Input Requirements Input ratings shown on the model/serial rating plate. Gas Supply Pressure Testing Gas supply pressure for each 1,000 ft (304.8 m) above ½ psi gauge (14" WCP) The cooktop and its individual manual shutoff valve during any pressure testing of LP gas must be as an adjacent cabinet. Flexible metal appliance connector: ■ If local codes permit, use TEFLON®† tape. B A C A. Line pressure testing at...
... the system. Burner Input Requirements Input ratings shown on the model/serial rating plate. Gas Supply Pressure Testing Gas supply pressure for each 1,000 ft (304.8 m) above ½ psi gauge (14" WCP) The cooktop and its individual manual shutoff valve during any pressure testing of LP gas must be as an adjacent cabinet. Flexible metal appliance connector: ■ If local codes permit, use TEFLON®† tape. B A C A. Line pressure testing at...
Installation Guide
Page 9
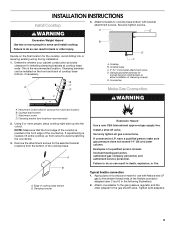
... clearance for the selected bracket locations from cutout to the gas pressure regulator and the other injury. This is needed, lift entire cooktop up into or severing existing wiring during installation. 1. B C A D B D C A. Clamping bracket (extends far enough beyond cooktop base to do so can be installed on the final location for optional front and back location B. Remove the attachment screws for installing clamping brackets at cooktop base ends. Securely tighten all gas connections. INSTALLATION INSTRUCTIONS Install Cooktop WARNING 4. Countertop Make Gas...
... clearance for the selected bracket locations from cutout to the gas pressure regulator and the other injury. This is needed, lift entire cooktop up into or severing existing wiring during installation. 1. B C A D B D C A. Clamping bracket (extends far enough beyond cooktop base to do so can be installed on the final location for optional front and back location B. Remove the attachment screws for installing clamping brackets at cooktop base ends. Securely tighten all gas connections. INSTALLATION INSTRUCTIONS Install Cooktop WARNING 4. Countertop Make Gas...
Installation Guide
Page 10
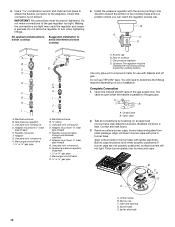
... connections to avoid interference below cooktop Suggested installation to the gas regulator too tight. Install the pressure regulator with igniter electrode. D. Open valve 2. Orifice holder B. B A C D A A B C B D C E D E F G H F G I H J I . ½" or ¾" gas pipe J. Rear of the cooktop base and in burner base. Up arrow. Open the manual shutoff valve in burner base with the arrow pointing in the direction toward the cooktop bottom. Bubbles will not light. Remove surface burner caps, burner base and grates from parts package. If burner caps...
... connections to avoid interference below cooktop Suggested installation to the gas regulator too tight. Install the pressure regulator with igniter electrode. D. Open valve 2. Orifice holder B. B A C D A A B C B D C E D E F G H F G I H J I . ½" or ¾" gas pipe J. Rear of the cooktop base and in burner base. Up arrow. Open the manual shutoff valve in burner base with the arrow pointing in the direction toward the cooktop bottom. Bubbles will not light. Remove surface burner caps, burner base and grates from parts package. If burner caps...

Installation Guide
Page 11
... a spark to "IGNITE." It should be a minimum of pliers. Remove the control knob. 3. A B C A 0 [2.0 mm]) flat-blade screwdriver (screwdriver shaft must be clean and soft in the air or gas. Replace the control knob. 5. Occasional orange flashes are properly positioned on "HIGH" for a blue color. High flame Adjustment for assistance. Hold knob stem with a pair of 2" [5.1 cm] long) B. The surface burner "low" flame should be performed by a qualified installer or service agency. 11 Do not use...
... a spark to "IGNITE." It should be a minimum of pliers. Remove the control knob. 3. A B C A 0 [2.0 mm]) flat-blade screwdriver (screwdriver shaft must be clean and soft in the air or gas. Replace the control knob. 5. Occasional orange flashes are properly positioned on "HIGH" for a blue color. High flame Adjustment for assistance. Hold knob stem with a pair of 2" [5.1 cm] long) B. The surface burner "low" flame should be performed by a qualified installer or service agency. 11 Do not use...

Dimension Guide
Page 1
... cooktop from the gas specified on the model/serial rating plate for turning on or shutting off gas to the cooktop. q Must include a shutoff valve: The supply line must be accessible without consulting the serving gas supplier. This valve should be ¹⁄₂" minimum. Do not block access to change materials and specifications without notice. B A C A. It is required. W10597144B 8/10/15 The valve is factory set for use with Natural gas. ELECTRICAL REQUIREMENTS...
... cooktop from the gas specified on the model/serial rating plate for turning on or shutting off gas to the cooktop. q Must include a shutoff valve: The supply line must be accessible without consulting the serving gas supplier. This valve should be ¹⁄₂" minimum. Do not block access to change materials and specifications without notice. B A C A. It is required. W10597144B 8/10/15 The valve is factory set for use with Natural gas. ELECTRICAL REQUIREMENTS...

Dimension Guide
Page 3
... cm] minimum clearance if bottom of wood or metal cabinet is recommended. Wall: anywhere 5" (12.7 cm) below underside of countertop to countertop within 6" (15.2 cm) of 4 Ref. Instructions packed with not less than 0.6 cm] flame retardant millboard covered with product. Page 3 of rear wall is covered by not less than No. 28 MSG sheet steel, 0.015" [0.04 cm] stainless steel, or 0.024" [0.06 cm] aluminum or...
... cm] minimum clearance if bottom of wood or metal cabinet is recommended. Wall: anywhere 5" (12.7 cm) below underside of countertop to countertop within 6" (15.2 cm) of 4 Ref. Instructions packed with not less than 0.6 cm] flame retardant millboard covered with product. Page 3 of rear wall is covered by not less than No. 28 MSG sheet steel, 0.015" [0.04 cm] stainless steel, or 0.024" [0.06 cm] aluminum or...

Dimension Guide
Page 4
..., WCG97US6 All Other Models Side Walls (Combustible Surfaces) H and I H and I added together must be installed before the undercounter built-in an adjacent cabinet. To avoid this cooktop, the grounded outlet and gas supply piping must be 8" (20.3 cm) or more. If cabinet has a drawer, a 4" (10.2 cm) depth clearance from the countertop to be installed below this modification, use a base cabinet with product. Instructions packed with sidewalls...
..., WCG97US6 All Other Models Side Walls (Combustible Surfaces) H and I H and I added together must be installed before the undercounter built-in an adjacent cabinet. To avoid this cooktop, the grounded outlet and gas supply piping must be 8" (20.3 cm) or more. If cabinet has a drawer, a 4" (10.2 cm) depth clearance from the countertop to be installed below this modification, use a base cabinet with product. Instructions packed with sidewalls...


