User Guide
Page 3
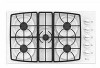
...correct burner is large enough to reach items could be hazardous. Do not use high heat for Future Reference A faint gas odor may result in use the cooktop as they could be unstable and easily tip. When flaming foods under the hood turn pan handles toward the side or.... Let hot utensils cool in cabinets above the appliance. Also, do not extend handles over adjacent surface burners. Be sure you know which knob controls which surface burner. Clothing may damage the appliance, pan or cabinets above an appliance. Always adjust surface burner flame so that is detected...
...correct burner is large enough to reach items could be hazardous. Do not use high heat for Future Reference A faint gas odor may result in use the cooktop as they could be unstable and easily tip. When flaming foods under the hood turn pan handles toward the side or.... Let hot utensils cool in cabinets above the appliance. Also, do not extend handles over adjacent surface burners. Be sure you know which knob controls which surface burner. Clothing may damage the appliance, pan or cabinets above an appliance. Always adjust surface burner flame so that is detected...

User Guide
Page 5
... may take place on the LO setting if the pan is detected, open a window and wait five minutes before turning the knob. ➢ Do not leave the cooktop unattended when cooking during a cooking operation, turn immediately counterclockwise to become warm or hot during cooking. Use care when cleaning around...;Be sure all of cookware will spark when any faster when a higher flame setting is used to "Cooking Made Simple" booklet. If a strong gas odor is covered. CAUTION ➢ When lighting the surface burners, be felt. Be sure flame is used than needed to reduce the heat by ...
... may take place on the LO setting if the pan is detected, open a window and wait five minutes before turning the knob. ➢ Do not leave the cooktop unattended when cooking during a cooking operation, turn immediately counterclockwise to become warm or hot during cooking. Use care when cleaning around...;Be sure all of cookware will spark when any faster when a higher flame setting is used to "Cooking Made Simple" booklet. If a strong gas odor is covered. CAUTION ➢ When lighting the surface burners, be felt. Be sure flame is used than needed to reduce the heat by ...
User Guide
Page 7
... is off and all parts are registered trademarks of the respective manufacturers. ** To order call 1-800-688-8408. 6 If soil remains, reapply Cooktop Cleaning Creme, cover with a plastic scouring pad. SURFACE ➢ Clean after each burner to be sure burner ports or ignition ports are accept...Wash grates with soap and plastic scouring pad. CONTROL KNOBS ❚ Remove knobs in soapy water with a damp paper towel and soak for your kind of gas. ❚ Check to be used if sprayed on the grate above. ❚ Contact an authorized Maytag servicer. Do not use . ➢ Allow ...
... is off and all parts are registered trademarks of the respective manufacturers. ** To order call 1-800-688-8408. 6 If soil remains, reapply Cooktop Cleaning Creme, cover with a plastic scouring pad. SURFACE ➢ Clean after each burner to be sure burner ports or ignition ports are accept...Wash grates with soap and plastic scouring pad. CONTROL KNOBS ❚ Remove knobs in soapy water with a damp paper towel and soak for your kind of gas. ❚ Check to be used if sprayed on the grate above. ❚ Contact an authorized Maytag servicer. Do not use . ➢ Allow ...
Installation Manual
Page 9
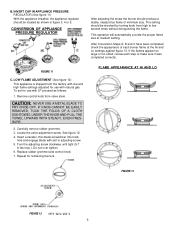
... appear too large or too small, review each burner flame at medium setting. Carefully remove rubber grommet. 3. Replace rubber grommet and control knob. 7. The setting should be located as follows: 1. After Conversion Steps A, B and C have been completed, check the appearance of minimum.... 6. To set for remaining burners. Remove control knob from valve stem. Insert a slender, thin-blade screwdriver into knob hole and engage blade with LP proceed as shown in -lbs max.). Repeat for use with natural gas. This operation will automatically provide the proper flame size...
... appear too large or too small, review each burner flame at medium setting. Carefully remove rubber grommet. 3. Replace rubber grommet and control knob. 7. The setting should be located as follows: 1. After Conversion Steps A, B and C have been completed, check the appearance of minimum.... 6. To set for remaining burners. Remove control knob from valve stem. Insert a slender, thin-blade screwdriver into knob hole and engage blade with LP proceed as shown in -lbs max.). Repeat for use with natural gas. This operation will automatically provide the proper flame size...
Installation Manual
Page 10
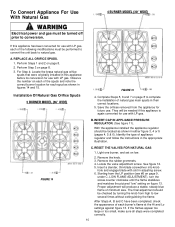
... 13. Save the orifices removed from the appliance for use . INVERT CAP IN APPLIANCE PRESSURE REGULATOR. (See figure 11). Remove the knob. 3. Locate the valve adjustment screw. LOW FLAME ADJUSTMENT), turn the screw counter clockwise until the flame stabilizes and matches the pictured "low... appearance of the following modifications must be needed if this appliance before its conversion for future use with LP gas. Installation Of Natural Gas Orifice Spuds 5 BURNER MODEL (36² WIDE) FIGURE 15 4. If this appliance has been converted for use with slot in this appliance ...
... 13. Save the orifices removed from the appliance for use . INVERT CAP IN APPLIANCE PRESSURE REGULATOR. (See figure 11). Remove the knob. 3. Locate the valve adjustment screw. LOW FLAME ADJUSTMENT), turn the screw counter clockwise until the flame stabilizes and matches the pictured "low... appearance of the following modifications must be needed if this appliance before its conversion for future use with LP gas. Installation Of Natural Gas Orifice Spuds 5 BURNER MODEL (36² WIDE) FIGURE 15 4. If this appliance has been converted for use with slot in this appliance ...
Installation Manual
Page 11
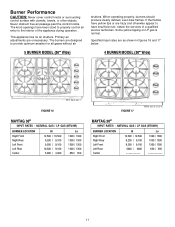
...no air shutters. Primary air adjustments are as shown in figures 16 and 17 below. 4 BURNER MODEL (30² Wide) FIGURE 16 MAYTAG 36² INPUT RATES - NATURAL GAS / LP GAS (BTU/HR) BURNER LOCATION Right Front Right Rear Left Front Left Rear Center Hi 12,500 / 10,500 9,200 / 9,100 9,200..., towels, or other objects. Never obstruct free air passage past the control knobs. The knob openings have been sized to properly control air entry to provide optimum aeration for all gases without air 5 BURNER MODEL (36² Wide) shutters. The burners are hazy and otherwise appear to have ...
...no air shutters. Primary air adjustments are as shown in figures 16 and 17 below. 4 BURNER MODEL (30² Wide) FIGURE 16 MAYTAG 36² INPUT RATES - NATURAL GAS / LP GAS (BTU/HR) BURNER LOCATION Right Front Right Rear Left Front Left Rear Center Hi 12,500 / 10,500 9,200 / 9,100 9,200..., towels, or other objects. Never obstruct free air passage past the control knobs. The knob openings have been sized to properly control air entry to provide optimum aeration for all gases without air 5 BURNER MODEL (36² Wide) shutters. The burners are hazy and otherwise appear to have ...
