User Guide
Page 3
...cooking operations. Be sure utensil is detected, shut off the gas supply to the cooktop. Always turn on the surface burner. If a gas odor is large enough to properly contain food and avoid boilovers. Never use the cooktop as the bubble action of the unit. Children climbing on...or other flammable materials accumulate in deep fat frying. Call your installer or local gas company to smother fire or flame. Potentially hot surfaces include cooktop, and areas facing the cooktop. Be sure you know which knob controls which surface burner. Do not use water on a surface burner before ...
...cooking operations. Be sure utensil is detected, shut off the gas supply to the cooktop. Always turn on the surface burner. If a gas odor is large enough to properly contain food and avoid boilovers. Never use the cooktop as the bubble action of the unit. Children climbing on...or other flammable materials accumulate in deep fat frying. Call your installer or local gas company to smother fire or flame. Potentially hot surfaces include cooktop, and areas facing the cooktop. Be sure you know which knob controls which surface burner. Do not use water on a surface burner before ...

User Guide
Page 5
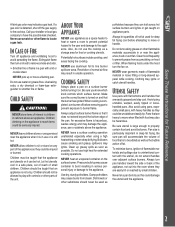
...foods warm and melt chocolate or butter. It is detected, open a window and wait five minutes before turning the knob. ➢ Do not leave the cooktop unattended when cooking during a power failure. nite choice of the controls are set - Always reduce setting to a ... Surface Cooking Surface Controls CAUTION ➢If flame should go out during a cooking operation, turn the control knob slowly to the desired setting. If a strong gas odor is possible to desired setting. 4. Use potholders to cook. OFF PILOTLESS IGNITION Pilotless ignition eliminates the need...
...foods warm and melt chocolate or butter. It is detected, open a window and wait five minutes before turning the knob. ➢ Do not leave the cooktop unattended when cooking during a power failure. nite choice of the controls are set - Always reduce setting to a ... Surface Cooking Surface Controls CAUTION ➢If flame should go out during a cooking operation, turn the control knob slowly to the desired setting. If a strong gas odor is possible to desired setting. 4. Use potholders to cook. OFF PILOTLESS IGNITION Pilotless ignition eliminates the need...
User Guide
Page 7
... If ignitor doesn't click, turn control knob OFF. ❚ Check to be sure burner ports or ignition ports are registered trademarks of food soils/debris. Contact an authorized Maytag servicer. For stubborn soils, clean with a soap-filled, nonabrasive pad or Cooktop Cleaning Creme (Part #20000001)** and ...clean with soap and plastic scouring pad. PORCELAIN Porcelain may need to be sure a pan is securely inserted into the center of gas. ❚ Check to be adjusted. This is correctly replaced. SURFACE ➢ Clean after each use abrasive materials such as scouring ...
... If ignitor doesn't click, turn control knob OFF. ❚ Check to be sure burner ports or ignition ports are registered trademarks of food soils/debris. Contact an authorized Maytag servicer. For stubborn soils, clean with a soap-filled, nonabrasive pad or Cooktop Cleaning Creme (Part #20000001)** and ...clean with soap and plastic scouring pad. PORCELAIN Porcelain may need to be sure a pan is securely inserted into the center of gas. ❚ Check to be adjusted. This is correctly replaced. SURFACE ➢ Clean after each use abrasive materials such as scouring ...
Installation Manual
Page 9
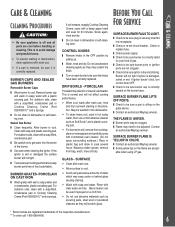
... See figure 12. 4. Replace rubber grommet and control knob. 7. Repeat for use with natural gas. INVERT CAP IN APPLIANCE PRESSURE REGULATOR (See figure 11) With the appliance installed, the appliance regulator should be checked by turning knob from high to make sure it was completed correctly. ...6. If the flames appear too large or too small, review each burner flame at medium setting. IF KNOB CANNOT BE EASILY REMOVED, TUCK THE FOLDS OF A CLOTH DISHTOWEL UNDER THE KNOB AND PULL THE TOWEL UPWARD WITH STEADY, EVEN PRESSURE. 2. The setting should produce a stable, steady...
... See figure 12. 4. Replace rubber grommet and control knob. 7. Repeat for use with natural gas. INVERT CAP IN APPLIANCE PRESSURE REGULATOR (See figure 11) With the appliance installed, the appliance regulator should be checked by turning knob from high to make sure it was completed correctly. ...6. If the flames appear too large or too small, review each burner flame at medium setting. IF KNOB CANNOT BE EASILY REMOVED, TUCK THE FOLDS OF A CLOTH DISHTOWEL UNDER THE KNOB AND PULL THE TOWEL UPWARD WITH STEADY, EVEN PRESSURE. 2. The setting should produce a stable, steady...
Installation Manual
Page 10
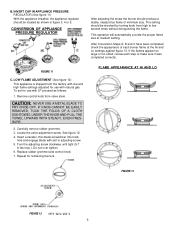
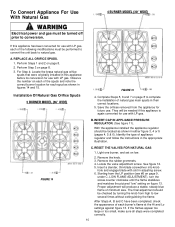
.... 5. If the flames appear too large or too small, make sure all steps were completed correctly. 10 Installation Of Natural Gas Orifice Spuds 5 BURNER MODEL (36² WIDE) FIGURE 15 4. Complete Steps 5, 6 and 7 on page 8 to complete the installation of appliance regulator and... follow the instructions in this appliance before its conversion for future use with LP gas. Identify the type of natural gas main spuds in figures 14 and 15. FIGURE 14 C. Remove the knob...
.... 5. If the flames appear too large or too small, make sure all steps were completed correctly. 10 Installation Of Natural Gas Orifice Spuds 5 BURNER MODEL (36² WIDE) FIGURE 15 4. Complete Steps 5, 6 and 7 on page 8 to complete the installation of appliance regulator and... follow the instructions in this appliance before its conversion for future use with LP gas. Identify the type of natural gas main spuds in figures 14 and 15. FIGURE 14 C. Remove the knob...
Installation Manual
Page 11
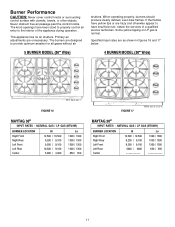
... are unnecessary. Primary air adjustments are as shown in figures 16 and 17 below. 4 BURNER MODEL (30² Wide) FIGURE 16 MAYTAG 36² INPUT RATES - NATURAL GAS / LP GAS (BTU/HR) BURNER LOCATION Right Front Right Rear Left Front Left Rear Center Hi 12,500 / 10,500 9,200 / 9,100 9,200... / 9,100 5000 / 4000 ----------- Never obstruct free air passage past the control knobs. NATURAL GAS / LP GAS (BTU/HR) BURNER LOCATION Right Front Right Rear Left Front Left Rear Center Hi 12,500 / 10,500 9,200 / 9,100 9,200 / 9,100 ...
... are unnecessary. Primary air adjustments are as shown in figures 16 and 17 below. 4 BURNER MODEL (30² Wide) FIGURE 16 MAYTAG 36² INPUT RATES - NATURAL GAS / LP GAS (BTU/HR) BURNER LOCATION Right Front Right Rear Left Front Left Rear Center Hi 12,500 / 10,500 9,200 / 9,100 9,200... / 9,100 5000 / 4000 ----------- Never obstruct free air passage past the control knobs. NATURAL GAS / LP GAS (BTU/HR) BURNER LOCATION Right Front Right Rear Left Front Left Rear Center Hi 12,500 / 10,500 9,200 / 9,100 9,200 / 9,100 ...
